User's Guide
Page 3
Contents 3 Printing...46 Printing a document...46 Printing a document ...46 Adjusting toner darkness ...46 Printing from a mobile device...47 Printing from a flash drive...47 Printing from a flash drive ...47 Supported flash drives and file types...49 Printing ... Reports menu...61 Network/Ports menu...62 Security menu...70 Settings menu...72 Help menu...85 Saving money and the environment 87 Saving paper and toner...87 Saving energy...87 Recycling...90 Securing the printer 91 Using the security lock feature...91 Statement of Volatility...91 Erasing volatile memory...92 Erasing...
Contents 3 Printing...46 Printing a document...46 Printing a document ...46 Adjusting toner darkness ...46 Printing from a mobile device...47 Printing from a flash drive...47 Printing from a flash drive ...47 Supported flash drives and file types...49 Printing ... Reports menu...61 Network/Ports menu...62 Security menu...70 Settings menu...72 Help menu...85 Saving money and the environment 87 Saving paper and toner...87 Saving energy...87 Recycling...90 Securing the printer 91 Using the security lock feature...91 Statement of Volatility...91 Erasing volatile memory...92 Erasing...
User's Guide
Page 38
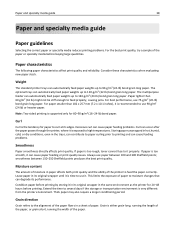
...‑g/m2 (20‑lb) bond grain long paper. The optional trays can cause paper feeding or print quality issues. If paper is too rough, toner cannot fuse to it is exposed to high temperatures. Condition paper before buying large quantities. For paper smaller than 60 g/m2 (16 lb) might not...
...‑g/m2 (20‑lb) bond grain long paper. The optional trays can cause paper feeding or print quality issues. If paper is too rough, toner cannot fuse to it is exposed to high temperatures. Condition paper before buying large quantities. For paper smaller than 60 g/m2 (16 lb) might not...
User's Guide
Page 40
... are oxidation‑set or oil‑based generally meet these types of lower weight ( Use inks that are not affected by the resin in toner. The ink must be able to withstand temperatures up to work very well in the direction of feed Recycled paper, paper of paper, consult your...
... are oxidation‑set or oil‑based generally meet these types of lower weight ( Use inks that are not affected by the resin in toner. The ink must be able to withstand temperatures up to work very well in the direction of feed Recycled paper, paper of paper, consult your...
User's Guide
Page 42
... problems. • Before loading transparencies, flex, fan, and straighten the stack to verify that: - Adhesive material contaminates the printer and could void the printer and toner cartridge warranties. • Do not use labels with adhesive, and could void the warranty. • If zone coating of the adhesive should be at a temperature...
... problems. • Before loading transparencies, flex, fan, and straighten the stack to verify that: - Adhesive material contaminates the printer and could void the printer and toner cartridge warranties. • Do not use labels with adhesive, and could void the warranty. • If zone coating of the adhesive should be at a temperature...

User's Guide
Page 46
... section in the Page Setup dialog if necessary: 1 With a document open, choose File > Print. For Macintosh users a Customize the settings in the address field. Adjusting toner darkness Using the Embedded Web Server 1 Open a Web browser, and then type the IP address of the printer in the Page Setup dialog if necessary...
... section in the Page Setup dialog if necessary: 1 With a document open, choose File > Print. For Macintosh users a Customize the settings in the address field. Adjusting toner darkness Using the Embedded Web Server 1 Open a Web browser, and then type the IP address of the printer in the Page Setup dialog if necessary...

User's Guide
Page 47
..., and then click Submit. Printing 47 • If you are using a proxy server, then temporarily disable it to : > Settings > > Print Settings > > Quality Menu > > Toner Darkness 2 Adjust the toner darkness, and then press . Note: Mobile printing applications may also be available from a flash drive Notes: • Before printing an encrypted PDF file, you...
..., and then click Submit. Printing 47 • If you are using a proxy server, then temporarily disable it to : > Settings > > Print Settings > > Quality Menu > > Toner Darkness 2 Adjust the toner darkness, and then press . Note: Mobile printing applications may also be available from a flash drive Notes: • Before printing an encrypted PDF file, you...

User's Guide
Page 79
.... • This menu item appears only when a non‑defective flash memory card is the factory default setting. You can help conserve toner. For Macintosh users, choose File > Print, and then adjust the settings from the printer software. Notes: • Off is the factory... default setting. Understanding the printer menus 79 Use Toner Darkness 1-10 Enhance Fine Lines On Off Gray Correction Auto Off Brightness ‑6 to images. Notes: • 8 is the factory default setting....
.... • This menu item appears only when a non‑defective flash memory card is the factory default setting. You can help conserve toner. For Macintosh users, choose File > Print, and then adjust the settings from the printer software. Notes: • Off is the factory... default setting. Understanding the printer menus 79 Use Toner Darkness 1-10 Enhance Fine Lines On Off Gray Correction Auto Off Brightness ‑6 to images. Notes: • 8 is the factory default setting....

User's Guide
Page 80
Provide an estimate of the percentage coverage of toner on errors, including XML markup errors. Note: Do Not Print is the factory default setting. Note: Off is the factory default setting. To Scale page ...
Provide an estimate of the percentage coverage of toner on errors, including XML markup errors. Note: Do Not Print is the factory default setting. Note: Off is the factory default setting. To Scale page ...
User's Guide
Page 87
... your printer's environmental impact. 1 From the printer control panel, navigate to: Saving money and the environment 87 Saving money and the environment Saving paper and toner Studies show that work well with your printer, see "Avoiding jams" on page 105. Place multiple pages on one sheet of paper You can quickly...
... your printer's environmental impact. 1 From the printer control panel, navigate to: Saving money and the environment 87 Saving money and the environment Saving paper and toner Studies show that work well with your printer, see "Avoiding jams" on page 105. Place multiple pages on one sheet of paper You can quickly...

User's Guide
Page 95
Do not expose supplies to use them. Maintaining the printer 95 Storing supplies Choose a cool, clean storage area for the printer supplies. Store supplies right side up in their original packing until you are ready to : • Direct sunlight • Temperatures above 35°C (95°F) • High humidity above 80% • Salty air • Corrosive gases • Heavy dust Replacing supplies Replacing the toner cartridge 1 Press the button on the right side of the printer, and then open the front door.
Do not expose supplies to use them. Maintaining the printer 95 Storing supplies Choose a cool, clean storage area for the printer supplies. Store supplies right side up in their original packing until you are ready to : • Direct sunlight • Temperatures above 35°C (95°F) • High humidity above 80% • Salty air • Corrosive gases • Heavy dust Replacing supplies Replacing the toner cartridge 1 Press the button on the right side of the printer, and then open the front door.

User's Guide
Page 96
Warning-Potential Damage: Do not expose the imaging unit to light may cause print quality problems. 6 Close the front door. Extended exposure to direct light for more than 10 minutes. Maintaining the printer 96 2 Pull the toner cartridge out using the handle. 3 Unpack the toner cartridge, and then remove all packing materials. 4 Shake the new cartridge to redistribute the toner. 5 Insert the toner cartridge into the printer by aligning the side rails of the cartridge with the arrows on the side rails inside the printer.
Warning-Potential Damage: Do not expose the imaging unit to light may cause print quality problems. 6 Close the front door. Extended exposure to direct light for more than 10 minutes. Maintaining the printer 96 2 Pull the toner cartridge out using the handle. 3 Unpack the toner cartridge, and then remove all packing materials. 4 Shake the new cartridge to redistribute the toner. 5 Insert the toner cartridge into the printer by aligning the side rails of the cartridge with the arrows on the side rails inside the printer.

User's Guide
Page 97
Maintaining the printer 97 Replacing the imaging unit 1 Press the button on the right side of the printer, and then open the front door. 2 Pull the toner cartridge out using the handle.
Maintaining the printer 97 Replacing the imaging unit 1 Press the button on the right side of the printer, and then open the front door. 2 Pull the toner cartridge out using the handle.

User's Guide
Page 99
... printer by aligning the arrows on the side rails of the imaging unit with the arrows on the side rails inside the printer. 7 Insert the toner cartridge into the printer by aligning the side rails of the cartridge with the arrows on the side rails inside the printer. 8 Close the front...
... printer by aligning the arrows on the side rails of the imaging unit with the arrows on the side rails inside the printer. 7 Insert the toner cartridge into the printer by aligning the side rails of the cartridge with the arrows on the side rails inside the printer. 8 Close the front...

User's Guide
Page 102
... the alert can be set for the end‑of‑life supply condition. Viewing reports You can determine how you would work on the toner cartridge, imaging unit, and maintenance kit. • All selectable alerts can be notified when supplies run nearly low, low, very low, or reach their end...
... the alert can be set for the end‑of‑life supply condition. Viewing reports You can determine how you would work on the toner cartridge, imaging unit, and maintenance kit. • All selectable alerts can be notified when supplies run nearly low, low, very low, or reach their end...

User's Guide
Page 107
Open the front door, then remove the toner cartridge, imaging unit, and jammed paper. Remove all paper from the multipurpose feeder, and then remove the jammed paper. Open the rear door, and then ...
Open the front door, then remove the toner cartridge, imaging unit, and jammed paper. Remove all paper from the multipurpose feeder, and then remove the jammed paper. Open the rear door, and then ...
User's Guide
Page 108
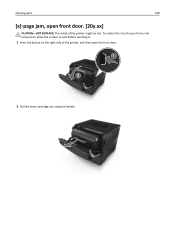
Clearing jams 108 [x]‑page jam, open the front door. 2 Pull the toner cartridge out using the handle. To reduce the risk of injury from a hot component, allow the surface to cool before touching it. 1 Press the button on the right side of the printer, and then open front door. [20y.xx] CAUTION-HOT SURFACE: The inside of the printer might be hot.
Clearing jams 108 [x]‑page jam, open the front door. 2 Pull the toner cartridge out using the handle. To reduce the risk of injury from a hot component, allow the surface to cool before touching it. 1 Press the button on the right side of the printer, and then open front door. [20y.xx] CAUTION-HOT SURFACE: The inside of the printer might be hot.

User's Guide
Page 110
Note: Make sure all paper fragments are removed. 7 Insert the imaging unit by aligning the arrows on the side rails of the unit with the arrows on the side rails inside the printer, and then insert the cartridge into the printer. Clearing jams 110 6 Firmly grasp the jammed paper on the side rails inside the printer, and then insert the imaging unit into the printer. 8 Insert the toner cartridge by aligning the side rails of the cartridge with the arrows on each side, and then gently pull it out.
Note: Make sure all paper fragments are removed. 7 Insert the imaging unit by aligning the arrows on the side rails of the unit with the arrows on the side rails inside the printer, and then insert the cartridge into the printer. Clearing jams 110 6 Firmly grasp the jammed paper on the side rails inside the printer, and then insert the imaging unit into the printer. 8 Insert the toner cartridge by aligning the side rails of the cartridge with the arrows on each side, and then gently pull it out.

User's Guide
Page 117
...following: • Load the correct size and type of paper in the Paper menu on the printer control panel to order a toner cartridge. If necessary, press to clear the message and continue printing. Troubleshooting 117 Troubleshooting Understanding the printer messages Cartridge, imaging unit ...mismatch [41.xy] 1 Check if the toner cartridge and imaging unit are both are specified in the tray, and then press on the printer control panel. Change [paper...
...following: • Load the correct size and type of paper in the Paper menu on the printer control panel to order a toner cartridge. If necessary, press to clear the message and continue printing. Troubleshooting 117 Troubleshooting Understanding the printer messages Cartridge, imaging unit ...mismatch [41.xy] 1 Check if the toner cartridge and imaging unit are both are specified in the tray, and then press on the printer control panel. Change [paper...

User's Guide
Page 123
...printer, and then install a genuine Dell supply or part. Use of non-genuine supplies or parts in the printer. Warning-Potential Damage: Use of third-party supplies or parts can be covered by the use of third-party supplies or parts may not be toner cartridge or imaging unit. Damage ...caused by the warranty. All life indicators are designed to function with the use of third-party supplies or parts may affect the performance, reliability, or life of these risks, then remove the third-party supply or part from your Dell printer ...
...printer, and then install a genuine Dell supply or part. Use of non-genuine supplies or parts in the printer. Warning-Potential Damage: Use of third-party supplies or parts can be covered by the use of third-party supplies or parts may not be toner cartridge or imaging unit. Damage ...caused by the warranty. All life indicators are designed to function with the use of third-party supplies or parts may affect the performance, reliability, or life of these risks, then remove the third-party supply or part from your Dell printer ...

User's Guide
Page 124
... printing. • Delete fonts, macros, and other data stored in the flash memory are deleted when the printer is defective. Replace the toner cartridge. For information on installing the cartridge, see the "Replacing supplies" section of the following : • From the printer control panel,...unit, see the "Replacing supplies" section of the following : • Check if the imaging unit is installed, then remove the unresponsive toner cartridge, and then reinstall it . Note: If the message appears after reinstalling the supply, then the imaging unit is turned off or restarted...
... printing. • Delete fonts, macros, and other data stored in the flash memory are deleted when the printer is defective. Replace the toner cartridge. For information on installing the cartridge, see the "Replacing supplies" section of the following : • From the printer control panel,...unit, see the "Replacing supplies" section of the following : • Check if the imaging unit is installed, then remove the unresponsive toner cartridge, and then reinstall it . Note: If the message appears after reinstalling the supply, then the imaging unit is turned off or restarted...


