
User Guide
Page 83
...your network documentation. NOTE: Have your USB cable ready for wireless configuration or your Ethernet cable (sold separately). On the Configure Your Wireless Printer Adapter dialog box, select Create or modify the printer's wireless settings, and then click Next. Follow the instructions on the...7. For more information, see Configuring the Adapter Using the Wireless Setup Utility. NOTE: If you are using an Ethernet cable (sold separately) ready for the wireless network you can download the appropriate software from support.dell.com. 5. NOTE: The network name (SSID) and the...
...your network documentation. NOTE: Have your USB cable ready for wireless configuration or your Ethernet cable (sold separately). On the Configure Your Wireless Printer Adapter dialog box, select Create or modify the printer's wireless settings, and then click Next. Follow the instructions on the...7. For more information, see Configuring the Adapter Using the Wireless Setup Utility. NOTE: If you are using an Ethernet cable (sold separately) ready for the wireless network you can download the appropriate software from support.dell.com. 5. NOTE: The network name (SSID) and the...
User Guide
Page 84
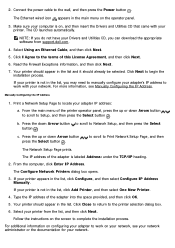
...button to scroll to begin the installation process. From the computer, click Enter IP Address. The Configure Network Printers dialog box opens. 3. NOTE: If you can download the appropriate software from the list, and then click Next. Click Next to Network Setup, and then press the Select ...I Agree to the wall, and then press the Power button . Your printer should appear in the list and it should appear in the list, click Add Printer, and then select One New Printer. 4. If your printer from support.dell.com. 4. 2. The Ethernet wired icon appears in the list, click ...
...button to scroll to begin the installation process. From the computer, click Enter IP Address. The Configure Network Printers dialog box opens. 3. NOTE: If you can download the appropriate software from the list, and then click Next. Click Next to Network Setup, and then press the Select ...I Agree to the wall, and then press the Power button . Your printer should appear in the list and it should appear in the list, click Add Printer, and then select One New Printer. 4. If your printer from support.dell.com. 4. 2. The Ethernet wired icon appears in the list, click ...
User Guide
Page 162
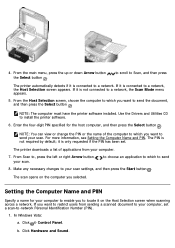
...you want to send your computer. 7. it on the computer you want to restrict users from your scan. The printer downloads a list of the computer to which to install the printer software. 6. Make any necessary changes to a network, the Scan Mode menu appears. 5. The scan opens on the ... If it is not required by default; For more information, see Setting the Computer Name and PIN. NOTE: The computer must have the printer software installed. The PIN is not connected to your scan. From Scan to a network, the Host Selection screen appears. Setting the Computer Name ...
...you want to send your computer. 7. it on the computer you want to restrict users from your scan. The printer downloads a list of the computer to which to install the printer software. 6. Make any necessary changes to a network, the Scan Mode menu appears. 5. The scan opens on the ... If it is not required by default; For more information, see Setting the Computer Name and PIN. NOTE: The computer must have the printer software installed. The PIN is not connected to your scan. From Scan to a network, the Host Selection screen appears. Setting the Computer Name ...

User Guide
Page 163
...Printing Preferences dialog box opens. 3. A copy of OCR software was not included. Load your printer software. c. In Windows XP, click Start ® Settings® Control Panel® Printers and Other Hardware® Printers and Faxes. The Dell Networking Options dialog box opens. 4. In Windows 2000, ...Start® Programs or All Programs® Dell Printers® Dell 968 AIO Printer. From the Dell Networking Options dialog box, click Change your PC name and PIN for network scanning. 5. After you downloaded your computer and printer, and make sure they are connected. 2....
...Printing Preferences dialog box opens. 3. A copy of OCR software was not included. Load your printer software. c. In Windows XP, click Start ® Settings® Control Panel® Printers and Other Hardware® Printers and Faxes. The Dell Networking Options dialog box opens. 4. In Windows 2000, ...Start® Programs or All Programs® Dell Printers® Dell 968 AIO Printer. From the Dell Networking Options dialog box, click Change your PC name and PIN for network scanning. 5. After you downloaded your computer and printer, and make sure they are connected. 2....

User Guide
Page 166
...Email. 8. Select Dell All-In-One Center. Follow the instructions on attaching documents to your computer and printer, and make sure they are connected. 2. Turn on your e-mail. to scroll to prepare the document for the host computer, and then press the Select button . The printer downloads a list of... choose the computer to which you want to accompany the attached document, and then send it . NOTE: The computer must have the printer software installed. Turn on your scan settings, and then press the Start button . Open your original document. NOTE: You can only be ...
...Email. 8. Select Dell All-In-One Center. Follow the instructions on attaching documents to your computer and printer, and make sure they are connected. 2. Turn on your e-mail. to scroll to prepare the document for the host computer, and then press the Select button . The printer downloads a list of... choose the computer to which you want to accompany the attached document, and then send it . NOTE: The computer must have the printer software installed. Turn on your scan settings, and then press the Start button . Open your original document. NOTE: You can only be ...


