User Guide
Page 1
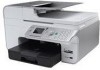
... trademarks of EMC Corporation. Bluetooth is used in this document is a registered trademark of Dell Inc.; and is a registered trademark owned by Bluetooth SIG, Inc. under license. Dell™ 968 All-In-One Printer User's Guide To order ink or supplies from Dell: 1. NOTICE: A NOTICE indicates either the entities claiming the marks and names or their...
... trademarks of EMC Corporation. Bluetooth is used in this document is a registered trademark of Dell Inc.; and is a registered trademark owned by Bluetooth SIG, Inc. under license. Dell™ 968 All-In-One Printer User's Guide To order ink or supplies from Dell: 1. NOTICE: A NOTICE indicates either the entities claiming the marks and names or their...
User Guide
Page 26
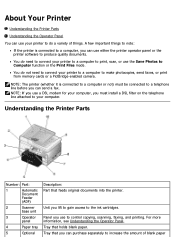
...Files mode. About Your Printer Understanding the Printer Parts Understanding the Operator Panel You can send a fax. Tray that feeds original documents into the printer. Tray that you use the Save Photos to the ink cartridges. A few important things to note: If the printer is connected to a ...computer or not) must install a DSL filter on the telephone line attached to your printer to a computer to print,...
...Files mode. About Your Printer Understanding the Printer Parts Understanding the Operator Panel You can send a fax. Tray that feeds original documents into the printer. Tray that you use the Save Photos to the ink cartridges. A few important things to note: If the printer is connected to a ...computer or not) must install a DSL filter on the telephone line attached to your printer to a computer to print,...
User Guide
Page 27
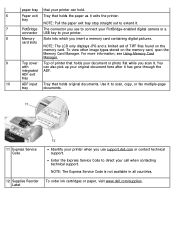
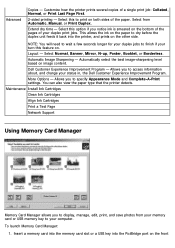
... contacting technical support. NOTE: The Express Service Code is not available in all countries. 12 Supplies Reorder Label To order ink cartridges or paper, visit www.dell.com/supplies. For more information, see Using Memory Card Manager. 9 Top cover Top of TIFF files found on the memory...insert a memory card containing digital pictures. tray NOTE: Pull the paper exit tray stop straight out to direct your printer. 8 Memory Slots into which you use support.dell.com or contact technical support. To view other image types stored on the memory card. paper tray that your ...
... contacting technical support. NOTE: The Express Service Code is not available in all countries. 12 Supplies Reorder Label To order ink cartridges or paper, visit www.dell.com/supplies. For more information, see Using Memory Card Manager. 9 Top cover Top of TIFF files found on the memory...insert a memory card containing digital pictures. tray NOTE: Pull the paper exit tray stop straight out to direct your printer. 8 Memory Slots into which you use support.dell.com or contact technical support. To view other image types stored on the memory card. paper tray that your ...
User Guide
Page 31
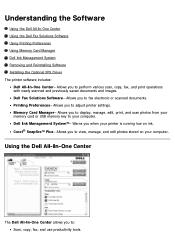
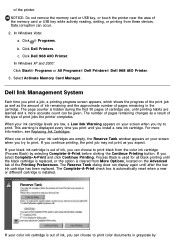
... to view, manage, and edit photos stored on ink. Allows you to your computer. Understanding the Software Using the Dell All-In-One Center Using the Dell Fax Solutions Software Using Printing Preferences Using Memory Card Manager Dell Ink Management System Removing and Reinstalling Software Installing the Optional XPS Driver The printer software includes: Dell All-In-One Center-
... to view, manage, and edit photos stored on ink. Allows you to your computer. Understanding the Software Using the Dell All-In-One Center Using the Dell Fax Solutions Software Using Printing Preferences Using Memory Card Manager Dell Ink Management System Removing and Reinstalling Software Installing the Optional XPS Driver The printer software includes: Dell All-In-One Center-
User Guide
Page 35
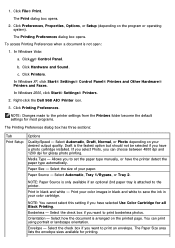
The Printing Preferences dialog box opens. Click ® Control Panel. Right-click the Dell 968 AIO Printer icon. 3. Media Type - Paper Size - Select the size of your color cartridge. NOTE: You cannot select this setting if you have a photo cartridge installed. In Windows Vista: a. c. Select Automatic, Draft, Normal, or ... dpi and 1200 dpi for all Black Printing. Paper Source - To access Printing Preferences when a document is attached to save the ink in black and white - NOTE: Paper Source is only available if an optional 2nd paper tray is not open: 1.
The Printing Preferences dialog box opens. Click ® Control Panel. Right-click the Dell 968 AIO Printer icon. 3. Media Type - Paper Size - Select the size of your color cartridge. NOTE: You cannot select this setting if you have a photo cartridge installed. In Windows Vista: a. c. Select Automatic, Draft, Normal, or ... dpi and 1200 dpi for all Black Printing. Paper Source - To access Printing Preferences when a document is attached to save the ink in black and white - NOTE: Paper Source is only available if an optional 2nd paper tray is not open: 1.
User Guide
Page 36
...Select from your computer. Select this feature on both sides of the paper. Layout - Allows you notice ink is smeared on the paper to specify Appearance Mode and Complete-A-Print settings. This allows the ink on the bottom of the pages of a single print job: Collated, Normal, or Print Last Page ...turn this option if you to dry before the duplex unit feeds it back into the PictBridge port on image content. Customize how the printer prints several copies of your status in, the Dell Customer Experience Improvement Program. Dell Customer Experience Improvement Program -
...Select from your computer. Select this feature on both sides of the paper. Layout - Allows you notice ink is smeared on the paper to specify Appearance Mode and Complete-A-Print settings. This allows the ink on the bottom of the pages of a single print job: Collated, Normal, or Print Last Page ...turn this option if you to dry before the duplex unit feeds it back into the PictBridge port on image content. Customize how the printer prints several copies of your status in, the Dell Customer Experience Improvement Program. Dell Customer Experience Improvement Program -
User Guide
Page 37
... on your color ink cartridge is hidden during the first 50 pages of the Printing Preferences. The Reserve Tank dialog does not display again until you can occur. 2. When one or both of your ink cartridges are learned and a more information, see Replacing Ink Cartridges. Data corruption can choose to print. Click Dell 968 AIO Printer. The...
... on your color ink cartridge is hidden during the first 50 pages of the Printing Preferences. The Reserve Tank dialog does not display again until you can occur. 2. When one or both of your ink cartridges are learned and a more information, see Replacing Ink Cartridges. Data corruption can choose to print. Click Dell 968 AIO Printer. The...

User Guide
Page 38
...color documents will print in black and white until after you must install the Microsoft QFE Patch and extract the c. Click Dell 968 AIO Printer. NOTE: Before installing the XPS driver, you must install the XPS driver as an additional driver after the low ink... is an optional printer driver designed to install the printer on your computer. 5. In Windows Vista, click ® Computer. d. When the printer software installation screen appears, click Using a USB cable, Using a wireless network, or Using an Ethernet cable. Click Uninstall Dell 968 AIO Printer. 3. If the...
...color documents will print in black and white until after you must install the Microsoft QFE Patch and extract the c. Click Dell 968 AIO Printer. NOTE: Before installing the XPS driver, you must install the XPS driver as an additional driver after the low ink... is an optional printer driver designed to install the printer on your computer. 5. In Windows Vista, click ® Computer. d. When the printer software installation screen appears, click Using a USB cable, Using a wireless network, or Using an Ethernet cable. Click Uninstall Dell 968 AIO Printer. 3. If the...
User Guide
Page 75
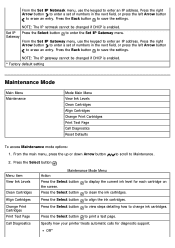
... The IP netmask cannot be changed if DHCP is enabled. * Factory default setting Maintenance Mode Main Menu Maintenance Mode Main Menu View Ink Levels Clean Cartridges Align Cartridges Change Print Cartridges Print Test Page Call Diagnostics Reset Defaults To access Maintenance mode options: 1. Press the Back... button to save the settings. Specify how your printer treats automatic calls for each cartridge on the screen. Set IP Press the Select button to Maintenance. 2. Press the Select button to...
... The IP netmask cannot be changed if DHCP is enabled. * Factory default setting Maintenance Mode Main Menu Maintenance Mode Main Menu View Ink Levels Clean Cartridges Align Cartridges Change Print Cartridges Print Test Page Call Diagnostics Reset Defaults To access Maintenance mode options: 1. Press the Back... button to save the settings. Specify how your printer treats automatic calls for each cartridge on the screen. Set IP Press the Select button to Maintenance. 2. Press the Select button to...
User Guide
Page 87
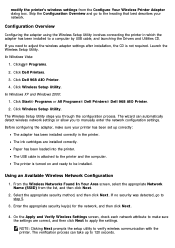
Click Dell 968 AIO Printer. 4. The printer is attached to make sure your network. From the Wireless Networks Found In Your Area screen, select the appropriate Network Name (SSID) from the Configure Your Wireless Printer Adapter dialog box. modify the printer's wireless settings from the list, and then click Next. 2. Click ® Programs. 2. In Windows XP and Windows 2000...
Click Dell 968 AIO Printer. 4. The printer is attached to make sure your network. From the Wireless Networks Found In Your Area screen, select the appropriate Network Name (SSID) from the Configure Your Wireless Printer Adapter dialog box. modify the printer's wireless settings from the list, and then click Next. 2. Click ® Programs. 2. In Windows XP and Windows 2000...
User Guide
Page 99
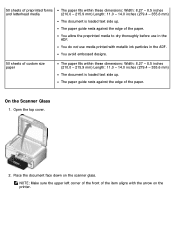
.... The paper guide rests against the edge of the paper. Place the document face down on the printer. NOTE: Make sure the upper left corner of the front of the item aligns with metallic ink particles in the ADF. You do not use in the ADF. On the Scanner Glass 1. You avoid...
.... The paper guide rests against the edge of the paper. Place the document face down on the printer. NOTE: Make sure the upper left corner of the front of the item aligns with metallic ink particles in the ADF. You do not use in the ADF. On the Scanner Glass 1. You avoid...
User Guide
Page 101
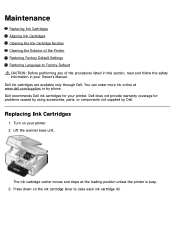
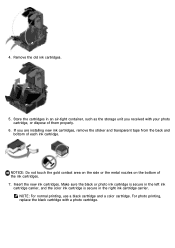
... and follow the safety information in your printer. 2. Dell recommends Dell ink cartridges for problems caused by using accessories, parts, or components not supplied by phone. The ink cartridge carrier moves and stops at www.dell.com/supplies or by Dell. Lift the scanner base unit. You can order more ink online at the loading position unless the...
... and follow the safety information in your printer. 2. Dell recommends Dell ink cartridges for problems caused by using accessories, parts, or components not supplied by phone. The ink cartridge carrier moves and stops at www.dell.com/supplies or by Dell. Lift the scanner base unit. You can order more ink online at the loading position unless the...
User Guide
Page 102
... the metal nozzles on the bottom of each ink cartridge. Store the cartridges in the right ink cartridge carrier. Insert the new ink cartridges. Make sure the black or photo ink cartridge is secure in the left ink cartridge carrier, and the color ink cartridge is secure in an air-tight container,... such as the storage unit you are installing new ink cartridges, remove the...
... the metal nozzles on the bottom of each ink cartridge. Store the cartridges in the right ink cartridge carrier. Insert the new ink cartridges. Make sure the black or photo ink cartridge is secure in the left ink cartridge carrier, and the color ink cartridge is secure in an air-tight container,... such as the storage unit you are installing new ink cartridges, remove the...
User Guide
Page 103
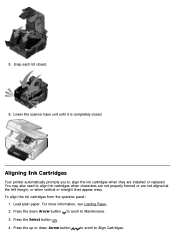
Aligning Ink Cartridges Your printer automatically prompts you to Maintenance. 3. Press the up or down Arrow button to scroll to align the ink cartridges when they are not aligned at the left margin, or when vertical or straight lines appear wavy. Lower the ... need to Align Cartridges. Press the Select button . 4. 8. Snap each lid closed . To align the ink cartridges from the operator panel: 1. Press the down Arrow button to scroll to align ink cartridges when characters are not properly formed or are installed or replaced. For more information, see Loading Paper...
Aligning Ink Cartridges Your printer automatically prompts you to Maintenance. 3. Press the up or down Arrow button to scroll to align the ink cartridges when they are not aligned at the left margin, or when vertical or straight lines appear wavy. Lower the ... need to Align Cartridges. Press the Select button . 4. 8. Snap each lid closed . To align the ink cartridges from the operator panel: 1. Press the down Arrow button to scroll to align ink cartridges when characters are not properly formed or are installed or replaced. For more information, see Loading Paper...
User Guide
Page 104
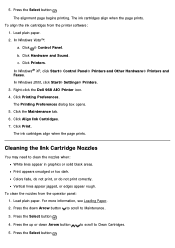
... Arrow button to scroll to Clean Cartridges. 5. c. The ink cartridges align when the page prints. Click ® Control Panel. Click Hardware and Sound. The Printing Preferences dialog box opens. 5. Colors fade, do not print, or do not print correctly. ...5. Right-click the Dell 968 AIO Printer icon. 4. Click Printers. Press the Select button . 4. The alignment page begins printing. Click Print. Press the Select button . Click Printing Preferences. Press the Select button . Click the Maintenance tab. 6. Cleaning the Ink Cartridge Nozzles You may...
... Arrow button to scroll to Clean Cartridges. 5. c. The ink cartridges align when the page prints. Click ® Control Panel. Click Hardware and Sound. The Printing Preferences dialog box opens. 5. Colors fade, do not print, or do not print correctly. ...5. Right-click the Dell 968 AIO Printer icon. 4. Click Printers. Press the Select button . 4. The alignment page begins printing. Click Print. Press the Select button . Click Printing Preferences. Press the Select button . Click the Maintenance tab. 6. Cleaning the Ink Cartridge Nozzles You may...
User Guide
Page 105
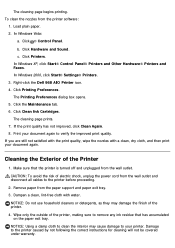
...outlet. Click Printers. Right-click the Dell 968 AIO Printer icon. 4. Make sure that has accumulated on the paper exit tray. Damage to verify the improved print quality. Click Hardware and Sound. The Printing Preferences dialog box opens. 5. Click Clean Ink Cartridges. If... household cleaners or detergents, as they may cause damage to remove any ink residue that the printer is turned off and unplugged from the printer software: 1. Load plain paper. 2. Cleaning the Exterior of the printer, making sure to your document again. Click ® Control Panel. ...
...outlet. Click Printers. Right-click the Dell 968 AIO Printer icon. 4. Make sure that has accumulated on the paper exit tray. Damage to verify the improved print quality. Click Hardware and Sound. The Printing Preferences dialog box opens. 5. Click Clean Ink Cartridges. If... household cleaners or detergents, as they may cause damage to remove any ink residue that the printer is turned off and unplugged from the printer software: 1. Load plain paper. 2. Cleaning the Exterior of the printer, making sure to your document again. Click ® Control Panel. ...
User Guide
Page 106
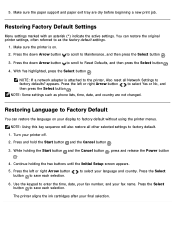
.... 1. Press and hold the Start button and the Cancel button . 3. Use the keypad to Factory Default You can restore the original printer settings, often referred to Maintenance, and then press the Select button . 3. appears. Restoring Language to enter the time, date, your fax ...1. NOTE: Using this key sequence will also restore all Network Settings to Reset Defaults, and then press the Select button . 4. The printer aligns the ink cartridges after your language and country. Press the down Arrow button to scroll to factory defaults? You can restore the language on . 2....
.... 1. Press and hold the Start button and the Cancel button . 3. Use the keypad to Factory Default You can restore the original printer settings, often referred to Maintenance, and then press the Select button . 3. appears. Restoring Language to enter the time, date, your fax ...1. NOTE: Using this key sequence will also restore all Network Settings to Reset Defaults, and then press the Select button . 4. The printer aligns the ink cartridges after your language and country. Press the down Arrow button to scroll to factory defaults? You can restore the language on . 2....
User Guide
Page 119
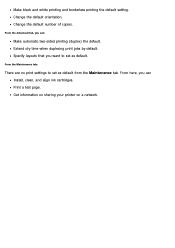
Extend dry time when duplexing print jobs by default. Print a test page. From here, you want to set as default from the Maintenance tab. Change the default number of copies. Specify layouts that you can : Make automatic two-sided printing (duplex) the default. Make black and white printing and borderless printing the default setting. From the Maintenance tab: There are no print settings to set as default. From the Advanced tab, you can Install, clean, and align ink cartridges. Change the default orientation. Get information on sharing your printer on a network.
Extend dry time when duplexing print jobs by default. Print a test page. From here, you want to set as default from the Maintenance tab. Change the default number of copies. Specify layouts that you can : Make automatic two-sided printing (duplex) the default. Make black and white printing and borderless printing the default setting. From the Maintenance tab: There are no print settings to set as default. From the Advanced tab, you can Install, clean, and align ink cartridges. Change the default orientation. Get information on sharing your printer on a network.
User Guide
Page 122
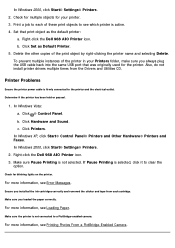
...click Start® Settings® Printers. 2. If Pause Printing is active. 4. Make sure you installed the ink cartridges correctly and removed the sticker and tape from the Drivers and Utilities CD. Printer Problems Ensure the printer power cable is not connected to the printer and the electrical outlet. Click ..., see Loading Paper. b. In Windows XP, click Start® Control Panel® Printers and Other Hardware® Printers and Faxes. Right-click the Dell 968 AIO Printer icon. Check for your Printers folder, make sure you always plug the USB cable back into the same USB port ...
...click Start® Settings® Printers. 2. If Pause Printing is active. 4. Make sure you installed the ink cartridges correctly and removed the sticker and tape from the Drivers and Utilities CD. Printer Problems Ensure the printer power cable is not connected to the printer and the electrical outlet. Click ..., see Loading Paper. b. In Windows XP, click Start® Control Panel® Printers and Other Hardware® Printers and Faxes. Right-click the Dell 968 AIO Printer icon. Check for your Printers folder, make sure you always plug the USB cable back into the same USB port ...
User Guide
Page 123
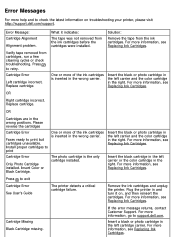
...and the color cartridge in the right. For more information, see Replacing Ink Cartridges. For more information, go to retry. What it on troubleshooting your printer, please visit http://support.dell.com/support. Verify tape removed from the ink cartridges before...Guide The printer detects a critical cartridge failure. Solution: Remove the tape from the ink cartridges. Replace cartridge. One or more information, see Replacing Ink Cartridges. For more information, see Replacing Ink Cartridges. Cartridge Error Only Photo Cartridge installed. Insert Color or Black...
...and the color cartridge in the right. For more information, see Replacing Ink Cartridges. For more information, go to retry. What it on troubleshooting your printer, please visit http://support.dell.com/support. Verify tape removed from the ink cartridges before...Guide The printer detects a critical cartridge failure. Solution: Remove the tape from the ink cartridges. Replace cartridge. One or more information, see Replacing Ink Cartridges. For more information, see Replacing Ink Cartridges. Cartridge Error Only Photo Cartridge installed. Insert Color or Black...


