

User Guide
Page 38
... If you install your computer. 5. Click Uninstall Dell 968 AIO Printer. 3. Double-click the CD-ROM drive icon, and then double-click setup.exe. When the printer software installation screen appears, click Using a USB cable, Using a wireless network, or Using an Ethernet cable. NOTE: ...In Windows Vista: a. Click ® Programs. b. In Windows XP and WIndows 2000: Click Start® Programs or All Programs® Dell Printers® Dell 968 AIO Printer. 2. Follow the instructions on the screen. Insert the Drivers and Utilities CD, and then follow the instructions on the screen....
... If you install your computer. 5. Click Uninstall Dell 968 AIO Printer. 3. Double-click the CD-ROM drive icon, and then double-click setup.exe. When the printer software installation screen appears, click Using a USB cable, Using a wireless network, or Using an Ethernet cable. NOTE: ...In Windows Vista: a. Click ® Programs. b. In Windows XP and WIndows 2000: Click Start® Programs or All Programs® Dell Printers® Dell 968 AIO Printer. 2. Follow the instructions on the screen. Insert the Drivers and Utilities CD, and then follow the instructions on the screen....
User Guide
Page 39
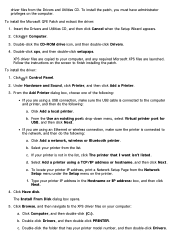
...installing the patch. e. Click Have disk. Double-click Drivers, and then double-click PRINTER. c. Select Add a printer using an Ethernet or wireless connection, make sure the USB cable is not in the list, click The printer that has your printer IP address in the Hostname or ... privileges on the screen to the network, and then do the following: a. Insert the Drivers and Utilities CD, and then click Cancel when the Setup Wizard appears. 2. Double-click xps, and then double-click setupxps. b. b. f. Click Browse, and then navigate to your printer from the Drivers...
...installing the patch. e. Click Have disk. Double-click Drivers, and then double-click PRINTER. c. Select Add a printer using an Ethernet or wireless connection, make sure the USB cable is not in the list, click The printer that has your printer IP address in the Hostname or ... privileges on the screen to the network, and then do the following: a. Insert the Drivers and Utilities CD, and then click Cancel when the Setup Wizard appears. 2. Double-click xps, and then double-click setupxps. b. b. f. Click Browse, and then navigate to your printer from the Drivers...
User Guide
Page 65
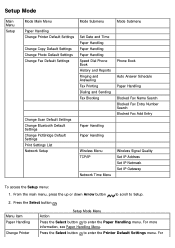
... the Printer Default Settings menu. For From the main menu, press the up or down Arrow button to scroll to Setup. 2. Setup Mode Main Menu Setup Mode Main Menu Mode Submenu Mode Submenu Paper Handling Change Printer Default Settings Change Copy Default Settings Change Photo Default Settings ...Paper Handling Speed Dial Phone Book History and Reports Ringing and Answering Fax Printing Dialing and Sending Fax Blocking Paper Handling Paper Handling Wireless Menu TCP/IP Network Time Menu Phone Book Auto Answer Schedule Paper Handling Blocked Fax Name Search Blocked Fax Entry Number Search ...
... the Printer Default Settings menu. For From the main menu, press the up or down Arrow button to scroll to Setup. 2. Setup Mode Main Menu Setup Mode Main Menu Mode Submenu Mode Submenu Paper Handling Change Printer Default Settings Change Copy Default Settings Change Photo Default Settings ...Paper Handling Speed Dial Phone Book History and Reports Ringing and Answering Fax Printing Dialing and Sending Fax Blocking Paper Handling Paper Handling Wireless Menu TCP/IP Network Time Menu Phone Book Auto Answer Schedule Paper Handling Blocked Fax Name Search Blocked Fax Entry Number Search ...
User Guide
Page 73
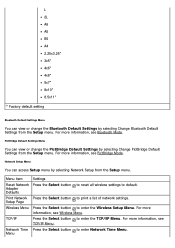
... Select button to enter the TCP/IP Menu. Press the Select button to print a list of network settings. Press the Select button to enter the Wireless Setup Menu. L 2L A6 A5 B5 A4 2.25x3.25" 3x5" 4x6" 4x8" 5x7" 8x10" 8.5x11" * Factory default setting Bluetooth Default Settings Menu You can view or...
... Select button to enter the TCP/IP Menu. Press the Select button to print a list of network settings. Press the Select button to enter the Wireless Setup Menu. L 2L A6 A5 B5 A4 2.25x3.25" 3x5" 4x6" 4x8" 5x7" 8x10" 8.5x11" * Factory default setting Bluetooth Default Settings Menu You can view or...

User Guide
Page 74
Yes* No NOTE: You cannot change the settings in the Wireless Setup Menu by selecting TCP/IP from the Network Setup menu. Set IP Address Press the Select button to save the settings. NOTE: The IP address cannot be changed if DHCP is enabled. TCP/IP ... You can view or change the value of numbers in the TCP/IP Menu by selecting Wireless Menu from the Network Setup menu. Menu item Network Name Wireless Signal Quality * Factory default setting Settings Reflects the current SSID being used. Netmask Press the right Arrow button to save the settings. NOTE: You ...
Yes* No NOTE: You cannot change the settings in the Wireless Setup Menu by selecting TCP/IP from the Network Setup menu. Set IP Address Press the Select button to save the settings. NOTE: The IP address cannot be changed if DHCP is enabled. TCP/IP ... You can view or change the value of numbers in the TCP/IP Menu by selecting Wireless Menu from the Network Setup menu. Menu item Network Name Wireless Signal Quality * Factory default setting Settings Reflects the current SSID being used. Netmask Press the right Arrow button to save the settings. NOTE: You ...

User Guide
Page 80
... adapter that has been installed in all regions. Check with your local Dell Sales Representative to determine availability. Minimum Requirements for Setup Wireless Network Settings Wireless Encryption Installing and Configuring the Dell Internal Network Adapter 1150 Configuring the Adapter Using the Wireless Setup Utility The optional Dell™ Internal Network Adapter 1150 enables you use-Ad-Hoc or...
... adapter that has been installed in all regions. Check with your local Dell Sales Representative to determine availability. Minimum Requirements for Setup Wireless Network Settings Wireless Encryption Installing and Configuring the Dell Internal Network Adapter 1150 Configuring the Adapter Using the Wireless Setup Utility The optional Dell™ Internal Network Adapter 1150 enables you use-Ad-Hoc or...

User Guide
Page 83
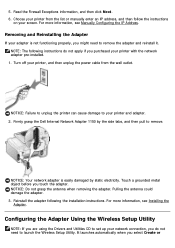
... the installation process. If you are using an Ethernet cable (sold separately) ready for the wireless network you can download the appropriate software from support.dell.com. 5. The Dell Wireless Setup Utility launches. Configuring the Adapter for a Wireless Connection 1. Select Using a wireless network, and then click Next. 6. Read the Firewall Exception information, and then click Next. 8. Follow...
... the installation process. If you are using an Ethernet cable (sold separately) ready for the wireless network you can download the appropriate software from support.dell.com. 5. The Dell Wireless Setup Utility launches. Configuring the Adapter for a Wireless Connection 1. Select Using a wireless network, and then click Next. 6. Read the Firewall Exception information, and then click Next. 8. Follow...
User Guide
Page 86
...Dell Internal Network Adapter 1150 by static electricity. Pulling the antenna could damage the adapter. 3. Removing and Reinstalling the Adapter If your printer with the network adapter pre-installed. 1. NOTE: The following the installation instructions. Reinstall the adapter following instructions do not need to launch the Wireless Setup... is not functioning properly, you are using the Drivers and Utilities CD to remove. Configuring the Adapter Using the Wireless Setup Utility NOTE: If you might need to remove the adapter and reinstall it. 5. Choose your screen. Turn off...
...Dell Internal Network Adapter 1150 by static electricity. Pulling the antenna could damage the adapter. 3. Removing and Reinstalling the Adapter If your printer with the network adapter pre-installed. 1. NOTE: The following the installation instructions. Reinstall the adapter following instructions do not need to launch the Wireless Setup... is not functioning properly, you are using the Drivers and Utilities CD to remove. Configuring the Adapter Using the Wireless Setup Utility NOTE: If you might need to remove the adapter and reinstall it. 5. Choose your screen. Turn off...
User Guide
Page 87
... key(s) for the network, and then click Next. 4. In Windows Vista: 1. Click Start® Programs or All Programs® Dell Printers® Dell 968 AIO Printer. 2. modify the printer's wireless settings from the list, and then click Next. 2. Click Dell 968 AIO Printer. 4. In Windows XP and Windows 2000: 1. The Wireless Setup Utility steps you need to step 5. 3.
... key(s) for the network, and then click Next. 4. In Windows Vista: 1. Click Start® Programs or All Programs® Dell Printers® Dell 968 AIO Printer. 2. modify the printer's wireless settings from the list, and then click Next. 2. Click Dell 968 AIO Printer. 4. In Windows XP and Windows 2000: 1. The Wireless Setup Utility steps you need to step 5. 3.
User Guide
Page 88
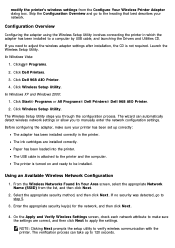
...click Next. 2. Select the appropriate Channel from the list, and then click Next. For additional setup instructions, see Verifying Network Communication. On the Apply and Verify Wireless Settings screen, check each network attribute to make sure the settings are correct, and then click...) - For Ad-Hoc Mode, select Access other computers directly without using a wireless router (Ad-Hoc Mode), and then click Next. For additional setup instructions, see Verifying Network Communication. From the Wireless Security Settings screen, select No Security, and then click Next. 2. Typical, ...
...click Next. 2. Select the appropriate Channel from the list, and then click Next. For additional setup instructions, see Verifying Network Communication. On the Apply and Verify Wireless Settings screen, check each network attribute to make sure the settings are correct, and then click...) - For Ad-Hoc Mode, select Access other computers directly without using a wireless router (Ad-Hoc Mode), and then click Next. For additional setup instructions, see Verifying Network Communication. From the Wireless Security Settings screen, select No Security, and then click Next. 2. Typical, ...
User Guide
Page 89
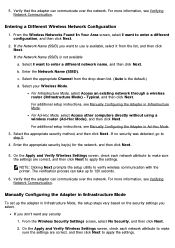
...apply the settings. 4. The Advanced WPA Options dialog box opens. 2. Click Next. 4. For more information, see Verifying Network Communication. From the Wireless Security Settings screen, select Wired Equivalent Privacy (WEP), and then click Next. For more information, see Verifying Network Communication. Manually Configuring the Adapter...in Ad-Hoc Mode than they are correct, and then click Next to make sure the settings are in Ad-Hoc Mode, the setup steps vary based on the security settings you don't want to connect to use Wi-Fi Protected Access (WPA) security 1. For ...
...apply the settings. 4. The Advanced WPA Options dialog box opens. 2. Click Next. 4. For more information, see Verifying Network Communication. From the Wireless Security Settings screen, select Wired Equivalent Privacy (WEP), and then click Next. For more information, see Verifying Network Communication. Manually Configuring the Adapter...in Ad-Hoc Mode than they are correct, and then click Next to make sure the settings are in Ad-Hoc Mode, the setup steps vary based on the security settings you don't want to connect to use Wi-Fi Protected Access (WPA) security 1. For ...

User Guide
Page 118
... that you want to print, you can specify various settings such as default when printing from most programs. From the Print Setup tab, you can: Change the default print quality to specify your printing preferences each time you can make your preferred settings ...you send a print job. Click ® Control Panel. c. Right-click the Dell 968 AIO Printer icon. 3. Change the settings that appears. 5. In Windows Vista: a. Change the default media type and paper size. Sent From a Computer Over a Wireless Network 1. Click Hardware and Sound. From the Document menu, click Cancel.
... that you want to print, you can specify various settings such as default when printing from most programs. From the Print Setup tab, you can: Change the default print quality to specify your printing preferences each time you can make your preferred settings ...you send a print job. Click ® Control Panel. c. Right-click the Dell 968 AIO Printer icon. 3. Change the settings that appears. 5. In Windows Vista: a. Change the default media type and paper size. Sent From a Computer Over a Wireless Network 1. Click Hardware and Sound. From the Document menu, click Cancel.
User Guide
Page 120
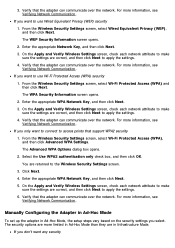
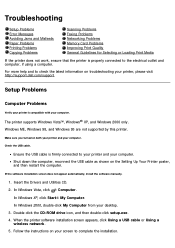
...click the CD-ROM drive icon, and then double-click setup.exe. 4. Follow the instructions on your screen to check the latest information on troubleshooting your printer, please visit http://support.dell.com/support. The printer supports Windows Vista™, Windows&#...When the printer software installation screen appears, click Using a USB cable or Using a wireless network. 5. If the software installation screen does not appear automatically, install the software manually. 1. Setup Problems Computer Problems Verify your printer is firmly connected to the electrical outlet and computer...
...click the CD-ROM drive icon, and then double-click setup.exe. 4. Follow the instructions on your screen to check the latest information on troubleshooting your printer, please visit http://support.dell.com/support. The printer supports Windows Vista™, Windows&#...When the printer software installation screen appears, click Using a USB cable or Using a wireless network. 5. If the software installation screen does not appear automatically, install the software manually. 1. Setup Problems Computer Problems Verify your printer is firmly connected to the electrical outlet and computer...


