
User Guide
Page 4
About Your Printer Understanding the Printer Parts Setting Up Your Printer Understanding the Operator Panel You can use your printer to do not need to connect your printer to a computer to make photocopies, send faxes, or print from a PictBridge-enabled camera. NOTE: The printer (whether it is connected to a computer or not) must be connected to a telephone line...
About Your Printer Understanding the Printer Parts Setting Up Your Printer Understanding the Operator Panel You can use your printer to do not need to connect your printer to a computer to make photocopies, send faxes, or print from a PictBridge-enabled camera. NOTE: The printer (whether it is connected to a computer or not) must be connected to a telephone line...
User Guide
Page 5
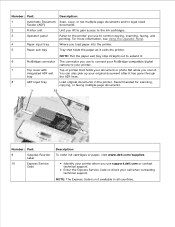
...exit tray Tray that holds your call when contacting technical support. integrated ADF exit You can also pick up your printer when you use support.dell.com or contact technical support. Identify your original document after it has gone through tray the ADF here. 8 ...connect your PictBridge-compatible digital camera to control copying, scanning, faxing, and printing. Number: Part: Description: 1 Automatic Document Scan, copy, or fax multiple page documents and/or legal sized Feeder (ADF) documents. 2 Printer unit Unit you lift to gain access to the ink cartridges. 3 ...
...exit tray Tray that holds your call when contacting technical support. integrated ADF exit You can also pick up your printer when you use support.dell.com or contact technical support. Identify your original document after it has gone through tray the ADF here. 8 ...connect your PictBridge-compatible digital camera to control copying, scanning, faxing, and printing. Number: Part: Description: 1 Automatic Document Scan, copy, or fax multiple page documents and/or legal sized Feeder (ADF) documents. 2 Printer unit Unit you lift to gain access to the ink cartridges. 3 ...
User Guide
Page 7
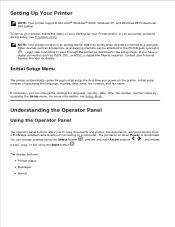
...country, date, time, fax number, and fax name by accessing the Setup menu. NOTE: Your printer modem is illuminated. If you to copy documents and photos, fax documents, and print photos from a PictBridge-enabled camera without connecting to the PHONE jack connector ( - If necessary, ...you power on the printer. Initial Setup Menu The printer automatically cycles through the printer as ISDN, DSL, or ADSL, a digital line...
...country, date, time, fax number, and fax name by accessing the Setup menu. NOTE: Your printer modem is illuminated. If you to copy documents and photos, fax documents, and print photos from a PictBridge-enabled camera without connecting to the PHONE jack connector ( - If necessary, ...you power on the printer. Initial Setup Menu The printer automatically cycles through the printer as ISDN, DSL, or ADSL, a digital line...

User Guide
Page 8
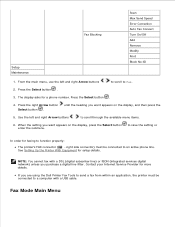
Cancel a scan, print, or copy job in the number to be dialed to make. Clear a fax...message light 3 Back 4 Left arrow 5 Cancel 6 Select 7 Right arrow 8 Pause 9 A keypad number or symbol Purpose: To turn your printer on the display. Scroll through a list on the display. Exit a menu. Scroll through a list on the display. To choose the option ... return to the fax default. To alert you have already begun entering the number. Increase a number on the printer display. Insert a three-second pause in progress. Type numbers to enter or edit the date and time shown ...
Cancel a scan, print, or copy job in the number to be dialed to make. Clear a fax...message light 3 Back 4 Left arrow 5 Cancel 6 Select 7 Right arrow 8 Pause 9 A keypad number or symbol Purpose: To turn your printer on the display. Scroll through a list on the display. Exit a menu. Scroll through a list on the display. To choose the option ... return to the fax default. To alert you have already begun entering the number. Increase a number on the printer display. Insert a three-second pause in progress. Type numbers to enter or edit the date and time shown ...
User Guide
Page 16
Setup Maintenance Fax Blocking Scan Max Send Speed Error Correction Auto Fax Convert Turn On/Off Add Remove Modify Print Block No-ID 1. Press the Select button . 4. until the heading you want appears on the display, press the Select button to save ...subscriber line) or ISDN (integrated services digital network) unless you are using the Dell Printer Fax Tools to send a fax from within an application, the printer must be connected to scroll through the available menu items. 6. See Setting Up the Printer With Equipment for a phone number. If you purchase a digital line filter....
Setup Maintenance Fax Blocking Scan Max Send Speed Error Correction Auto Fax Convert Turn On/Off Add Remove Modify Print Block No-ID 1. Press the Select button . 4. until the heading you want appears on the display, press the Select button to save ...subscriber line) or ISDN (integrated services digital network) unless you are using the Dell Printer Fax Tools to send a fax from within an application, the printer must be connected to scroll through the available menu items. 6. See Setting Up the Printer With Equipment for a phone number. If you purchase a digital line filter....

User Guide
Page 17
View Add Remove Modify Print On Hook Dial For more information, see Speed Dial. Press the Select button if you want the printer to go off , or schedule a time for your Phone Book. to specify the darkness setting (middle Set various setup features for the feature to ...be sent. Reports Ringing and Answering Fax Printing Dialing and Sending Fax Blocking For more information about your...
View Add Remove Modify Print On Hook Dial For more information, see Speed Dial. Press the Select button if you want the printer to go off , or schedule a time for your Phone Book. to specify the darkness setting (middle Set various setup features for the feature to ...be sent. Reports Ringing and Answering Fax Printing Dialing and Sending Fax Blocking For more information about your...

User Guide
Page 18
..., press the Select button . 5. Fax Setup Menu From this menu: You can: Reports Specify the type of report you would like to set print settings for how you want appears on any of the options listed under the Reports heading, see Additional Fax Options. Activity Report Fax Confirmation... Page Fax Footer Dialing and Sending For more information on any of the options listed under the Fax Printing heading, see Additional Fax Options. Set various ringing and answering features for your printer sends faxes. The option you want to change more settings in the Fax Setup menu, use the...
..., press the Select button . 5. Fax Setup Menu From this menu: You can: Reports Specify the type of report you would like to set print settings for how you want appears on any of the options listed under the Reports heading, see Additional Fax Options. Activity Report Fax Confirmation... Page Fax Footer Dialing and Sending For more information on any of the options listed under the Fax Printing heading, see Additional Fax Options. Set various ringing and answering features for your printer sends faxes. The option you want to change more settings in the Fax Setup menu, use the...

User Guide
Page 20
...on country selection. Specify if you want to print a fax confirmation. On Error* Off Print for which report or log you want to be printed. Specify a type of patterns shown is based on the printer. Caller ID Pattern Off* Forward Print & Forward Specify the Caller ID pattern you ... many rings you want to occur before the printer answers the fax if the printer is selected the printer answers all incoming calls. Pattern 1* Pattern 2 Pattern n Error Correction NOTE: The number of ring for All Print Reports Specify which the printer will only answer incoming calls with that ring....
...on country selection. Specify if you want to print a fax confirmation. On Error* Off Print for which report or log you want to be printed. Specify a type of patterns shown is based on the printer. Caller ID Pattern Off* Forward Print & Forward Specify the Caller ID pattern you ... many rings you want to occur before the printer answers the fax if the printer is selected the printer answers all incoming calls. Pattern 1* Pattern 2 Pattern n Error Correction NOTE: The number of ring for All Print Reports Specify which the printer will only answer incoming calls with that ring....
User Guide
Page 22
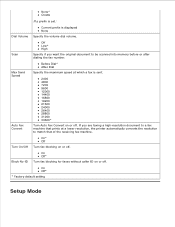
Scan Off Low* High Specify if you are faxing a high-resolution document to a fax machine that prints at which a fax is displayed None Specify the volume dial volume. On Off* * Factory default setting Setup Mode None* Create If a prefix is set: Dial ...* Off Turn fax blocking on or off . Max Send Speed Auto Fax Convert Before Dial* After Dial Specify the maximum speed at a lower resolution, the printer automatically converts the resolution to be scanned into memory before or after dialing the fax number. If you want the original document to match that...
Scan Off Low* High Specify if you are faxing a high-resolution document to a fax machine that prints at which a fax is displayed None Specify the volume dial volume. On Off* * Factory default setting Setup Mode None* Create If a prefix is set: Dial ...* Off Turn fax blocking on or off . Max Send Speed Auto Fax Convert Before Dial* After Dial Specify the maximum speed at a lower resolution, the printer automatically converts the resolution to be scanned into memory before or after dialing the fax number. If you want the original document to match that...

User Guide
Page 27
Use the left and right Arrow buttons to print. 2.25x3.25" 3.5x5" 4x6"* Specify the size of the paper in the paper input tray. 3.5x5" 4x6" 5x7" 8.5x11"* L 2L Hagaki A6 A5 B5 A4* ... setting you want appears on the display, press the Select button to PictBridge mode. When your printer changes to PictBridge mode, press the right Arrow button you plug your PictBridge-enabled camera into your printer, the printer automatically switches to save the setting. PictBridge Mode Menu From this menu: Paper Size Photo Size...
Use the left and right Arrow buttons to print. 2.25x3.25" 3.5x5" 4x6"* Specify the size of the paper in the paper input tray. 3.5x5" 4x6" 5x7" 8.5x11"* L 2L Hagaki A6 A5 B5 A4* ... setting you want appears on the display, press the Select button to PictBridge mode. When your printer changes to PictBridge mode, press the right Arrow button you plug your PictBridge-enabled camera into your printer, the printer automatically switches to save the setting. PictBridge Mode Menu From this menu: Paper Size Photo Size...

User Guide
Page 31
... letterhead paper with the stamp in the upper left corner. Do not select Draft if you are mailing within Japan, the envelope can be printed in Portrait orientation with the stamp in the lower right corner, or in Landscape orientation, with Landscape orientation. You select A4 Banner or Letter...of plain paper Make sure: The paper guides rest against the edges of the printer, and feed in the first sheet. You print the envelopes with the stamp in front of the paper. Print Media Guidelines for inkjet printers. The paper guides rest against the edges of the envelope faces down and ...
... letterhead paper with the stamp in the upper left corner. Do not select Draft if you are mailing within Japan, the envelope can be printed in Portrait orientation with the stamp in the lower right corner, or in Landscape orientation, with Landscape orientation. You select A4 Banner or Letter...of plain paper Make sure: The paper guides rest against the edges of the printer, and feed in the first sheet. You print the envelopes with the stamp in front of the paper. Print Media Guidelines for inkjet printers. The paper guides rest against the edges of the envelope faces down and ...

User Guide
Page 32
... edges of the transparencies faces down . You select Automatic, Normal, or Photo print quality. The rough side of the transfer. The print side of the paper. Understanding the Automatic Paper Type Sensor Your printer has an automatic paper type sensor that detects the following paper types: Plain Transparency...35 sheets of labels 100 sheets of letterhead paper 100 sheets of custom size paper The print side of the labels feeds into the printer first. You select Automatic, Draft, Normal, or Photo print quality. The paper guides rest against the edges of the labels faces down . The ...
... edges of the transparencies faces down . You select Automatic, Normal, or Photo print quality. The rough side of the transfer. The print side of the paper. Understanding the Automatic Paper Type Sensor Your printer has an automatic paper type sensor that detects the following paper types: Plain Transparency...35 sheets of labels 100 sheets of letterhead paper 100 sheets of custom size paper The print side of the labels feeds into the printer first. You select Automatic, Draft, Normal, or Photo print quality. The paper guides rest against the edges of the labels faces down . The ...
User Guide
Page 33
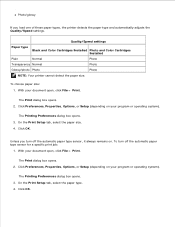
... system). To turn off the automatic paper type sensor for a specific print job: 1. The Printing Preferences dialog box opens. 3. Click OK. Unless you load one of these paper types, the printer detects the paper type and automatically adjusts the Quality/Speed settings. The Print dialog box opens. 2. Click Preferences, Properties, Options, or Setup (depending...
... system). To turn off the automatic paper type sensor for a specific print job: 1. The Printing Preferences dialog box opens. 3. Click OK. Unless you load one of these paper types, the printer detects the paper type and automatically adjusts the Quality/Speed settings. The Print dialog box opens. 2. Click Preferences, Properties, Options, or Setup (depending...

User Guide
Page 34
Right-click the Dell AIO Printer 946 icon. 3. Click OK. The ADF is recommended for scanning, copying, and faxing. Loading Original Documents Into the ADF You can load up to 50 sheets ... documents. Place these items on the scanner glass. In Windows 2000, click Start Settings Printers. 2. NOTE: Do not load postcards, photo cards, photo paper, or small images in the ADF. Paper Guidelines for all print jobs: 1. Click Printing Preferences. To turn off the automatic paper type sensor for the ADF In Windows XP...
Right-click the Dell AIO Printer 946 icon. 3. Click OK. The ADF is recommended for scanning, copying, and faxing. Loading Original Documents Into the ADF You can load up to 50 sheets ... documents. Place these items on the scanner glass. In Windows 2000, click Start Settings Printers. 2. NOTE: Do not load postcards, photo cards, photo paper, or small images in the ADF. Paper Guidelines for all print jobs: 1. Click Printing Preferences. To turn off the automatic paper type sensor for the ADF In Windows XP...

User Guide
Page 37
.... The Print dialog box opens. 4. Printing Printing a Document Printing Photos Printing Envelopes Printing Photos From a PictBridge-Enabled Camera Printing a Document 1. Turn on your computer and printer, and make any necessary changes for printing photos. 3. On the Print Setup and Advanced tabs, make sure they are connected. 2. When you use a color cartridge and a photo cartridge for printing photos. 1. Printing Photos NOTE: Dell recommends you...
.... The Print dialog box opens. 4. Printing Printing a Document Printing Photos Printing Envelopes Printing Photos From a PictBridge-Enabled Camera Printing a Document 1. Turn on your computer and printer, and make any necessary changes for printing photos. 3. On the Print Setup and Advanced tabs, make sure they are connected. 2. When you use a color cartridge and a photo cartridge for printing photos. 1. Printing Photos NOTE: Dell recommends you...

User Guide
Page 38
... tab, select Photo, then select the dpi settings for your prints. Remove each photo after it exits the printer to 24 hours, depending on the Advanced tab. This maximizes the life of your document. 7. On the Print Setup and Advanced tabs, make sure they are using photo/glossy ...your photos from sticking together or smudging. NOTE: To print borderless photos, select the Borderless check box in a nonadhesive photo album or frame, allow sufficient time for the prints to dry thoroughly (12 to prevent your computer and printer, and make any necessary changes for the photo from the...
... tab, select Photo, then select the dpi settings for your prints. Remove each photo after it exits the printer to 24 hours, depending on the Advanced tab. This maximizes the life of your document. 7. On the Print Setup and Advanced tabs, make sure they are using photo/glossy ...your photos from sticking together or smudging. NOTE: To print borderless photos, select the Borderless check box in a nonadhesive photo album or frame, allow sufficient time for the prints to dry thoroughly (12 to prevent your computer and printer, and make any necessary changes for the photo from the...

User Guide
Page 39
... in the upper left corner. Refer to the instructions included with the stamp in the lower left corner. The Print dialog box opens. 4. Turn on the program or operating system). With your digital camera. If you are mailing internationally...USB cable into the PictBridge port on the front of the USB cable into the camera. 2. 3. On the Print Setup tab, select Landscape orientation. Printing Photos From a PictBridge-Enabled Camera Your printer supports PictBridge-enabled cameras. 1. Click Preferences, Properties, Options, or Setup (depending on your document open, click...
... in the upper left corner. Refer to the instructions included with the stamp in the lower left corner. The Print dialog box opens. 4. Turn on the program or operating system). With your digital camera. If you are mailing internationally...USB cable into the PictBridge port on the front of the USB cable into the camera. 2. 3. On the Print Setup tab, select Landscape orientation. Printing Photos From a PictBridge-Enabled Camera Your printer supports PictBridge-enabled cameras. 1. Click Preferences, Properties, Options, or Setup (depending on your document open, click...

User Guide
Page 40
Refer to the instructions included with your camera to the documentation included with your camera. For more information, refer to begin printing photos. For PictBridge printing, the printer (or PTP) USB selection should be used. NOTE: For many digital cameras, there are two USB mode selections: computer and printer (or PTP). 4.
Refer to the instructions included with your camera to the documentation included with your camera. For more information, refer to begin printing photos. For PictBridge printing, the printer (or PTP) USB selection should be used. NOTE: For many digital cameras, there are two USB mode selections: computer and printer (or PTP). 4.
User Guide
Page 77
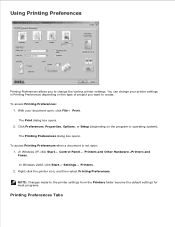
... box opens. 2. NOTE: Changes made to change your document open : 1. To access Printing Preferences: 1. In Windows 2000, click Start Settings Printers. 2. With your printer settings in Printing Preferences depending on the program or operating system). The Printing Preferences dialog box opens. Using Printing Preferences Printing Preferences allows you want to create. Click Preferences, Properties, Options, or Setup...
... box opens. 2. NOTE: Changes made to change your document open : 1. To access Printing Preferences: 1. In Windows 2000, click Start Settings Printers. 2. With your printer settings in Printing Preferences depending on the program or operating system). The Printing Preferences dialog box opens. Using Printing Preferences Printing Preferences allows you want to create. Click Preferences, Properties, Options, or Setup...

User Guide
Page 88
... lights on the printer. Determine if the printer has been held or paused. 1. In Windows XP, click Start Control Panel Printers and Other Hardware Printers and Faxes. Also, do not install printer software multiple times from the electrical outlet. Reconnect the USB cable to the printer and the electrical outlet. Right-click Dell AIO Printer 946, and select Set...
... lights on the printer. Determine if the printer has been held or paused. 1. In Windows XP, click Start Control Panel Printers and Other Hardware Printers and Faxes. Also, do not install printer software multiple times from the electrical outlet. Reconnect the USB cable to the printer and the electrical outlet. Right-click Dell AIO Printer 946, and select Set...

