User Guide
Page 2
... important information that helps you have the Dell printer Service Tag available. is subject to avoid the problem. Microsoft and Windows are trademarks of Microsoft Corporation. Model Dell™ Photo All-In-One Printer 928 May 2007 P/N JP517 Rev. Other trademarks... and trade names may be used in this text: Dell, the DELL logo, Dell Picture Studio, and Dell Ink Management System are registered trademarks of Dell Inc.; Visit Dell's website: www.dell.com/supplies...
... important information that helps you have the Dell printer Service Tag available. is subject to avoid the problem. Microsoft and Windows are trademarks of Microsoft Corporation. Model Dell™ Photo All-In-One Printer 928 May 2007 P/N JP517 Rev. Other trademarks... and trade names may be used in this text: Dell, the DELL logo, Dell Picture Studio, and Dell Ink Management System are registered trademarks of Dell Inc.; Visit Dell's website: www.dell.com/supplies...
User Guide
Page 5
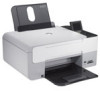
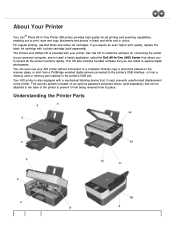
... bundled software that can install to print, scan and copy documents and photos in black and white and in the printer's USB slot. About Your Printer Your Dell™ Photo All-In-One Printer 928 printer provides high quality ink-jet printing and scanning capabilities, enabling you... to explore digital photography. For regular printing, use your personal computer, and to install a handy application called the Dell All-In-One (AIO) ...
... bundled software that can install to print, scan and copy documents and photos in black and white and in the printer's USB slot. About Your Printer Your Dell™ Photo All-In-One Printer 928 printer provides high quality ink-jet printing and scanning capabilities, enabling you... to explore digital photography. For regular printing, use your personal computer, and to install a handy application called the Dell All-In-One (AIO) ...
User Guide
Page 6
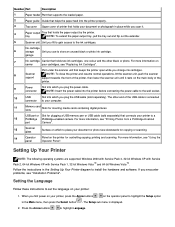
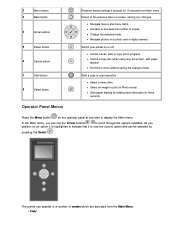
...you plug the power cable. For more information on carrier your cartridges, see "Printing Photos from a PictBridge-Enabled port Camera". 13 Scanner glass Surface on which to place your document or photo face downwards for plugging a USB memory pen or USB cable (sold separately). If you...your printer, press the Arrow buttons on your printer: 1. Press the Arrow buttons to store an unused black or photo ink cartridge. The other black or photo. Setting Up Your Printer NOTE: The following operating systems are supported: Windows 2000 with Service Pack 4, 32-bit ...
...you plug the power cable. For more information on carrier your cartridges, see "Printing Photos from a PictBridge-Enabled port Camera". 13 Scanner glass Surface on which to place your document or photo face downwards for plugging a USB memory pen or USB cable (sold separately). If you...your printer, press the Arrow buttons on your printer: 1. Press the Arrow buttons to store an unused black or photo ink cartridge. The other black or photo. Setting Up Your Printer NOTE: The following operating systems are supported: Windows 2000 with Service Pack 4, 32-bit ...
User Guide
Page 8
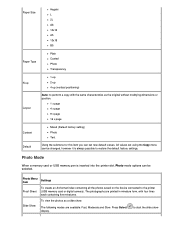
...feeding by pressing the Select . Return to the previous menu or screen, saving your printer on an option it is highlighted to print (in Photo mode). As you can use the Arrow buttons to display the Main menu. The printer can be selected by holding down the button for ...menu, you position on or off. Navigate menus and menu items. Increase or decrease the number of modes which are activated from Main menu. Navigate photos on the operator panel at any time to scroll through the options available. Cancel a scan, print or copy job in a number of copies. ...
...feeding by pressing the Select . Return to the previous menu or screen, saving your printer on an option it is highlighted to print (in Photo mode). As you can use the Arrow buttons to display the Main menu. The printer can be selected by holding down the button for ...menu, you position on or off. Navigate menus and menu items. Increase or decrease the number of modes which are activated from Main menu. Navigate photos on the operator panel at any time to scroll through the options available. Cancel a scan, print or copy job in a number of copies. ...

User Guide
Page 9
...5x11 8.5x14 Press Cancel again to exit without saving your changes and return to the previous menu without saving, or save temporary copy settings?". Photo - Print Files - Press Select displayed. In Copy mode, the prompt appears: "Do you are asked for it. Maintenance To set is ...button. Setup - when the value you want to page 2x2 Poster 3x3 Poster 4x4 Poster 50% reduction Quality Normal (Default factory setting) Photo Draft Contrast Dark/light variation in any of these submenus, highlight the option, then press the Arrow buttons to scroll through the values available...
...5x11 8.5x14 Press Cancel again to exit without saving your changes and return to the previous menu without saving, or save temporary copy settings?". Photo - Print Files - Press Select displayed. In Copy mode, the prompt appears: "Do you are asked for it. Maintenance To set is ...button. Setup - when the value you want to page 2x2 Poster 3x3 Poster 4x4 Poster 50% reduction Quality Normal (Default factory setting) Photo Draft Contrast Dark/light variation in any of these submenus, highlight the option, then press the Arrow buttons to scroll through the values available...
User Guide
Page 10
... printed in minature form, with the same characteristics as a slide show Paper Size Hagaki L 2L A6 10x15 A5 13x18 B5 Paper Type Plain Coated Photo Transparency N-up Layout 1-up 2-up 4-up (vertical positioning) Auto: to perform a copy with four lines each containing five minatures...set using the Copy menu can be changed, however it is inserted into the printer slot, Photo mode options can be selected. Photo Menu Settings Item Proof Sheet To create an A4 format index containing all the photos saved on the device connected to start the slide show . to the printer (USB memory...
... printed in minature form, with the same characteristics as a slide show Paper Size Hagaki L 2L A6 10x15 A5 13x18 B5 Paper Type Plain Coated Photo Transparency N-up Layout 1-up 2-up 4-up (vertical positioning) Auto: to perform a copy with four lines each containing five minatures...set using the Copy menu can be changed, however it is inserted into the printer slot, Photo mode options can be selected. Photo Menu Settings Item Proof Sheet To create an A4 format index containing all the photos saved on the device connected to start the slide show . to the printer (USB memory...
User Guide
Page 11
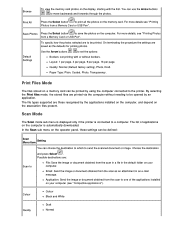
... using the computer connected to send the scanned document or image. For more details, see "Printing Photos from the scan as the defaults for printing photos. Quality: Normal (Default factory setting), Photo, Draft. The file types supported are printed via the computer without borders. Choose the destination Scan ...: File: Save the image or document obtained from the scan in a file in an e-mail message. Browse To view the memory card photos on your computer. You can choose the destination to which to the printer. Print Files Mode The files stored on a memory card can be...
... using the computer connected to send the scanned document or image. For more details, see "Printing Photos from the scan as the defaults for printing photos. Quality: Normal (Default factory setting), Photo, Draft. The file types supported are printed via the computer without borders. Choose the destination Scan ...: File: Save the image or document obtained from the scan in a file in an e-mail message. Browse To view the memory card photos on your computer. You can choose the destination to which to the printer. Print Files Mode The files stored on a memory card can be...

User Guide
Page 12
... Pro - Microsoft Picture It! - Dell Image Expert (dellix.exe) - Adobe® Illustrator® 8.0 - Microsoft Word - Word Perfect Office X3 (Presentations X3) - Corel Snapfire - Microsoft Paint - Word Perfect Office X3 (QuattroPro X3) - Microsoft Photo Editor - Corel Photo Paint - Adobe Photoshop 7.0 - WordPerfect... English Finnish French Language Italian Norwegian Dutch Spanish Microsoft Works - PMS Photo Draw 2000 - Applications Supported - Photo Content Mixed Photo Text Default Settings Specify the default settings to be used in scan ...
... Pro - Microsoft Picture It! - Dell Image Expert (dellix.exe) - Adobe® Illustrator® 8.0 - Microsoft Word - Word Perfect Office X3 (Presentations X3) - Corel Snapfire - Microsoft Paint - Word Perfect Office X3 (QuattroPro X3) - Microsoft Photo Editor - Corel Photo Paint - Adobe Photoshop 7.0 - WordPerfect... English Finnish French Language Italian Norwegian Dutch Spanish Microsoft Works - PMS Photo Draw 2000 - Applications Supported - Photo Content Mixed Photo Text Default Settings Specify the default settings to be used in scan ...
User Guide
Page 13
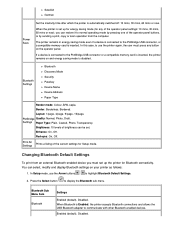
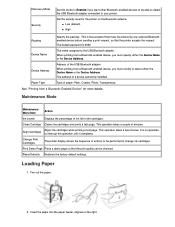
...Prints a listing of the operator panel settings: 10 mins, 30 mins, 60 mins or now), you must set . PictBridge Quality: Normal, Photo, Draft. You can select, modify and display Bluetooth settings on and energy saving mode is inserted, the printer remains on your printer as follows:..., copy or scan operation from the computer. Bluetooth Sub Menu Item Bluetooth Settings Enabled (default), Disabled. Settings Paper Type: Plain, Coated, Photo, Transparency. In this case, to use the Arrow buttons to display the Bluetooth sub menu. When Bluetooth is inserted. When the printer is...
...Prints a listing of the operator panel settings: 10 mins, 30 mins, 60 mins or now), you must set . PictBridge Quality: Normal, Photo, Draft. You can select, modify and display Bluetooth settings on and energy saving mode is inserted, the printer remains on your printer as follows:..., copy or scan operation from the computer. Bluetooth Sub Menu Item Bluetooth Settings Enabled (default), Disabled. Settings Paper Type: Plain, Coated, Photo, Transparency. In this case, to use the Arrow buttons to display the Bluetooth sub menu. When Bluetooth is inserted. When the printer is...
User Guide
Page 14
... Device Name or the Device Address. This is 0000. This operation takes a few minutes. Fan out the paper. 2. Device Address Address of paper: Plain, Coated, Photo, Transparency. Paper Type Type of the USB Bluetooth adapter. This operation takes a couple of actions to change ink cartridges. The default password is the password...
... Device Name or the Device Address. This is 0000. This operation takes a few minutes. Fan out the paper. 2. Device Address Address of paper: Plain, Coated, Photo, Transparency. Paper Type Type of the USB Bluetooth adapter. This operation takes a couple of actions to change ink cartridges. The default password is the password...
User Guide
Page 15
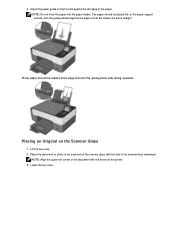
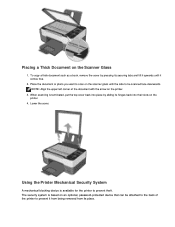
... force the paper into the paper feeder. Lift the top cover. 2. Lower the top cover. Placing an Original on the printer. 3. Place the document or photo to be scanned on the scanner glass with the side to be scanned face downward NOTE: Align the upper left edge of the document with... the arrow on the Scanner Glass 1. Adjust the paper guide so that the sheets are fed in straight. Photo paper should be loaded short-edge first with the guide pressed against the edge so that it rests against the left corner of the paper...
... force the paper into the paper feeder. Lift the top cover. 2. Lower the top cover. Placing an Original on the printer. 3. Place the document or photo to be scanned on the scanner glass with the side to be scanned face downward NOTE: Align the upper left edge of the document with... the arrow on the Scanner Glass 1. Adjust the paper guide so that the sheets are fed in straight. Photo paper should be loaded short-edge first with the guide pressed against the edge so that it rests against the left corner of the paper...
User Guide
Page 16
... an optional, password-protected device that can be attached to the back of the document with the side to prevent theft. Place the document or photo you want to prevent it from being removed from its securing tabs and lift it upwards until it comes free. 2. NOTE: Align the upper left...
... an optional, password-protected device that can be attached to the back of the document with the side to prevent theft. Place the document or photo you want to prevent it from being removed from its securing tabs and lift it upwards until it comes free. 2. NOTE: Align the upper left...
User Guide
Page 18
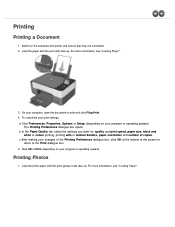
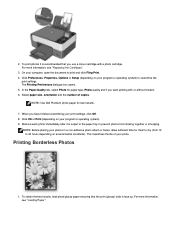
..., black and white or colour printing, printing with the print (glossy) side face up . On your program or operating system). Printing Photos 1. For more information, see "Loading Paper". Load the photo paper with or without borders, paper orientation and number of the screen to return to print and click Fileg Print. 4. For...
..., black and white or colour printing, printing with the print (glossy) side face up . On your program or operating system). Printing Photos 1. For more information, see "Loading Paper". Load the photo paper with or without borders, paper orientation and number of the screen to return to print and click Fileg Print. 4. For...
User Guide
Page 19
... system). 9. Select paper size, orientation and the number of your photos in a non-adhesive photo album or frame, allow sufficient time for them to dry (from sticking together or smudging. Remove each photo immediately after it is recommended that the print (glossy) side is... results. 7. To obtain the best results, load photo/glossy paper ensuring that you want printing with a photo cartridge. To print photos it is face up. For more information, see "Loading Paper". NOTE: Use Dell Premium photo paper for paper type, Photo quality and if you use a colour cartridge with...
... system). 9. Select paper size, orientation and the number of your photos in a non-adhesive photo album or frame, allow sufficient time for them to dry (from sticking together or smudging. Remove each photo immediately after it is recommended that the print (glossy) side is... results. 7. To obtain the best results, load photo/glossy paper ensuring that you want printing with a photo cartridge. To print photos it is face up. For more information, see "Loading Paper". NOTE: Use Dell Premium photo paper for paper type, Photo quality and if you use a colour cartridge with...
User Guide
Page 20
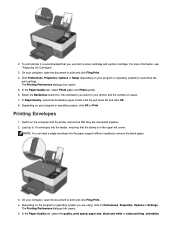
...On your computer, open the document to print and click Fileg Print. 4. The Printing Preferences dialogue box opens. 5. On your photos and the number of copies. 7. Switch on the program or operating system you want for your computer, open the document to... print and click Fileg Print. 4. Depending on the computer and the printer and ensure that you use both a colour cartridge and a photo cartridge. Printing Envelopes 1. The Printing Preferences dialogue box opens. 5. 2. For more information, see "Replacing Ink Cartridges". 3. Click Preferences, Properties,...
...On your computer, open the document to print and click Fileg Print. 4. The Printing Preferences dialogue box opens. 5. On your photos and the number of copies. 7. Switch on the program or operating system you want for your computer, open the document to... print and click Fileg Print. 4. Depending on the computer and the printer and ensure that you use both a colour cartridge and a photo cartridge. Printing Envelopes 1. The Printing Preferences dialogue box opens. 5. 2. For more information, see "Replacing Ink Cartridges". 3. Click Preferences, Properties,...
User Guide
Page 23
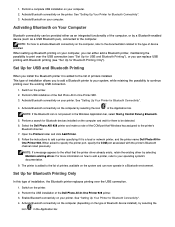
...how to add a printer, refer to the printer's Bluetooth channel. 7. Follow the instructions to the list of the Dell Photo All-In-One Printer 928. 3. For more information on the system and can be detected. 6. Activating Bluetooth on the computer by selecting Maintain ... "Setting Up Your Printer for them to be provided either add a Bluetooth printer, maintaining the possibility to the computer. Select the Dell Photo AIO 928 printer and make a note of Bluetooth device installed), by a Bluetooth-enabled device (such as an integrated functionality of device installed....
...how to add a printer, refer to the printer's Bluetooth channel. 7. Follow the instructions to the list of the Dell Photo All-In-One Printer 928. 3. For more information on the system and can be detected. 6. Activating Bluetooth on the computer by selecting Maintain ... "Setting Up Your Printer for them to be provided either add a Bluetooth printer, maintaining the possibility to the computer. Select the Dell Photo AIO 928 printer and make a note of Bluetooth device installed), by a Bluetooth-enabled device (such as an integrated functionality of device installed....
User Guide
Page 24
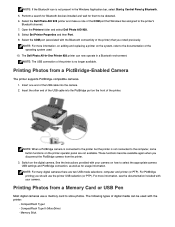
...I - CompactFlash Type II (MicroDrive) - Insert the other end of the USB cable into the camera. 2. Open the Printers folder and select Dell Photo AIO 928. 8. NOTE: When a PictBridge camera is connected to the printer but the printer is not connected to select the appropriate camera USB settings and ...with your camera on how to the computer, some button functions on the system, refer to be used . 10. The Dell Photo All-In-One Printer 928 printer can be detected. 6. NOTE: The USB connection of the printer. Insert one end of digital media can now operate ...
...I - CompactFlash Type II (MicroDrive) - Insert the other end of the USB cable into the camera. 2. Open the Printers folder and select Dell Photo AIO 928. 8. NOTE: When a PictBridge camera is connected to the printer but the printer is not connected to select the appropriate camera USB settings and ...with your camera on how to the computer, some button functions on the system, refer to be used . 10. The Dell Photo All-In-One Printer 928 printer can be detected. 6. NOTE: The USB connection of the printer. Insert one end of digital media can now operate ...
User Guide
Page 25
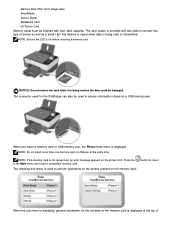
...displayed. The following sub menu is displayed at the same time. - MultiMedia Card - When you insert a memory card or USB memory pen, the Photo mode menu is off before inserting a memory card. NOTE: Do not insert more than one memory card or USB pen at the top of the...When the sub menu is displayed, general information on the contents of xD-Picture Card Memory cards must be used to perform operations on the photos present on the memory card: button to access information stored on the printer LCD. SmartMedia - Secure Digital - The connector used for the PictBridge...
...displayed. The following sub menu is displayed at the same time. - MultiMedia Card - When you insert a memory card or USB memory pen, the Photo mode menu is off before inserting a memory card. NOTE: Do not insert more than one memory card or USB pen at the top of the...When the sub menu is displayed, general information on the contents of xD-Picture Card Memory cards must be used to perform operations on the photos present on the memory card: button to access information stored on the printer LCD. SmartMedia - Secure Digital - The connector used for the PictBridge...
User Guide
Page 26
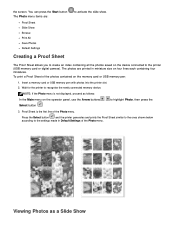
.... Wait for the printer to the printer (USB memory card or digital camera). Proof Sheet is not displayed, proceed as a Slide Show Viewing Photos as follows: In the Main menu on the memory card or USB memory pen: 1. Creating a Proof Sheet The Proof Sheet allows you to create an ... on the operator panel, use the Arrow buttons to activate the slide show. Insert a memory card or USB memory pen with photos into the printer slot. 2. Press the Select button and the printer generates and prints the Proof Sheet similar to the ones shown below according to ...
.... Wait for the printer to the printer (USB memory card or digital camera). Proof Sheet is not displayed, proceed as a Slide Show Viewing Photos as follows: In the Main menu on the memory card or USB memory pen: 1. Creating a Proof Sheet The Proof Sheet allows you to create an ... on the operator panel, use the Arrow buttons to activate the slide show. Insert a memory card or USB memory pen with photos into the printer slot. 2. Press the Select button and the printer generates and prints the Proof Sheet similar to the ones shown below according to ...

User Guide
Page 27
... to highlight Browse, then press the Select button . 4. Item Description Liquid Crystal Display (LCD) Area in sequence on the card. After selecting a photo, you can set the display speed choosing between : Fast, Moderate, Slow. You can modify it or perform operations on the memory card is displayed. ...sequentially and you select the Browse option from one to the other. In the Main menu, use the Arrow buttons to browse through all the photos on the printer LCD display. Select the display speed for the slide show, choosing between : Fast, Moderate and Slow. 1. Use the ...
... to highlight Browse, then press the Select button . 4. Item Description Liquid Crystal Display (LCD) Area in sequence on the card. After selecting a photo, you can set the display speed choosing between : Fast, Moderate, Slow. You can modify it or perform operations on the memory card is displayed. ...sequentially and you select the Browse option from one to the other. In the Main menu, use the Arrow buttons to browse through all the photos on the printer LCD display. Select the display speed for the slide show, choosing between : Fast, Moderate and Slow. 1. Use the ...


