User's Guide
Page 3
... card ...34 Installing hardware options...36 Installing a 250- or 550-sheet drawer...36 Printing the printer settings configuration sheet...38 Interpreting the printer control panel lights 39 Understanding the printer control panel light sequences 39 Understanding the primary...
... card ...34 Installing hardware options...36 Installing a 250- or 550-sheet drawer...36 Printing the printer settings configuration sheet...38 Interpreting the printer control panel lights 39 Understanding the printer control panel light sequences 39 Understanding the primary...
User's Guide
Page 4
... 72 Linux®...73 Software Overview 74 Status Monitor Center...74 Local Printer Settings Utility...74 Contents 4 Understanding the secondary error light sequences...46 Understanding the secondary paper jam light sequences 50 Loading paper and specialty media 55 Setting the paper size and paper type...55 Configuring Universal paper settings...55 Loading...
... 72 Linux®...73 Software Overview 74 Status Monitor Center...74 Local Printer Settings Utility...74 Contents 4 Understanding the secondary error light sequences...46 Understanding the secondary paper jam light sequences 50 Loading paper and specialty media 55 Setting the paper size and paper type...55 Configuring Universal paper settings...55 Loading...

User's Guide
Page 6
... 96 Adjusting Power Saver...96 Restoring the factory default settings...96 Clearing jams 97 Avoiding jams...97 Accessing jam areas...98 Understanding jam lights and access locations...98 Clearing jams behind the photoconductor kit and toner cartridge 102 Clearing jams from the standard exit bin...104 Clearing ...or quits after it is installed 112 Drawers...113 Memory card ...113 Solving paper feed problems...113 Paper frequently jams ...113 Paper jam lights remain on after jam is cleared ...114 Page that jammed does not reprint after the jam is cleared 114 Solving print quality problems......
... 96 Adjusting Power Saver...96 Restoring the factory default settings...96 Clearing jams 97 Avoiding jams...97 Accessing jam areas...98 Understanding jam lights and access locations...98 Clearing jams behind the photoconductor kit and toner cartridge 102 Clearing jams from the standard exit bin...104 Clearing ...or quits after it is installed 112 Drawers...113 Memory card ...113 Solving paper feed problems...113 Paper frequently jams ...113 Paper jam lights remain on after jam is cleared ...114 Page that jammed does not reprint after the jam is cleared 114 Solving print quality problems......
User's Guide
Page 7
Incorrect margins...117 Paper curl...117 Print is too dark...118 Print is too light ...118 Skewed print...119 Toner fog or background shading appears on the page 119 Toner rubs off...120 Toner specks...120 Transparency print quality is poor...120 Streaked horizontal lines...121 Streaked vertical lines ...121 Solid black or white streaks appear on transparencies or paper 122 Appendix 124 Dell Technical Support Policy...124 Contacting Dell...124 Warranty and Return Policy...125 Index 126 Contents 7
Incorrect margins...117 Paper curl...117 Print is too dark...118 Print is too light ...118 Skewed print...119 Toner fog or background shading appears on the page 119 Toner rubs off...120 Toner specks...120 Transparency print quality is poor...120 Streaked horizontal lines...121 Streaked vertical lines ...121 Solid black or white streaks appear on transparencies or paper 122 Appendix 124 Dell Technical Support Policy...124 Contacting Dell...124 Warranty and Return Policy...125 Index 126 Contents 7

User's Guide
Page 13
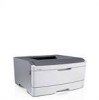
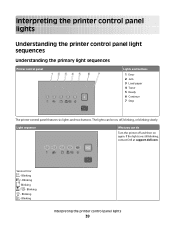
Learning about the printer 13 1 Front door release button 2 Paper stop 3 Standard exit bin 4 Printer control panel 5 System board door 6 Standard 250-sheet tray (Tray 1) 7 Optional 550-sheet drawer (Tray 2) 8 Manual feeder door 9 Front door Understanding the printer control panel The printer control panel features six lights and two buttons.
Learning about the printer 13 1 Front door release button 2 Paper stop 3 Standard exit bin 4 Printer control panel 5 System board door 6 Standard 250-sheet tray (Tray 1) 7 Optional 550-sheet drawer (Tray 2) 8 Manual feeder door 9 Front door Understanding the printer control panel The printer control panel features six lights and two buttons.

User's Guide
Page 14
Learning about the printer 14 Item 1 Error light 2 Jam light 3 Load paper light 4 Toner light 5 Ready light 6 Continue button 7 Stop button Attaching cables 1 Connect the printer to a computer using USB or parallel cable. 2 Connect the power cord to the printer first and then to a wall outlet.
Learning about the printer 14 Item 1 Error light 2 Jam light 3 Load paper light 4 Toner light 5 Ready light 6 Continue button 7 Stop button Attaching cables 1 Connect the printer to a computer using USB or parallel cable. 2 Connect the power cord to the printer first and then to a wall outlet.

User's Guide
Page 17
... Envelope B5 Envelope DL Envelope Other Envelope Set Type menu for Tray 1 Plain Paper Card Stock Transparency Recycled Bond Letterhead Preprinted Colored Paper Light Paper Heavy Paper Rough/Cotton Custom Type Lets you specify the type of paper loaded in Tray 1 Notes: • Plain Paper is...Note: Letter is the international factory default setting. Set Size menu for Tray 2 Plain Paper Card Stock Recycled Bond Letterhead Preprinted Colored Paper Light Paper Heavy Paper Rough/Cotton Custom Type Lets you specify the size of Custom Type . • Use this menu item to configure ...
... Envelope B5 Envelope DL Envelope Other Envelope Set Type menu for Tray 1 Plain Paper Card Stock Transparency Recycled Bond Letterhead Preprinted Colored Paper Light Paper Heavy Paper Rough/Cotton Custom Type Lets you specify the type of paper loaded in Tray 1 Notes: • Plain Paper is...Note: Letter is the international factory default setting. Set Size menu for Tray 2 Plain Paper Card Stock Recycled Bond Letterhead Preprinted Colored Paper Light Paper Heavy Paper Rough/Cotton Custom Type Lets you specify the size of Custom Type . • Use this menu item to configure ...

User's Guide
Page 18
... Select Type Plain Texture Card Stock Texture Transparency Texture Recycled Texture Bond Texture Envelope Texture Letterhead Texture Preprinted Texture Colored Texture Light Texture Heavy Texture Rough Texture Custom Texture Description Specifies the paper type Understanding the printer menus 18 Menu item Set Type menu... for Manual Paper Plain Paper Card Stock Transparency Bond Letterhead Preprinted Colored Paper Light Paper Heavy Paper Rough/Cotton Custom Type Set Type menu for a specific type of paper. Lets you specify the type ...
... Select Type Plain Texture Card Stock Texture Transparency Texture Recycled Texture Bond Texture Envelope Texture Letterhead Texture Preprinted Texture Colored Texture Light Texture Heavy Texture Rough Texture Custom Texture Description Specifies the paper type Understanding the printer menus 18 Menu item Set Type menu... for Manual Paper Plain Paper Card Stock Transparency Bond Letterhead Preprinted Colored Paper Light Paper Heavy Paper Rough/Cotton Custom Type Set Type menu for a specific type of paper. Lets you specify the type ...

User's Guide
Page 19
...Plain Weight Card Stock Weight Transparency Weight Recycled Weight Bond Weight Envelope Weight Letterhead Weight Preprinted Weight Colored Weight Light Weight Heavy Weight Rough Weight Custom Texture Select Weight Light Normal Heavy Description Specifies the paper type After you select a setting for Select Type, the Select Weight... selected for that type of paper. Notes: • Normal is the factory default setting for most items. • When Light Weight is the setting selected for Select Type, Light is the only Select Weight setting available. • When Heavy Weight is supported.
...Plain Weight Card Stock Weight Transparency Weight Recycled Weight Bond Weight Envelope Weight Letterhead Weight Preprinted Weight Colored Weight Light Weight Heavy Weight Rough Weight Custom Texture Select Weight Light Normal Heavy Description Specifies the paper type After you select a setting for Select Type, the Select Weight... selected for that type of paper. Notes: • Normal is the factory default setting for most items. • When Light Weight is the setting selected for Select Type, Light is the only Select Weight setting available. • When Heavy Weight is supported.

User's Guide
Page 20
... the selected tray or feeder in other menus. Paper Loading menu Menu item Select Type Recycled Loading Bond Loading Letterhead loading Preprinted Loading Colored Loading Light Loading Heavy Loading Custom Loading Set Loading • Duplex • Off Custom Types menu Menu item Custom Type Paper Card Stock Transparency Envelope Rough/Cotton...
... the selected tray or feeder in other menus. Paper Loading menu Menu item Select Type Recycled Loading Bond Loading Letterhead loading Preprinted Loading Colored Loading Light Loading Heavy Loading Custom Loading Set Loading • Duplex • Off Custom Types menu Menu item Custom Type Paper Card Stock Transparency Envelope Rough/Cotton...
User's Guide
Page 25
... Notes: • 60 minutes is the factory default setting. • Disabled does not appear unless Energy Conserve is low message will appear and the indicator light will appear as a warning. • Single means the Toner is Off. Understanding the printer menus 25 Notes: • Off is using PCL.
... Notes: • 60 minutes is the factory default setting. • Disabled does not appear unless Energy Conserve is low message will appear and the indicator light will appear as a warning. • Single means the Toner is Off. Understanding the printer menus 25 Notes: • Off is using PCL.

User's Guide
Page 38
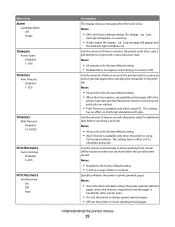
...the printer on how to navigate through the configuration menus to select and save new settings. On - On 6 Press until all the lights cycle. All the lights cycle. 4 Release . 5 Close the front door. On - It also provides instructions on . Home Menu - Note: The sheet... prints only when the home menu light sequence is on. Additional printer setup 38 On - The light sequence representing the home menu appears. The printer settings configuration sheet prints. Printing the printer settings configuration sheet...
...the printer on how to navigate through the configuration menus to select and save new settings. On - On 6 Press until all the lights cycle. All the lights cycle. 4 Release . 5 Close the front door. On - It also provides instructions on . Home Menu - Note: The sheet... prints only when the home menu light sequence is on. Additional printer setup 38 On - The light sequence representing the home menu appears. The printer settings configuration sheet prints. Printing the printer settings configuration sheet...
User's Guide
Page 39
... the printer control panel lights 39 If the lights are still blinking, contact Dell at support.dell.com. Blinking - Service Error - Light sequence What you can be on again. Blinking - Blinking - The lights can do Turn the printer off and then on , off, blinking, or blinking slowly. Interpreting the printer control panel lights Understanding the printer control...
... the printer control panel lights 39 If the lights are still blinking, contact Dell at support.dell.com. Blinking - Service Error - Light sequence What you can be on again. Blinking - Blinking - The lights can do Turn the printer off and then on , off, blinking, or blinking slowly. Interpreting the printer control panel lights Understanding the printer control...
User's Guide
Page 40
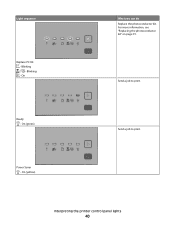
Blinking - On Ready - For more information, see "Replacing the photoconductor kit" on page 91. Power Saver - On (green) What you can do Replace the photoconductor kit. Send a job to print. Send a job to print. On (yellow) Interpreting the printer control panel lights 40 Blinking - Light sequence Replace PC Kit -
Blinking - On Ready - For more information, see "Replacing the photoconductor kit" on page 91. Power Saver - On (green) What you can do Replace the photoconductor kit. Send a job to print. Send a job to print. On (yellow) Interpreting the printer control panel lights 40 Blinking - Light sequence Replace PC Kit -

User's Guide
Page 41
Slowly Blinking Busy - Blinking What you can do Use Hex Trace to the Ready state. Interpreting the printer control panel lights 41 Blinking - Blinking Flushing Buffer - Wait until the printer returns to troubleshoot printing problems. Wait or press . Light sequence Hex Trace Ready -
Slowly Blinking Busy - Blinking What you can do Use Hex Trace to the Ready state. Interpreting the printer control panel lights 41 Blinking - Blinking Flushing Buffer - Wait until the printer returns to troubleshoot printing problems. Wait or press . Light sequence Hex Trace Ready -

User's Guide
Page 42
Waiting - On Press and release . On - Canceling job - On - On - On - On Wait for the light sequence to clear. Invalid Engine Code - On Interpreting the printer control panel lights 42 Light sequence What you use a valid code when programming the printer. On - On - On - To avoid this light sequence in the future, ensure that you can do Wait for the light sequence to clear.
Waiting - On Press and release . On - Canceling job - On - On - On - On Wait for the light sequence to clear. Invalid Engine Code - On Interpreting the printer control panel lights 42 Light sequence What you use a valid code when programming the printer. On - On - On - To avoid this light sequence in the future, ensure that you can do Wait for the light sequence to clear.
User's Guide
Page 43
On Front door is open - Light sequence Not ready - On Cartridge region mismatch - On - For more information, see "Replacing the toner cartridge" on page 89. On What you can do Press and release either or l to return to the Ready state. Close the front door. Replace the toner cartridge with one suitable for your region. Interpreting the printer control panel lights 43
On Front door is open - Light sequence Not ready - On Cartridge region mismatch - On - For more information, see "Replacing the toner cartridge" on page 89. On What you can do Press and release either or l to return to the Ready state. Close the front door. Replace the toner cartridge with one suitable for your region. Interpreting the printer control panel lights 43

User's Guide
Page 44
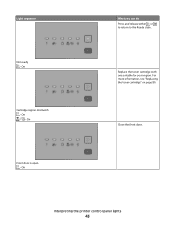
Blinking What you can do Load paper in the manual feeder. Remove printed pages from the standard exit bin - Load paper in Tray 1 or Tray 2. On Remove paper from the standard exit bin, and then press and release to clear the light sequence and continue printing. Interpreting the printer control panel lights 44 On No paper in Tray 1 or Tray 2 - On - Light sequence No paper in manual feeder -
Blinking What you can do Load paper in the manual feeder. Remove printed pages from the standard exit bin - Load paper in Tray 1 or Tray 2. On Remove paper from the standard exit bin, and then press and release to clear the light sequence and continue printing. Interpreting the printer control panel lights 44 On No paper in Tray 1 or Tray 2 - On - Light sequence No paper in manual feeder -
User's Guide
Page 45
...see the secondary error code. On - On - Printer error - Light sequence Cartridge is a secondary error code or secondary jam code to read: Light sequence What you can do • Press and release to clear the light sequence and continue processing the print job. • With the ...8226; Replace the toner cartridge, and then turn the printer on. Blinking - On What you can do Press twice quickly to clear the light sequence and continue processing the print job. • Replace the photoconductor kit. For more information, see "Replacing the toner cartridge" on page ...
...see the secondary error code. On - On - Printer error - Light sequence Cartridge is a secondary error code or secondary jam code to read: Light sequence What you can do • Press and release to clear the light sequence and continue processing the print job. • With the ...8226; Replace the toner cartridge, and then turn the printer on. Blinking - On What you can do Press twice quickly to clear the light sequence and continue processing the print job. • Replace the photoconductor kit. For more information, see "Replacing the toner cartridge" on page ...

User's Guide
Page 46
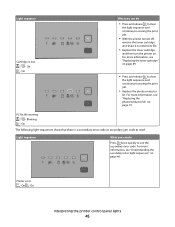
For more information, see the secondary error code. On Understanding the secondary error light sequences When the and lights are on simultaneously, press twice quickly to see the secondary paper jam code. On - Light sequence What you can do Press twice quickly to see "Understanding the secondary paper jam light sequences" on page 50. Paper jam - Printer control panel Lights and buttons 1 Error 2 Jam 3 Load paper 4 Toner 5 Ready 6 Continue 7 Stop Interpreting the printer control panel lights 46
For more information, see the secondary error code. On Understanding the secondary error light sequences When the and lights are on simultaneously, press twice quickly to see the secondary paper jam code. On - Light sequence What you can do Press twice quickly to see "Understanding the secondary paper jam light sequences" on page 50. Paper jam - Printer control panel Lights and buttons 1 Error 2 Jam 3 Load paper 4 Toner 5 Ready 6 Continue 7 Stop Interpreting the printer control panel lights 46


