User Manual
Page 4
...\0630_UG??\Mioga_AIO_UG_FM\Mioga_AIO _UG_FM\Mioga-AIO-UGTOC.fm Ordering Supplies 43 Setting up the Printer (Printer Setup) 47 5 Preparing Printer Hardware 49 Removing Tape 49 Removing the Print Head Device (PHD) ...Wireless Adapter Using Video Instructions (Recommended 65 Installing the Optional Wireless Adapter . . . . . 66 Printing System Settings Report 67 Determining the Wireless Network Settings . . . 68 Configuring the Optional Wireless Adapter 69 Using Wizard Setup to Configure a Wireless Adapter 70 Using Advanced Setup to Configure a Wireless Adapter 72 Constructing a New Wireless...
...\0630_UG??\Mioga_AIO_UG_FM\Mioga_AIO _UG_FM\Mioga-AIO-UGTOC.fm Ordering Supplies 43 Setting up the Printer (Printer Setup) 47 5 Preparing Printer Hardware 49 Removing Tape 49 Removing the Print Head Device (PHD) ...Wireless Adapter Using Video Instructions (Recommended 65 Installing the Optional Wireless Adapter . . . . . 66 Printing System Settings Report 67 Determining the Wireless Network Settings . . . 68 Configuring the Optional Wireless Adapter 69 Using Wizard Setup to Configure a Wireless Adapter 70 Using Advanced Setup to Configure a Wireless Adapter 72 Constructing a New Wireless...

User Manual
Page 33
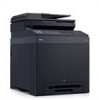
... changes to install drivers or access your printer. You can buy separately. • Additional memory (512 MB) • 250-sheet feeder • Wireless adapter • USB cable • Ethernet cable What are the optional accessories that you looking for? • Drivers for my printer • My... User's Guide Find it here Drivers and Utilities CD The Drivers and Utilities CD contains setup video, documentation, and drivers for experienced users or technicians. 2 Finding Information NOTE: The following are you can use the CD to your ...
... changes to install drivers or access your printer. You can buy separately. • Additional memory (512 MB) • 250-sheet feeder • Wireless adapter • USB cable • Ethernet cable What are the optional accessories that you looking for? • Drivers for my printer • My... User's Guide Find it here Drivers and Utilities CD The Drivers and Utilities CD contains setup video, documentation, and drivers for experienced users or technicians. 2 Finding Information NOTE: The following are you can use the CD to your ...

User Manual
Page 66
The specifications of WPA 1x noncorresponds) Push-Button Configuration (PBC), Personal Identification Number (PIN) NOTE: When the wireless adapter is installed, you to use IEEE 802.1x authentication and/or the Ethernet port for the optional 250-sheet feeder setting. 3 Click... Printers and Faxes(, Printers, or Devices and Printers) dialog box. Item Connectivity Technology Compliant Standards Bandwidth Data Transfer Rate Security Wi-Fi® Protected Setup (WPS) Specification Wireless IEEE 802.11b, 802.11g, and 802.11n 2.4 GHz IEEE 802.11n: 65 Mbps IEEE 802.11g: 54, 48, 36, 24, 18, ...
The specifications of WPA 1x noncorresponds) Push-Button Configuration (PBC), Personal Identification Number (PIN) NOTE: When the wireless adapter is installed, you to use IEEE 802.1x authentication and/or the Ethernet port for the optional 250-sheet feeder setting. 3 Click... Printers and Faxes(, Printers, or Devices and Printers) dialog box. Item Connectivity Technology Compliant Standards Bandwidth Data Transfer Rate Security Wi-Fi® Protected Setup (WPS) Specification Wireless IEEE 802.11b, 802.11g, and 802.11n 2.4 GHz IEEE 802.11n: 65 Mbps IEEE 802.11g: 54, 48, 36, 24, 18, ...

User Manual
Page 67
... your computer. Installing the Wireless Adapter Using Video Instructions (Recommended) To install the Dell wireless adapter, perform the following method. 1 Insert the Drivers and Utilities CD in your printer, which can also be downloaded from support.dell.com. The Easy Setup Navigator file launches automatically. 2 Select Optional Accessories Setup on the Easy Setup Navigator window. Installing Optional...
... your computer. Installing the Wireless Adapter Using Video Instructions (Recommended) To install the Dell wireless adapter, perform the following method. 1 Insert the Drivers and Utilities CD in your printer, which can also be downloaded from support.dell.com. The Easy Setup Navigator file launches automatically. 2 Select Optional Accessories Setup on the Easy Setup Navigator window. Installing Optional...

User Manual
Page 69
... panel a Press the (Menu) button. b Press button until System Setup is printed. The system settings report is highlighted, and then press the (Set) button. 2 Align the connector and the three protrusions of the wireless adapter with the four holes and insert the adapter. d Ensure that ... System Settings is highlighted, and then press the (Set) button. NOTE: If a message displays telling you to make initial setup on the printer. NOTE: Ensure that the wireless adapter is fully inserted and secured. 3 Turn on the operator panel, always do as instructed. 4 Print the system settings ...
... panel a Press the (Menu) button. b Press button until System Setup is printed. The system settings report is highlighted, and then press the (Set) button. 2 Align the connector and the three protrusions of the wireless adapter with the four holes and insert the adapter. d Ensure that ... System Settings is highlighted, and then press the (Set) button. NOTE: If a message displays telling you to make initial setup on the printer. NOTE: Ensure that the wireless adapter is fully inserted and secured. 3 Turn on the operator panel, always do as instructed. 4 Print the system settings ...

User Manual
Page 71
...Key Pass Phrase Specifies the name that identifies the wireless network with up to configure a wireless adapter from the following: Wizard Setup through USB connection Installing Optional Accessories 69 Specifies the WEP key set used through Easy Setup Navigator. You can select a method to 32 ...alphanumeric characters. Specifies the transmit key from Ad-hoc or Infrastructure. Configuring the Optional Wireless Adapter This section describes how to 63 bytes long only...
...Key Pass Phrase Specifies the name that identifies the wireless network with up to configure a wireless adapter from the following: Wizard Setup through USB connection Installing Optional Accessories 69 Specifies the WEP key set used through Easy Setup Navigator. You can select a method to 32 ...alphanumeric characters. Specifies the transmit key from Ad-hoc or Infrastructure. Configuring the Optional Wireless Adapter This section describes how to 63 bytes long only...
User Manual
Page 72
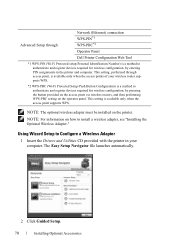
... the button provided on the access point via wireless routers, and then performing WPS-PBC setting on the printer. The Easy Setup Navigator file launches automatically. 2 Click Guided Setup. 70 Installing Optional Accessories This setting, performed through Network (Ethernet) connection WPS-PIN*1 WPS-PBC*2 Operator Panel Dell Printer Configuration Web Tool *1 WPS-PIN (Wi...
... the button provided on the access point via wireless routers, and then performing WPS-PBC setting on the printer. The Easy Setup Navigator file launches automatically. 2 Click Guided Setup. 70 Installing Optional Accessories This setting, performed through Network (Ethernet) connection WPS-PIN*1 WPS-PBC*2 Operator Panel Dell Printer Configuration Web Tool *1 WPS-PIN (Wi...

User Manual
Page 74
... • WPS-PBC • Operator Panel • Dell Printer Configuration Web Tool 1 Insert the Drivers and Utilities CD provided with the printer in your computer. The Wireless Connection window appears. 5 Select Wizard, and then click the Next button. Using Advanced Setup to configure wireless settings. The Easy Setup Navigator file launches automatically. 72 Installing Optional...
... • WPS-PBC • Operator Panel • Dell Printer Configuration Web Tool 1 Insert the Drivers and Utilities CD provided with the printer in your computer. The Wireless Connection window appears. 5 Select Wizard, and then click the Next button. Using Advanced Setup to configure wireless settings. The Easy Setup Navigator file launches automatically. 72 Installing Optional...

User Manual
Page 77
... button. This setting, performed through access point, is available only when the access points of your wireless router supports WPS. 1 Press the (Menu) button. 2 Press button until System Setup is highlighted, and then press the (Set) button. 3 Press button until Admin Menu is highlighted... IP address of your printer is highlighted, and then press the (Set) button. For WPS-PIN, WPS-PBC, Operator Panel, and Dell Printer Configuration Web Tool, follow the following instructions. NOTE: For details on -screen instructions to a printer and computer. Confirm the settings screen...
... button. This setting, performed through access point, is available only when the access points of your wireless router supports WPS. 1 Press the (Menu) button. 2 Press button until System Setup is highlighted, and then press the (Set) button. 3 Press button until Admin Menu is highlighted... IP address of your printer is highlighted, and then press the (Set) button. For WPS-PIN, WPS-PBC, Operator Panel, and Dell Printer Configuration Web Tool, follow the following instructions. NOTE: For details on -screen instructions to a printer and computer. Confirm the settings screen...

User Manual
Page 78
...can start Push Button Control only from the operator panel. NOTE: WPS-PBC (Wi-Fi Protected Setup-Push Button Configuration) is displayed, and enter the PIN code displayed on the step 7 into the wireless LAN access point (Registrar). This setting is available only when the access point supports WPS. ... access point. 11 When the WPS operation is successful and the printer is rebooted, wireless LAN connection setting is completed. 5 Press button until Wireless Setup is highlighted, and then press the (Set) button. 6 Press button until WPS is highlighted, and then press the (Set) button. 7 Press ...
...can start Push Button Control only from the operator panel. NOTE: WPS-PBC (Wi-Fi Protected Setup-Push Button Configuration) is displayed, and enter the PIN code displayed on the step 7 into the wireless LAN access point (Registrar). This setting is available only when the access point supports WPS. ... access point. 11 When the WPS operation is successful and the printer is rebooted, wireless LAN connection setting is completed. 5 Press button until Wireless Setup is highlighted, and then press the (Set) button. 6 Press button until WPS is highlighted, and then press the (Set) button. 7 Press ...

User Manual
Page 79
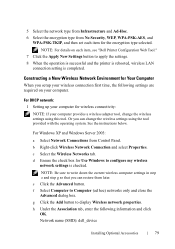
... to step 10. 9 Select the encryption type from Infrastructure and Ad-hoc depending on the wireless LAN access point (Registrar), within two minutes of the step 7 operation. 5 Press button until Wireless Setup is highlighted, and then press the (Set) button. 6 Press button until WPS is highlighted...Set) button. 7 Ensure that Push Button Control is highlighted, and then press the (Set) button. 8 Press button until Wireless Setup is highlighted, and then press the (Set) button. 6 Ensure that the message Please wait Wireless Setting is displayed, and start the WPS-PBC on your environment.
... to step 10. 9 Select the encryption type from Infrastructure and Ad-hoc depending on the wireless LAN access point (Registrar), within two minutes of the step 7 operation. 5 Press button until Wireless Setup is highlighted, and then press the (Set) button. 6 Press button until WPS is highlighted...Set) button. 7 Ensure that Push Button Control is highlighted, and then press the (Set) button. 8 Press button until Wireless Setup is highlighted, and then press the (Set) button. 6 Ensure that the message Please wait Wireless Setting is displayed, and start the WPS-PBC on your environment.
User Manual
Page 81
...-PSK-TKIP, and then set each item for Your Computer When you setup your wireless connection first time, the following information and click OK. b Right-click Wireless Network Connection and select Properties. c Select the Wireless Networks tab. g Click the Add button to Computer (ad hoc) ... enter the following settings are required on each item, see "Dell Printer Configuration Web Tool." 7 Click the Apply New Settings button to configure my wireless network settings is completed. Or you can change the wireless settings using the tool provided with the operating system. NOTE: For...
...-PSK-TKIP, and then set each item for Your Computer When you setup your wireless connection first time, the following information and click OK. b Right-click Wireless Network Connection and select Properties. c Select the Wireless Networks tab. g Click the Add button to Computer (ad hoc) ... enter the following settings are required on each item, see "Dell Printer Configuration Web Tool." 7 Click the Apply New Settings button to configure my wireless network settings is completed. Or you can change the wireless settings using the tool provided with the operating system. NOTE: For...

User Manual
Page 96
...DSL, you will need to disconnect the network cable. Contact your printer directly to a Digital Subscriber Line (DSL). For a wireless connection, see "Installing the Optional Wireless Adapter." To use an appropriate DSL filter. This may damage the printer. Connecting the Telephone Line NOTE: Do not connect ...of a telephone line cord into the wall jack connector and the other end to a LAN drop or hub. To setup a wireless connection, insert the wireless adapter into the wireless adapter socket on the rear of the printer, and the other end into an active wall jack. 94 Connecting Your...
...DSL, you will need to disconnect the network cable. Contact your printer directly to a Digital Subscriber Line (DSL). For a wireless connection, see "Installing the Optional Wireless Adapter." To use an appropriate DSL filter. This may damage the printer. Connecting the Telephone Line NOTE: Do not connect ...of a telephone line cord into the wall jack connector and the other end to a LAN drop or hub. To setup a wireless connection, insert the wireless adapter into the wireless adapter socket on the rear of the printer, and the other end into an active wall jack. 94 Connecting Your...

User Manual
Page 145
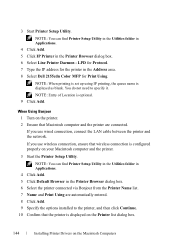
... connect the LAN cable between the printer and the Macintosh computer. 3 Start Printer Setup Utility. FILE LOCATION: C:\Users\fxstdpcadmin\Desktop\0630_UG??\Mioga_AIO_UG_FM\Mioga_AIO_UG_FM\section11.fm If you use wireless connection, ensure that wireless connection is configured properly on your Macintosh computer and the printer. When Using IP ...been installed on the printer. 2 Connect the USB cable between the printer and the network. NOTE: You can find Printer Setup Utility in the Utilities folder in Applications. 4 Click Add. 5 Click Default Browser in the Print & Fax dialog box.
... connect the LAN cable between the printer and the Macintosh computer. 3 Start Printer Setup Utility. FILE LOCATION: C:\Users\fxstdpcadmin\Desktop\0630_UG??\Mioga_AIO_UG_FM\Mioga_AIO_UG_FM\section11.fm If you use wireless connection, ensure that wireless connection is configured properly on your Macintosh computer and the printer. When Using IP ...been installed on the printer. 2 Connect the USB cable between the printer and the network. NOTE: You can find Printer Setup Utility in the Utilities folder in Applications. 4 Click Add. 5 Click Default Browser in the Print & Fax dialog box.
User Manual
Page 146
...for Protocol. 7 Type the IP address for Print Using. NOTE: Entry of Location is displayed as blank. If you use wireless connection, ensure that wireless connection is displayed on the printer. 2 Ensure that the printer is configured properly on the Macintosh Computers You do not need ... the LAN cable between the printer and the network. NOTE: You can find Printer Setup Utility in the Utilities folder in Applications. 4 Click Add. 5 Click Default Browser in the Address area. 8 Select Dell 2155cdn Color MFP for the printer in the Printer Browser dialog box. 6 Select the...
...for Protocol. 7 Type the IP address for Print Using. NOTE: Entry of Location is displayed as blank. If you use wireless connection, ensure that wireless connection is displayed on the printer. 2 Ensure that the printer is configured properly on the Macintosh Computers You do not need ... the LAN cable between the printer and the network. NOTE: You can find Printer Setup Utility in the Utilities folder in Applications. 4 Click Add. 5 Click Default Browser in the Address area. 8 Select Dell 2155cdn Color MFP for the printer in the Printer Browser dialog box. 6 Select the...
User Manual
Page 147
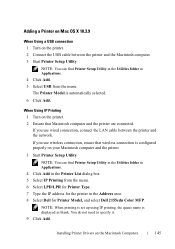
... OS X 10.3.9 When Using a USB connection 1 Turn on your Macintosh computer and the printer. 3 Start Printer Setup Utility. The Printer Model is displayed as blank. If you use wireless connection, ensure that Macintosh computer and the printer are connected. You do not need to specify it. 9 Click Add.... 2 Connect the USB cable between the printer and the network. NOTE: You can find Printer Setup Utility in the Utilities folder in Applications. 4 Click Add in the Address area. 8 Select Dell for the printer in the Printer List dialog box. 5 Select IP Printing from the menu.
... OS X 10.3.9 When Using a USB connection 1 Turn on your Macintosh computer and the printer. 3 Start Printer Setup Utility. The Printer Model is displayed as blank. If you use wireless connection, ensure that Macintosh computer and the printer are connected. You do not need to specify it. 9 Click Add.... 2 Connect the USB cable between the printer and the network. NOTE: You can find Printer Setup Utility in the Utilities folder in Applications. 4 Click Add in the Address area. 8 Select Dell for the printer in the Printer List dialog box. 5 Select IP Printing from the menu.
User Manual
Page 148
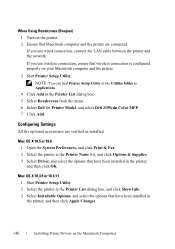
...cable between the printer and the network. NOTE: You can find Printer Setup Utility in the Utilities folder in Applications. 4 Click Add in the printer, and then click OK. If you use wireless connection, ensure that Macintosh computer and the printer are verified as installed. ..., and select the options that have been installed in the Printer List dialog box. 5 Select Rendezvous from the menu. 6 Select Dell for Printer Model, and select Dell 2155cdn Color MFP. 7 Click Add. DE LL CONFIDENTIAL - Configuring Settings All the optional accessories are connected. Mac OS X 10...
...cable between the printer and the network. NOTE: You can find Printer Setup Utility in the Utilities folder in Applications. 4 Click Add in the printer, and then click OK. If you use wireless connection, ensure that Macintosh computer and the printer are verified as installed. ..., and select the options that have been installed in the Printer List dialog box. 5 Select Rendezvous from the menu. 6 Select Dell for Printer Model, and select Dell 2155cdn Color MFP. 7 Click Add. DE LL CONFIDENTIAL - Configuring Settings All the optional accessories are connected. Mac OS X 10...

User Manual
Page 163
13 Dell Printer Configuration Web Tool Overview NOTE: This web tool is not available unless the printer is E-Mail Alert Setup, which sends e-mail to a network using a network cable or the wireless printer adapter. NOTE: The images used and procedures described in this manual are those of the Dell Printer Configuration Web Tool is connected to you or the key operator when the printer needs supplies or intervention. Dell Printer Configuration Web Tool 161 One of the features of Dell™ 2155cdn Multifunction Color Printer.
13 Dell Printer Configuration Web Tool Overview NOTE: This web tool is not available unless the printer is E-Mail Alert Setup, which sends e-mail to a network using a network cable or the wireless printer adapter. NOTE: The images used and procedures described in this manual are those of the Dell Printer Configuration Web Tool is connected to you or the key operator when the printer needs supplies or intervention. Dell Printer Configuration Web Tool 161 One of the features of Dell™ 2155cdn Multifunction Color Printer.
User Manual
Page 177
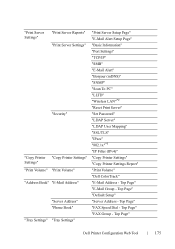
...Phone Book" "Tray Settings" "Tray Settings" "Print Server Setup Page" "E-Mail Alert Setup Page" "Basic Information" "Port Settings" "TCP/IP" "SMB" "E-Mail Alert" "Bonjour (mDNS)" "SNMP" "Scan To PC" "LLTD" "Wireless LAN"*2 "Reset Print Server" "Set Password" "LDAP ...Server" "LDAP User Mapping" "SSL/TLS" "IPsec" "802.1x"*3 "IP Filter (IPv4)" "Copy Printer Settings" "Copy Printer Settings Report" "Print Volume" "Dell...
...Phone Book" "Tray Settings" "Tray Settings" "Print Server Setup Page" "E-Mail Alert Setup Page" "Basic Information" "Port Settings" "TCP/IP" "SMB" "E-Mail Alert" "Bonjour (mDNS)" "SNMP" "Scan To PC" "LLTD" "Wireless LAN"*2 "Reset Print Server" "Set Password" "LDAP ...Server" "LDAP User Mapping" "SSL/TLS" "IPsec" "802.1x"*3 "IP Filter (IPv4)" "Copy Printer Settings" "Copy Printer Settings Report" "Print Volume" "Dell...

User Manual
Page 485
Wireless Setup NOTE: Wireless Setup is available only when the printer is connected using the wireless network. Values: Connection SSID Encryption Type Good Acceptable Low No Reception Displays the name that identifies the wireless network. Values: Understanding the Printer Menus 483 Displays the encryption type. Purpose: To configure the wireless network interface. Purpose: To confirm the wireless communication status. Wireless Status NOTE: Wireless Status feature is available only when the printer is connected using the wireless network.
Wireless Setup NOTE: Wireless Setup is available only when the printer is connected using the wireless network. Values: Connection SSID Encryption Type Good Acceptable Low No Reception Displays the name that identifies the wireless network. Values: Understanding the Printer Menus 483 Displays the encryption type. Purpose: To configure the wireless network interface. Purpose: To confirm the wireless communication status. Wireless Status NOTE: Wireless Status feature is available only when the printer is connected using the wireless network.


