Owner's Manual
Page 6
... System 44 Status Monitor Center 44 Printing Status Window 44 Printer Supplies Reorder Application 45 Dell Local Printer Settings Utility 45 Set IP Address Utility 45 Dell Printer Software Uninstall 46 Driver Profiler 46 Dell Printer Configuration Web Tool 47 6 Troubleshooting Basic Problems 50 Replacing the Toner Cartridge 54 Replacing the Imaging Drum 57 Clearing Paper Jams 60 6 Contents
... System 44 Status Monitor Center 44 Printing Status Window 44 Printer Supplies Reorder Application 45 Dell Local Printer Settings Utility 45 Set IP Address Utility 45 Dell Printer Software Uninstall 46 Driver Profiler 46 Dell Printer Configuration Web Tool 47 6 Troubleshooting Basic Problems 50 Replacing the Toner Cartridge 54 Replacing the Imaging Drum 57 Clearing Paper Jams 60 6 Contents
Owner's Manual
Page 14
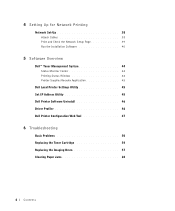
...dell.com/supplies | support.dell.com Installing the 550-Sheet Optional Drawer Your printer supports one optional drawer that lets you load up the printer, turn the printer off and unplug the power cord before continuing. 1 Unpack the 550-sheet drawer and remove any packing material. 2 Place the drawer in the printer... with the positioning posts on page 15 for your printer. Specifying the media type and size loaded into each tray will help prevent jams. See "Configuring the Paper Trays" on the 550-sheet drawer and lower the printer into place. NOTE: If ...
...dell.com/supplies | support.dell.com Installing the 550-Sheet Optional Drawer Your printer supports one optional drawer that lets you load up the printer, turn the printer off and unplug the power cord before continuing. 1 Unpack the 550-sheet drawer and remove any packing material. 2 Place the drawer in the printer... with the positioning posts on page 15 for your printer. Specifying the media type and size loaded into each tray will help prevent jams. See "Configuring the Paper Trays" on the 550-sheet drawer and lower the printer into place. NOTE: If ...
Owner's Manual
Page 25
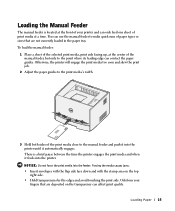
Forcing the media causes jams. • Insert envelopes with the flap side face down and with the stamp area on the transparency can use the manual feeder to make quick runs of the print media close to the manual feeder and push it into the printer until it feeds into the feeder...to the print media's width. 3 Hold both sides of paper types or sizes that are not currently loaded in the paper tray. There is located at a time. Loading Paper 25 You can affect print quality. NOTICE: Do not force the print media into the printer. To load the manual feeder: 1 Place a sheet of...
Forcing the media causes jams. • Insert envelopes with the flap side face down and with the stamp area on the transparency can use the manual feeder to make quick runs of the print media close to the manual feeder and push it into the printer until it feeds into the feeder...to the print media's width. 3 Hold both sides of paper types or sizes that are not currently loaded in the paper tray. There is located at a time. Loading Paper 25 You can affect print quality. NOTICE: Do not force the print media into the printer. To load the manual feeder: 1 Place a sheet of...
Owner's Manual
Page 26
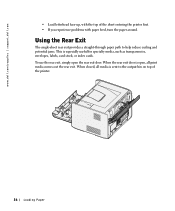
... the output bin on top of the sheet entering the printer first. • If you experience problems with paper feed, turn the paper around. To use the rear exit, simply open , all media is sent to help reduce curling and potential jams. This is open the rear exit door. When closed,... all print media comes out the rear exit. When the rear exit door is especially useful for specialty media, such as transparencies, envelopes, labels, card stock, or index cards. www.dell.com/supplies | support.dell.com •...
... the output bin on top of the sheet entering the printer first. • If you experience problems with paper feed, turn the paper around. To use the rear exit, simply open , all media is sent to help reduce curling and potential jams. This is open the rear exit door. When closed,... all print media comes out the rear exit. When the rear exit door is especially useful for specialty media, such as transparencies, envelopes, labels, card stock, or index cards. www.dell.com/supplies | support.dell.com •...
Owner's Manual
Page 27
... not use envelopes that: - CAUTION: Your product uses a printing process that discusses the guidelines for selecting appropriate print media to release emissions. Loading Paper 27 To reduce paper jams, do not use labels that have exposed adhesive on the sheets. • Do not print a large number of labels continuously. • Use ...heats the print media, and heat can cause certain media to avoid the possibility of harmful emissions. • Use 20 lb (75 g/m2) xerographic paper. • Use transparencies designed for laser printers. • Use envelopes made from 24 lb (90 g/m2) bond...
... not use envelopes that: - CAUTION: Your product uses a printing process that discusses the guidelines for selecting appropriate print media to release emissions. Loading Paper 27 To reduce paper jams, do not use labels that have exposed adhesive on the sheets. • Do not print a large number of labels continuously. • Use ...heats the print media, and heat can cause certain media to avoid the possibility of harmful emissions. • Use 20 lb (75 g/m2) xerographic paper. • Use transparencies designed for laser printers. • Use envelopes made from 24 lb (90 g/m2) bond...
Owner's Manual
Page 53
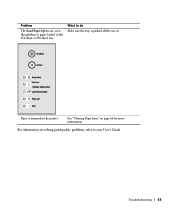
See "Clearing Paper Jams" on page 60 for more information. Troubleshooting 53 For information on solving print quality problems, refer to do Make sure the tray is pushed all the way in. Paper is paper loaded in the 250-sheet or 550-sheet tray. What to your User's Guide. Problem The Load Paper light is on, even though there is jammed in the printer.
See "Clearing Paper Jams" on page 60 for more information. Troubleshooting 53 For information on solving print quality problems, refer to do Make sure the tray is pushed all the way in. Paper is paper loaded in the 250-sheet or 550-sheet tray. What to your User's Guide. Problem The Load Paper light is on, even though there is jammed in the printer.
Owner's Manual
Page 60
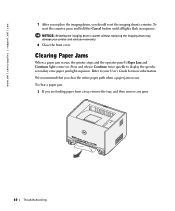
Clearing Paper Jams When a paper jam occurs, the printer stops and the operator panel's Paper Jam and Continue lights come on. We recommend that you should reset the imaging drum's counter. Press and release Continue twice quickly to your warranty. 8 Close the front cover. www.dell.com/supplies | support.dell.com 7 After you replace the imaging drum, you clear the...
Clearing Paper Jams When a paper jam occurs, the printer stops and the operator panel's Paper Jam and Continue lights come on. We recommend that you should reset the imaging drum's counter. Press and release Continue twice quickly to your warranty. 8 Close the front cover. www.dell.com/supplies | support.dell.com 7 After you replace the imaging drum, you clear the...
Owner's Manual
Page 62
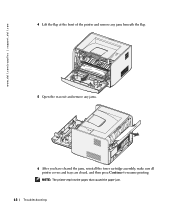
www.dell.com/supplies | support.dell.com 4 Lift the flap at the front of the printer and remove any jams beneath the flap. 5 Open the rear exit and remove any jams. 6 After you have cleared the jams, reinstall the toner cartridge assembly, make sure all printer covers and trays are closed, and then press Continue to resume printing. NOTE: The printer reprints the pages that caused the paper jam. 62 Troubleshooting
www.dell.com/supplies | support.dell.com 4 Lift the flap at the front of the printer and remove any jams beneath the flap. 5 Open the rear exit and remove any jams. 6 After you have cleared the jams, reinstall the toner cartridge assembly, make sure all printer covers and trays are closed, and then press Continue to resume printing. NOTE: The printer reprints the pages that caused the paper jam. 62 Troubleshooting
Owner's Manual
Page 101
Index C card stock sizes and weights, 28 cards, installing, 17 clearing paper jams, 60 connect the printer Ethernet cable, 38 parallel cable, 30 USB cable, 30 D Dell contacting, 65 Dell Toner Management System, 44 driver profiler, using, 46 E envelopes sizes and weights, 28 Ethernet cable, connecting, 38 I imaging drum replacing, 57 installing optional cards, 17 ...
Index C card stock sizes and weights, 28 cards, installing, 17 clearing paper jams, 60 connect the printer Ethernet cable, 38 parallel cable, 30 USB cable, 30 D Dell contacting, 65 Dell Toner Management System, 44 driver profiler, using, 46 E envelopes sizes and weights, 28 Ethernet cable, connecting, 38 I imaging drum replacing, 57 installing optional cards, 17 ...
Owner's Manual
Page 102
... settings page, 39 network, 37 network setup page, 39 clearing paper jams, 60 replacing the imaging drum, 57 replacing the toner cartridge, 54 S set IP address utility, using, 45 software applications Dell Toner Management System, 44 driver profiler, 46 local printer settings utility, 45 printer supplies reorder application, 45 set IP address utility, 45 status...
... settings page, 39 network, 37 network setup page, 39 clearing paper jams, 60 replacing the imaging drum, 57 replacing the toner cartridge, 54 S set IP address utility, using, 45 software applications Dell Toner Management System, 44 driver profiler, 46 local printer settings utility, 45 printer supplies reorder application, 45 set IP address utility, 45 status...


