Owner's Manual
Page 3
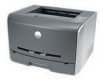
NOTE: You cannot access your User's Guide until you have installed the drivers for your User's Guide, click Start→Programs or All Programs→Dell Printers→Dell Laser Printer 1700→User's Guide. www.dell.com/supplies | support.dell.com Dell™ Laser Printer 1700 4 5 3 6 2 1 7 1 Optional 550-sheet tray 2 250-sheet tray 3 Manual feed slot 4 Paper guide 5 Output bin 6 Operator panel 7 Front cover Accessing your User's Guide To access your printer.
NOTE: You cannot access your User's Guide until you have installed the drivers for your User's Guide, click Start→Programs or All Programs→Dell Printers→Dell Laser Printer 1700→User's Guide. www.dell.com/supplies | support.dell.com Dell™ Laser Printer 1700 4 5 3 6 2 1 7 1 Optional 550-sheet tray 2 250-sheet tray 3 Manual feed slot 4 Paper guide 5 Output bin 6 Operator panel 7 Front cover Accessing your User's Guide To access your printer.
Owner's Manual
Page 4
... and Windows are provided with the limits for property damage, personal injury, or death. Information in this document to refer to either potential damage to hardware or loss of data and tells you make better use of the FCC rules. CAUTION: A CAUTION indicates a potential for a Class B digital device, pursuant to Part 15 of your printer. is a trademark of Dell...
... and Windows are provided with the limits for property damage, personal injury, or death. Information in this document to refer to either potential damage to hardware or loss of data and tells you make better use of the FCC rules. CAUTION: A CAUTION indicates a potential for a Class B digital device, pursuant to Part 15 of your printer. is a trademark of Dell...
Owner's Manual
Page 6
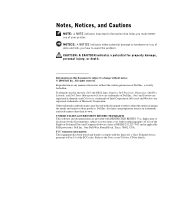
4 Setting Up for Network Printing Network Set-Up 38 Attach Cables 38 Print and Check the Network Setup Page 39 Run the Installation Software 40 5 Software Overview Dell™ Toner Management System 44 Status Monitor Center 44 Printing Status Window 44 Printer Supplies Reorder Application 45 Dell Local Printer Settings Utility 45 Set IP Address Utility 45 Dell Printer Software Uninstall 46 Driver Profiler 46 Dell Printer Configuration Web Tool 47 6 Troubleshooting Basic Problems 50 Replacing the Toner Cartridge 54 Replacing the Imaging Drum 57 Clearing Paper Jams 60 6 ...
4 Setting Up for Network Printing Network Set-Up 38 Attach Cables 38 Print and Check the Network Setup Page 39 Run the Installation Software 40 5 Software Overview Dell™ Toner Management System 44 Status Monitor Center 44 Printing Status Window 44 Printer Supplies Reorder Application 45 Dell Local Printer Settings Utility 45 Set IP Address Utility 45 Dell Printer Software Uninstall 46 Driver Profiler 46 Dell Printer Configuration Web Tool 47 6 Troubleshooting Basic Problems 50 Replacing the Toner Cartridge 54 Replacing the Imaging Drum 57 Clearing Paper Jams 60 6 ...
Owner's Manual
Page 15
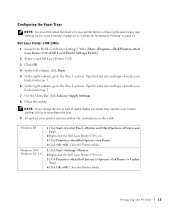
Configuring the Paper Trays NOTE: You must first install the drivers for Network Printing" on page 37. Specify what size and type of media you loaded into tray 1. 6 In the right column, go to reconfigure the tray. 9 To update your printer options, follow the instructions in the table. Close the Printers folder. Windows XP Windows 2000 Windows NT 4.0 1 Click Start→Control Panel→Printers and Other Hardware→Printers and Faxes. 2 Right-click the Dell Laser Printer 1700 icon. 3 Click...
Configuring the Paper Trays NOTE: You must first install the drivers for Network Printing" on page 37. Specify what size and type of media you loaded into tray 1. 6 In the right column, go to reconfigure the tray. 9 To update your printer options, follow the instructions in the table. Close the Printers folder. Windows XP Windows 2000 Windows NT 4.0 1 Click Start→Control Panel→Printers and Other Hardware→Printers and Faxes. 2 Right-click the Dell Laser Printer 1700 icon. 3 Click...
Owner's Manual
Page 16
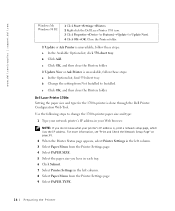
... Dell Laser Printer 1700 icon. 3 Click Properties→Device (or Features)→Update (or Update Now). 4 Click OK→OK. If Update or Ask Printer is done through the Dell Printer Configuration Web Tool. For more information, see "Print and Check the Network Setup Page" on page 39. 2 When the Printer Status page appears, select Printer Settings in the left column. 8 Select Paper Menu from Not Installed to Installed. b Click Add. If Update Now or Ask Printer is , print a network setup page, which lists the IP address...
... Dell Laser Printer 1700 icon. 3 Click Properties→Device (or Features)→Update (or Update Now). 4 Click OK→OK. If Update or Ask Printer is done through the Dell Printer Configuration Web Tool. For more information, see "Print and Check the Network Setup Page" on page 39. 2 When the Printer Status page appears, select Printer Settings in the left column. 8 Select Paper Menu from Not Installed to Installed. b Click Add. If Update Now or Ask Printer is , print a network setup page, which lists the IP address...
Owner's Manual
Page 30
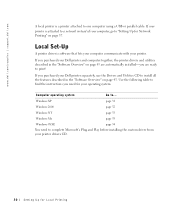
... print! Use the following table to find the instructions you are ready to complete Microsoft's Plug and Play before installing the custom driver from your Dell printer and computer together, the printer drivers and utilities described in the "Software Overview" on page 37. If you purchased your printer drivers CD. 30 Setting Up for Local Printing Windows XP page 31 Windows 2000 page 32 Windows NT page 33 Windows Me page 33 Windows 98 SE page...
... print! Use the following table to find the instructions you are ready to complete Microsoft's Plug and Play before installing the custom driver from your Dell printer and computer together, the printer drivers and utilities described in the "Software Overview" on page 37. If you purchased your printer drivers CD. 30 Setting Up for Local Printing Windows XP page 31 Windows 2000 page 32 Windows NT page 33 Windows Me page 33 Windows 98 SE page...
Owner's Manual
Page 31
... Printing 31 Setting Up for your printer. 7 Select your computer. Using Windows XP With a USB or Parallel Cable NOTE: Windows XP Professional requires that you have administrative access to install printer drivers on your CD), and then click OK. 6 When the Drivers and Utilities CD screen appears, click Personal Installation - If the CD does not automatically launch, click Start→Run, type D:\setup.exe (where D is the drive letter...
... Printing 31 Setting Up for your printer. 7 Select your computer. Using Windows XP With a USB or Parallel Cable NOTE: Windows XP Professional requires that you have administrative access to install printer drivers on your CD), and then click OK. 6 When the Drivers and Utilities CD screen appears, click Personal Installation - If the CD does not automatically launch, click Start→Run, type D:\setup.exe (where D is the drive letter...
Owner's Manual
Page 32
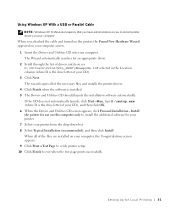
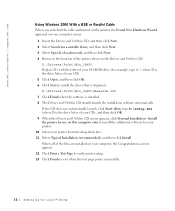
..., type D:\setup.exe (where D is the drive letter of the printer driver on the Drivers and Utilities CD. www.dell.com/supplies | support.dell.com Using Windows 2000 With a USB or Parallel Cable When you attached the cable and turned on the printer, the Found New Hardware Wizard appeared on your computer, the Congratulations screen appears. 12 Click Print a Test Page to verify printer setup. 13 Click Finish to exit when the test page prints successfully. 32 Setting...
..., type D:\setup.exe (where D is the drive letter of the printer driver on the Drivers and Utilities CD. www.dell.com/supplies | support.dell.com Using Windows 2000 With a USB or Parallel Cable When you attached the cable and turned on the printer, the Found New Hardware Wizard appeared on your computer, the Congratulations screen appears. 12 Click Print a Test Page to verify printer setup. 13 Click Finish to exit when the test page prints successfully. 32 Setting...

Owner's Manual
Page 33
... administrative access to install printer drivers on your computer, your screens may vary from those in the instructions. Setting Up for the USB driver on the screen (where D is found, click Finish. 3 Select Automatic search for the best driver (recommended), and then click Next. If you must install both a USB port driver and a custom print driver. Using Windows Me With a USB or Parallel Cable NOTE: Depending on the software and printers already installed...
... administrative access to install printer drivers on your computer, your screens may vary from those in the instructions. Setting Up for the USB driver on the screen (where D is found, click Finish. 3 Select Automatic search for the best driver (recommended), and then click Next. If you must install both a USB port driver and a custom print driver. Using Windows Me With a USB or Parallel Cable NOTE: Depending on the software and printers already installed...

Owner's Manual
Page 34
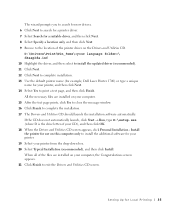
... must install both a USB port driver and a custom print driver. If the CD does not automatically launch, click Start→Run, type D:\setup.exe (where D is installed, click Finish. 34 Setting Up for Local Printing www.dell.com/supplies | support.dell.com 7 Use the default printer name (for example, Dell Laser Printer 1700) or type a unique name for your printer, and then click Next. 8 Click Yes (recommended), and then click Finish to print a test page. 9 After the test page prints, click...
... must install both a USB port driver and a custom print driver. If the CD does not automatically launch, click Start→Run, type D:\setup.exe (where D is installed, click Finish. 34 Setting Up for Local Printing www.dell.com/supplies | support.dell.com 7 Use the default printer name (for example, Dell Laser Printer 1700) or type a unique name for your printer, and then click Next. 8 Click Yes (recommended), and then click Finish to print a test page. 9 After the test page prints, click...
Owner's Manual
Page 35
... files are installed on this computer only to print a test page, and then click Finish. D:\Drivers\Print\Win_9xme\\ dkaag2da.inf 10 Highlight the driver, and then select to install the updated driver (recommended). 11 Click Next. 12 Click Next to complete installation. 13 Use the default printer name (for example, Dell Laser Printer 1700) or type a unique name for your printer, and then click Next. 14 Select Yes to install the additional software...
... files are installed on this computer only to print a test page, and then click Finish. D:\Drivers\Print\Win_9xme\\ dkaag2da.inf 10 Highlight the driver, and then select to install the updated driver (recommended). 11 Click Next. 12 Click Next to complete installation. 13 Use the default printer name (for example, Dell Laser Printer 1700) or type a unique name for your printer, and then click Next. 14 Select Yes to install the additional software...
Owner's Manual
Page 44
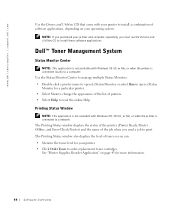
Use the Status Monitor Center to manage multiple Status Monitors. • Double-click a printer name to open its Status Monitor, or select Run to open a Status Monitor for more information. 44 Software Overview The Printing Status window displays the status of the printer (Printer Ready, Printer Offline, and Error-Check Printer) and the name of printers. • Select Help to read the online Help. See "Printer Supplies Reorder Application" on your printer to install a combination of toner so you send a job to...
Use the Status Monitor Center to manage multiple Status Monitors. • Double-click a printer name to open its Status Monitor, or select Run to open a Status Monitor for more information. 44 Software Overview The Printing Status window displays the status of the printer (Printer Ready, Printer Offline, and Error-Check Printer) and the name of printers. • Select Help to read the online Help. See "Printer Supplies Reorder Application" on your printer to install a combination of toner so you send a job to...
Owner's Manual
Page 45
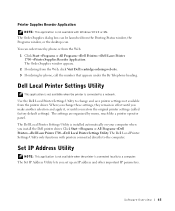
... the Printing Status window, the Programs window, or the desktop icon. The Set IP Address Utility lets you restore the original printer settings (called factory default settings). Dell Local Printer Settings Utility This application is not available when the printer is installed automatically on your computer when you install the Dell printer driver. You can be launched from the Web. 1 Click Start→Programs or All Programs→Dell Printers→Dell Laser Printer 1700→Printer Supplies Reorder...
... the Printing Status window, the Programs window, or the desktop icon. The Set IP Address Utility lets you restore the original printer settings (called factory default settings). Dell Local Printer Settings Utility This application is not available when the printer is installed automatically on your computer when you install the Dell printer driver. You can be launched from the Web. 1 Click Start→Programs or All Programs→Dell Printers→Dell Laser Printer 1700→Printer Supplies Reorder...
Owner's Manual
Page 50
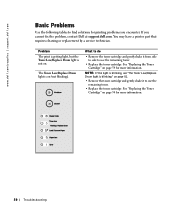
... "Replacing the Toner Cartridge" on page 51. • Remove the toner cartridge and gently shake it from side to side to use the remaining toner. • Replace the toner cartridge. on page 54 for more information. 50 Troubleshooting You may have a printer part that requires cleaning or replacement by a service technician. NOTE: If the light is blinking, see "The Toner Low/Replace Drum light is blinking." www.dell.com/supplies | support.dell.com Basic Problems Use the following tables to find solutions for printing problems you cannot fix...
... "Replacing the Toner Cartridge" on page 51. • Remove the toner cartridge and gently shake it from side to side to use the remaining toner. • Replace the toner cartridge. on page 54 for more information. 50 Troubleshooting You may have a printer part that requires cleaning or replacement by a service technician. NOTE: If the light is blinking, see "The Toner Low/Replace Drum light is blinking." www.dell.com/supplies | support.dell.com Basic Problems Use the following tables to find solutions for printing problems you cannot fix...
Owner's Manual
Page 53
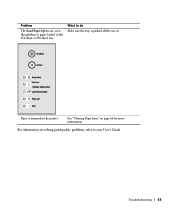
Problem The Load Paper light is on page 60 for more information. For information on solving print quality problems, refer to do Make sure the tray is pushed all the way in. See "Clearing Paper Jams" on , even though there is jammed in the 250-sheet or 550-sheet tray. What to your User's Guide. Troubleshooting 53 Paper is paper loaded in the printer.
Problem The Load Paper light is on page 60 for more information. For information on solving print quality problems, refer to do Make sure the tray is pushed all the way in. See "Clearing Paper Jams" on , even though there is jammed in the 250-sheet or 550-sheet tray. What to your User's Guide. Troubleshooting 53 Paper is paper loaded in the printer.

Owner's Manual
Page 54
www.dell.com/supplies | support.dell.com Replacing the Toner Cartridge CAUTION: When replacing a toner cartridge, do not leave the new cartridge exposed to direct light for an extended period of the toner cartridge assembly. 54 Troubleshooting Extended light exposure can cause print quality problems. 1 Open the front cover by pressing the button on the left side of the printer and lowering the cover. 2 Remove the toner cartridge: a Press the button on the base of time.
www.dell.com/supplies | support.dell.com Replacing the Toner Cartridge CAUTION: When replacing a toner cartridge, do not leave the new cartridge exposed to direct light for an extended period of the toner cartridge assembly. 54 Troubleshooting Extended light exposure can cause print quality problems. 1 Open the front cover by pressing the button on the left side of the printer and lowering the cover. 2 Remove the toner cartridge: a Press the button on the base of time.
Owner's Manual
Page 84
... follow the product instructions or failure to the Dell-branded hardware products through our factory-integration system, third-party software, or the reloading of software • Non-Dell-branded and Solution Provider Direct products and accessories • Problems that is not in accordance with your hardware product(s), see your -our end-user customer's- This limited warranty covers defects in materials...
... follow the product instructions or failure to the Dell-branded hardware products through our factory-integration system, third-party software, or the reloading of software • Non-Dell-branded and Solution Provider Direct products and accessories • Problems that is not in accordance with your hardware product(s), see your -our end-user customer's- This limited warranty covers defects in materials...
Owner's Manual
Page 89
Servicing not authorized by Dell • Products with missing or altered service tags or serial numbers • Products for Dell-branded projectors lasts only ninety days. DELL'S RESPONSIBILITY FOR MALFUNCTIONS AND DEFECTS IN PRODUCT IS LIMITED TO REPAIR AND REPLACEMENT AS SET FORTH IN THIS WARRANTY STATEMENT, FOR THE TERM OF THE WARRANTY PERIOD REFLECTED ON YOUR PACKING SLIP OR INVOICE. WE...
Servicing not authorized by Dell • Products with missing or altered service tags or serial numbers • Products for Dell-branded projectors lasts only ninety days. DELL'S RESPONSIBILITY FOR MALFUNCTIONS AND DEFECTS IN PRODUCT IS LIMITED TO REPAIR AND REPLACEMENT AS SET FORTH IN THIS WARRANTY STATEMENT, FOR THE TERM OF THE WARRANTY PERIOD REFLECTED ON YOUR PACKING SLIP OR INVOICE. WE...
Owner's Manual
Page 93
... authorized Dell distributor in performing repairs and building replacement products. The end user must call Dell Customer Service at Dell's expense. To return products, you must always supply proof of purchase, indicating name and address of the seller, date of purchase, model and serial number, name and address of the customer, and details of symptoms and configuration at the time of Dell's limited warranties are made by Dell. Products...
... authorized Dell distributor in performing repairs and building replacement products. The end user must call Dell Customer Service at Dell's expense. To return products, you must always supply proof of purchase, indicating name and address of the seller, date of purchase, model and serial number, name and address of the customer, and details of symptoms and configuration at the time of Dell's limited warranties are made by Dell. Products...
Owner's Manual
Page 101
... I imaging drum replacing, 57 installing optional cards, 17 optional drawer, 14 optional memory, 17 printer drivers using Windows 2000, 32 using Windows 98, 34 using Windows Me, 33 using Windows NT, 33 using Windows XP, 31 J jams, 60 L labels sizes and weights, 28 loading paper standard and optional trays, 22 local printer settings utility, using, 45 M media, 28 types and sizes, 28 memory, installing, 17 O optional drawer, installing, 14 ordering supplies, 2 P paper jams, 60 sizes and weights, 28 paper jams clearing, 60 parallel cable, connecting, 30 photoconductor kit see imaging drum print...
... I imaging drum replacing, 57 installing optional cards, 17 optional drawer, 14 optional memory, 17 printer drivers using Windows 2000, 32 using Windows 98, 34 using Windows Me, 33 using Windows NT, 33 using Windows XP, 31 J jams, 60 L labels sizes and weights, 28 loading paper standard and optional trays, 22 local printer settings utility, using, 45 M media, 28 types and sizes, 28 memory, installing, 17 O optional drawer, installing, 14 ordering supplies, 2 P paper jams, 60 sizes and weights, 28 paper jams clearing, 60 parallel cable, connecting, 30 photoconductor kit see imaging drum print...


