Owner's Manual
Page 2
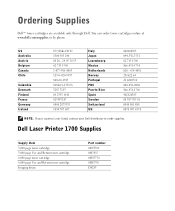
Dell Laser Printer 1700 Supplies Supply Item 3,000 page toner cartridge 3,000 page Use and Return toner cartridge 6,000 page toner cartridge 6,000 page Use and Return toner cartridge Imaging drum Part number 00N3769 00J3815 00H3730 00K3756 D4283 Ordering Supplies Dell™ toner cartridges are available only through Dell.... You can order toner cartridges online at www.dell.com/supplies or by phone. US Australia Austria Belgium Canada Chile...
Dell Laser Printer 1700 Supplies Supply Item 3,000 page toner cartridge 3,000 page Use and Return toner cartridge 6,000 page toner cartridge 6,000 page Use and Return toner cartridge Imaging drum Part number 00N3769 00J3815 00H3730 00K3756 D4283 Ordering Supplies Dell™ toner cartridges are available only through Dell.... You can order toner cartridges online at www.dell.com/supplies or by phone. US Australia Austria Belgium Canada Chile...
Owner's Manual
Page 3
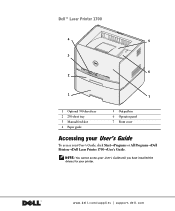
Dell™ Laser Printer 1700 4 5 3 6 2 1 7 1 Optional 550-sheet tray 2 250-sheet tray 3 Manual feed slot 4 Paper guide 5 Output bin 6 Operator panel 7 Front cover Accessing your User's Guide To access your printer. www.dell.com/supplies | support.dell.com NOTE: You cannot access your User's Guide until you have installed the drivers for your User's Guide, click Start→Programs or All Programs→Dell Printers→Dell Laser Printer 1700→User's Guide.
Dell™ Laser Printer 1700 4 5 3 6 2 1 7 1 Optional 550-sheet tray 2 250-sheet tray 3 Manual feed slot 4 Paper guide 5 Output bin 6 Operator panel 7 Front cover Accessing your User's Guide To access your printer. www.dell.com/supplies | support.dell.com NOTE: You cannot access your User's Guide until you have installed the drivers for your User's Guide, click Start→Programs or All Programs→Dell Printers→Dell Laser Printer 1700→User's Guide.
Owner's Manual
Page 4
..., and Dell Toner Management System are trademarks of Dell Inc. All rights reserved. is a trademark of the FCC rules. Other trademarks and trade names may be used in this document to refer to either potential damage to hardware or loss of your printer. Use,... duplication or disclosure by the Government is subject to restrictions as set forth in this document is subject to the Drivers and Utilities CD for details. Refer to change without the written permission of Dell Inc.; Intel and Pentium are provided with the limits for property damage, personal...
..., and Dell Toner Management System are trademarks of Dell Inc. All rights reserved. is a trademark of the FCC rules. Other trademarks and trade names may be used in this document to refer to either potential damage to hardware or loss of your printer. Use,... duplication or disclosure by the Government is subject to restrictions as set forth in this document is subject to the Drivers and Utilities CD for details. Refer to change without the written permission of Dell Inc.; Intel and Pentium are provided with the limits for property damage, personal...
Owner's Manual
Page 5
Contents 1 Preparing the Printer Replacing the Operator Panel Overlay 12 Installing the 550-Sheet Optional Drawer 14 Configuring the Paper Trays 15 Installing an Optional Memory Card 17 2 Loading ...
Contents 1 Preparing the Printer Replacing the Operator Panel Overlay 12 Installing the 550-Sheet Optional Drawer 14 Configuring the Paper Trays 15 Installing an Optional Memory Card 17 2 Loading ...
Owner's Manual
Page 6
...; Toner Management System 44 Status Monitor Center 44 Printing Status Window 44 Printer Supplies Reorder Application 45 Dell Local Printer Settings Utility 45 Set IP Address Utility 45 Dell Printer Software Uninstall 46 Driver Profiler 46 Dell Printer Configuration Web Tool 47 6 Troubleshooting Basic Problems 50 Replacing the Toner Cartridge 54 Replacing the Imaging Drum 57 Clearing...
...; Toner Management System 44 Status Monitor Center 44 Printing Status Window 44 Printer Supplies Reorder Application 45 Dell Local Printer Settings Utility 45 Set IP Address Utility 45 Dell Printer Software Uninstall 46 Driver Profiler 46 Dell Printer Configuration Web Tool 47 6 Troubleshooting Basic Problems 50 Replacing the Toner Cartridge 54 Replacing the Imaging Drum 57 Clearing...
Owner's Manual
Page 11
1 SECTION 1 Preparing the Printer Replacing the Operator Panel Overlay Installing the 550-Sheet Optional Drawer Installing an Optional Memory Card
1 SECTION 1 Preparing the Printer Replacing the Operator Panel Overlay Installing the 550-Sheet Optional Drawer Installing an Optional Memory Card
Owner's Manual
Page 12
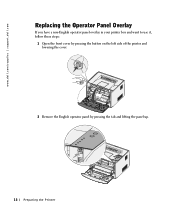
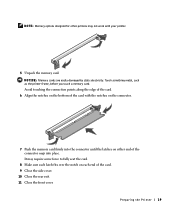
www.dell.com/supplies | support.dell.com Replacing the Operator Panel Overlay If you have a non-English operator panel overlay in your printer box and want to use it, follow these steps: 1 Open the front cover by pressing the button on the left side of the printer and lowering the cover. 2 Remove the English operator panel by pressing the tab and lifting the panel up. 12 Preparing the Printer
www.dell.com/supplies | support.dell.com Replacing the Operator Panel Overlay If you have a non-English operator panel overlay in your printer box and want to use it, follow these steps: 1 Open the front cover by pressing the button on the left side of the printer and lowering the cover. 2 Remove the English operator panel by pressing the tab and lifting the panel up. 12 Preparing the Printer

Owner's Manual
Page 13
3 Snap the non-English operator panel into place. 4 Close the front cover. Preparing the Printer 13
3 Snap the non-English operator panel into place. 4 Close the front cover. Preparing the Printer 13
Owner's Manual
Page 14
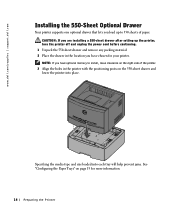
... jams. See "Configuring the Paper Trays" on page 15 for your printer. Specifying the media type and size loaded into place. www.dell.com/supplies | support.dell.com Installing the 550-Sheet Optional Drawer Your printer supports one optional drawer that lets you have chosen for more information.... 14 Preparing the Printer CAUTION: If you are installing a 550-sheet drawer ...
... jams. See "Configuring the Paper Trays" on page 15 for your printer. Specifying the media type and size loaded into place. www.dell.com/supplies | support.dell.com Installing the 550-Sheet Optional Drawer Your printer supports one optional drawer that lets you have chosen for more information.... 14 Preparing the Printer CAUTION: If you are installing a 550-sheet drawer ...
Owner's Manual
Page 15
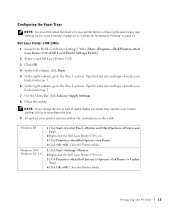
... type of media you loaded into tray 1. 6 In the right column, go to the Tray 2 section. Dell Laser Printer 1700/1700n 1 Launch the Dell Local Printer Settings Utility (Start→Programs→Dell Printers→Dell Laser Printer 1700→Dell Local Printer Settings Utility). 2 Select your printer options, follow the instructions in the table. NOTE: If you loaded into either tray, use the Local...
... type of media you loaded into tray 1. 6 In the right column, go to the Tray 2 section. Dell Laser Printer 1700/1700n 1 Launch the Dell Local Printer Settings Utility (Start→Programs→Dell Printers→Dell Laser Printer 1700→Dell Local Printer Settings Utility). 2 Select your printer options, follow the instructions in the table. NOTE: If you loaded into either tray, use the Local...
Owner's Manual
Page 16
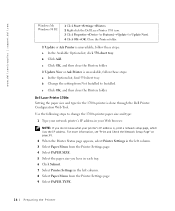
... Windows Me Windows 98 SE 1 Click Start→Settings→Printers. 2 Right-click the Dell Laser Printer 1700 icon. 3 Click Properties→Device (or Features)→Update (or Update Now). 4 Click OK→OK. If Update or Ask Printer is , print a network setup page, which lists the IP address. b Click Add. c Click OK, and then close...
... Windows Me Windows 98 SE 1 Click Start→Settings→Printers. 2 Right-click the Dell Laser Printer 1700 icon. 3 Click Properties→Device (or Features)→Update (or Update Now). 4 Click OK→OK. If Update or Ask Printer is , print a network setup page, which lists the IP address. b Click Add. c Click OK, and then close...

Owner's Manual
Page 17
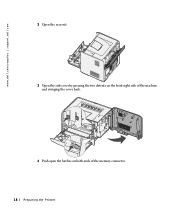
Installing an Optional Memory Card The system board has one connector for an optional memory card. The printer can support up the printer, turn the printer off and unplug the power cord before continuing. 1 Open the front cover by pressing the button on the left side of 160MB for a network printer and 144MB for a non-network printer). CAUTION: If you have in each tray. 11 Click Submit. Preparing the Printer 17 10 Select the paper type you are installing a memory card after setting up to 128MB (for a total of the printer and lowering the cover.
Installing an Optional Memory Card The system board has one connector for an optional memory card. The printer can support up the printer, turn the printer off and unplug the power cord before continuing. 1 Open the front cover by pressing the button on the left side of 160MB for a network printer and 144MB for a non-network printer). CAUTION: If you have in each tray. 11 Click Submit. Preparing the Printer 17 10 Select the paper type you are installing a memory card after setting up to 128MB (for a total of the printer and lowering the cover.
Owner's Manual
Page 18
www.dell.com/supplies | support.dell.com 2 Open the rear exit. 3 Open the side cover by pressing the two detents on the front right side of the machine and swinging the cover back. 4 Push open the latches on both ends of the memory connector. 18 Preparing the Printer
www.dell.com/supplies | support.dell.com 2 Open the rear exit. 3 Open the side cover by pressing the two detents on the front right side of the machine and swinging the cover back. 4 Push open the latches on both ends of the memory connector. 18 Preparing the Printer
Owner's Manual
Page 19
..., before you touch a memory card. NOTICE: Memory cards are easily damaged by static electricity. Preparing the Printer 19 It may not work with the notches on the connector. 7 Push the memory card firmly into the connector until the latches on either end ... the connection points along the edge of the card. 6 Align the notches on the bottom of the card with your printer. 5 Unpack the memory card. NOTE: Memory options designed for other printers may require some force to fully seat the card. 8 Make sure each latch fits over the notch on each end...
..., before you touch a memory card. NOTICE: Memory cards are easily damaged by static electricity. Preparing the Printer 19 It may not work with the notches on the connector. 7 Push the memory card firmly into the connector until the latches on either end ... the connection points along the edge of the card. 6 Align the notches on the bottom of the card with your printer. 5 Unpack the memory card. NOTE: Memory options designed for other printers may require some force to fully seat the card. 8 Make sure each latch fits over the notch on each end...

Owner's Manual
Page 20
www.dell.com/supplies | support.dell.com 20 Preparing the Printer
www.dell.com/supplies | support.dell.com 20 Preparing the Printer
Owner's Manual
Page 25
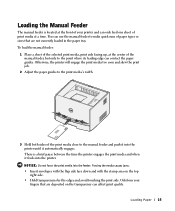
...the top right side. • Hold transparencies by the edges and avoid touching the print side. Oils from your printer and can contact the paper guides. NOTICE: Do not force the print media into the printer. You can use the manual feeder to the manual feeder and push it into the... with the stamp area on the transparency can affect print quality. Loading the Manual Feeder The manual feeder is a brief pause between the time the printer engages the print media and when it automatically engages. To load the manual feeder: 1 Place a sheet of the selected print media, print side ...
...the top right side. • Hold transparencies by the edges and avoid touching the print side. Oils from your printer and can contact the paper guides. NOTICE: Do not force the print media into the printer. You can use the manual feeder to the manual feeder and push it into the... with the stamp area on the transparency can affect print quality. Loading the Manual Feeder The manual feeder is a brief pause between the time the printer engages the print media and when it automatically engages. To load the manual feeder: 1 Place a sheet of the selected print media, print side ...
Owner's Manual
Page 26
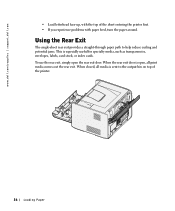
When the rear exit door is open the rear exit door. www.dell.com/supplies | support.dell.com • Load letterhead face-up, with paper feed, turn the paper around. To use the rear exit, simply open , all media is especially useful ... a straight-through paper path to help reduce curling and potential jams. This is sent to the output bin on top of the sheet entering the printer first. • If you experience problems with the top of the printer. 26 Loading Paper When closed, all print media comes out the rear exit.
When the rear exit door is open the rear exit door. www.dell.com/supplies | support.dell.com • Load letterhead face-up, with paper feed, turn the paper around. To use the rear exit, simply open , all media is especially useful ... a straight-through paper path to help reduce curling and potential jams. This is sent to the output bin on top of the sheet entering the printer first. • If you experience problems with the top of the printer. 26 Loading Paper When closed, all print media comes out the rear exit.
Owner's Manual
Page 27
... are considering before buying large quantities. You must understand the section in the sealed position • Do not use envelopes that discusses the guidelines for laser printers. • Use envelopes made from 24 lb (90 g/m2) bond paper.
... are considering before buying large quantities. You must understand the section in the sealed position • Do not use envelopes that discusses the guidelines for laser printers. • Use envelopes made from 24 lb (90 g/m2) bond paper.
Owner's Manual
Page 30
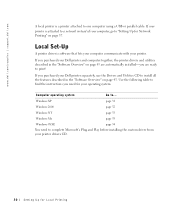
... with your computer, go to print! If you are automatically installed-you purchased your operating system. If you purchased your Dell printer and computer together, the printer drivers and utilities described in the "Software Overview" on page 43 are ready to "Setting Up for Network Printing" on... NT page 33 Windows Me page 33 Windows 98 SE page 34 You need for Local Printing www.dell.com/supplies | support.dell.com A local printer is a printer attached to ... If your printer is attached to install all the features described in the "Software Overview" on page 43.
... with your computer, go to print! If you are automatically installed-you purchased your operating system. If you purchased your Dell printer and computer together, the printer drivers and utilities described in the "Software Overview" on page 43 are ready to "Setting Up for Network Printing" on... NT page 33 Windows Me page 33 Windows 98 SE page 34 You need for Local Printing www.dell.com/supplies | support.dell.com A local printer is a printer attached to ... If your printer is attached to install all the features described in the "Software Overview" on page 43.
Owner's Manual
Page 31
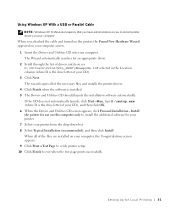
...D is the drive letter of your CD), and then click OK. 6 When the Drivers and Utilities CD screen appears, click Personal Installation - Install the printer for an appropriate driver. 2 Scroll through the list of drivers until you see D:\Drivers\Print\Win_2kXP\dkaap2da.inf selected in the ...column (where D is the drive letter of your CD). 3 Click Next. The wizard copies all of the necessary files and installs the printer drivers. 4 Click Finish when the software is installed. 5 The Drivers and Utilities CD should launch the installation software automatically. Using Windows XP...
...D is the drive letter of your CD), and then click OK. 6 When the Drivers and Utilities CD screen appears, click Personal Installation - Install the printer for an appropriate driver. 2 Scroll through the list of drivers until you see D:\Drivers\Print\Win_2kXP\dkaap2da.inf selected in the ...column (where D is the drive letter of your CD). 3 Click Next. The wizard copies all of the necessary files and installs the printer drivers. 4 Click Finish when the software is installed. 5 The Drivers and Utilities CD should launch the installation software automatically. Using Windows XP...


