User Manual
Page 2
...(Cable 19 PPPoE (DSL 20 PPTP 21 L2TP 22 Dual Access (for Russia only 23 Wireless Setup 24 LAN Setup 30 DHCP Server Settings 31 Time and Date 32 Parental Control 33 Port Forwarding 34 Application Rules 35 Access Control 36 Firewall & DMZ 37 Advanced Wireless 38 Advanced... Network 39 Device Administration 40 Save and Restore 41 Firmware Update 42 DDNS Setting 43 System Check 44 Schedules 45 Log Settings 46 Device Info 47 Log 48 Statistics 49 Wireless 50 Help 51 Wireless Security 52 What is WEP 52 D-Link DIR-605 User Manual 2
...(Cable 19 PPPoE (DSL 20 PPTP 21 L2TP 22 Dual Access (for Russia only 23 Wireless Setup 24 LAN Setup 30 DHCP Server Settings 31 Time and Date 32 Parental Control 33 Port Forwarding 34 Application Rules 35 Access Control 36 Firewall & DMZ 37 Advanced Wireless 38 Advanced... Network 39 Device Administration 40 Save and Restore 41 Firmware Update 42 DDNS Setting 43 System Check 44 Schedules 45 Log Settings 46 Device Info 47 Log 48 Statistics 49 Wireless 50 Help 51 Wireless Security 52 What is WEP 52 D-Link DIR-605 User Manual 2
User Manual
Page 3
...Network 58 Using Windows® XP 58 Configure WEP 59 Configure WPA-PSK 61 Setting Up Wi-Fi Protection 63 (WCN 2.0 in Windows Vista 63 Initial Router Configuration for Wi-Fi Protection..... 63 Setting Up a Configured Router 64 Changing the Computer Name and Joining a Workgroup 65 ... IP Address in Vista 67 Setting Up a Connection or Network Wirelessly..... 70 Connecting to a Secured Wireless Network (WEP, WPA-PSK & WPA2-PSK 75 Connecting to an Unsecured Wireless Network..... 79 Troubleshooting 83 Wireless Basics 87 What is Wireless 88 D-Link DIR-605 User Manual Tips 90 Wireless ...
...Network 58 Using Windows® XP 58 Configure WEP 59 Configure WPA-PSK 61 Setting Up Wi-Fi Protection 63 (WCN 2.0 in Windows Vista 63 Initial Router Configuration for Wi-Fi Protection..... 63 Setting Up a Configured Router 64 Changing the Computer Name and Joining a Workgroup 65 ... IP Address in Vista 67 Setting Up a Connection or Network Wirelessly..... 70 Connecting to a Secured Wireless Network (WEP, WPA-PSK & WPA2-PSK 75 Connecting to an Unsecured Wireless Network..... 79 Troubleshooting 83 Wireless Basics 87 What is Wireless 88 D-Link DIR-605 User Manual Tips 90 Wireless ...
User Manual
Page 5
...is still fully compatible with the IEEE 802.11b and IEEE 802.11g standard, so it can pass through VPN sessions. D-Link DIR-605 User Manual 5 Network conditions and environmental factors, including volume of advanced network management features including: • Content Filtering -... - These filters can securely access corporate networks. • User-friendly Setup Wizard - This capability allows users to your specific settings within minutes. * Maximum wireless signal rate derived from your router to participate in real-time activities online, such as video streaming...
...is still fully compatible with the IEEE 802.11b and IEEE 802.11g standard, so it can pass through VPN sessions. D-Link DIR-605 User Manual 5 Network conditions and environmental factors, including volume of advanced network management features including: • Content Filtering -... - These filters can securely access corporate networks. • User-friendly Setup Wizard - This capability allows users to your specific settings within minutes. * Maximum wireless signal rate derived from your router to participate in real-time activities online, such as video streaming...
User Manual
Page 6
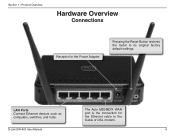
Product Overview Hardware Overview Connections Receptor for the Ethernet cable to its original factory default settings. LAN Ports Connect Ethernet devices such as computers, switches, and hubs. D-Link DIR-605 User Manual 6 Section 1 - The Auto MDI/MDIX WAN port is the connection for the Power Adapter. Pressing the Reset Button restores the router to the Cable or DSL modem.
Product Overview Hardware Overview Connections Receptor for the Ethernet cable to its original factory default settings. LAN Ports Connect Ethernet devices such as computers, switches, and hubs. D-Link DIR-605 User Manual 6 Section 1 - The Auto MDI/MDIX WAN port is the connection for the Power Adapter. Pressing the Reset Button restores the router to the Cable or DSL modem.
User Manual
Page 11
... your network. Click Save Settings to continue. 3. Plug the power into the router. Connect one of the router in which case you are connecting the D-Link router to receive an IP address automatically in the future. Click OK to continue. 4. Uncheck the Enable DHCP Server server checkbox. D-Link DIR-605 User Manual 11 Click on...
... your network. Click Save Settings to continue. 3. Plug the power into the router. Connect one of the router in which case you are connecting the D-Link router to receive an IP address automatically in the future. Click OK to continue. 4. Uncheck the Enable DHCP Server server checkbox. D-Link DIR-605 User Manual 11 Click on...
User Manual
Page 12
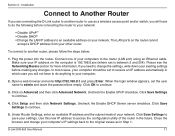
...may now use the other three LAN ports to the router. Refer to the Configuration and Wireless Security sections for more information on setting up your wireless network, open a web browser and enter the IP address you assigned to connect other router. Connect an Ethernet ...cable in one of the LAN ports of the D-Link router. 8. Installation 6. To configure your wireless network. Disconnect the Ethernet cable from the router and reconnect your computer to your network. 7. D-Link DIR-605 User Manual 12 Section 2 - Do not plug anything into the WAN ...
...may now use the other three LAN ports to the router. Refer to the Configuration and Wireless Security sections for more information on setting up your wireless network, open a web browser and enter the IP address you assigned to connect other router. Connect an Ethernet ...cable in one of the LAN ports of the D-Link router. 8. Installation 6. To configure your wireless network. Disconnect the Ethernet cable from the router and reconnect your computer to your network. 7. D-Link DIR-605 User Manual 12 Section 2 - Do not plug anything into the WAN ...
User Manual
Page 14
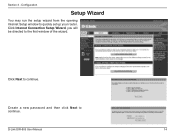
Configuration Setup Wizard You may run the setup wizard from the opening Internet Setup window to continue. Create a new password and then click Next to quickly set up your router. Click Internet Connection Setup Wizard, you will be directed to continue. Section 3 - Click Next to the first window of the wizard. D-Link DIR-605 User Manual 14
Configuration Setup Wizard You may run the setup wizard from the opening Internet Setup window to continue. Create a new password and then click Next to quickly set up your router. Click Internet Connection Setup Wizard, you will be directed to continue. Section 3 - Click Next to the first window of the wizard. D-Link DIR-605 User Manual 14
User Manual
Page 17
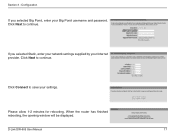
Click Next to save your settings. When the router has finished rebooting, the opening window will be displayed. Section 3 - Click Connect to continue. If you selected Big Pond, enter your Internet provider. Configuration If you selected Static, enter your network settings supplied by your Big Pond username and password. Please allow 1-2 minutes for rebooting. D-Link DIR-605 User Manual 17 Click Next to continue.
Click Next to save your settings. When the router has finished rebooting, the opening window will be displayed. Section 3 - Click Connect to continue. If you selected Big Pond, enter your Internet provider. Configuration If you selected Static, enter your network settings supplied by your Big Pond username and password. Please allow 1-2 minutes for rebooting. D-Link DIR-605 User Manual 17 Click Next to continue.
User Manual
Page 18
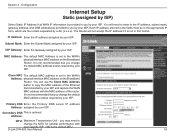
... optional. ISP Gateway: Enter the Gateway assigned by your ISP. D-Link DIR-605 User Manual 18 Each IP address entered in the fields must be... form, which are four octets separated by ISP) Select Static IP Address if all WAN IP information is set to the WAN's Address: physical interface MAC address on the Broadband Router. Configuration Internet Setup Static (assigned ...is not recommended that you by your ISP. You will not accept the IP address if it is set to the WAN's physical interface MAC address on the Broadband Router. Subnet Mask: Enter the Subnet Mask...
... optional. ISP Gateway: Enter the Gateway assigned by your ISP. D-Link DIR-605 User Manual 18 Each IP address entered in the fields must be... form, which are four octets separated by ISP) Select Static IP Address if all WAN IP information is set to the WAN's Address: physical interface MAC address on the Broadband Router. Configuration Internet Setup Static (assigned ...is not recommended that you by your ISP. You will not accept the IP address if it is set to the WAN's physical interface MAC address on the Broadband Router. Subnet Mask: Enter the Subnet Mask...
User Manual
Page 19
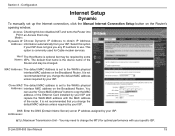
...Point only. DNS Enter the DNS (Domain Name Server) server IP address assigned by some Name: ISPs. Configuration Internet Setup Dynamic To manually set to the WAN's physical interface MAC address on the Router's opening window. Mode: Dynamic IP Choose Dynamic IP Address to use the "...default MAC address unless required by your ISP and replace the WAN MAC address with your ISP. Addresses: MTU: Maximum Transmission Unit - D-Link DIR-605 User Manual 19 This option is the device name of the router. Access Checking this option if your ISP. Clone MAC The default MAC...
...Point only. DNS Enter the DNS (Domain Name Server) server IP address assigned by some Name: ISPs. Configuration Internet Setup Dynamic To manually set to the WAN's physical interface MAC address on the Router's opening window. Mode: Dynamic IP Choose Dynamic IP Address to use the "...default MAC address unless required by your ISP and replace the WAN MAC address with your ISP. Addresses: MTU: Maximum Transmission Unit - D-Link DIR-605 User Manual 19 This option is the device name of the router. Access Checking this option if your ISP. Clone MAC The default MAC...

User Manual
Page 23
... address is entered manually or copied from the ISP. First, configure a PPPoE connection (as previously described for PPPoE connections), and add the physical WAN IP settings as previously described for Russia. D-Link DIR-605 User Manual 23 Second, configure a PPTP connection (as instructed from the computer. Section 3 -
... address is entered manually or copied from the ISP. First, configure a PPPoE connection (as previously described for PPPoE connections), and add the physical WAN IP settings as previously described for Russia. D-Link DIR-605 User Manual 23 Second, configure a PPTP connection (as instructed from the computer. Section 3 -

User Manual
Page 24
... Name in this Configuration section provides additional explanation for the router may be configured manually or by using a wizard. Configuration Wireless Setup Wireless settings for how to continue. D-Link DIR-605 User Manual 24 Click Next to configure the WEP, WPA, WPA2, and WPA/WPA2 wireless security mode options. The Wireless Security section that...
... Name in this Configuration section provides additional explanation for the router may be configured manually or by using a wizard. Configuration Wireless Setup Wireless settings for how to continue. D-Link DIR-605 User Manual 24 Click Next to configure the WEP, WPA, WPA2, and WPA/WPA2 wireless security mode options. The Wireless Security section that...

User Manual
Page 25
Section 3 - Configuration Use the radio buttons to continue. When it is finished after 1-2 minutes, the opening Wireless Setup window is displayed. Please print this out or record this information in the textbox and then click Next to select the desired level of your new settings and reboot. Enter a Wireless Security Password in a safe place and then click Save to continue. The Router will save your wireless security settings. This window displays a summary of wireless security, Best, Better, or Good, and then click Next to continue. D-Link DIR-605 User Manual 25
Section 3 - Configuration Use the radio buttons to continue. When it is finished after 1-2 minutes, the opening Wireless Setup window is displayed. Please print this out or record this information in the textbox and then click Next to select the desired level of your new settings and reboot. Enter a Wireless Security Password in a safe place and then click Save to continue. The Router will save your wireless security settings. This window displays a summary of wireless security, Best, Better, or Good, and then click Next to continue. D-Link DIR-605 User Manual 25
User Manual
Page 26
... this option if you do not want to use wireless, uncheck the box to use the Rate: default setting, Best (automatic). D-Link DIR-605 User Manual 26 Section 3 - The Channel can be broadcasted by Site Survey utilities so your wireless clients will have to it.... Transmission Use the drop-down menu to Default, and then configure the Wi-Fi settings below. Configuration Wi-Fi To implement Wi-Fi protection, or...
... this option if you do not want to use wireless, uncheck the box to use the Rate: default setting, Best (automatic). D-Link DIR-605 User Manual 26 Section 3 - The Channel can be broadcasted by Site Survey utilities so your wireless clients will have to it.... Transmission Use the drop-down menu to Default, and then configure the Wi-Fi settings below. Configuration Wi-Fi To implement Wi-Fi protection, or...
User Manual
Page 27
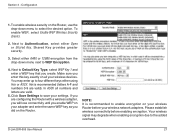
...menu to save your adapter and enter the same WEP key as you create. Next to Authentication, select either using Hex or ASCII. Click Save Settings to select the desired option. Your wireless signal may enter up to the added overhead. Next to Default Key Type, select WEP Key 1 ... wireless Router before enabling encryption. To enable wireless security on the Router, use the drop-down menu next to enable encryption on your settings. Hex is recommended to WEP Encryption. 4. D-Link DIR-605 User Manual 27 NOTE: It is recommended (letters A-F and numbers 0-9 are valid. 5.
...menu to save your adapter and enter the same WEP key as you create. Next to Authentication, select either using Hex or ASCII. Click Save Settings to select the desired option. Your wireless signal may enter up to the added overhead. Next to Default Key Type, select WEP Key 1 ... wireless Router before enabling encryption. To enable wireless security on the Router, use the drop-down menu next to enable encryption on your settings. Hex is recommended to WEP Encryption. 4. D-Link DIR-605 User Manual 27 NOTE: It is recommended (letters A-F and numbers 0-9 are valid. 5.
User Manual
Page 28
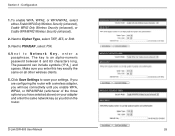
... lose connectivity until you enable WPA, WPA2, or WPA/WPA2 (whichever of the three options you have selected above) on your settings. Next to Cipher Type, select TKIP, AES, or Both. 3. D-Link DIR-605 User Manual 28 Section 3 - Configuration 1. Next to PSK/EAP, select PSK. 4. Make sure you did on all other wireless clients...
... lose connectivity until you enable WPA, WPA2, or WPA/WPA2 (whichever of the three options you have selected above) on your settings. Next to Cipher Type, select TKIP, AES, or Both. 3. D-Link DIR-605 User Manual 28 Section 3 - Configuration 1. Next to PSK/EAP, select PSK. 4. Make sure you did on all other wireless clients...

User Manual
Page 29
.../EAP, select EAP. 4. Next to RADIUS Server 1 enter the IP Address of your RADIUS server. 5. D-Link DIR-605 User Manual 29 Configuration 1. If you are using with your settings. Next to Shared Secret, enter the security key. 7. Click Save Settings to Port, enter the port you have a secondary RADIUS server, enter its IP address, port...
.../EAP, select EAP. 4. Next to RADIUS Server 1 enter the IP Address of your RADIUS server. 5. D-Link DIR-605 User Manual 29 Configuration 1. If you are using with your settings. Next to Shared Secret, enter the security key. 7. Click Save Settings to Port, enter the port you have a secondary RADIUS server, enter its IP address, port...

User Manual
Page 30
... router and to the next page for a DNS server. If you change the IP address, once you click Apply, you to change the local network settings of the router. Refer to configure the DHCP settings. Local Domain Enter the Domain name (Optional). D-Link DIR-605 User Manual 30 Section 3 -
... router and to the next page for a DNS server. If you change the IP address, once you click Apply, you to change the local network settings of the router. Refer to configure the DHCP settings. Local Domain Enter the Domain name (Optional). D-Link DIR-605 User Manual 30 Section 3 -

User Manual
Page 31
Section 3 - DHCP IP Enter the starting and ending address of time for the IP address lease. The DIR-605 has a built-in minutes. Time: Enter the Lease time in DHCP server. The DHCP Server will automatically assign an IP address to the computers on , ... from the IP address pool to disable this function. Enable DHCP Check the box to be DHCP clients by the DIR-605. D-Link DIR-605 User Manual 31 When you turn your router. Be sure to set your computers to enable the DHCP server on Server: your computers on the LAN/private network. You must specify...
Section 3 - DHCP IP Enter the starting and ending address of time for the IP address lease. The DIR-605 has a built-in minutes. Time: Enter the Lease time in DHCP server. The DHCP Server will automatically assign an IP address to the computers on , ... from the IP address pool to disable this function. Enable DHCP Check the box to be DHCP clients by the DIR-605. D-Link DIR-605 User Manual 31 When you turn your router. Be sure to set your computers to enable the DHCP server on Server: your computers on the LAN/private network. You must specify...
User Manual
Page 32
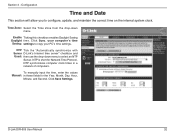
...copy your PC's time settings. NTP is short for the Year, Month, Day, Hour, Minute, and Second. NTP synchronizes computer clock times in these fields for Network Time Protocol. To manually input the time, enter the values Manual: in a network of computers. D-Link DIR-605 User Manual 32 Time... Zone: Select the Time Zone from the drop-down menu to select an NTP Server. NTP Tick the "Automatically synchronize with Server D-Link's Internet time server" checkbox and Used: then use the drop...
...copy your PC's time settings. NTP is short for the Year, Month, Day, Hour, Minute, and Second. NTP synchronizes computer clock times in these fields for Network Time Protocol. To manually input the time, enter the values Manual: in a network of computers. D-Link DIR-605 User Manual 32 Time... Zone: Select the Time Zone from the drop-down menu to select an NTP Server. NTP Tick the "Automatically synchronize with Server D-Link's Internet time server" checkbox and Used: then use the drop...


