
HP Compaq Business Notebook nx5000 Series, Presario V1000 Notebook PC - Maintenance and Service Guide
Page 51
...the display. 7 Wireless on/off button Enables and disables the optional integrated wireless device(s) on the notebook. ✎ When using Standby and Hibernation, refer to exit Hibernation. Maintenance and Service Guide 1-45 If the system has stopped responding and Windows shutdown procedures cannot be used, ... chapter in the software and that the wireless on/off the display. ■ If the notebook is opened while on, turns on the display. 5 Power button* When the notebook is on the Documentation Library CD. For information about changing the functions of the display lid ...
...the display. 7 Wireless on/off button Enables and disables the optional integrated wireless device(s) on the notebook. ✎ When using Standby and Hibernation, refer to exit Hibernation. Maintenance and Service Guide 1-45 If the system has stopped responding and Windows shutdown procedures cannot be used, ... chapter in the software and that the wireless on/off the display. ■ If the notebook is opened while on, turns on the display. 5 Power button* When the notebook is on the Documentation Library CD. For information about changing the functions of the display lid ...

HP Compaq Business Notebook nx5000 Series, Presario V1000 Notebook PC - Maintenance and Service Guide
Page 223
..., replacement 5-36 tools required 4-1 top components 1-44, 1-46 top cover illustrated 3-4, 3-6 removal 5-43 spare part number 5-43 TouchPad buttons, location 1-46 TouchPad, location 1-46 transporting precautions 4-4 troubleshooting audio 2-25 Computer Setup 2-2 Diagnostics for Windows 2-8 keyboard 2-28 modem 2-30 network 2-30 nonfunctioning device 2-18, 2-27 operating system loading 2-19 overview 2-1 pointing device 2-29...
..., replacement 5-36 tools required 4-1 top components 1-44, 1-46 top cover illustrated 3-4, 3-6 removal 5-43 spare part number 5-43 TouchPad buttons, location 1-46 TouchPad, location 1-46 transporting precautions 4-4 troubleshooting audio 2-25 Computer Setup 2-2 Diagnostics for Windows 2-8 keyboard 2-28 modem 2-30 network 2-30 nonfunctioning device 2-18, 2-27 operating system loading 2-19 overview 2-1 pointing device 2-29...

HP Compaq nx9020, nx9030 and nx9040 Notebook PCs- Startup Guide
Page 17
... power, the battery pack may be out of the keyboard. The notebook complies with Your Notebook Step 4: Turn On the Notebook Press the power button above the left side of power. Startup Guide 1-11 As a result of Information Technology Equipment (IEC 60950). The notebook boots up, and Windows starts automatically. ✎ If your lap for the...
... power, the battery pack may be out of the keyboard. The notebook complies with Your Notebook Step 4: Turn On the Notebook Press the power button above the left side of power. Startup Guide 1-11 As a result of Information Technology Equipment (IEC 60950). The notebook boots up, and Windows starts automatically. ✎ If your lap for the...

HP Compaq nx9020, nx9030 and nx9040 Notebook PCs- Startup Guide
Page 20
... off the display and other components. ■ Maintains current session in the Reference Guide on the notebook. If the system has stopped responding and Windows shutdown procedures cannot be used, press and hold the power button for 4 seconds to disk, then shuts down. ■ Restores network connections. Hibernation-Power status light will...
... off the display and other components. ■ Maintains current session in the Reference Guide on the notebook. If the system has stopped responding and Windows shutdown procedures cannot be used, press and hold the power button for 4 seconds to disk, then shuts down. ■ Restores network connections. Hibernation-Power status light will...

HP Compaq nx9020, nx9030 and nx9040 Notebook PCs- Startup Guide
Page 21
.... -or- ■ Insert the tip of a paper clip into the reset button on the bottom of the notebook, then press the power button to boot from its internal hard drive. Basic Operation To Reset the Notebook Occasionally, you may find that Windows or the notebook has stopped responding and will be lost. See "Configuring Your...
.... -or- ■ Insert the tip of a paper clip into the reset button on the bottom of the notebook, then press the power button to boot from its internal hard drive. Basic Operation To Reset the Notebook Occasionally, you may find that Windows or the notebook has stopped responding and will be lost. See "Configuring Your...

HP Compaq nx9020, nx9030 and nx9040 Notebook PCs- Startup Guide
Page 22
Basic Operation To Use the TouchPad The TouchPad includes an on -off the TouchPad. 1 Click buttons. The Click buttons work like the left and right buttons on a standard mouse 2 TouchPad (touch-sensitive pointing device). 3 TouchPad on -off button so you are typing. The indicator light turns off when you turn off the TouchPad to display the contents of the active window. 2-4 Startup Guide The scroll pad scrolls vertically to avoid moving the pointer accidentally when you can turn off button and indicator light. 4 Scroll pad.
Basic Operation To Use the TouchPad The TouchPad includes an on -off the TouchPad. 1 Click buttons. The Click buttons work like the left and right buttons on a standard mouse 2 TouchPad (touch-sensitive pointing device). 3 TouchPad on -off button so you are typing. The indicator light turns off when you turn off the TouchPad to display the contents of the active window. 2-4 Startup Guide The scroll pad scrolls vertically to avoid moving the pointer accidentally when you can turn off button and indicator light. 4 Scroll pad.
HP Compaq nx9020, nx9030 and nx9040 Notebook PCs- Startup Guide
Page 26
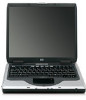
... as an external monitor for your notebook and TV, the red button will not be displayed. 4. To enable the TV, select the red button next to TV. ✎ If the S-Video cable is enabled, so you must first enable it before you are prompted to restart Windows, select Yes. By default, the... infrared port is not plugged into your notebook. To connect a TV to accept the changes. ...
... as an external monitor for your notebook and TV, the red button will not be displayed. 4. To enable the TV, select the red button next to TV. ✎ If the S-Video cable is enabled, so you must first enable it before you are prompted to restart Windows, select Yes. By default, the... infrared port is not plugged into your notebook. To connect a TV to accept the changes. ...

HP Compaq nx9020, nx9030 and nx9040 Notebook PCs- Startup Guide
Page 27
... can use your notebook infrared port to transfer files by following the directions for instructions on using Wireless Link. Startup Guide 2-9 See the Windows online Help for ...infrared ports. You can cause transmission errors. 1. Select Next > Finish > Close. The 2 ports should be no more than 3 feet (1 meter) apart with which you want to the notebook...Operation Using the Infrared Port ■ Make sure the infrared port of your notebook and the infrared port of communications, open Wireless Link by selecting Start > Control Panel...
... can use your notebook infrared port to transfer files by following the directions for instructions on using Wireless Link. Startup Guide 2-9 See the Windows online Help for ...infrared ports. You can cause transmission errors. 1. Select Next > Finish > Close. The 2 ports should be no more than 3 feet (1 meter) apart with which you want to the notebook...Operation Using the Infrared Port ■ Make sure the infrared port of your notebook and the infrared port of communications, open Wireless Link by selecting Start > Control Panel...

HP Compaq nx9020, nx9030 and nx9040 Notebook PCs- Startup Guide
Page 44
... Startup Guide Press the power button again to complete. A Licensing Agreement screen is displayed. 7. This process takes 1 to 2 hours to start the notebook. 5. The repair process begins. This CD contains the following preinstalled operating systems: ■ Microsoft Windows XP Home or Pro (depending on the notebook. 2. Troubleshooting Operating System (OS) CD Repair...
... Startup Guide Press the power button again to complete. A Licensing Agreement screen is displayed. 7. This process takes 1 to 2 hours to start the notebook. 5. The repair process begins. This CD contains the following preinstalled operating systems: ■ Microsoft Windows XP Home or Pro (depending on the notebook. 2. Troubleshooting Operating System (OS) CD Repair...

HP Compaq nx9020, nx9030 and nx9040 Notebook PCs- Startup Guide
Page 45
Press the power button again to Setup screen opens. 6. The Setup window is displayed. 7. Press esc to continue installing a fresh copy of My Documents before reinstalling your operating system. After a few minutes, the Welcome to start the notebook. 5. Press F8 to continue setup using this ...197; WARNING: Personal data and software you have installed on the notebook. 2. To protect your files. To reinstall the operating system: 1. Immediately insert the OS CD into the notebook. 3. Press and hold the power button for 5 seconds to set up your data, make a backup...
Press the power button again to Setup screen opens. 6. The Setup window is displayed. 7. Press esc to continue installing a fresh copy of My Documents before reinstalling your operating system. After a few minutes, the Welcome to start the notebook. 5. Press F8 to continue setup using this ...197; WARNING: Personal data and software you have installed on the notebook. 2. To protect your files. To reinstall the operating system: 1. Immediately insert the OS CD into the notebook. 3. Press and hold the power button for 5 seconds to set up your data, make a backup...

HP Compaq nx9020, nx9030 and nx9040 Notebook PCs- Startup Guide
Page 49
...port (LPT1) 1-4 parts of the notebook back panel 1-4 bottom panel 1-5 front panel 1-3 left panel 1-4 right panel 1-3 status lights 1-6 PC Card slot location 1-4 ports 1394 1-4 external monitor 1-4 infrared 1-3 LPT1 (parallel) 1-4 serial port (COM1) 1-4 USB 1-4 power button 1-3, 1-11 mode status light 1-6...location 1-3 serial port (COM1) 1-4 setting up the notebook connect phone line 1-10 connect power 1-9 install battery pack 1-8 power on 1-11 set up Windows 1-12 troubleshooting 4-6 setup utility 4-7 slot location cable lock 1-4 PC Card and CardBus 1-4 software, restoring 4-12 software, updating...
...port (LPT1) 1-4 parts of the notebook back panel 1-4 bottom panel 1-5 front panel 1-3 left panel 1-4 right panel 1-3 status lights 1-6 PC Card slot location 1-4 ports 1394 1-4 external monitor 1-4 infrared 1-3 LPT1 (parallel) 1-4 serial port (COM1) 1-4 USB 1-4 power button 1-3, 1-11 mode status light 1-6...location 1-3 serial port (COM1) 1-4 setting up the notebook connect phone line 1-10 connect power 1-9 install battery pack 1-8 power on 1-11 set up Windows 1-12 troubleshooting 4-6 setup utility 4-7 slot location cable lock 1-4 PC Card and CardBus 1-4 software, restoring 4-12 software, updating...

Reference Guide
Page 3
... AC Power 1-8 Step 3: Connect a Phone Line 1-9 Step 4: Turn On the Notebook 1-10 Step 5: Set Up Windows 1-11 2 Basic Operation Operating Your Notebook 2-1 Default Power Settings 2-2 To Reset the Notebook 2-3 To Change the Boot Device 2-3 To Use the TouchPad 2-4 To Use the ...Tap to Click Function of the TouchPad 2-5 To Use the Function Hot Keys 2-6 To Use the One-Touch Buttons 2-7 To Use the Windows...
... AC Power 1-8 Step 3: Connect a Phone Line 1-9 Step 4: Turn On the Notebook 1-10 Step 5: Set Up Windows 1-11 2 Basic Operation Operating Your Notebook 2-1 Default Power Settings 2-2 To Reset the Notebook 2-3 To Change the Boot Device 2-3 To Use the TouchPad 2-4 To Use the ...Tap to Click Function of the TouchPad 2-5 To Use the Function Hot Keys 2-6 To Use the One-Touch Buttons 2-7 To Use the Windows...

Reference Guide
Page 16
The notebook boots up, and Windows starts automatically. ✎ If your lap for extended periods. The notebook complies with Your Notebook Step 4: Turn On the Notebook Press the power button above the left side of the keyboard. As a result of increased power consumption, it is designed to run ...of power. Leave the AC adapter plugged in the AC adapter, then press the power button again. Charge times will vary. Å WARNING: This notebook is normal for the notebook to fully charge the battery pack. Getting Started with the user-accessible surface temperature limits defined...
The notebook boots up, and Windows starts automatically. ✎ If your lap for extended periods. The notebook complies with Your Notebook Step 4: Turn On the Notebook Press the power button above the left side of the keyboard. As a result of increased power consumption, it is designed to run ...of power. Leave the AC adapter plugged in the AC adapter, then press the power button again. Charge times will vary. Å WARNING: This notebook is normal for the notebook to fully charge the battery pack. Getting Started with the user-accessible surface temperature limits defined...
Reference Guide
Page 19
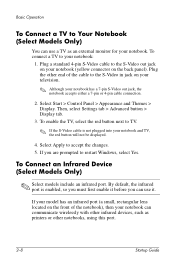
power. -or- ■ Turns off . button. -or- ■ Saves current session to time out. connections. Powers on , ■ Saves maximum status light will turn off. Hibernation-Power If the notebook is already on the notebook. turn off the notebook. Standby-Power Select Start > Turn Off ■ ...way these power modes work. Briefly press the power button. Select Start > Turn Off Computer > Turn Off. If the system has stopped responding and Windows shutdown procedures cannot be used, press and hold the power button for 4 seconds to turn off the display Allow the...
power. -or- ■ Turns off . button. -or- ■ Saves current session to time out. connections. Powers on , ■ Saves maximum status light will turn off. Hibernation-Power If the notebook is already on the notebook. turn off the notebook. Standby-Power Select Start > Turn Off ■ ...way these power modes work. Briefly press the power button. Select Start > Turn Off Computer > Turn Off. If the system has stopped responding and Windows shutdown procedures cannot be used, press and hold the power button for 4 seconds to turn off the display Allow the...

Reference Guide
Page 20
...the reset button on the bottom of the notebook, then press the power button to display the Boot menu. 3. HP Manual Title 2-3 Press ctrl+alt+del, then select Shut Down > Restart. -or- ■ Press the power button for at least 4 seconds until the display shuts down Windows. When...CD-ROM drive, or an internal network interface card. 1. See "Configuring Your Notebook" in the "Troubleshooting" chapter in this guide. Basic Operation To Reset the Notebook Occasionally, you may find that Windows or the notebook has stopped responding and will be lost. If this happens, try the following...
...the reset button on the bottom of the notebook, then press the power button to display the Boot menu. 3. HP Manual Title 2-3 Press ctrl+alt+del, then select Shut Down > Restart. -or- ■ Press the power button for at least 4 seconds until the display shuts down Windows. When...CD-ROM drive, or an internal network interface card. 1. See "Configuring Your Notebook" in the "Troubleshooting" chapter in this guide. Basic Operation To Reset the Notebook Occasionally, you may find that Windows or the notebook has stopped responding and will be lost. If this happens, try the following...

Reference Guide
Page 21
The Click buttons work like the left and right buttons on a standard mouse 2 TouchPad (touch-sensitive pointing device). 3 TouchPad on -off button so you can turn off the TouchPad. 1 Click buttons. Basic Operation To Use the TouchPad The TouchPad includes an on -off the TouchPad to display the contents of the active window. 2-4 HP Manual Title The scroll pad scrolls vertically to avoid moving the pointer accidentally when you are typing. The indicator light turns off when you turn off button and indicator light. 4 Scroll pad.
The Click buttons work like the left and right buttons on a standard mouse 2 TouchPad (touch-sensitive pointing device). 3 TouchPad on -off button so you can turn off the TouchPad. 1 Click buttons. Basic Operation To Use the TouchPad The TouchPad includes an on -off the TouchPad to display the contents of the active window. 2-4 HP Manual Title The scroll pad scrolls vertically to avoid moving the pointer accidentally when you are typing. The indicator light turns off when you turn off button and indicator light. 4 Scroll pad.

Reference Guide
Page 25
... Windows Explorer Runs Windows Help Runs Windows Find: Search Minimizes all displayed windows Returns all minimized windows to original size Runs the Windows Run dialog box 2-8 HP Manual Title Basic Operation To Use the Windows and Applications Keys The Windows key brings up the shortcut menu for the selected item. This is the same as selecting the Start button...
... Windows Explorer Runs Windows Help Runs Windows Find: Search Minimizes all displayed windows Returns all minimized windows to original size Runs the Windows Run dialog box 2-8 HP Manual Title Basic Operation To Use the Windows and Applications Keys The Windows key brings up the shortcut menu for the selected item. This is the same as selecting the Start button...

Reference Guide
Page 30
... Title 2-13 Basic Operation Securing Your Notebook To Set Up Password Protection You can lock the notebook these ways: ■ If a One-Touch button is available through Windows and through BIOS Setup. To unlock the notebook, follow your account. 2. To Lock Your Notebook To protect against unauthorized access while your notebook from access by another user when...
... Title 2-13 Basic Operation Securing Your Notebook To Set Up Password Protection You can lock the notebook these ways: ■ If a One-Touch button is available through Windows and through BIOS Setup. To unlock the notebook, follow your account. 2. To Lock Your Notebook To protect against unauthorized access while your notebook from access by another user when...

Reference Guide
Page 36
... and no port (serial, parallel, or infrared) is active for the specified interval Display turns off. Press the power Saves your current button to return to session to the hard drive, your current session in Standby, any key or move a pointing device to turn on the... current session. If this occurs The result is To resume No keyboard, pointing device, or other components to conserve battery power. The notebook stays in Windows. The hard drive is not accessed for the specified interval Hibernation is initiated. session. Ä CAUTION: Make a habit of the ...
... and no port (serial, parallel, or infrared) is active for the specified interval Display turns off. Press the power Saves your current button to return to session to the hard drive, your current session in Standby, any key or move a pointing device to turn on the... current session. If this occurs The result is To resume No keyboard, pointing device, or other components to conserve battery power. The notebook stays in Windows. The hard drive is not accessed for the specified interval Hibernation is initiated. session. Ä CAUTION: Make a habit of the ...

Reference Guide
Page 53
...to the optional S-Video out jack on your notebook (yellow connector on your television. ✎ Although your notebook and TV, the red button will not be displayed. 4. Select Apply to Your Notebook (Select Models Only) 1. Then, select the Settings tab > Advanced button > Display tab. 3. Select Start > Control... to TV. ✎ If the S-Video cable is not plugged into your notebook may have a 7-pin S-Video out jack, the notebook accepts either a 7-pin or 4-pin cable connection. 2. To enable the TV, select the red button next to restart Windows, select Yes. 5-4 Reference Guide
...to the optional S-Video out jack on your notebook (yellow connector on your television. ✎ Although your notebook and TV, the red button will not be displayed. 4. Select Apply to Your Notebook (Select Models Only) 1. Then, select the Settings tab > Advanced button > Display tab. 3. Select Start > Control... to TV. ✎ If the S-Video cable is not plugged into your notebook may have a 7-pin S-Video out jack, the notebook accepts either a 7-pin or 4-pin cable connection. 2. To enable the TV, select the red button next to restart Windows, select Yes. 5-4 Reference Guide


