Limited Warranty and Technical Support
Page 5
... needs a hardware repair that is covered under warranty, then HP will help sources to meet your needs: „ Access to drivers and product documentation: Find original product drivers, latest updates and software fixes, Limited Warranty information, and product documentation. „ Open an online service event with an HP Support Specialist: If you assume the risk of your problem using HP online services, call HP: - Add-on options - A technical support...
... needs a hardware repair that is covered under warranty, then HP will help sources to meet your needs: „ Access to drivers and product documentation: Find original product drivers, latest updates and software fixes, Limited Warranty information, and product documentation. „ Open an online service event with an HP Support Specialist: If you assume the risk of your problem using HP online services, call HP: - Add-on options - A technical support...
WLAN solutions for HP enterprise notebooks and Tablet PCs
Page 4
... across multiple notebooks and WLAN adapters, and are backwards compatible with the symmetrical RC4 stream cipher2 and static 64- Managed product lifecycles and software upgrades Stable product configurations over a network. WLAN driver and client software that was insufficient for the security and simplified management of the WLAN installed base. 2 For more complex than WEP3, and has received acceptance from creating new profiles. AES...
... across multiple notebooks and WLAN adapters, and are backwards compatible with the symmetrical RC4 stream cipher2 and static 64- Managed product lifecycles and software upgrades Stable product configurations over a network. WLAN driver and client software that was insufficient for the security and simplified management of the WLAN installed base. 2 For more complex than WEP3, and has received acceptance from creating new profiles. AES...

HP Compaq Business Notebook nx5000 Series, Presario V1000 Notebook PC - Maintenance and Service Guide
Page 41
... also clear CMOS. 1. Replace the RTC battery and reassemble the notebook. 5. Turn on the notebook. The notebook supports the following power management features: ■ Standby ■ Hibernation ■ User customization of performance ■ Display switch standby/resume ■ Power/Standby button ■ Advanced Configuration and Power Interface (ACPI) compliance Maintenance and Service Guide 1-35 Wait approximately 5 minutes. 4. Connect AC power to clear the password. All passwords and all CMOS settings will have been cleared. 1.4 Power Management The notebook comes...
... also clear CMOS. 1. Replace the RTC battery and reassemble the notebook. 5. Turn on the notebook. The notebook supports the following power management features: ■ Standby ■ Hibernation ■ User customization of performance ■ Display switch standby/resume ■ Power/Standby button ■ Advanced Configuration and Power Interface (ACPI) compliance Maintenance and Service Guide 1-35 Wait approximately 5 minutes. 4. Connect AC power to clear the password. All passwords and all CMOS settings will have been cleared. 1.4 Power Management The notebook comes...

HP Compaq Business Notebook nx5000 Series, Presario V1000 Notebook PC - Maintenance and Service Guide
Page 75
... notebook operation after each replacement. 1. I/O board 3. Port Replicator motor mechanism 2-18 Maintenance and Service Guide Check voltage setting on Port Replicator. Power supply 2. Switch box 5. N Remove notebook, reseat all internal parts, and replace any damaged items in Port Replicator and power outlet. N Done Replace the following Port Replicator components one at Port Replicator. Troubleshooting Flowchart 2.8-Nonfunctioning Port Replicator (if applicable) Nonfunctioning Port Replicator. Reseat power cord in Port Replicator. Reseat monitor cable connector...
... notebook operation after each replacement. 1. I/O board 3. Port Replicator motor mechanism 2-18 Maintenance and Service Guide Check voltage setting on Port Replicator. Power supply 2. Switch box 5. N Remove notebook, reseat all internal parts, and replace any damaged items in Port Replicator and power outlet. N Done Replace the following Port Replicator components one at Port Replicator. Troubleshooting Flowchart 2.8-Nonfunctioning Port Replicator (if applicable) Nonfunctioning Port Replicator. Reseat power cord in Port Replicator. Reseat monitor cable connector...

HP Compaq Business Notebook nx5000 Series, Presario V1000 Notebook PC - Maintenance and Service Guide
Page 80
... drive boot order correct? Y Install bootable diskette and reboot notebook. Y Nonsystem disk error? Replace diskette drive. 2. Clear CMOS. Check diskette for instructions. Try different diskette. N Done Change boot priority using the Setup utility. Reseat diskette drive. Y N Diskette drive enabled in drive? Y OS loading? Maintenance and Service Guide 2-23 Refer to Flowchart 2.17-Nonfunctioning Device. Replace system board. N 1. N N Boot from diskette drive. N Bootable diskette in the Setup utility? N Go to Section 1.3 "Clearing a Password...
... drive boot order correct? Y Install bootable diskette and reboot notebook. Y Nonsystem disk error? Replace diskette drive. 2. Clear CMOS. Check diskette for instructions. Try different diskette. N Done Change boot priority using the Setup utility. Reseat diskette drive. Y N Diskette drive enabled in drive? Y OS loading? Maintenance and Service Guide 2-23 Refer to Flowchart 2.17-Nonfunctioning Device. Replace system board. N 1. N N Boot from diskette drive. N Bootable diskette in the Setup utility? N Go to Section 1.3 "Clearing a Password...
HP Compaq Business Notebook nx5000 Series, Presario V1000 Notebook PC - Maintenance and Service Guide
Page 217
... battery slot, location 1-37 Bluetooth compartment cover illustrated 3-2, 3-10 removal 5-16 Bluetooth compartment, location 1-37, 1-48 Bluetooth wireless communications board removal 5-16 spare part number 5-16 bottom board illustrated 3-4, 3-6 removal 5-54 spare part number 5-54 bottom components 1-48 C cables, service considerations 4-2 caps lock key, location 1-43 caps lock light, location 1-44 carrying case, spare part numbers 3-13 CD-ROM drive spare part number 3-7, 3-12 specifications 6-15 components bottom 1-48 front 1-36 keyboard 1-40, 1-42 left-side 1-36 rear panel 1-38 Maintenance...
... battery slot, location 1-37 Bluetooth compartment cover illustrated 3-2, 3-10 removal 5-16 Bluetooth compartment, location 1-37, 1-48 Bluetooth wireless communications board removal 5-16 spare part number 5-16 bottom board illustrated 3-4, 3-6 removal 5-54 spare part number 5-54 bottom components 1-48 C cables, service considerations 4-2 caps lock key, location 1-43 caps lock light, location 1-44 carrying case, spare part numbers 3-13 CD-ROM drive spare part number 3-7, 3-12 specifications 6-15 components bottom 1-48 front 1-36 keyboard 1-40, 1-42 left-side 1-36 rear panel 1-38 Maintenance...
HP Compaq Business Notebook nx5000 Series, Presario V1000 Notebook PC - Maintenance and Service Guide
Page 218
... A-3 headphone jack A-4 microphone jack A-4 monitor connector A-3 parallel connector A-5 RJ-11 (modem) jack A-2 RJ-45 (network) jack A-1 serial connector A-6 S-Video connector A-3 USB connector A-2 connectors 1394 1-39 power 1-38 service considerations 4-2 cursor control keys, location 1-43 D design overview 1-51 diagnostics configuration information 2-8 test information 2-8 Diagnostics for Windows 2-1, 2-8 disassembly sequence chart 5-3 diskette drive OS loading problems 2-23 spare part number 3-7, 3-12 display assembly illustrated 3-2 removal 5-39 spare part numbers 3-3, 5-39 specifications...
... A-3 headphone jack A-4 microphone jack A-4 monitor connector A-3 parallel connector A-5 RJ-11 (modem) jack A-2 RJ-45 (network) jack A-1 serial connector A-6 S-Video connector A-3 USB connector A-2 connectors 1394 1-39 power 1-38 service considerations 4-2 cursor control keys, location 1-43 D design overview 1-51 diagnostics configuration information 2-8 test information 2-8 Diagnostics for Windows 2-1, 2-8 disassembly sequence chart 5-3 diskette drive OS loading problems 2-23 spare part number 3-7, 3-12 display assembly illustrated 3-2 removal 5-39 spare part numbers 3-3, 5-39 specifications...

HP Compaq Business Notebook nx5000 Series, Presario V1000 Notebook PC - Maintenance and Service Guide
Page 222
...-45 (network) jack location 1-39 pin assignments A-1 RTC battery illustrated 3-2, 3-10 removal 5-47 S Screw Kit, spare part number 3-14 scroll lock light, location 1-44 Secure Digital (SD) Card slot, location 1-37 security cable slot, location 1-37 security card, spare part number 3-14 serial connector location 1-38 pin assignments A-6 serial number 3-1, 5-2 service considerations 4-2 specifications AC adapter 6-7 battery pack 6-7, 6-8 CD-ROM drive 6-15 display 6-3, 6-4, 6-5 DMA 6-16 DVD+RW/R and CD-RW Combo Drive 6-9 DVD/CD-RW Combo Drive 6-11 DVD-ROM drive 6-13 hard drive 6-6 I/O addresses...
...-45 (network) jack location 1-39 pin assignments A-1 RTC battery illustrated 3-2, 3-10 removal 5-47 S Screw Kit, spare part number 3-14 scroll lock light, location 1-44 Secure Digital (SD) Card slot, location 1-37 security cable slot, location 1-37 security card, spare part number 3-14 serial connector location 1-38 pin assignments A-6 serial number 3-1, 5-2 service considerations 4-2 specifications AC adapter 6-7 battery pack 6-7, 6-8 CD-ROM drive 6-15 display 6-3, 6-4, 6-5 DMA 6-16 DVD+RW/R and CD-RW Combo Drive 6-9 DVD/CD-RW Combo Drive 6-11 DVD-ROM drive 6-13 hard drive 6-6 I/O addresses...
HP Compaq nx9020, nx9030 and nx9040 Notebook PCs- Startup Guide
Page 12
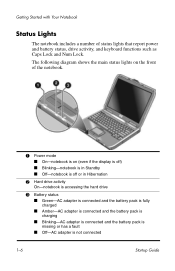
... battery pack is fully charged ■ Amber-AC adapter is connected and the battery pack is charging ■ Blinking-AC adapter is connected and the battery pack is missing or has a fault ■ Off-AC adapter is not connected 1-6 Startup Guide The following diagram shows the main status lights on the front of status lights that report power and battery status, drive activity, and keyboard functions such as Caps Lock...
... battery pack is fully charged ■ Amber-AC adapter is connected and the battery pack is charging ■ Blinking-AC adapter is connected and the battery pack is missing or has a fault ■ Off-AC adapter is not connected 1-6 Startup Guide The following diagram shows the main status lights on the front of status lights that report power and battery status, drive activity, and keyboard functions such as Caps Lock...
HP Compaq nx9020, nx9030 and nx9040 Notebook PCs- Startup Guide
Page 36
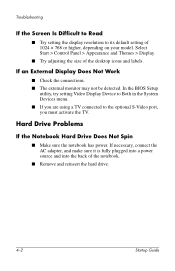
... the BIOS Setup utility, try setting Video Display Device to Both in the System Devices menu. ■ If you are using a TV connected to its default setting of 1024 × 768 or higher, depending on your model. Hard Drive Problems If the Notebook Hard Drive Does Not Spin ■ Make sure the notebook has power. Troubleshooting If the Screen Is Difficult to Read ■ Try setting the display resolution to the optional S-Video port, you must activate the...
... the BIOS Setup utility, try setting Video Display Device to Both in the System Devices menu. ■ If you are using a TV connected to its default setting of 1024 × 768 or higher, depending on your model. Hard Drive Problems If the Notebook Hard Drive Does Not Spin ■ Make sure the notebook has power. Troubleshooting If the Screen Is Difficult to Read ■ Try setting the display resolution to the optional S-Video port, you must activate the...

HP Compaq nx9020, nx9030 and nx9040 Notebook PCs- Startup Guide
Page 45
... your operating system. Press enter to boot from the CD. Troubleshooting OS CD Reinstall If other recovery efforts do not successfully repair the notebook, you can reinstall the operating system. Å WARNING: Personal data and software you have installed on the notebook. 2. The Setup window is displayed. 7. Immediately insert the OS CD into the notebook. 3. Press F8 to start the notebook. 5. Startup Guide 4-11 A Licensing Agreement screen is displayed. 8. Press the power button...
... your operating system. Press enter to boot from the CD. Troubleshooting OS CD Reinstall If other recovery efforts do not successfully repair the notebook, you can reinstall the operating system. Å WARNING: Personal data and software you have installed on the notebook. 2. The Setup window is displayed. 7. Immediately insert the OS CD into the notebook. 3. Press F8 to start the notebook. 5. Startup Guide 4-11 A Licensing Agreement screen is displayed. 8. Press the power button...

HP Compaq nx9020, nx9030 and nx9040 Notebook PCs- Startup Guide
Page 48
... Library CD 1-12 drivers reinstalling 4-12 DVD drive creating data disc 2-7 creating movie disc 2-7 location 1-3 playing movies 2-7 setting region code 2-7 E external monitor connecting 2-8 port location 1-4 F front panel components 1-3 function hot keys 2-6 H hard drive activity status light 1-6 location 1-3, 1-5 troubleshooting 4-2 Hibernation mode 2-2 hot keys 2-6 I identifying components 1-2 increasing display brightness 2-6 infrared port connecting a device 2-8 location 1-3 printing 2-9 transferring files 2-9 using the port 2-9 inserting the battery pack 1-8 K keyboard status lights...
... Library CD 1-12 drivers reinstalling 4-12 DVD drive creating data disc 2-7 creating movie disc 2-7 location 1-3 playing movies 2-7 setting region code 2-7 E external monitor connecting 2-8 port location 1-4 F front panel components 1-3 function hot keys 2-6 H hard drive activity status light 1-6 location 1-3, 1-5 troubleshooting 4-2 Hibernation mode 2-2 hot keys 2-6 I identifying components 1-2 increasing display brightness 2-6 infrared port connecting a device 2-8 location 1-3 printing 2-9 transferring files 2-9 using the port 2-9 inserting the battery pack 1-8 K keyboard status lights...

HP Compaq nx9020, nx9030 and nx9040 Notebook PCs- Startup Guide
Page 49
... 4-10 reset button location 1-5 using 2-3 restoring software 4-12 right panel components 1-3 RJ-11 (modem) jack connecting 1-10 location 1-4 RJ-45 (network) jack 1-4 S safeguarding data 4-9 safety information 1-1 scroll pad, location 1-3 serial port (COM1) 1-4 setting up the notebook connect phone line 1-10 connect power 1-9 install battery pack 1-8 power on 1-11 set up Windows 1-12 troubleshooting 4-6 setup utility 4-7 slot location cable lock 1-4 PC Card and CardBus 1-4 software, restoring 4-12 software, updating 4-8 Standby mode 2-2 status lights battery charge 1-6 hard drive 1-6 keyboard...
... 4-10 reset button location 1-5 using 2-3 restoring software 4-12 right panel components 1-3 RJ-11 (modem) jack connecting 1-10 location 1-4 RJ-45 (network) jack 1-4 S safeguarding data 4-9 safety information 1-1 scroll pad, location 1-3 serial port (COM1) 1-4 setting up the notebook connect phone line 1-10 connect power 1-9 install battery pack 1-8 power on 1-11 set up Windows 1-12 troubleshooting 4-6 setup utility 4-7 slot location cable lock 1-4 PC Card and CardBus 1-4 software, restoring 4-12 software, updating 4-8 Standby mode 2-2 status lights battery charge 1-6 hard drive 1-6 keyboard...

Reference Guide
Page 5
... an Audio Device 5-3 To Connect a TV to Your Notebook (Select Models Only 5-4 Switching the Display to the External Monitor (Select Models Only 5-5 To Connect a 1394 Device (Select Models Only 5-7 To Connect an Infrared Device (Select Models Only 5-7 Installing Additional RAM (Memory 5-9 To Install a RAM Expansion Module 5-9 To Remove a RAM Expansion Module 5-10 Replacing the Hard Drive 5-12 To Replace the Hard Drive 5-12 To Replace the Hard Drive Holder 5-13 To Prepare a New Hard Drive 5-14 6 Troubleshooting Troubleshooting Your Notebook 6-1 Audio Problems 6-2 CD-ROM and DVD...
... an Audio Device 5-3 To Connect a TV to Your Notebook (Select Models Only 5-4 Switching the Display to the External Monitor (Select Models Only 5-5 To Connect a 1394 Device (Select Models Only 5-7 To Connect an Infrared Device (Select Models Only 5-7 Installing Additional RAM (Memory 5-9 To Install a RAM Expansion Module 5-9 To Remove a RAM Expansion Module 5-10 Replacing the Hard Drive 5-12 To Replace the Hard Drive 5-12 To Replace the Hard Drive Holder 5-13 To Prepare a New Hard Drive 5-14 6 Troubleshooting Troubleshooting Your Notebook 6-1 Audio Problems 6-2 CD-ROM and DVD...

Reference Guide
Page 9
...1 AC adapter jack 2 Universal serial bus (USB) ports 3 RJ-45 jack: connects a network cable 4 S-Video out jack (select models only) 5 Parallel port (LPT1): use this port for a parallel printer or other parallel device (select models only) 6 Serial port (COM1): use this port for a serial mouse, modem, printer, or other serial device (select models only) 7 External monitor port 8 Cable lock slot (security connector) 9 RJ-11 jack: connects the modem cable - PC Card and CardBus slot and button (select models only; location varies by model) q IEEE 1394 port (select models only) w Audio jacks (left...
...1 AC adapter jack 2 Universal serial bus (USB) ports 3 RJ-45 jack: connects a network cable 4 S-Video out jack (select models only) 5 Parallel port (LPT1): use this port for a parallel printer or other parallel device (select models only) 6 Serial port (COM1): use this port for a serial mouse, modem, printer, or other serial device (select models only) 7 External monitor port 8 Cable lock slot (security connector) 9 RJ-11 jack: connects the modem cable - PC Card and CardBus slot and button (select models only; location varies by model) q IEEE 1394 port (select models only) w Audio jacks (left...

Reference Guide
Page 34
... the keyboard). ■ If you are not using an external monitor, set the Turn off monitor timeouts (for both AC and battery pack operation) to the shortest comfortable interval. ■ Avoid using AC power and have no external monitor attached, put the notebook in Standby mode when not in use. Do not apply any cleaner directly to the display. One-Touch button at your desk, connect an external monitor and turn off the internal display...
... the keyboard). ■ If you are not using an external monitor, set the Turn off monitor timeouts (for both AC and battery pack operation) to the shortest comfortable interval. ■ Avoid using AC power and have no external monitor attached, put the notebook in Standby mode when not in use. Do not apply any cleaner directly to the display. One-Touch button at your desk, connect an external monitor and turn off the internal display...

Reference Guide
Page 68
... external monitor may not be detected. Reference Guide 6-5 Troubleshooting If the Screen Is Difficult to Read ■ Try setting the display resolution to the optional S-Video port, you must activate the TV. Select Start > Control Panel > Appearance and Themes > Display. ■ Try adjusting the size of the notebook. ■ Remove and reinsert the hard drive. If necessary, connect the AC adapter, and make sure it is coming from elsewhere, such as from the fan...
... external monitor may not be detected. Reference Guide 6-5 Troubleshooting If the Screen Is Difficult to Read ■ Try setting the display resolution to the optional S-Video port, you must activate the TV. Select Start > Control Panel > Appearance and Themes > Display. ■ Try adjusting the size of the notebook. ■ Remove and reinsert the hard drive. If necessary, connect the AC adapter, and make sure it is coming from elsewhere, such as from the fan...

Reference Guide
Page 71
... Support > and use the Networking troubleshooter. ■ Open the hardware Device Manager. If the network interface is disabled, try to enable it has a conflict, try the following: press a key on the keyboard to the LAN ■ Check all cables and connections. Troubleshooting If the TouchPad Does Not Work ■ Press the TouchPad on-off button to turn on -off button to turn off the TouchPad while you type. Select Start > Control Panel > Performance and Maintenance > System. If it . Local Area Network (LAN) Problems...
... Support > and use the Networking troubleshooter. ■ Open the hardware Device Manager. If the network interface is disabled, try to enable it has a conflict, try the following: press a key on the keyboard to the LAN ■ Check all cables and connections. Troubleshooting If the TouchPad Does Not Work ■ Press the TouchPad on-off button to turn on -off button to turn off the TouchPad while you type. Select Start > Control Panel > Performance and Maintenance > System. If it . Local Area Network (LAN) Problems...

Reference Guide
Page 99
...troubleshooting 6-7 using the port 5-8 inserting battery pack 1-7 CD 2-10 DVD 2-10 PC Card 5-1 RAM (memory) 5-9 K keyboard status lights 1-2, 1-6 troubleshooting 6-7 keys ALT GR 2-9 Applications 2-8 Fn (Function) 2-6 Windows 2-8 L LAN connection 4-5 troubleshooting 6-8 left panel components 1-3 locking the hard drive 2-15 low-battery warning 3-4 M maintenance and care 2-15, 2-16, 2-17 mini PCI cover 1-4 modem AT commands 4-4 blackout periods 4-3 settings 4-4 troubleshooting 6-10 monitor resolution 5-5 N network jack, location 1-3 O One-Touch buttons 1-2, 2-7 on-off button 1-2 Reference Guide...
...troubleshooting 6-7 using the port 5-8 inserting battery pack 1-7 CD 2-10 DVD 2-10 PC Card 5-1 RAM (memory) 5-9 K keyboard status lights 1-2, 1-6 troubleshooting 6-7 keys ALT GR 2-9 Applications 2-8 Fn (Function) 2-6 Windows 2-8 L LAN connection 4-5 troubleshooting 6-8 left panel components 1-3 locking the hard drive 2-15 low-battery warning 3-4 M maintenance and care 2-15, 2-16, 2-17 mini PCI cover 1-4 modem AT commands 4-4 blackout periods 4-3 settings 4-4 troubleshooting 6-10 monitor resolution 5-5 N network jack, location 1-3 O One-Touch buttons 1-2, 2-7 on-off button 1-2 Reference Guide...

Reference Guide
Page 101
..., BIOS 6-24 setup utility 6-24 slot location cable lock 1-3 PC Card and CardBus 1-3 software, restoring 6-33 software, updating 6-29 Standby mode 2-2 status lights battery charge 1-5 hard drive 1-5 keyboard 1-2, 1-6 location 1-2 main 1-2, 1-5 meanings 1-5 wireless indicator 1-2 S-Video out jack location 1-3 using 5-4 switching the display, external monitor 5-5 system recovery 6-29 T telephone line connection 1-9 1394 port connecting 5-7 location 1-3 toggling built-in keypad 2-6 TouchPad 1-2, 2-4 functions 2-5 troubleshooting audio 6-2 battery packs 6-15 CD-ROM drive 6-3 display 6-4 DVD drive...
..., BIOS 6-24 setup utility 6-24 slot location cable lock 1-3 PC Card and CardBus 1-3 software, restoring 6-33 software, updating 6-29 Standby mode 2-2 status lights battery charge 1-5 hard drive 1-5 keyboard 1-2, 1-6 location 1-2 main 1-2, 1-5 meanings 1-5 wireless indicator 1-2 S-Video out jack location 1-3 using 5-4 switching the display, external monitor 5-5 system recovery 6-29 T telephone line connection 1-9 1394 port connecting 5-7 location 1-3 toggling built-in keypad 2-6 TouchPad 1-2, 2-4 functions 2-5 troubleshooting audio 6-2 battery packs 6-15 CD-ROM drive 6-3 display 6-4 DVD drive...


