HP Compaq nx9020, nx9030 and nx9040 Notebook PCs- Startup Guide
Page 6
... 2-7 To Play DVD Movies 2-7 To Write to DVD Media (Select Models Only) . . . . 2-7 To Connect a TV to Your Notebook (Select Models Only 2-8 To Connect an Infrared Device (Select Models Only 2-8 3 Battery Packs and Power Management Using Battery Power 3-1 To Check... 4-1 Hard Drive Problems 4-2 Keyboard and Pointing Device Problems 4-3 Power and Battery Pack Problems 4-5 Startup Problems 4-6 Configuring Your Notebook 4-7 To Run the BIOS Setup Utility 4-7 Updating Software and Drivers from the Web 4-8 Using System Recovery Features 4-8 Safeguarding Your Data 4-9 Operating System ...
... 2-7 To Play DVD Movies 2-7 To Write to DVD Media (Select Models Only) . . . . 2-7 To Connect a TV to Your Notebook (Select Models Only 2-8 To Connect an Infrared Device (Select Models Only 2-8 3 Battery Packs and Power Management Using Battery Power 3-1 To Check... 4-1 Hard Drive Problems 4-2 Keyboard and Pointing Device Problems 4-3 Power and Battery Pack Problems 4-5 Startup Problems 4-6 Configuring Your Notebook 4-7 To Run the BIOS Setup Utility 4-7 Updating Software and Drivers from the Web 4-8 Using System Recovery Features 4-8 Safeguarding Your Data 4-9 Operating System ...

HP Compaq nx9020, nx9030 and nx9040 Notebook PCs- Startup Guide
Page 21
... power button for at least 4 seconds until the display shuts down Windows. You can also boot the notebook from a specific device whenever it is present, change the boot order using the BIOS Setup utility. If you want to restart. Startup Guide 2-3 Unsaved data will not let you ...turn off the notebook. When the logo screen appears, press esc to select the boot device, then press enter. See "Configuring Your Notebook" in the "Troubleshooting" chapter...
... power button for at least 4 seconds until the display shuts down Windows. You can also boot the notebook from a specific device whenever it is present, change the boot order using the BIOS Setup utility. If you want to restart. Startup Guide 2-3 Unsaved data will not let you ...turn off the notebook. When the logo screen appears, press esc to select the boot device, then press enter. See "Configuring Your Notebook" in the "Troubleshooting" chapter...
HP Compaq nx9020, nx9030 and nx9040 Notebook PCs- Startup Guide
Page 36
Hard Drive Problems If the Notebook Hard Drive Does Not Spin ■ Make sure the notebook has power. If an External Display Does Not Work ■ Check the connections. ■ The external monitor may not be detected. Select Start ...> Control Panel > Appearance and Themes > Display. ■ Try adjusting the size of the notebook. ■ Remove and reinsert the hard drive. 4-2 Startup Guide In the BIOS Setup utility, try setting Video Display Device to Both in the System Devices menu. ■ If you must...
Hard Drive Problems If the Notebook Hard Drive Does Not Spin ■ Make sure the notebook has power. If an External Display Does Not Work ■ Check the connections. ■ The external monitor may not be detected. Select Start ...> Control Panel > Appearance and Themes > Display. ■ Try adjusting the size of the notebook. ■ Remove and reinsert the hard drive. 4-2 Startup Guide In the BIOS Setup utility, try setting Video Display Device to Both in the System Devices menu. ■ If you must...

HP Compaq nx9020, nx9030 and nx9040 Notebook PCs- Startup Guide
Page 38
... > Restart. One-Touch button to turn on the bottom of the notebook. If the Notebook Stops Responding ■ Press ctrl+alt+del and use Task Manager to end the application that is connected, the built-in this setting with the BIOS Setup utility. Then press the power button to restore normal operation...
... > Restart. One-Touch button to turn on the bottom of the notebook. If the Notebook Stops Responding ■ Press ctrl+alt+del and use Task Manager to end the application that is connected, the built-in this setting with the BIOS Setup utility. Then press the power button to restore normal operation...

HP Compaq nx9020, nx9030 and nx9040 Notebook PCs- Startup Guide
Page 41
...; Press the up and down arrow keys to your notebook operation. To Run the BIOS Setup Utility The BIOS (basic input and output system) Setup utility enables you to make changes to the notebook system configuration, and to tailor the operation of your notebook to move through values for the current parameter, or press...
...; Press the up and down arrow keys to your notebook operation. To Run the BIOS Setup Utility The BIOS (basic input and output system) Setup utility enables you to make changes to the notebook system configuration, and to tailor the operation of your notebook to move through values for the current parameter, or press...

HP Compaq nx9020, nx9030 and nx9040 Notebook PCs- Startup Guide
Page 47
... life of 3-3 installing 1-8 location 1-3 low-battery warning 3-2 recharging 3-3 release latch 1-5 Startup Guide status lights 1-6 troubleshooting 4-5 battery power check status 3-1 low-battery warning 3-2 battery status lights 3-1 BIOS Setup Utility 4-7 bottom panel components 1-5 brightness, adjusting 2-6 buttons Click 1-3 One-Touch 1-3 on-off (on TouchPad) 1-3 power 1-3, 1-11 reset 1-5 wireless on-off 1-3 C cable lock slot 1-4 CD...
... life of 3-3 installing 1-8 location 1-3 low-battery warning 3-2 recharging 3-3 release latch 1-5 Startup Guide status lights 1-6 troubleshooting 4-5 battery power check status 3-1 low-battery warning 3-2 battery status lights 3-1 BIOS Setup Utility 4-7 bottom panel components 1-5 brightness, adjusting 2-6 buttons Click 1-3 One-Touch 1-3 on-off (on TouchPad) 1-3 power 1-3, 1-11 reset 1-5 wireless on-off 1-3 C cable lock slot 1-4 CD...

HP Compaq nx9020, nx9030 and nx9040 Notebook PCs- Startup Guide
Page 50
... connection 1-10 1394 port location 1-4 toggling built-in keypad 2-6 TouchPad 1-3, 2-4 functions 2-5 transferring files 2-9 troubleshooting battery packs 4-5 display 4-1 hard drive 4-2 keyboard 4-3 power 4-5 startup 4-6 turning off the notebook 2-2 turning on the notebook 1-11, 2-2 U updating software 4-8 USB port location 1-4 using BIOS Setup Utility 4-7 V volume control 1-4 W wireless indicator light 1-3 on-off button 1-3 Index-4 Startup Guide
... connection 1-10 1394 port location 1-4 toggling built-in keypad 2-6 TouchPad 1-3, 2-4 functions 2-5 transferring files 2-9 troubleshooting battery packs 4-5 display 4-1 hard drive 4-2 keyboard 4-3 power 4-5 startup 4-6 turning off the notebook 2-2 turning on the notebook 1-11, 2-2 U updating software 4-8 USB port location 1-4 using BIOS Setup Utility 4-7 V volume control 1-4 W wireless indicator light 1-3 on-off button 1-3 Index-4 Startup Guide

Reference Guide
Page 6
... Problems 6-6 Infrared Problems 6-7 Keyboard and Pointing Device Problems 6-7 Local Area Network (LAN) Problems 6-8 Memory Problems 6-9 Modem Problems 6-10 PC Card (PCMCIA) Problems 6-13 Performance Problems 6-14 Power and Battery Pack Problems 6-15 Printing Problems 6-18 Serial, Parallel and USB Problems ...6-19 Startup Problems 6-20 Wireless Problems 6-22 Configuring Your Notebook 6-24 To Run the BIOS Setup Utility 6-24 Updating Software and Drivers from the Web 6-29 Using System Recovery Features 6-29 Safeguarding Your...
... Problems 6-6 Infrared Problems 6-7 Keyboard and Pointing Device Problems 6-7 Local Area Network (LAN) Problems 6-8 Memory Problems 6-9 Modem Problems 6-10 PC Card (PCMCIA) Problems 6-13 Performance Problems 6-14 Power and Battery Pack Problems 6-15 Printing Problems 6-18 Serial, Parallel and USB Problems ...6-19 Startup Problems 6-20 Wireless Problems 6-22 Configuring Your Notebook 6-24 To Run the BIOS Setup Utility 6-24 Updating Software and Drivers from the Web 6-29 Using System Recovery Features 6-29 Safeguarding Your...

Reference Guide
Page 20
...Insert the tip of a paper clip into the reset button on the bottom of the notebook, then press the power button to boot from a specific device whenever it is present, change the boot order using the BIOS Setup utility. Select Start > Turn Off Computer > Restart. 2. Basic Operation To Reset ...the Notebook Occasionally, you may find that Windows or the notebook has stopped responding and will be lost. Unsaved data will not let you...
...Insert the tip of a paper clip into the reset button on the bottom of the notebook, then press the power button to boot from a specific device whenever it is present, change the boot order using the BIOS Setup utility. Select Start > Turn Off Computer > Restart. 2. Basic Operation To Reset ...the Notebook Occasionally, you may find that Windows or the notebook has stopped responding and will be lost. Unsaved data will not let you...

Reference Guide
Page 30
...and Maintenance > Power Options. 4. To unlock the notebook, follow your account. 2. Basic Operation Securing Your Notebook To Set Up Password Protection You can lock the notebook these ways: ■ If a One-Touch button is available through Windows and through BIOS Setup. Windows 1. On the Advanced tab, select... the option to Quick Lock, press that button. -or■ Press ctrl+alt+del, then select Lock Computer. You can protect your notebook from access by another user when you...
...and Maintenance > Power Options. 4. To unlock the notebook, follow your account. 2. Basic Operation Securing Your Notebook To Set Up Password Protection You can lock the notebook these ways: ■ If a One-Touch button is available through Windows and through BIOS Setup. Windows 1. On the Advanced tab, select... the option to Quick Lock, press that button. -or■ Press ctrl+alt+del, then select Lock Computer. You can protect your notebook from access by another user when you...

Reference Guide
Page 32
... drive) password. Basic Operation To Lock the Hard Drive The notebook enables you to lock its internal hard drive to help keep your information secure. Ä CAUTION: When you enable the hard drive lock, the current BIOS user password (or administrator password if that is encoded on the.... Press F10 to enter the BIOS Setup utility. 3. If you forget the password, you can be damaged by inappropriate handling and operation. ■ Avoid bumps or jolts. ■ Do not operate the notebook while traveling over bumpy terrain. From the Security menu, enable Internal hard drive lock. 5....
... drive) password. Basic Operation To Lock the Hard Drive The notebook enables you to lock its internal hard drive to help keep your information secure. Ä CAUTION: When you enable the hard drive lock, the current BIOS user password (or administrator password if that is encoded on the.... Press F10 to enter the BIOS Setup utility. 3. If you forget the password, you can be damaged by inappropriate handling and operation. ■ Avoid bumps or jolts. ■ Do not operate the notebook while traveling over bumpy terrain. From the Security menu, enable Internal hard drive lock. 5....

Reference Guide
Page 68
... or Whining Noise ■ See whether the noise is fully plugged into a power source and into the back of the notebook. ■ Remove and reinsert the hard drive. In the BIOS Setup utility, try setting Video Display Device to Both in the System Devices menu. ■ If you must activate the ...TV. If necessary, connect the AC adapter, and make sure it is coming from elsewhere, such as from the fan or a PC Card drive. ■ ...
... or Whining Noise ■ See whether the noise is fully plugged into a power source and into the back of the notebook. ■ Remove and reinsert the hard drive. In the BIOS Setup utility, try setting Video Display Device to Both in the System Devices menu. ■ If you must activate the ...TV. If necessary, connect the AC adapter, and make sure it is coming from elsewhere, such as from the fan or a PC Card drive. ■ ...

Reference Guide
Page 71
... Press the TouchPad on the keyboard to turn on the light. ■ Do not touch the TouchPad while the notebook is connected, the built-in this setting with the BIOS Setup utility. Select Start > Control Panel > Performance and Maintenance > System. If this happens, try the following:...or resuming from Standby mode. Select Start > Turn Off Computer > Restart. You can change this chapter. ■ Restart the notebook. See "Configuring Your Notebook" in pointing devices are normally disabled. If it . Troubleshooting If the TouchPad Does Not Work ■ Press the TouchPad on-off...
... Press the TouchPad on the keyboard to turn on the light. ■ Do not touch the TouchPad while the notebook is connected, the built-in this setting with the BIOS Setup utility. Select Start > Control Panel > Performance and Maintenance > System. If this happens, try the following:...or resuming from Standby mode. Select Start > Turn Off Computer > Restart. You can change this chapter. ■ Restart the notebook. See "Configuring Your Notebook" in pointing devices are normally disabled. If it . Troubleshooting If the TouchPad Does Not Work ■ Press the TouchPad on-off...
Reference Guide
Page 72
... The amount of RAM is shown in your network administrator. If Memory Does Not Increase After Adding RAM Make sure your notebook is using only PC2100 DDR 266 MHz or higher memory (RAM) modules. A certain amount of display memory is used ...> Help and Support. ■ The full amount of Memory ■ Make sure drive C is not available for a notebook. Check with your notebook is not running low on free space. ■ If you may need to force your frame type to Netware Servers If ... frame type. Memory Problems If a Message Reports You Are Out of RAM in the BIOS Setup utility.
... The amount of RAM is shown in your network administrator. If Memory Does Not Increase After Adding RAM Make sure your notebook is using only PC2100 DDR 266 MHz or higher memory (RAM) modules. A certain amount of display memory is used ...> Help and Support. ■ The full amount of Memory ■ Make sure drive C is not available for a notebook. Check with your notebook is not running low on free space. ■ If you may need to force your frame type to Netware Servers If ... frame type. Memory Problems If a Message Reports You Are Out of RAM in the BIOS Setup utility.
Reference Guide
Page 84
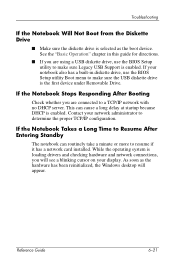
...routinely take a minute or more to make sure Legacy USB Support is enabled. If your notebook also has a built-in this guide for directions. ■ If you are using a USB diskette drive, use the BIOS Setup utility Boot menu to resume if it has a network card installed. While the ...operating system is the first device under Removable Drive. If the Notebook Stops Responding After Booting Check whether you are connected to determine the ...
...routinely take a minute or more to make sure Legacy USB Support is enabled. If your notebook also has a built-in this guide for directions. ■ If you are using a USB diskette drive, use the BIOS Setup utility Boot menu to resume if it has a network card installed. While the ...operating system is the first device under Removable Drive. If the Notebook Stops Responding After Booting Check whether you are connected to determine the ...

Reference Guide
Page 87
...or press enter to move through values for the BIOS version at publication. The settings made in a menu. ❏ Press + or - If your notebook operation. Troubleshooting Configuring Your Notebook The BIOS Setup utility helps you configure your BIOS is a different version, some settings may differ ... Press the left and right arrow keys to move among parameters in BIOS Setup generally control the notebook hardware, and so greatly affect how the notebook operates. 1. To Run the BIOS Setup Utility The BIOS (basic input and output system) Setup utility enables you to move ...
...or press enter to move through values for the BIOS version at publication. The settings made in a menu. ❏ Press + or - If your notebook operation. Troubleshooting Configuring Your Notebook The BIOS Setup utility helps you configure your BIOS is a different version, some settings may differ ... Press the left and right arrow keys to move among parameters in BIOS Setup generally control the notebook hardware, and so greatly affect how the notebook operates. 1. To Run the BIOS Setup Utility The BIOS (basic input and output system) Setup utility enables you to move ...

Reference Guide
Page 88
... Disk UMA Video Memory Memory Serial Number Service ID UUID MAC Address Description Shows the current BIOS version. Sets the date using 24-hour format. Shows the extended memory size. Displays an identifier used for BIOS Setup. Values set take effect immediately. Default Detected automatically Detected automatically Detected automatically Auto Detected automatically...
... Disk UMA Video Memory Memory Serial Number Service ID UUID MAC Address Description Shows the current BIOS version. Sets the date using 24-hour format. Shows the extended memory size. Displays an identifier used for BIOS Setup. Values set take effect immediately. Default Detected automatically Detected automatically Detected automatically Auto Detected automatically...

Reference Guide
Page 89
... down. The password can have no more than 8 characters (0-9, A-Z), and cannot include special or accented characters. Default Clear Clear Enter 6-26 Reference Guide Lets the notebook be turned on via the LAN port. Troubleshooting System Devices Menu Setting Video Display Device External Pointing Device Legacy USB Support Wake On LAN from... is detected. Disables the internal pointing devices when an external pointing device is connected. Press enter to an external display, if one is set. Enables BIOS support for USB mouse, keyboard, and diskette disk drive during startup.
... down. The password can have no more than 8 characters (0-9, A-Z), and cannot include special or accented characters. Default Clear Clear Enter 6-26 Reference Guide Lets the notebook be turned on via the LAN port. Troubleshooting System Devices Menu Setting Video Display Device External Pointing Device Legacy USB Support Wake On LAN from... is detected. Disables the internal pointing devices when an external pointing device is connected. Press enter to an external display, if one is set. Enables BIOS support for USB mouse, keyboard, and diskette disk drive during startup.
Reference Guide
Page 90
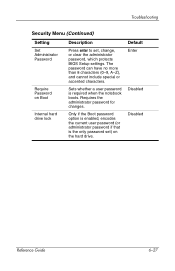
Only if the Boot password option is enabled, encodes the current user password (or administrator password if that is required when the notebook boots. Requires the administrator password for changes. The password can have no more than 8 characters (0-9, A-Z), and cannot include special or accented characters. Troubleshooting Security Menu (... Press enter to set ) on the hard drive. Sets whether a user password is the only password set , change, or clear the administrator password, which protects BIOS Setup settings. Default Enter Disabled Disabled Reference Guide 6-27
Only if the Boot password option is enabled, encodes the current user password (or administrator password if that is required when the notebook boots. Requires the administrator password for changes. The password can have no more than 8 characters (0-9, A-Z), and cannot include special or accented characters. Troubleshooting Security Menu (... Press enter to set ) on the hard drive. Sets whether a user password is the only password set , change, or clear the administrator password, which protects BIOS Setup settings. Default Enter Disabled Disabled Reference Guide 6-27

Reference Guide
Page 97
...-battery warning 3-4 recharging 3-5 release latch 1-4 saving power automatically 3-2 saving power manually 3-3 status lights 1-5 troubleshooting 6-15 battery power check status 3-3 low-battery warning 3-4 battery status lights 3-3 BIOS Setup Utility 6-24 blackout periods, modem 4-3 bottom panel components 1-4 brightness, adjusting 2-6 buttons Click 1-2 One-Touch 1-2, 2-7 on-off (on TouchPad) 1-2 Reference Guide Index-1
...-battery warning 3-4 recharging 3-5 release latch 1-4 saving power automatically 3-2 saving power manually 3-3 status lights 1-5 troubleshooting 6-15 battery power check status 3-3 low-battery warning 3-4 battery status lights 3-3 BIOS Setup Utility 6-24 blackout periods, modem 4-3 bottom panel components 1-4 brightness, adjusting 2-6 buttons Click 1-2 One-Touch 1-2, 2-7 on-off (on TouchPad) 1-2 Reference Guide Index-1


