
HP USB Digital Drive
Page 9
Disconnecting the Digital Drive ✎ Do not attempt to Remove Hardware" message appears on your taskbar. Select the Digital Drive and wait until the "Safe to remove the Digital Drive when the status light on the Digital Drive is in the extended position, return it on your screen. 3. Select the "Safely Remove Hardware" icon on its track for safe storage. 8 User Guide A dialog box displays a list of connected devices. 2. Gently unplug the Digital Drive from the USB port. ✎ If the USB connector cable is flashing. 1.
Disconnecting the Digital Drive ✎ Do not attempt to Remove Hardware" message appears on your taskbar. Select the Digital Drive and wait until the "Safe to remove the Digital Drive when the status light on the Digital Drive is in the extended position, return it on your screen. 3. Select the "Safely Remove Hardware" icon on its track for safe storage. 8 User Guide A dialog box displays a list of connected devices. 2. Gently unplug the Digital Drive from the USB port. ✎ If the USB connector cable is flashing. 1.
HP Client Manager 6.1
Page 7
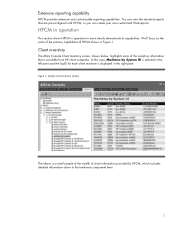
... the inventory information that are pre-configured with HPCM, or you can create your own customized Web reports. Client inventory The Altiris Console Client Inventory screen, shown below, highlights some of the primary capabilities of client information provided by HPCM, which includes detailed information down to more clearly demonstrate its capabilities...
... the inventory information that are pre-configured with HPCM, or you can create your own customized Web reports. Client inventory The Altiris Console Client Inventory screen, shown below, highlights some of the primary capabilities of client information provided by HPCM, which includes detailed information down to more clearly demonstrate its capabilities...
HP Client Manager 6.1
Page 8
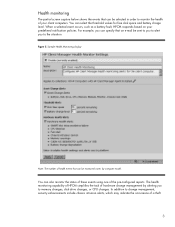
... task of hardware change management, security enhancements include chassis intrusion alerts, which may indicate the occurrence of your predefined notification policies. Health monitoring The partial screen capture below shows the events that an e-mail be sent to you to alert you to the situation. When a selected event occurs, such as a battery...
... task of hardware change management, security enhancements include chassis intrusion alerts, which may indicate the occurrence of your predefined notification policies. Health monitoring The partial screen capture below shows the events that an e-mail be sent to you to alert you to the situation. When a selected event occurs, such as a battery...
HP Client Manager 6.1
Page 9
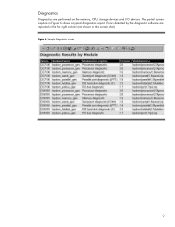
Sample Diagnostics screen 9 Errors detected by the diagnostic software are performed on the memory, CPU, storage devices and I/O devices. Figure 6. The partial screen capture in this screen shot). Diagnostics Diagnostics are reported in the far right column (not shown in Figure 6 shows a typical diagnostics report.
Sample Diagnostics screen 9 Errors detected by the diagnostic software are performed on the memory, CPU, storage devices and I/O devices. Figure 6. The partial screen capture in this screen shot). Diagnostics Diagnostics are reported in the far right column (not shown in Figure 6 shows a typical diagnostics report.
HP Client Manager 6.1
Page 10
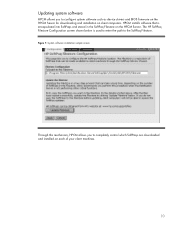
... system software HPCM allows you to completely control which SoftPaqs are downloaded and installed on each of your client machines. 10 System software installation sample screen Through this mechanism, HPCM allows you to the SoftPaq Filestore. HPCM installs software that is used to enter the path to configure system software such...
... system software HPCM allows you to completely control which SoftPaqs are downloaded and installed on each of your client machines. 10 System software installation sample screen Through this mechanism, HPCM allows you to the SoftPaq Filestore. HPCM installs software that is used to enter the path to configure system software such...
Hard Drive White Paper
Page 2
...down can cause read/write head misalignment, or contact between the read/write heads and the media, resulting in symptoms such as blue screens and continuous reboots. HP addresses these issues with the following errors to trace of them all of files. This white paper explains the...measures include a new power management policy, an enhanced hard drive self-test, and recommendations for maintaining software integrity. The hard drive in the notebook is providing to its customers to reduce the risk of hard drive performance issues that HP is in symptoms such as a clicking noise, the...
...down can cause read/write head misalignment, or contact between the read/write heads and the media, resulting in symptoms such as blue screens and continuous reboots. HP addresses these issues with the following errors to trace of them all of files. This white paper explains the...measures include a new power management policy, an enhanced hard drive self-test, and recommendations for maintaining software integrity. The hard drive in the notebook is providing to its customers to reduce the risk of hard drive performance issues that HP is in symptoms such as a clicking noise, the...

Installing Microsoft Windows XP Service Pack 2 on HP Compaq Business Notebooks
Page 5
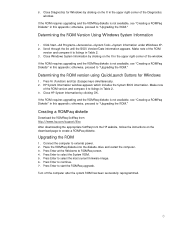
...appears. Otherwise, proceed to Table 2 for Windows 1. Click the system icon (the leftmost icon on the notebook PC, the following steps can be used to determine the ROM version. 2. Press F10 when the block cursor ...screen during startup. 1. Click Start→Settings→Control Panel. 3. Make note of the window). 5. Make note of the ROM version and compare it to highlight View System Information and press Enter. Table 2 ROM versions Portable family Current ROM version HP Compaq nc4000/nc4010 F.2A HP Compaq nc6000 F.0F HP Compaq nc8000 F.0F HP Compaq...
...appears. Otherwise, proceed to Table 2 for Windows 1. Click the system icon (the leftmost icon on the notebook PC, the following steps can be used to determine the ROM version. 2. Press F10 when the block cursor ...screen during startup. 1. Click Start→Settings→Control Panel. 3. Make note of the window). 5. Make note of the ROM version and compare it to highlight View System Information and press Enter. Table 2 ROM versions Portable family Current ROM version HP Compaq nc4000/nc4010 F.2A HP Compaq nc6000 F.0F HP Compaq nc8000 F.0F HP Compaq...
Installing Microsoft Windows XP Service Pack 2 on HP Compaq Business Notebooks
Page 6
....hp.com/support/files After downloading the appropriate SoftPaq from the HP website, follow the instructions on the X in this appendix; otherwise, proceed to ROMPaq screen. 4. Press Enter at the Welcome to "Upgrading the ROM." Press Enter to "Upgrading the ROM." otherwise, proceed to start the ROMPaq upgrade. Determining the ROM...
....hp.com/support/files After downloading the appropriate SoftPaq from the HP website, follow the instructions on the X in this appendix; otherwise, proceed to ROMPaq screen. 4. Press Enter at the Welcome to "Upgrading the ROM." Press Enter to "Upgrading the ROM." otherwise, proceed to start the ROMPaq upgrade. Determining the ROM...
Installing Microsoft Windows XP Service Pack 2 on HP Compaq Business Notebooks
Page 7
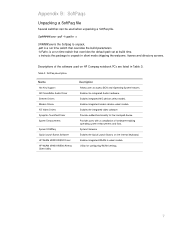
... Utility Description Allows users to unpack in select models. Enables integrated WLAN in silent mode skipping the welcome, license and directory screens. Appendix B: SoftPaqs Unpacking a SoftPaq file Several switches can be used on the internal keyboard. Descriptions of hardware-enabling operating ...unpacking a SoftPaq file. Enables the integrated Audio hardware. System Firmware Enables the Quick Launch Buttons on HP Compaq notebook PCs are listed in Table 3. Enables integrated NIC devices select models. Provides added functionality for configuring WLAN settings. 7
... Utility Description Allows users to unpack in select models. Enables integrated WLAN in silent mode skipping the welcome, license and directory screens. Appendix B: SoftPaqs Unpacking a SoftPaq file Several switches can be used on the internal keyboard. Descriptions of hardware-enabling operating ...unpacking a SoftPaq file. Enables the integrated Audio hardware. System Firmware Enables the Quick Launch Buttons on HP Compaq notebook PCs are listed in Table 3. Enables integrated NIC devices select models. Provides added functionality for configuring WLAN settings. 7

Wireless Security
Page 6
...Because authentication is generally recognized as CISCO 6 The screen shot below shows that EAP authentication can be extended or certificate-based, in development and will be available soon. IEEE 802.11i products are focused on HP notebook PCs. The group was approved and ratified June 25,... 2004, for the industry and will be available on all the WPA features - The following screen shots show available WPA authentication and encryption supported on delivering...
...Because authentication is generally recognized as CISCO 6 The screen shot below shows that EAP authentication can be extended or certificate-based, in development and will be available soon. IEEE 802.11i products are focused on HP notebook PCs. The group was approved and ratified June 25,... 2004, for the industry and will be available on all the WPA features - The following screen shots show available WPA authentication and encryption supported on delivering...
Wireless Security
Page 8
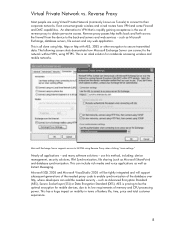
Virtual Private Network vs. The following screen shots demonstrate how Microsoft Exchange Server can add the needed proxy code to enable synchronization of reverse proxy to obtain pervasive access. Microsoft Exchange Server ... wireless and wired routers have VPN and some Firewall and DMZ capabilities. Microsoft SQL 2005 and Microsoft VisualStudio 2005 will be the optimal encryption for notebooks accessing wireless and mobile networks. An alternative to VPN that is rapidly gaining acceptance is an ideal solution for mobile devices, due to secure transmitted...
Virtual Private Network vs. The following screen shots demonstrate how Microsoft Exchange Server can add the needed proxy code to enable synchronization of reverse proxy to obtain pervasive access. Microsoft Exchange Server ... wireless and wired routers have VPN and some Firewall and DMZ capabilities. Microsoft SQL 2005 and Microsoft VisualStudio 2005 will be the optimal encryption for notebooks accessing wireless and mobile networks. An alternative to VPN that is rapidly gaining acceptance is an ideal solution for mobile devices, due to secure transmitted...

Hardware Guide
Page 3
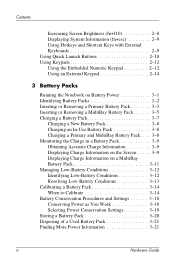
Contents 1 Notebook Features Pointing Device Components 1-1 Top Components 1-2 Lights 1-5 Left Side Components 1-7 Right Side Components 1-9 Front View Components 1-11 Rear Panel Components 1-12 Bottom Components 1-14 Labels 1-... fn and Function Keys 2-5 Hotkey and Shortcut Key Quick Reference 2-6 Initiating Standby (fn+f3 2-7 Switching Displays (fn+f4 2-7 Viewing Battery Charge Information (fn+f8 2-8 Decreasing Screen Brightness (fn+f9 2-8 Hardware Guide iii
Contents 1 Notebook Features Pointing Device Components 1-1 Top Components 1-2 Lights 1-5 Left Side Components 1-7 Right Side Components 1-9 Front View Components 1-11 Rear Panel Components 1-12 Bottom Components 1-14 Labels 1-... fn and Function Keys 2-5 Hotkey and Shortcut Key Quick Reference 2-6 Initiating Standby (fn+f3 2-7 Switching Displays (fn+f4 2-7 Viewing Battery Charge Information (fn+f8 2-8 Decreasing Screen Brightness (fn+f9 2-8 Hardware Guide iii
Hardware Guide
Page 4
...Screen Brightness (fn+f10 2-8 Displaying System Information (fn+esc 2-9 Using Hotkeys and Shortcut Keys with External Keyboards 2-9 Using Quick Launch Buttons 2-10 Using Keypads 2-12 Using the Embedded Numeric Keypad 2-12 Using an External Keypad 2-14 3 Battery Packs Running the Notebook...Battery Pack . . . . 3-8 Monitoring the Charge in a Battery Pack 3-9 Obtaining Accurate Charge Information 3-9 Displaying Charge Information on the Screen . . . . . 3-9 Displaying Charge Information on a MultiBay Battery Pack 3-11 Managing Low-Battery Conditions 3-12 Identifying Low-Battery ...
...Screen Brightness (fn+f10 2-8 Displaying System Information (fn+esc 2-9 Using Hotkeys and Shortcut Keys with External Keyboards 2-9 Using Quick Launch Buttons 2-10 Using Keypads 2-12 Using the Embedded Numeric Keypad 2-12 Using an External Keypad 2-14 3 Battery Packs Running the Notebook...Battery Pack . . . . 3-8 Monitoring the Charge in a Battery Pack 3-9 Obtaining Accurate Charge Information 3-9 Displaying Charge Information on the Screen . . . . . 3-9 Displaying Charge Information on a MultiBay Battery Pack 3-11 Managing Low-Battery Conditions 3-12 Identifying Low-Battery ...
Hardware Guide
Page 7
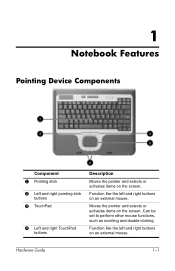
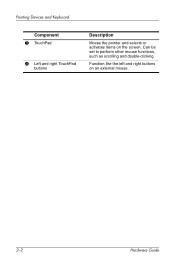
Moves the pointer and selects or activates items on an external mouse. Function like the left and right buttons on the screen. Hardware Guide 1-1 Function like the left and right buttons on the screen. Can be set to perform other mouse functions, such as scrolling and double-clicking. 1 Notebook Features Pointing Device Components Component 1 Pointing stick 2 Left and right pointing stick buttons 3 TouchPad 4 Left and right TouchPad buttons Description Moves the pointer and selects or activates items on an external mouse.
Moves the pointer and selects or activates items on an external mouse. Function like the left and right buttons on the screen. Hardware Guide 1-1 Function like the left and right buttons on the screen. Can be set to perform other mouse functions, such as scrolling and double-clicking. 1 Notebook Features Pointing Device Components Component 1 Pointing stick 2 Left and right pointing stick buttons 3 TouchPad 4 Left and right TouchPad buttons Description Moves the pointer and selects or activates items on an external mouse.
Hardware Guide
Page 24
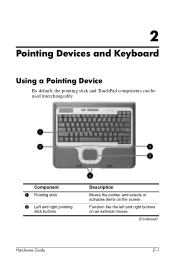
Function like the left and right buttons on the screen. 2 Pointing Devices and Keyboard Using a Pointing Device By default, the pointing stick and TouchPad components can be used interchangeably. I Component 1 Pointing stick 2 Left and right pointing stick buttons Description Moves the pointer and selects or activates items on an external mouse. (Continued) Hardware Guide 2-1
Function like the left and right buttons on the screen. 2 Pointing Devices and Keyboard Using a Pointing Device By default, the pointing stick and TouchPad components can be used interchangeably. I Component 1 Pointing stick 2 Left and right pointing stick buttons Description Moves the pointer and selects or activates items on an external mouse. (Continued) Hardware Guide 2-1
Hardware Guide
Page 25
Function like the left and right buttons on the screen. Pointing Devices and Keyboard Component 3 TouchPad 4 Left and right TouchPad buttons Description Moves the pointer and selects or activates items on an external mouse. 2-2 Hardware Guide Can be set to perform other mouse functions, such as scrolling and double-clicking.
Function like the left and right buttons on the screen. Pointing Devices and Keyboard Component 3 TouchPad 4 Left and right TouchPad buttons Description Moves the pointer and selects or activates items on an external mouse. 2-2 Hardware Guide Can be set to perform other mouse functions, such as scrolling and double-clicking.
Hardware Guide
Page 29
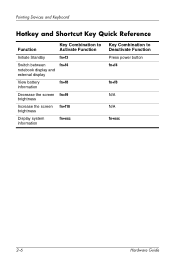
Pointing Devices and Keyboard Hotkey and Shortcut Key Quick Reference Function Key Combination to Activate Function Initiate Standby fn+f3 Switch between fn+f4 notebook display and external display View battery information fn+f8 Decrease the screen fn+f9 brightness Increase the screen fn+f10 brightness Display system information fn+esc Key Combination to Deactivate Function Press power button fn+f4 fn+f8 N/A N/A fn+esc 2-6 Hardware Guide
Pointing Devices and Keyboard Hotkey and Shortcut Key Quick Reference Function Key Combination to Activate Function Initiate Standby fn+f3 Switch between fn+f4 notebook display and external display View battery information fn+f8 Decrease the screen fn+f9 brightness Increase the screen fn+f10 brightness Display system information fn+esc Key Combination to Deactivate Function Press power button fn+f4 fn+f8 N/A N/A fn+esc 2-6 Hardware Guide
Hardware Guide
Page 30
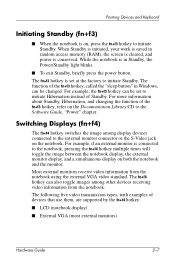
...devices receiving video information from the notebook using the external VGA video standard. While the notebook is in Windows, can also ...notebook, pressing the fn+f4 hotkey multiple times will toggle the image between the notebook display, the external monitor display, and a simultaneous display on both the notebook... use them, are supported by the fn+f4 hotkey: ■ LCD (notebook display) ■ External VGA (most external monitors) Hardware Guide 2-7 For ... Keyboard Initiating Standby (fn+f3) ■ When the notebook is on, press the fn+f3 hotkey to initiate Standby. When ...
...devices receiving video information from the notebook using the external VGA video standard. While the notebook is in Windows, can also ...notebook, pressing the fn+f4 hotkey multiple times will toggle the image between the notebook display, the external monitor display, and a simultaneous display on both the notebook... use them, are supported by the fn+f4 hotkey: ■ LCD (notebook display) ■ External VGA (most external monitors) Hardware Guide 2-7 For ... Keyboard Initiating Standby (fn+f3) ■ When the notebook is on, press the fn+f3 hotkey to initiate Standby. When ...
Hardware Guide
Page 31
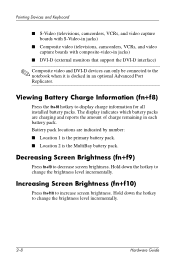
...interface) ✎ Composite video and DVI-D devices can only be connected to the notebook when it is the MultiBay battery pack. Increasing Screen Brightness (fn+f10) Press fn+f10 to decrease screen brightness. The display indicates which battery packs are indicated by number: ■ Location...Advanced Port Replicator. Hold down the hotkey to change the brightness level incrementally. 2-8 Hardware Guide Decreasing Screen Brightness (fn+f9) Press fn+f9 to increase screen brightness. Viewing Battery Charge Information (fn+f8) Press the fn+f8 hotkey to change the brightness ...
...interface) ✎ Composite video and DVI-D devices can only be connected to the notebook when it is the MultiBay battery pack. Increasing Screen Brightness (fn+f10) Press fn+f10 to decrease screen brightness. The display indicates which battery packs are indicated by number: ■ Location...Advanced Port Replicator. Hold down the hotkey to change the brightness level incrementally. 2-8 Hardware Guide Decreasing Screen Brightness (fn+f9) Press fn+f9 to increase screen brightness. Viewing Battery Charge Information (fn+f8) Press the fn+f8 hotkey to change the brightness ...
Hardware Guide
Page 32
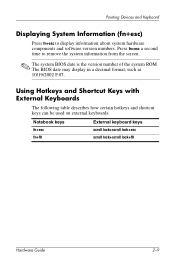
Using Hotkeys and Shortcut Keys with External Keyboards The following table describes how certain hotkeys and shortcut keys can be used on external keyboards: Notebook keys External keyboard keys fn+esc fn+f8 scroll lock+scroll lock+esc scroll lock+scroll lock+f8 Hardware Guide 2-9 Press fn+esc a second time ..., such as 10/19/2002 F.07. Pointing Devices and Keyboard Displaying System Information (fn+esc) Press fn+esc to remove the system information from the screen. ✎ The system BIOS date is the version number of the system ROM.
Using Hotkeys and Shortcut Keys with External Keyboards The following table describes how certain hotkeys and shortcut keys can be used on external keyboards: Notebook keys External keyboard keys fn+esc fn+f8 scroll lock+scroll lock+esc scroll lock+scroll lock+f8 Hardware Guide 2-9 Press fn+esc a second time ..., such as 10/19/2002 F.07. Pointing Devices and Keyboard Displaying System Information (fn+esc) Press fn+esc to remove the system information from the screen. ✎ The system BIOS date is the version number of the system ROM.


