Backup and Recovery - Windows XP
Page 5
Table of contents 1 Creating recovery discs 2 Backing up your information When to back up ...3 Backup suggestions ...4 Backing up specific files or folders ...5 Backing up the entire hard drive ...6 Creating recovery points ...7 Scheduling backups ...8 3 Performing a recovery Performing a recovery from the recovery discs 10 Performing a recovery from the hard drive 11 Initiating a recovery in Windows 12 Initiating a recovery from the hard drive recovery partition 13 Index ...14 v
Table of contents 1 Creating recovery discs 2 Backing up your information When to back up ...3 Backup suggestions ...4 Backing up specific files or folders ...5 Backing up the entire hard drive ...6 Creating recovery points ...7 Scheduling backups ...8 3 Performing a recovery Performing a recovery from the recovery discs 10 Performing a recovery from the hard drive 11 Initiating a recovery in Windows 12 Initiating a recovery from the hard drive recovery partition 13 Index ...14 v

Backup and Recovery - Windows XP and Windows Vista
Page 5
Table of contents 1 Creating recovery discs 2 Backing up your information When to back up ...3 Backup suggestions ...4 Backing up specific files or folders ...5 Backing up the entire hard drive ...6 Creating recovery points ...7 Scheduling backups ...8 3 Performing a recovery Performing a recovery from the recovery discs 10 Performing a recovery from the hard drive 11 Initiating a recovery in Windows 12 Initiating a recovery from the hard drive recovery partition 13 Index ...14 v
Table of contents 1 Creating recovery discs 2 Backing up your information When to back up ...3 Backup suggestions ...4 Backing up specific files or folders ...5 Backing up the entire hard drive ...6 Creating recovery points ...7 Scheduling backups ...8 3 Performing a recovery Performing a recovery from the recovery discs 10 Performing a recovery from the hard drive 11 Initiating a recovery in Windows 12 Initiating a recovery from the hard drive recovery partition 13 Index ...14 v
ProtectTools - Windows Vista and Windows XP
Page 3
...a secure password 8 HP ProtectTools Backup and Restore 8 Backing up credentials and settings 8 Restoring credentials 10 Configuring settings 10 2 Credential Manager for HP ProtectTools Setup procedures ...12 Logging on to Credential Manger 12 Using the ...Credential Manager Logon Wizard 12 Logging on for the first time 13 Registering credentials ...13 Registering fingerprints 13 Setting up the fingerprint reader 14 Using your registered fingerprint to log on to Windows...
...a secure password 8 HP ProtectTools Backup and Restore 8 Backing up credentials and settings 8 Restoring credentials 10 Configuring settings 10 2 Credential Manager for HP ProtectTools Setup procedures ...12 Logging on to Credential Manger 12 Using the ...Credential Manager Logon Wizard 12 Logging on for the first time 13 Registering credentials ...13 Registering fingerprints 13 Setting up the fingerprint reader 14 Using your registered fingerprint to log on to Windows...

Security - Windows XP and Windows Vista
Page 5
Table of contents 1 Protecting the computer 2 Using passwords Setting passwords in Windows ...3 Setting passwords in Computer Setup 4 Setup password ...5 Managing a setup password 5 Entering a setup password 5 Power-on password ...6 Managing ...a power-on password at restart 7 Using Computer Setup DriveLock ...8 Setting a DriveLock password 9 Entering a DriveLock password 10 Changing a DriveLock password 10 Removing DriveLock protection 10 3 Using Computer Setup security features Securing system devices ...11 Using Computer Setup stringent security 11 Setting stringent security 12 ...
Table of contents 1 Protecting the computer 2 Using passwords Setting passwords in Windows ...3 Setting passwords in Computer Setup 4 Setup password ...5 Managing a setup password 5 Entering a setup password 5 Power-on password ...6 Managing ...a power-on password at restart 7 Using Computer Setup DriveLock ...8 Setting a DriveLock password 9 Entering a DriveLock password 10 Changing a DriveLock password 10 Removing DriveLock protection 10 3 Using Computer Setup security features Securing system devices ...11 Using Computer Setup stringent security 11 Setting stringent security 12 ...

Notebook Tour - Windows Vista
Page 11
... mode uses a focal length of approximately 50 cm for capturing close-up images. ● To use macro mode, slide the switch to Windows instead of distance from traditional notebook mode into tablet mode or vice versa. Swivels the display and converts the computer from the camera. Illuminates the keyboard in your environment... a fingerprint logon to the left. Record sound and transmit sound for video conferencing. On: The camera is pressed. Macro mode uses a focal length of approximately 10 cm for capturing images within a standard range of a password logon.
... mode uses a focal length of approximately 50 cm for capturing close-up images. ● To use macro mode, slide the switch to Windows instead of distance from traditional notebook mode into tablet mode or vice versa. Swivels the display and converts the computer from the camera. Illuminates the keyboard in your environment... a fingerprint logon to the left. Record sound and transmit sound for video conferencing. On: The camera is pressed. Macro mode uses a focal length of approximately 10 cm for capturing images within a standard range of a password logon.
Notebook Tour - Windows Vista
Page 13
If the computer has stopped responding and Windows® shutdown procedures are ineffective, slide the switch to the right and hold for capturing close-up images. ● To use macro mode, slide the .... ● When the computer is off the computer. Normal mode uses a focal length of approximately 50 cm for capturing images within a standard range of approximately 10 cm for at least 5 seconds to turn off , slide the switch to the right to communicate with wireless wide area networks (WWAN). ● When the...
If the computer has stopped responding and Windows® shutdown procedures are ineffective, slide the switch to the right and hold for capturing close-up images. ● To use macro mode, slide the .... ● When the computer is off the computer. Normal mode uses a focal length of approximately 50 cm for capturing images within a standard range of approximately 10 cm for at least 5 seconds to turn off , slide the switch to the right to communicate with wireless wide area networks (WWAN). ● When the...
Notebook Tour - Windows Vista
Page 22
...identifying 14 bays battery 12, 15 Bluetooth compartment, identifying 7 Bluetooth label 15 buttons external WWAN antenna 7 keyboard light 5, 7 Presentation 4 volume mute 4 Windows security 8 C camera macro mode 5, 7 normal mode 5, 7 camera light, identifying 5, 7 camera mode switch 5, 7 camera, identifying 5 caps lock ...identifying 12 compartments hard drive 12 memory module 12 wireless devices 12 components additional hardware 14 bottom 12 display 5 front 7 left-side 10 rear 8 right-side 9 top 2 wireless antennae 13 connector, power 8 convertible hinge, identifying 5 cord, power 14 D display ...
...identifying 14 bays battery 12, 15 Bluetooth compartment, identifying 7 Bluetooth label 15 buttons external WWAN antenna 7 keyboard light 5, 7 Presentation 4 volume mute 4 Windows security 8 C camera macro mode 5, 7 normal mode 5, 7 camera light, identifying 5, 7 camera mode switch 5, 7 camera, identifying 5 caps lock ...identifying 12 compartments hard drive 12 memory module 12 wireless devices 12 components additional hardware 14 bottom 12 display 5 front 7 left-side 10 rear 8 right-side 9 top 2 wireless antennae 13 connector, power 8 convertible hinge, identifying 5 cord, power 14 D display ...

Notebook Tour - Windows Vista
Page 23
..., identifying 4 volume mute light, identifying 3 volume scroll zone, identifying 4 volume up light, identifying 3 W Windows applications key, identifying 6 Windows logo key, identifying 6 Windows security button, identifying 8 wireless certification label 15 wireless device compartment 12 wireless light, identifying 10, 11 wireless switch, identifying 10, 11 WLAN antenna, identifying 13 WLAN device 15 WLAN label 15 WWAN antenna...
..., identifying 4 volume mute light, identifying 3 volume scroll zone, identifying 4 volume up light, identifying 3 W Windows applications key, identifying 6 Windows logo key, identifying 6 Windows security button, identifying 8 wireless certification label 15 wireless device compartment 12 wireless light, identifying 10, 11 wireless switch, identifying 10, 11 WLAN antenna, identifying 13 WLAN device 15 WLAN label 15 WWAN antenna...
Notebook Tour - Windows XP
Page 11
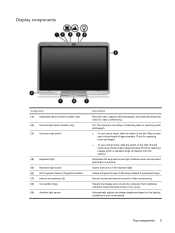
...fingerprint logon to the left. Top components 5 Record sound and transmit sound for video conferencing. Macro mode uses a focal length of approximately 10 cm for capturing images within a standard range of a password logon. On: The camera is pressed. Normal mode uses a focal length ...of approximately 50 cm for capturing close-up images. ● To use macro mode, slide the switch to Windows instead of distance from traditional notebook mode into tablet mode or vice versa. Swivels the display and converts the computer from the camera. Display components Component...
...fingerprint logon to the left. Top components 5 Record sound and transmit sound for video conferencing. Macro mode uses a focal length of approximately 10 cm for capturing images within a standard range of a password logon. On: The camera is pressed. Normal mode uses a focal length ...of approximately 50 cm for capturing close-up images. ● To use macro mode, slide the switch to Windows instead of distance from traditional notebook mode into tablet mode or vice versa. Swivels the display and converts the computer from the camera. Display components Component...

Notebook Tour - Windows XP
Page 13
... more about your power settings, select Start > Control Panel > Performance and Maintenance > Power Options. If the computer has stopped responding and Windows® shutdown procedures are ineffective, slide the switch to the right and hold for capturing closeup images. ● To use macro mode, ... the switch to the left. Normal mode uses a focal length of approximately 50 cm for capturing images within a standard range of approximately 10 cm for at least 5 seconds to turn off the computer. Sends and receives wireless signals to communicate with wireless wide area networks (WWAN...
... more about your power settings, select Start > Control Panel > Performance and Maintenance > Power Options. If the computer has stopped responding and Windows® shutdown procedures are ineffective, slide the switch to the right and hold for capturing closeup images. ● To use macro mode, ... the switch to the left. Normal mode uses a focal length of approximately 50 cm for capturing images within a standard range of approximately 10 cm for at least 5 seconds to turn off the computer. Sends and receives wireless signals to communicate with wireless wide area networks (WWAN...
Notebook Tour - Windows XP
Page 22
...identifying 14 bays battery 12, 15 Bluetooth compartment, identifying 7 Bluetooth label 15 buttons external WWAN antenna 7 keyboard light 5, 7 Presentation 4 volume mute 4 Windows security 8 C camera macro mode 5, 7 normal mode 5, 7 camera light, identifying 5, 7 camera mode switch 5, 7 camera, identifying 5 caps lock ...identifying 12 compartments hard drive 12 memory module 12 wireless devices 12 components additional hardware 14 bottom 12 display 5 front 7 left-side 10 rear 8 right-side 9 top 2 wireless antennae 13 connector, power 8 convertible hinge, identifying 5 cord, power 14 D display ...
...identifying 14 bays battery 12, 15 Bluetooth compartment, identifying 7 Bluetooth label 15 buttons external WWAN antenna 7 keyboard light 5, 7 Presentation 4 volume mute 4 Windows security 8 C camera macro mode 5, 7 normal mode 5, 7 camera light, identifying 5, 7 camera mode switch 5, 7 camera, identifying 5 caps lock ...identifying 12 compartments hard drive 12 memory module 12 wireless devices 12 components additional hardware 14 bottom 12 display 5 front 7 left-side 10 rear 8 right-side 9 top 2 wireless antennae 13 connector, power 8 convertible hinge, identifying 5 cord, power 14 D display ...
Notebook Tour - Windows XP
Page 23
..., identifying 4 volume mute light, identifying 3 volume scroll zone, identifying 4 volume up light, identifying 3 W Windows applications key, identifying 6 Windows logo key, identifying 6 Windows security button, identifying 8 wireless certification label 15 wireless device compartment 12 wireless light, identifying 10, 11 wireless switch, identifying 10, 11 WLAN antenna, identifying 13 WLAN device 15 WLAN label 15 WWAN antenna...
..., identifying 4 volume mute light, identifying 3 volume scroll zone, identifying 4 volume up light, identifying 3 W Windows applications key, identifying 6 Windows logo key, identifying 6 Windows security button, identifying 8 wireless certification label 15 wireless device compartment 12 wireless light, identifying 10, 11 wireless switch, identifying 10, 11 WLAN antenna, identifying 13 WLAN device 15 WLAN label 15 WWAN antenna...

Pointing Devices and Keyboard - Windows Vista
Page 16
... and setting preferences, refer to your password when you can view the QuickLook information. Select Start > All Programs > Software Setup. 2. Click Install. 10 Chapter 3 HP Quick Launch buttons Installing QuickLook To install QuickLook: 1. Expand Optional Software Applications, and then select HP QuickLook. 4. Clear all check boxes...the info button while the computer is off , in the Sleep state, or in Hibernation. NOTE: If you have set a Windows logon password, you will be installed before you can quickly view this information by pressing the info button on the computer.
... and setting preferences, refer to your password when you can view the QuickLook information. Select Start > All Programs > Software Setup. 2. Click Install. 10 Chapter 3 HP Quick Launch buttons Installing QuickLook To install QuickLook: 1. Expand Optional Software Applications, and then select HP QuickLook. 4. Clear all check boxes...the info button while the computer is off , in the Sleep state, or in Hibernation. NOTE: If you have set a Windows logon password, you will be installed before you can quickly view this information by pressing the info button on the computer.
Pointing Devices and Keyboard - Windows XP
Page 16
...Displaying the Q Menu The Q Menu provides quick access to many of the system tasks accessed with the buttons, keys, or hotkeys found on the Windows desktop ● Displaying the HP Quick Launch Buttons icon ● Displaying HP Quick Launch Buttons desktop notifications ● Enabling or disabling automatic mode change...NOTE: Some of the preferences listed on the desktop: ▲ Right-click the HP Quick Launch Buttons icon and select Launch Q Menu. 10 Chapter 3 HP Quick Launch buttons To display the Q Menu on the HP Quick Launch Buttons control panel may not be supported by the computer....
...Displaying the Q Menu The Q Menu provides quick access to many of the system tasks accessed with the buttons, keys, or hotkeys found on the Windows desktop ● Displaying the HP Quick Launch Buttons icon ● Displaying HP Quick Launch Buttons desktop notifications ● Enabling or disabling automatic mode change...NOTE: Some of the preferences listed on the desktop: ▲ Right-click the HP Quick Launch Buttons icon and select Launch Q Menu. 10 Chapter 3 HP Quick Launch buttons To display the Q Menu on the HP Quick Launch Buttons control panel may not be supported by the computer....


