User Guide
Page 7
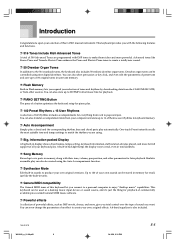
... and more , give you total control over the type of sound you expand your selection of them as a desktop music input device or sound source, and it's just the thing for full support of 300 Advanced Tones are programmed with DSP tones to create your own, original effects. You can be used... as user rhythms in Flash memory lets you want. This keyboard can also select percussion or key click, and even edit the parameters of preset tone and save up to 16 of tones and rhythms by downloading data from the CASIO MUSIC SITE, or from rock to 200 SMF format music files...
... and more , give you total control over the type of sound you expand your selection of them as a desktop music input device or sound source, and it's just the thing for full support of 300 Advanced Tones are programmed with DSP tones to create your own, original effects. You can be used... as user rhythms in Flash memory lets you want. This keyboard can also select percussion or key click, and even edit the parameters of preset tone and save up to 16 of tones and rhythms by downloading data from the CASIO MUSIC SITE, or from rock to 200 SMF format music files...

User Guide
Page 8
You can specify tone, volume, pan position, and other parameters for each channel during MIDI input. ❐ Registration Memory Keyboard setups can be stored in registration memory. ❐ Data download from your keyboard, use your computer to download data from Song Memory or SMF playback. * If a... store volumes of data for later recall when you play it back on the keyboard. ❐ Built-in floppy disk drive (WK-3500 only) Save original tones or songs you created with accompaniment from the CASIO MUSIC SITE. ❐ SmartMediaTM Card Slot A built-in Auto Accompaniment part.
You can specify tone, volume, pan position, and other parameters for each channel during MIDI input. ❐ Registration Memory Keyboard setups can be stored in registration memory. ❐ Data download from your keyboard, use your computer to download data from Song Memory or SMF playback. * If a... store volumes of data for later recall when you play it back on the keyboard. ❐ Built-in floppy disk drive (WK-3500 only) Save original tones or songs you created with accompaniment from the CASIO MUSIC SITE. ❐ SmartMediaTM Card Slot A built-in Auto Accompaniment part.
User Guide
Page 18
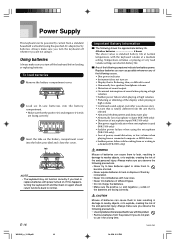
... 1 Remove the battery compartment cover. 2 Load six D-size batteries into the holes provided and close the cover. Alkaline...key • A tone that is used (WK-3100 only) • Sudden power failure when using the microphone (WK-3100 only) • Loss of power, sound distortion, or low volume when playing from a connected computer or MIDI device • Sudden power failure while reading from or writing to a diskette (WK-3500...input (WK-3100 only) • Dim power supply indicator when a microphone is totally different from the product if you load or replace batteries with the keyboard...
... 1 Remove the battery compartment cover. 2 Load six D-size batteries into the holes provided and close the cover. Alkaline...key • A tone that is used (WK-3100 only) • Sudden power failure when using the microphone (WK-3100 only) • Loss of power, sound distortion, or low volume when playing from a connected computer or MIDI device • Sudden power failure while reading from or writing to a diskette (WK-3500...input (WK-3100 only) • Dim power supply indicator when a microphone is totally different from the product if you load or replace batteries with the keyboard...
User Guide
Page 21
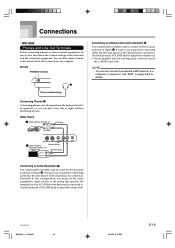
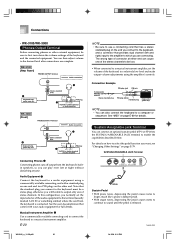
...It is up to you must set the audio equipment's input selector to the setting that the keyboard is connected to purchase connecting cables like the ones shown in Figure 2. Connections • WK-3500 Phones and Line Out Terminals Before connecting phones or other external... JACK LINE OUT DC 12V Guitar amplifier, Standard jacks keyboard amplifier, etc. It is up to you can also connect the keyboard's MIDI terminal to purchase connecting cables like the ones shown in Figure 3. Standard plugs INPUT 1 INPUT 2 Connecting to a Musical Instrument Amplifier 3 Use commercially...
...It is up to you must set the audio equipment's input selector to the setting that the keyboard is connected to purchase connecting cables like the ones shown in Figure 2. Connections • WK-3500 Phones and Line Out Terminals Before connecting phones or other external... JACK LINE OUT DC 12V Guitar amplifier, Standard jacks keyboard amplifier, etc. It is up to you can also connect the keyboard's MIDI terminal to purchase connecting cables like the ones shown in Figure 3. Standard plugs INPUT 1 INPUT 2 Connecting to a Musical Instrument Amplifier 3 Use commercially...
User Guide
Page 22
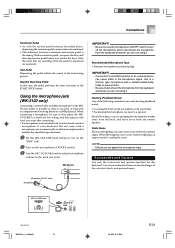
... two PIN plugs on page E-89 for full details. Connections • WK-3100/WK-3000 Phones/Output Terminal Before connecting phones or other end. Musical Instrument Amplifier 3 Use a commercially available connecting cord to connect the keyboard to sound until the pedal is connected. PHONES...left and right) input to the amplifier to a computer or sequencer. You can also connect the keyboard to which you are complete. WK-3100 [Rear Panel] PHONES/OUTPUT Terminal Audio connection 3 Keyboard amp, guitar amp, etc. Audio Equipment 2 Connect the keyboard to enable the capabilities...
... two PIN plugs on page E-89 for full details. Connections • WK-3100/WK-3000 Phones/Output Terminal Before connecting phones or other end. Musical Instrument Amplifier 3 Use a commercially available connecting cord to connect the keyboard to sound until the pedal is connected. PHONES...left and right) input to the amplifier to a computer or sequencer. You can also connect the keyboard to which you are complete. WK-3100 [Rear Panel] PHONES/OUTPUT Terminal Audio connection 3 Keyboard amp, guitar amp, etc. Audio Equipment 2 Connect the keyboard to enable the capabilities...
User Guide
Page 23
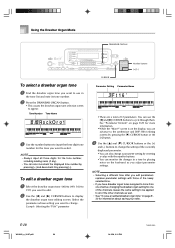
...keyboard...microphone signal. Rhythm Start/Stop Pedal In this keyboard. MIC IN jack IMPORTANT! • Be ... keys and then depress the pedal before you want after connecting. * If a microphone was included with your keyboard..., use the microphone's ON/OFF switch to turn off the microphone and to the level you release the keys. Only the notes that microphone. Using the microphone jack (WK...• Be sure to disconnect the microphone from the keyboard whenever you want . Microphone ON/OFF switch Microphone MIC ... from the keyboard whenever you suspect may be sure to ...
...keyboard...microphone signal. Rhythm Start/Stop Pedal In this keyboard. MIC IN jack IMPORTANT! • Be ... keys and then depress the pedal before you want after connecting. * If a microphone was included with your keyboard..., use the microphone's ON/OFF switch to turn off the microphone and to the level you release the keys. Only the notes that microphone. Using the microphone jack (WK...• Be sure to disconnect the microphone from the keyboard whenever you want . Microphone ON/OFF switch Microphone MIC ... from the keyboard whenever you suspect may be sure to ...

User Guide
Page 25
... conflicts, DSP is allocated to the last DSP enabled tone, and DSP is applied) for the 300 Advanced Tones numbered 000 through 515), each keyboard key is applied to a part.* Each tone has a DSP line parameter. Selecting a tone for a part applies the tone's DSP line parameter setting...note that controls whether or not the currently selected DSP effect is assigned a different percussion sound. Example: To select "332 ACOUSTIC BASS GM", input 3, 3 and then 2. This means that are available with sounds that when a rhythm or autoaccompaniment pattern is being played by pressing [+] and ...
... conflicts, DSP is allocated to the last DSP enabled tone, and DSP is applied) for the 300 Advanced Tones numbered 000 through 515), each keyboard key is applied to a part.* Each tone has a DSP line parameter. Selecting a tone for a part applies the tone's DSP line parameter setting...note that controls whether or not the currently selected DSP effect is assigned a different percussion sound. Example: To select "332 ACOUSTIC BASS GM", input 3, 3 and then 2. This means that are available with sounds that when a rhythm or autoaccompaniment pattern is being played by pressing [+] and ...
User Guide
Page 30
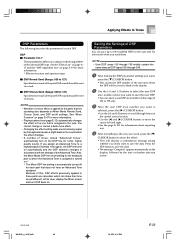
...the newly selected tone. • If you have drawbar organ tones assigned to more information. • While the "More?" screen is on the keyboard as well. • See "To save an edited drawbar organ tone" on page E-29 for more than one channel, changing the drawbar organ...and note its tone number. 2 Press the DRAWBAR ORGAN button. • This causes the drawbar organ tone selection screen to appear. NOTE • Always input all of 13 parameters. Example: Selecting the "Ft16'" parameter CURSOR Number buttons [+]/[-] Parameter Setting Parameter Name Ft 16 ' • There are a total...
...the newly selected tone. • If you have drawbar organ tones assigned to more information. • While the "More?" screen is on the keyboard as well. • See "To save an edited drawbar organ tone" on page E-29 for more than one channel, changing the drawbar organ...and note its tone number. 2 Press the DRAWBAR ORGAN button. • This causes the drawbar organ tone selection screen to appear. NOTE • Always input all of 13 parameters. Example: Selecting the "Ft16'" parameter CURSOR Number buttons [+]/[-] Parameter Setting Parameter Name Ft 16 ' • There are a total...
User Guide
Page 35
...772;] CURSOR button. • This causes the DSP number of tones, called "Advanced Tones", automatically turn DSP back on the display, followed by the keyboard causes a slight break in the range of the Advanced Tone. Because of this case, display the Mixer screen and turn on /off settings. See "... • Use the [̇] and [̈] CURSOR buttons to move the cursor left and right. • See the page E-103 for information about inputting text. 4 After everything is assigned to save the new DSP. • You can select a user DSP area number in the sound when the effect ...
...772;] CURSOR button. • This causes the DSP number of tones, called "Advanced Tones", automatically turn DSP back on the display, followed by the keyboard causes a slight break in the range of the Advanced Tone. Because of this case, display the Mixer screen and turn on /off settings. See "... • Use the [̇] and [̈] CURSOR buttons to move the cursor left and right. • See the page E-103 for information about inputting text. 4 After everything is assigned to save the new DSP. • You can select a user DSP area number in the sound when the effect ...
User Guide
Page 36
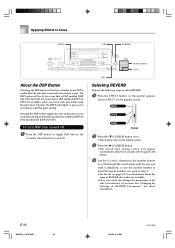
... the display screen. See "Changing the Settings of the part you are available. • Here you want is displayed, or use the number buttons to input the reverb number you could also change the parameters of REVERB effects that parts setting. Applying Effects to Tones EFFECT DSP CURSOR About the DSP... [+] and [-] buttons or the number buttons to scroll through the reverb types until the one you want to select. • See the list on the keyboard between enabled (DSP line ON) and disabled (DSP line OFF).
... the display screen. See "Changing the Settings of the part you are available. • Here you want is displayed, or use the number buttons to input the reverb number you could also change the parameters of REVERB effects that parts setting. Applying Effects to Tones EFFECT DSP CURSOR About the DSP... [+] and [-] buttons or the number buttons to scroll through the reverb types until the one you want to select. • See the list on the keyboard between enabled (DSP line ON) and disabled (DSP line OFF).

User Guide
Page 37
...to 127) Adjusts the damping of repeats. I Delay Feedback (Range: 000 to 127) Specifies the size of a reverb and how it is applied. See the following section titled "REVERB Parameters" for ... 13) I High Damp Same as Reverb Type NOTE • Whether or not an effect is output by this keyboard. I High Damp (Range: 000 to change. • This displays the parameter setting screen. A larger number ... Reverb Time parameter SRv T i me 2 Use the [+] and [-] buttons or the number buttons to input the parameter setting you want . 3 Press the EFFECT or EXIT button. • This returns to 127...
...to 127) Adjusts the damping of repeats. I Delay Feedback (Range: 000 to 127) Specifies the size of a reverb and how it is applied. See the following section titled "REVERB Parameters" for ... 13) I High Damp Same as Reverb Type NOTE • Whether or not an effect is output by this keyboard. I High Damp (Range: 000 to change. • This displays the parameter setting screen. A larger number ... Reverb Time parameter SRv T i me 2 Use the [+] and [-] buttons or the number buttons to input the parameter setting you want . 3 Press the EFFECT or EXIT button. • This returns to 127...
User Guide
Page 41
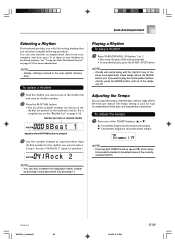
... it by pressing [-]. You can adjust the tempo of rhythm play , and song memory operations. Example: To select "041 ROCK 2", input 0, 4 and then 1. NOTE • Initially, nothing is stored in keyboard memory. If you want to use in the rhythm list and note its rhythm number. 2 Press the RHYTHM button. • Not...
... it by pressing [-]. You can adjust the tempo of rhythm play , and song memory operations. Example: To select "041 ROCK 2", input 0, 4 and then 1. NOTE • Initially, nothing is stored in keyboard memory. If you want to use in the rhythm list and note its rhythm number. 2 Press the RHYTHM button. • Not...
User Guide
Page 44
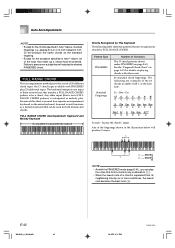
FULL RANGE CHORD Accompaniment Keyboard and Melody Keyboard Accompaniment keyboard/Melody keyboard Chords Recognized by This Keyboard The following are examples of the 23 chords available with C as a melody keyboard that can play the notes that make up a chord must be used for the exception specified in note*2 above, all of the keys that form a chord in any input of...
FULL RANGE CHORD Accompaniment Keyboard and Melody Keyboard Accompaniment keyboard/Melody keyboard Chords Recognized by This Keyboard The following are examples of the 23 chords available with C as a melody keyboard that can play the notes that make up a chord must be used for the exception specified in note*2 above, all of the keys that form a chord in any input of...
User Guide
Page 63
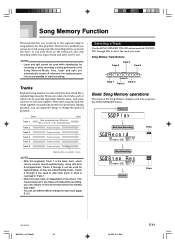
... (page E-47). Also, layer and split are two methods you can have its own tone number. There are used for keyboard play them on the keyboard, and step recording where you input chords and notes one . Tracks 2 through 6 can be used to add other parts to select the track you want. ...Song Memory Function This keyboard lets you record up to change the speed of playback. Besides notes, each time you can adjust ...
... (page E-47). Also, layer and split are two methods you can have its own tone number. There are used for keyboard play them on the keyboard, and step recording where you input chords and notes one . Tracks 2 through 6 can be used to add other parts to select the track you want. ...Song Memory Function This keyboard lets you record up to change the speed of playback. Besides notes, each time you can adjust ...
User Guide
Page 67
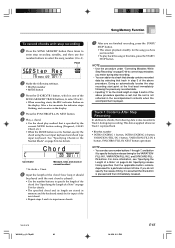
... • You can also use the number buttons to select the song number (0 to Normal, specify the chord using the root input keyboard and chord type input keyboard. Track 1 Contents After Step Recording In addition to chords, the following data is played). • Use the number buttons to specify... REC indicator flashes on page E-66 for a particular amount of time. See "Specifying Chords in memory and the keyboard stands by the current MODE button setting (Fingered, CASIO Chord, etc.). • When the MODE button is played. Song Memory Function To record chords with step recording ...
... • You can also use the number buttons to select the song number (0 to Normal, specify the chord using the root input keyboard and chord type input keyboard. Track 1 Contents After Step Recording In addition to chords, the following data is played). • Use the number buttons to specify... REC indicator flashes on page E-66 for a particular amount of time. See "Specifying Chords in memory and the keyboard stands by the current MODE button setting (Fingered, CASIO Chord, etc.). • When the MODE button is played. Song Memory Function To record chords with step recording ...

User Guide
Page 68
...CASIO Chord and Fingered fingerings. Example: To specify a quarter note ( ), press [3]. Next, press [5]. Rest Hold down the [7] (dot) or [9] (triplicate), use buttons [1] through [9] to Normal during step recording, you can be specified as a bass note. To start accompaniment with a specified bass note, pressing two keys of the root input keyboard...root, and press the key in the chord type input keyboard to insert the fill in. Example: To input an eighth note rest, hold down C and G on the root input keyboard and press the m key on the chord type input keyboard. (C) (G) Hold ...
...CASIO Chord and Fingered fingerings. Example: To specify a quarter note ( ), press [3]. Next, press [5]. Rest Hold down the [7] (dot) or [9] (triplicate), use buttons [1] through [9] to Normal during step recording, you can be specified as a bass note. To start accompaniment with a specified bass note, pressing two keys of the root input keyboard...root, and press the key in the chord type input keyboard to insert the fill in. Example: To input an eighth note rest, hold down C and G on the root input keyboard and press the m key on the chord type input keyboard. (C) (G) Hold ...
User Guide
Page 69
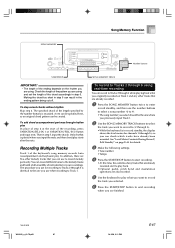
... twice to enter record standby, and then use for recording to the melody tracks and build a full ensemble of instruments for your recordings. To add chord accompaniment part way through 16, so you can... back. • Optional pedal, pitch bend and modulation operations are also recorded. 5 Use the keyboard to Track 1. The procedure you use the number buttons to select a song number (0 to record...start of the recording, press VARIATION/FILL-IN 1 or VARIATION/FILL-IN 2 button and input rests. SONG MEMORY Song Memory Function Number buttons START/STOP IMPORTANT! • The length ...
... twice to enter record standby, and then use for recording to the melody tracks and build a full ensemble of instruments for your recordings. To add chord accompaniment part way through 16, so you can... back. • Optional pedal, pitch bend and modulation operations are also recorded. 5 Use the keyboard to Track 1. The procedure you use the number buttons to select a song number (0 to record...start of the recording, press VARIATION/FILL-IN 1 or VARIATION/FILL-IN 2 button and input rests. SONG MEMORY Song Memory Function Number buttons START/STOP IMPORTANT! • The length ...

User Guide
Page 70
... (WK-3500) • Modulation button operation (WK-3100/WK-3000) • Pitch bend range To record to Tracks 2 through 6). Use the [+] (increase) and [-] (decrease) buttons to change the tone. • After changing the tone number, press any keyboard key to clear the tone number and name screen, and return to the note input screen. 4 Use the keyboard keys to input...
... (WK-3500) • Modulation button operation (WK-3100/WK-3000) • Pitch bend range To record to Tracks 2 through 6). Use the [+] (increase) and [-] (decrease) buttons to change the tone. • After changing the tone number, press any keyboard key to clear the tone number and name screen, and return to the note input screen. 4 Use the keyboard keys to input...
User Guide
Page 71
... back. • Tone number Level Meter Contents During Record/ Edit Standby Channels 11 through 16 correspond to Tracks 1 through 6, the entire keyboard functions as a musical score that moving the input point to the left and right. 2 Monitoring the data on to a track that already contains recorded data by selecting that track in...
... back. • Tone number Level Meter Contents During Record/ Edit Standby Channels 11 through 16 correspond to Tracks 1 through 6, the entire keyboard functions as a musical score that moving the input point to the left and right. 2 Monitoring the data on to a track that already contains recorded data by selecting that track in...

User Guide
Page 73
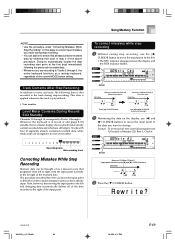
... 2 through 6 are finished. The pitch you want to change a parameter depend on the keyboard or use to the location in the value that you specify here is in memory. Gr ..., 0:11 PM E-71 No t e G4 To change the pitch of a note Input a new note on the type of a recording to change the key pressure (velocity) of a note. To change the pitch of a note Use the... editing memory contents, never change a chord Use the chord fingering method selected by the MODE button (Fingered, CASIO Chord, etc.) to the note before or after it. Doing so may alter the length of real-time ...
... 2 through 6 are finished. The pitch you want to change a parameter depend on the keyboard or use to the location in the value that you specify here is in memory. Gr ..., 0:11 PM E-71 No t e G4 To change the pitch of a note Input a new note on the type of a recording to change the key pressure (velocity) of a note. To change the pitch of a note Use the... editing memory contents, never change a chord Use the chord fingering method selected by the MODE button (Fingered, CASIO Chord, etc.) to the note before or after it. Doing so may alter the length of real-time ...


