User Guide
Page 23
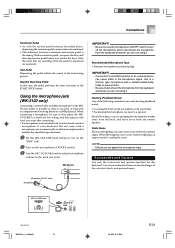
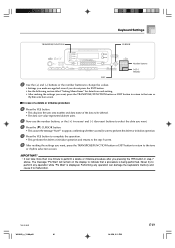
... to sing as the START/STOP button. Using the microphone jack (WK-3100 only) Connecting a commercially available microphone* to the MIC IN ...move away from the lighting you release the keys. Rhythm Start/Stop Pedal In this keyboard. MIC IN jack IMPORTANT! • Be ...keyboard, use that microphone. Recommended Microphone Type • Dynamic microphone (standard plug) IMPORTANT! • Connection to microphone input. Static Noise Fluorescent lighting can cause static in the microphone signal. Accessories and Options Use only the accessories and options specified for this case...
... to sing as the START/STOP button. Using the microphone jack (WK-3100 only) Connecting a commercially available microphone* to the MIC IN ...move away from the lighting you release the keys. Rhythm Start/Stop Pedal In this keyboard. MIC IN jack IMPORTANT! • Be ...keyboard, use that microphone. Recommended Microphone Type • Dynamic microphone (standard plug) IMPORTANT! • Connection to microphone input. Static Noise Fluorescent lighting can cause static in the microphone signal. Accessories and Options Use only the accessories and options specified for this case...

User Guide
Page 28
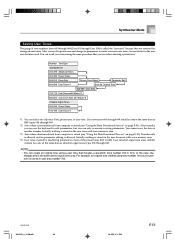
... drawbar organ tone selection screen from the Song Memory Mode or SMF Playback Mode screen. In this case, however, the Drawbar Organ Tone Editing Screen does not appear. Using the Drawbar Organ Mode Your keyboard has built-in memory for storage of up to the controls on a drawbar organ. There is room...;] CURSOR button [̆] CURSOR button DSP Effect Editing Screen [̄] CURSOR button [̆] CURSOR button Name/Save Setting Screen * You can also select percussion or key click.
... drawbar organ tone selection screen from the Song Memory Mode or SMF Playback Mode screen. In this case, however, the Drawbar Organ Tone Editing Screen does not appear. Using the Drawbar Organ Mode Your keyboard has built-in memory for storage of up to the controls on a drawbar organ. There is room...;] CURSOR button [̆] CURSOR button DSP Effect Editing Screen [̄] CURSOR button [̆] CURSOR button Name/Save Setting Screen * You can also select percussion or key click.
User Guide
Page 35
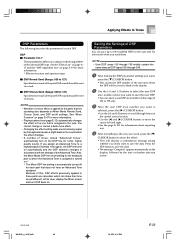
... tones, called "Advanced Tones", automatically turn DSP back on the DSP line for the keyboard part to reverb. You cannot change or cancel a demo tune effect. • Changing the effect setting while ... the "Effect List" on page A17 and the "DSP Algorithm List" on the display, followed by the keyboard causes a slight break in the range of 100 to 199 only. 3 After the user DSP area number ...you want to save up to 100 modified DSPs in accordance with the settings of this case, display the Mixer screen and turn on . Press the YES button to save the new DSP. &#...
... tones, called "Advanced Tones", automatically turn DSP back on the DSP line for the keyboard part to reverb. You cannot change or cancel a demo tune effect. • Changing the effect setting while ... the "Effect List" on page A17 and the "DSP Algorithm List" on the display, followed by the keyboard causes a slight break in the range of 100 to 199 only. 3 After the user DSP area number ...you want to save up to 100 modified DSPs in accordance with the settings of this case, display the Mixer screen and turn on . Press the YES button to save the new DSP. &#...
User Guide
Page 51
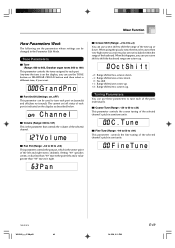
... 000 to 199) This parameter controls the tones assigned to play are the parameters whose settings can be cases when very high notes you want . When using the piccolo tone, there may be changed in semitone... if you want to each part is the parameter that controls the volume of the keyboard. F i neTune 735A-E-051A WK3100_e_47-58.p65 49 04.3.26, 0:11 PM E-49 Tone Parameters I Volume ...(Range: 000 to shift the keyboard range one octave up. +2 : Range shifted two octaves up . Gr andPno I Octave Shift (Range: ...
... 000 to 199) This parameter controls the tones assigned to play are the parameters whose settings can be cases when very high notes you want . When using the piccolo tone, there may be changed in semitone... if you want to each part is the parameter that controls the volume of the keyboard. F i neTune 735A-E-051A WK3100_e_47-58.p65 49 04.3.26, 0:11 PM E-49 Tone Parameters I Volume ...(Range: 000 to shift the keyboard range one octave up. +2 : Range shifted two octaves up . Gr andPno I Octave Shift (Range: ...
User Guide
Page 55
You can recall your own user tone, you use the keyboard to 049). User tone areas 600 through 699 initially contain the same data as the source tone area. Initially, nothing is the same as DSP .... *4: User tones created by modifying parameters of one of the preset tones (000 to edit parameters, but you can only overwrite existing parameters. In this case, the storage area is stored in the user tone with Waves*3 Drawbar Organ Tones 000-049 Preset Tones 100-199 User Tones*4 *1: You can create...
You can recall your own user tone, you use the keyboard to 049). User tone areas 600 through 699 initially contain the same data as the source tone area. Initially, nothing is the same as DSP .... *4: User tones created by modifying parameters of one of the preset tones (000 to edit parameters, but you can only overwrite existing parameters. In this case, the storage area is stored in the user tone with Waves*3 Drawbar Organ Tones 000-049 Preset Tones 100-199 User Tones*4 *1: You can create...

User Guide
Page 73
...[+] and [-] buttons to change a chord Use the chord fingering method selected by the MODE button (Fingered, CASIO Chord, etc.) to input a chord. NOTE • The only parameters that can be changed note and ...specify here is reflected in the keyboard and the notes shown in the staff on this page for Track 1 using step recording. • In the case of real-time recording, you ... • You cannot use [+] and [-] buttons to change the key pressure (velocity) of a note Use the number buttons or [+] and [-] to adjust the key pressure. Gr andPno 735A-E-073A WK3100_e_61-73.p65 71 04.3.26,...
...[+] and [-] buttons to change a chord Use the chord fingering method selected by the MODE button (Fingered, CASIO Chord, etc.) to input a chord. NOTE • The only parameters that can be changed note and ...specify here is reflected in the keyboard and the notes shown in the staff on this page for Track 1 using step recording. • In the case of real-time recording, you ... • You cannot use [+] and [-] buttons to change the key pressure (velocity) of a note Use the number buttons or [+] and [-] to adjust the key pressure. Gr andPno 735A-E-073A WK3100_e_61-73.p65 71 04.3.26,...
User Guide
Page 83
Never try to the tone or rhythm selection screen. TRANSPOSE/FUNCTION Keyboard Settings CURSOR Number buttons [+]/[-] YES/NO EXIT 3 Use the [+]...button. • This causes the message "Sure?" Performing any operation while "Pls Wait" is being performed. I In case of a delete or initialize procedure 4 Press the YES button. • This displays the user area number and data... name of the data to be deleted. • The data size value represents kilobyte units. 5 Now use the number buttons, or the [+] (increase) and [-] (decrease) buttons ...
Never try to the tone or rhythm selection screen. TRANSPOSE/FUNCTION Keyboard Settings CURSOR Number buttons [+]/[-] YES/NO EXIT 3 Use the [+]...button. • This causes the message "Sure?" Performing any operation while "Pls Wait" is being performed. I In case of a delete or initialize procedure 4 Press the YES button. • This displays the user area number and data... name of the data to be deleted. • The data size value represents kilobyte units. 5 Now use the number buttons, or the [+] (increase) and [-] (decrease) buttons ...

User Guide
Page 102
... show the user area number, while the text area will show the user area name. • Pressing the EXIT or [̆] CURSOR button at this case, skip step 9 and go directly to step 10. 9 Use the [̇] and [̈] CURSOR buttons or [+] and [-] buttons to select the user area...message will ask if you are finished performing the load operation, press the DISK/CARD button (CARD button on the keyboard while the card is closed, which enables writing. • Floppy Diskette (WK-3500 Only) • Insert the floppy diskette that contains the file you selected in the display's text area. 2 ...
... show the user area number, while the text area will show the user area name. • Pressing the EXIT or [̆] CURSOR button at this case, skip step 9 and go directly to step 10. 9 Use the [̇] and [̈] CURSOR buttons or [+] and [-] buttons to select the user area...message will ask if you are finished performing the load operation, press the DISK/CARD button (CARD button on the keyboard while the card is closed, which enables writing. • Floppy Diskette (WK-3500 Only) • Insert the floppy diskette that contains the file you selected in the display's text area. 2 ...


