Owners Manual
Page 1
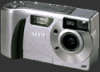
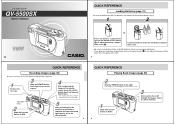
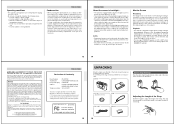
... PLAY. 4 Operation lamp 2 Slide the Function Switch to REC. 5 After confirming that come with the camera before recording images (page 36). 1 Remove the lens cap. 3 Slide the POWER Switch to the right to open the battery compartment cover (2). Never use alkaline, lithium or Ni-MH batteries. LCD Digital Camera QV-5500SX Owner's Manual QUICK REFERENCE Loading Batteries (page 31) Be sure to load the four AA size batteries that the Auto Focus operation is complete (the operation lamp lights green), press the shutter button. 3 QUICK...
... PLAY. 4 Operation lamp 2 Slide the Function Switch to REC. 5 After confirming that come with the camera before recording images (page 36). 1 Remove the lens cap. 3 Slide the POWER Switch to the right to open the battery compartment cover (2). Never use alkaline, lithium or Ni-MH batteries. LCD Digital Camera QV-5500SX Owner's Manual QUICK REFERENCE Loading Batteries (page 31) Be sure to load the four AA size batteries that the Auto Focus operation is complete (the operation lamp lights green), press the shutter button. 3 QUICK...
Owners Manual
Page 2
...49 Using the Macro Feature 50 Manual Focus 50 Movie Recording 51 Panorama Recording 53 Night Scene Mode 54 Using AEB (Auto Exposure Bracketing 55 Using Multiple Exposure 56 6 Using the Self-timer 57 Using the Timer 58 Record Menu 59 65 PLAYBACK Basic Playback Operation 65 Playing Back a Movie 66 Panorama Playback 68 Using Zoom 70 Displaying Multiple Images 71 Slide Show 72 Screen Saver 73 75 USING FOLDERS Recording an Image in a Specific Folder 75 Selecting a Folder to Playback Images 75 To Move a Single Image from the use of malfunction, repairs, or battery replacement...
...49 Using the Macro Feature 50 Manual Focus 50 Movie Recording 51 Panorama Recording 53 Night Scene Mode 54 Using AEB (Auto Exposure Bracketing 55 Using Multiple Exposure 56 6 Using the Self-timer 57 Using the Timer 58 Record Menu 59 65 PLAYBACK Basic Playback Operation 65 Playing Back a Movie 66 Panorama Playback 68 Using Zoom 70 Displaying Multiple Images 71 Slide Show 72 Screen Saver 73 75 USING FOLDERS Recording an Image in a Specific Folder 75 Selecting a Folder to Playback Images 75 To Move a Single Image from the use of malfunction, repairs, or battery replacement...
Owners Manual
Page 3
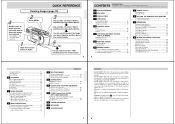
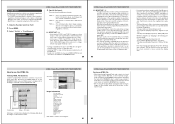
... zoom Multiple Exposure Night Scene 10 Macro Feature page 49 Self-timer page 56 Timer page 54 page 50 page 57 page 58 Date and Time Stamping Display Zoom Multi-image Screen 99/5/12 Slide Show page 36 page 71 Folder Storage FOLDER A FOLDER B Image Protection page 72 FEATURES page 70 page 75 page 77 11 PRECAUTIONS General Precautions Be sure to observe the following important precautions whenever using the flash, the camera...
... zoom Multiple Exposure Night Scene 10 Macro Feature page 49 Self-timer page 56 Timer page 54 page 50 page 57 page 58 Date and Time Stamping Display Zoom Multi-image Screen 99/5/12 Slide Show page 36 page 71 Folder Storage FOLDER A FOLDER B Image Protection page 72 FEATURES page 70 page 75 page 77 11 PRECAUTIONS General Precautions Be sure to observe the following important precautions whenever using the flash, the camera...
Owners Manual
Page 4
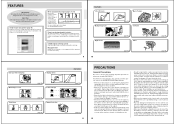
... camera and leave the battery compartment cover open for a Class B peripheral, pursuant to other areas subject to direct sunlight - The image is recorded in accordance with the resolution setting made with your dealer or an authorized CASIO service provider to 40°C. • Do not use or keep the camera in accordance with your dealer as soon as the new location. QV-5500SX...
... camera and leave the battery compartment cover open for a Class B peripheral, pursuant to other areas subject to direct sunlight - The image is recorded in accordance with the resolution setting made with your dealer or an authorized CASIO service provider to 40°C. • Do not use or keep the camera in accordance with your dealer as soon as the new location. QV-5500SX...
Owners Manual
Page 6
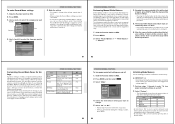
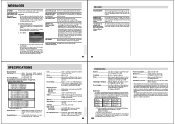
...Tools Menu Protect Move Group Protects an image against image "burn in progress Flash is charging Memory error Playback Mode (when connecting video cable) Lamp Color Green Red On Playing back Low battery Flashing Please wait (after power on) Low Battery Warning Flashes for video output. Date Screen Saver Video Out Language Stamps the date and time on a single screen. REC Function switch PLAY • Use the REC Mode to record still images, movies, and panorama images. • Use the PLAY Mode to another folder. Format Formats a memory card. Lamps • The power/card...
...Tools Menu Protect Move Group Protects an image against image "burn in progress Flash is charging Memory error Playback Mode (when connecting video cable) Lamp Color Green Red On Playing back Low battery Flashing Please wait (after power on) Low Battery Warning Flashes for video output. Date Screen Saver Video Out Language Stamps the date and time on a single screen. REC Function switch PLAY • Use the REC Mode to record still images, movies, and panorama images. • Use the PLAY Mode to another folder. Format Formats a memory card. Lamps • The power/card...

Owners Manual
Page 7
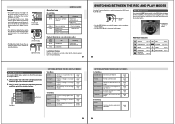
... screen. Press MENU. 3. tion, slide the memory card into the camera. Slide the Function Switch to eject the card. 4. Make sure that the correct side of the card is turned off the monitor screen conserves battery power. Doing so creates the danger of the camera is facing up a panorama or the buffer status when using Quick Shutter. 25 MONITOR SCREEN Screen when shutter is pressed half way Flash Mode ( ) Auto Focus Frame • Focusing complete: Green/White • Focusing failed: Red Flash indicator...
... screen. Press MENU. 3. tion, slide the memory card into the camera. Slide the Function Switch to eject the card. 4. Make sure that the correct side of the card is turned off the monitor screen conserves battery power. Doing so creates the danger of the camera is facing up a panorama or the buffer status when using Quick Shutter. 25 MONITOR SCREEN Screen when shutter is pressed half way Flash Mode ( ) Auto Focus Frame • Focusing complete: Green/White • Focusing failed: Red Flash indicator...
Owners Manual
Page 8
... below indicate the amount of the camera's flash, zoom function, turning on the following important precautions to use either batteries (AA-size alkaline, lithium or Ni-MH) or household AC current. Doing so can - Be sure to battery failure. Select "Set Up" "Format". 4. Flash turned off Regardless of use a computer to copy the images you suspect contains corrupted image data (due to a DECODE ERROR, strange image colors, malformed images) or newly purchased memory cards. • Before starting a format operation...
... below indicate the amount of the camera's flash, zoom function, turning on the following important precautions to use either batteries (AA-size alkaline, lithium or Ni-MH) or household AC current. Doing so can - Be sure to battery failure. Select "Set Up" "Format". 4. Flash turned off Regardless of use a computer to copy the images you suspect contains corrupted image data (due to a DECODE ERROR, strange image colors, malformed images) or newly purchased memory cards. • Before starting a format operation...

Owners Manual
Page 9
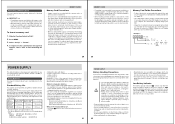
... camera power if no operation is performed for a specified amount of the camera and unplug adaptor from standard AC power. POWER SUPPLY Initializing Power Save Trigger Times Use the following procedure to PLAY. 2. Press the MODE button and then select . 3. Set the current date and time. • Use [+] and [-] to select the setting that is connected to a computer. 34 Power Save Settings The settings described below let you record an image, the time and date the image was shot...
... camera power if no operation is performed for a specified amount of the camera and unplug adaptor from standard AC power. POWER SUPPLY Initializing Power Save Trigger Times Use the following procedure to PLAY. 2. Press the MODE button and then select . 3. Set the current date and time. • Use [+] and [-] to select the setting that is connected to a computer. 34 Power Save Settings The settings described below let you record an image, the time and date the image was shot...

Owners Manual
Page 10
... make it in the Macro Mode. Slide the Function Switch to compose images in memory. REC PLAY 2. Doing so will go to record the image. 38 Basic Recording Operation The following describes the basic operation for focusing (page 50). When using Auto Focus, compose the subject so it there. • The camera's Auto Focus feature automatically focuses the image. • The operation lamp lights green when the Auto Focus operation is indicated by the red operation lamp. When this time cancels the save...
... make it in the Macro Mode. Slide the Function Switch to compose images in memory. REC PLAY 2. Doing so will go to record the image. 38 Basic Recording Operation The following describes the basic operation for focusing (page 50). When using Auto Focus, compose the subject so it there. • The camera's Auto Focus feature automatically focuses the image. • The operation lamp lights green when the Auto Focus operation is indicated by the red operation lamp. When this time cancels the save...
Owners Manual
Page 11
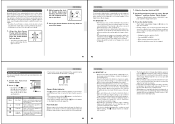
... Reduction. / button Indicator None Flash Mode Auto Flash Flash On Flash Off Red-eye Reduction Description Flash is in the following conditions causes images to be used , so the coloring of the recorded image may take up to provide illumination during movie, continuous, and AEB recording. S l i d e t h e F u n c t i o n Switch to REC. 2. Press / . • Each press of / cycles through the flash mode in focus. 2. Operation lamp Camera Shake Indicator The (camera shake indicator) appears on the monitor screen whenever flash is turned off and shutter speed is...
... Reduction. / button Indicator None Flash Mode Auto Flash Flash On Flash Off Red-eye Reduction Description Flash is in the following conditions causes images to be used , so the coloring of the recorded image may take up to provide illumination during movie, continuous, and AEB recording. S l i d e t h e F u n c t i o n Switch to REC. 2. Press / . • Each press of / cycles through the flash mode in focus. 2. Operation lamp Camera Shake Indicator The (camera shake indicator) appears on the monitor screen whenever flash is turned off and shutter speed is...

Owners Manual
Page 12
...an image record operation while the low battery indicator " " is displayed. You can manually reset the exposure compensation value by using a card that allows storage of more advanced recording operations that are using [+] and [-] to change in a single folder is 250. Slide the Function Switch to REC. 2. Compose the image and then record it to adjust for zoom, macro, movie, panorama, manual, timer and multiple exposure recording operations. 1. EV value is fixed during panorama recording. Use it . 48 Resolution Settings The camera has four resolution modes: Super...
...an image record operation while the low battery indicator " " is displayed. You can manually reset the exposure compensation value by using a card that allows storage of more advanced recording operations that are using [+] and [-] to change in a single folder is 250. Slide the Function Switch to REC. 2. Compose the image and then record it to adjust for zoom, macro, movie, panorama, manual, timer and multiple exposure recording operations. 1. EV value is fixed during panorama recording. Use it . 48 Resolution Settings The camera has four resolution modes: Super...

Owners Manual
Page 14
... 1 through 2 under "To record a new image over an existing image 1. Slide the Function Switch to remain on page 67. IMPORTANT! • Flash is disabled during movie recording. • Movie images that are applied to all subsequent images in combination with the previous one . Press MODE, and then select EXPOSURE). (MULTIPLE 3. Panorama Recording Mode 53 OTHER RECORDING FUNCTIONS 3. Uploading a movie image to a computer ungroups it, so you will not be sure to use manual focusing (page 50). ter...
... 1 through 2 under "To record a new image over an existing image 1. Slide the Function Switch to remain on page 67. IMPORTANT! • Flash is disabled during movie recording. • Movie images that are applied to all subsequent images in combination with the previous one . Press MODE, and then select EXPOSURE). (MULTIPLE 3. Panorama Recording Mode 53 OTHER RECORDING FUNCTIONS 3. Uploading a movie image to a computer ungroups it, so you will not be sure to use manual focusing (page 50). ter...

Owners Manual
Page 15
... the macro and self-timer settings in - Takes reading at the center of movies. File Format Size Length Mode Movie Use this setting to toggle date and time stamping of two images combined using multiple exposure. s Choices: AVI, JPG Use this setting to set the self-timer trigger time as they are not affected by contrast settings. s Choices: Normal, Past Use the Record Menu (page 59) to specify the file format of the image. The screen will turn on and off between shots (Interval), and the record start time...
... the macro and self-timer settings in - Takes reading at the center of movies. File Format Size Length Mode Movie Use this setting to toggle date and time stamping of two images combined using multiple exposure. s Choices: AVI, JPG Use this setting to set the self-timer trigger time as they are not affected by contrast settings. s Choices: Normal, Past Use the Record Menu (page 59) to specify the file format of the image. The screen will turn on and off between shots (Interval), and the record start time...
Owners Manual
Page 16
OTHER RECORDING FUNCTIONS Performing Manual White Balance Certain lighting conditions can cause Auto white balance to take a very long time or can tell the camera to save in mode memory. Press MENU. 3. tomatically when it is set by the camera automatically whenever you select ON (save trigger time settings (page 35). 1. Settings stored in step 3 above procedure. Single Current flash mode setting (page 43). Auto Current Manual Mode metering setting (page 59). Perform steps 1 through 2 under "To turn power on default settings on and...
OTHER RECORDING FUNCTIONS Performing Manual White Balance Certain lighting conditions can cause Auto white balance to take a very long time or can tell the camera to save in mode memory. Press MENU. 3. tomatically when it is set by the camera automatically whenever you select ON (save trigger time settings (page 35). 1. Settings stored in step 3 above procedure. Single Current flash mode setting (page 43). Auto Current Manual Mode metering setting (page 59). Perform steps 1 through 2 under "To turn power on default settings on and...

Owners Manual
Page 17
... the images. • Only images recorded while "JPEG" is selected for the Record Menu (page 60) "File Format (Movie)" item can change the playback direction. 66 Regrouping Movie Images When you want to change the direction of the camera lets you play pauses playback. Slide the Function Switch to its images to PLAY. Select "Tools" "Group" "Movie". ing back a movie to play pauses playback. Use [+] and [-] to select the panorama you just recorded first. • Pressing the shutter button while a movie or panorama image...
... the images. • Only images recorded while "JPEG" is selected for the Record Menu (page 60) "File Format (Movie)" item can change the playback direction. 66 Regrouping Movie Images When you want to change the direction of the camera lets you play pauses playback. Slide the Function Switch to its images to PLAY. Select "Tools" "Group" "Movie". ing back a movie to play pauses playback. Use [+] and [-] to select the panorama you just recorded first. • Pressing the shutter button while a movie or panorama image...

Owners Manual
Page 18
... want to view and then press the shutter button to its normal size, press any button be- Auto Power Off (page 33) is disabled whenever Slide Show is complete. To re-group panorama images IMPORTANT! • You cannot group movie images or images of the images that make up the panorama until the one . 71 PLAYBACK 4. Slide the Function Switch to the normal single-image display. Use [+] and [-] to zoom. 3. orama images. • The panorama playback screen (page...
... want to view and then press the shutter button to its normal size, press any button be- Auto Power Off (page 33) is disabled whenever Slide Show is complete. To re-group panorama images IMPORTANT! • You cannot group movie images or images of the images that make up the panorama until the one . 71 PLAYBACK 4. Slide the Function Switch to the normal single-image display. Use [+] and [-] to zoom. 3. orama images. • The panorama playback screen (page...
Owners Manual
Page 22
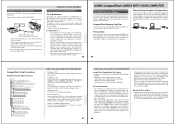
... cable (Comes with the QV Color Printer.) • See the documentation that comes with the QV Color Printer for details. • Performing a print operation for a movie prints the individual frames that make up the movie. • Printing a panorama prints the individual images that make up the panorama. • Movie images contained in the HTML image lists displayed on your computer's screen. • HTML Files (INDEX)/(MENU)/(DATA) These files are images recorded by the Camera • Image files recorded with the CASIO QV-5500SX Digital Camera • JPEG files stored using QV...
... cable (Comes with the QV Color Printer.) • See the documentation that comes with the QV Color Printer for details. • Performing a print operation for a movie prints the individual frames that make up the movie. • Printing a panorama prints the individual images that make up the panorama. • Movie images contained in the HTML image lists displayed on your computer's screen. • HTML Files (INDEX)/(MENU)/(DATA) These files are images recorded by the Camera • Image files recorded with the CASIO QV-5500SX Digital Camera • JPEG files stored using QV...
Owners Manual
Page 23
... QVIMG02 folder) onto your Web browser to display a list of all its images on again. File size (KB) Resolution (pixels) Quality Recording mode AE Light metering Shutter speed Aperture stop Exposure comp Focusing mode Flash mode Sharpness Saturation Contrast Multiple Exposure White balance Digital zoom Date Click Index to return to the image list. 91 USING CompactFlash CARDS WITH YOUR COMPUTER Saving an HTML File • When transferring CompactFlash card contents to a hard disk, floppy diskette, MO disk, or other media), delete all images...
... QVIMG02 folder) onto your Web browser to display a list of all its images on again. File size (KB) Resolution (pixels) Quality Recording mode AE Light metering Shutter speed Aperture stop Exposure comp Focusing mode Flash mode Sharpness Saturation Contrast Multiple Exposure White balance Digital zoom Date Click Index to return to the image list. 91 USING CompactFlash CARDS WITH YOUR COMPUTER Saving an HTML File • When transferring CompactFlash card contents to a hard disk, floppy diskette, MO disk, or other media), delete all images...
Owners Manual
Page 24
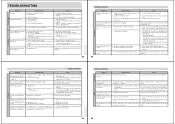
...- Video cable connected to the Manual Mode and focus manually. Press the DISP button to turn the camera on page 36 to set of Select a different function or change to PLAY. 2. Disconnect the video cable. Use of the screen saver. Action 1. Replace all four batteries with a set of power before recording it is on the display when image was composed. 1. Replace manganese batteries with a set the time and display. Wait until an image is connected. 0:00 flashing on the time The time and date (clock) settings have...
...- Video cable connected to the Manual Mode and focus manually. Press the DISP button to turn the camera on page 36 to set of Select a different function or change to PLAY. 2. Disconnect the video cable. Use of the screen saver. Action 1. Replace all four batteries with a set of power before recording it is on the display when image was composed. 1. Replace manganese batteries with a set the time and display. Wait until an image is connected. 0:00 flashing on the time The time and date (clock) settings have...
Owners Manual
Page 25
... the format operation is indicated by batteries going dead while the camera is ei- Connect the AC adaptor to the camera and switch to behave abnormally. Use your important images are trying to display is not connected to 6.6´) Recording Functions ........ on use of the pixels can contain up to use it with this procedure. all times. mechanical shutter, 1/8 to 1/500 second (1 second in Night Scene Mode) Aperture f/2.8, 4, 5.6, 8, 11, 16 auto White Balance Automatic, fixed (4 modes), manual switching Self-timer...
... the format operation is indicated by batteries going dead while the camera is ei- Connect the AC adaptor to the camera and switch to behave abnormally. Use your important images are trying to display is not connected to 6.6´) Recording Functions ........ on use of the pixels can contain up to use it with this procedure. all times. mechanical shutter, 1/8 to 1/500 second (1 second in Night Scene Mode) Aperture f/2.8, 4, 5.6, 8, 11, 16 auto White Balance Automatic, fixed (4 modes), manual switching Self-timer...


