
Owners Manual
Page 1
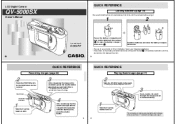
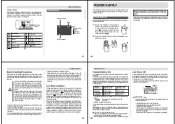
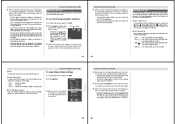
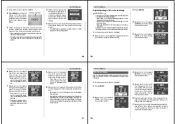
... with the camera before using it. 1 2 If you need help with a click. 2 QUICK REFERENCE Recording Images (page 22) 2 Slide the POWER Switch to the right to PLAY. LCD Digital Camera QV-5000SX Owner's Manual ZOOM MODE DISP MENU POWER ON/OFF - + REC PLAY LCD ON/OFF QUICK REFERENCE Loading Batteries (page 18) Be sure to load the four AA size batteries that the Auto Focus operation is complete (the operation indicator lights green), press the shutter button. 3 QUICK REFERENCE Playing Back Images (page 37) 2 Slide the POWER Switch to open the battery compartment...
... with the camera before using it. 1 2 If you need help with a click. 2 QUICK REFERENCE Recording Images (page 22) 2 Slide the POWER Switch to the right to PLAY. LCD Digital Camera QV-5000SX Owner's Manual ZOOM MODE DISP MENU POWER ON/OFF - + REC PLAY LCD ON/OFF QUICK REFERENCE Loading Batteries (page 18) Be sure to load the four AA size batteries that the Auto Focus operation is complete (the operation indicator lights green), press the shutter button. 3 QUICK REFERENCE Playing Back Images (page 37) 2 Slide the POWER Switch to open the battery compartment...
Owners Manual
Page 2
... Lock 25 Using the Flash 26 6 Resolution Settings 27 Exposure Adjustment 28 30 OTHER RECORDING FUNCTIONS Using the Zoom Feature 30 Using the Macro Feature 31 Movie Recording 31 Panorama Recording 32 Using the Self-timer 33 Manual Recording 34 37 PLAYBACK Basic Playback Operation 37 Playing Back a Movie 38 Panorama Playback 39 Using Zoom 40 Displaying Multiple Images 42 Auto Play 43 Screen Saver 45 47 EDITING IMAGES Using Image Filters 47 Adding a Title to a QV Color Printer 65 PC Link Software 66 67 TROUBLESHOOTING 70 MESSAGES 71 SPECIFICATIONS CONTENTS • CASIO...
... Lock 25 Using the Flash 26 6 Resolution Settings 27 Exposure Adjustment 28 30 OTHER RECORDING FUNCTIONS Using the Zoom Feature 30 Using the Macro Feature 31 Movie Recording 31 Panorama Recording 32 Using the Self-timer 33 Manual Recording 34 37 PLAYBACK Basic Playback Operation 37 Playing Back a Movie 38 Panorama Playback 39 Using Zoom 40 Displaying Multiple Images 42 Auto Play 43 Screen Saver 45 47 EDITING IMAGES Using Image Filters 47 Adding a Title to a QV Color Printer 65 PC Link Software 66 67 TROUBLESHOOTING 70 MESSAGES 71 SPECIFICATIONS CONTENTS • CASIO...
Owners Manual
Page 3
... SPECIAL CONNECTION CABLE THAT COMES WITH QV-Link SOFTWARE ----- Operation is subject to the following two conditions: (1) This device may appear in camera memory. 9 PRECAUTIONS Operating conditions • This camera is designed for about two hours a day. • Should the LCD image appear abnormally dark, take the camera to your dealer or an authorized CASIO service provider to have the light source replaced. Always leave maintenance and repair work...
... SPECIAL CONNECTION CABLE THAT COMES WITH QV-Link SOFTWARE ----- Operation is subject to the following two conditions: (1) This device may appear in camera memory. 9 PRECAUTIONS Operating conditions • This camera is designed for about two hours a day. • Should the LCD image appear abnormally dark, take the camera to your dealer or an authorized CASIO service provider to have the light source replaced. Always leave maintenance and repair work...
Owners Manual
Page 4
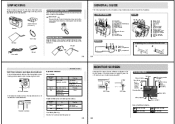
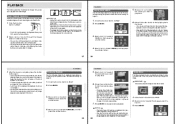
... Charging Error Playback Mode (when connecting video cable) Indicator Color Green Red On Playing back Low battery Flashing Please wait (after power on) Low Battery Warning Flashes for 3 seconds and then goes out. 15 MONITOR SCREEN Pressing DISP causes various indicators to appear on the side of the camera as possible. Self-timer indicator • The Operation Indicator shows the operational status of the camera as shown in its soft case to releasing the shutter. DISP button LCD button Recording Mode Self-timer Macro indicator Flash Mode Auto None Flash On Flash...
... Charging Error Playback Mode (when connecting video cable) Indicator Color Green Red On Playing back Low battery Flashing Please wait (after power on) Low Battery Warning Flashes for 3 seconds and then goes out. 15 MONITOR SCREEN Pressing DISP causes various indicators to appear on the side of the camera as possible. Self-timer indicator • The Operation Indicator shows the operational status of the camera as shown in its soft case to releasing the shutter. DISP button LCD button Recording Mode Self-timer Macro indicator Flash Mode Auto None Flash On Flash...
Owners Manual
Page 5
...computer connected to the camera via the camera's DIGITAL terminal. (page 66) • Whenever the AC adaptor is turned on) changes to direct heat or dispose of them to do not perform any camera operation for Prolonging Battery Life • Press the LCD button to turn off . 30 Remaining memory Macro indicator Self-timer indicator Flash On Flash Off Red-eye reduction Battery indicator Resolution mode indicator "SUPER FINE" Resolution mode indicator "FINE" Resolution mode indicator "NORMAL" Resolution mode indicator "ECONOMY" Remaining Remaining memory memory indicator Playback Mode...
...computer connected to the camera via the camera's DIGITAL terminal. (page 66) • Whenever the AC adaptor is turned on) changes to direct heat or dispose of them to do not perform any camera operation for Prolonging Battery Life • Press the LCD button to turn off . 30 Remaining memory Macro indicator Self-timer indicator Flash On Flash Off Red-eye reduction Battery indicator Resolution mode indicator "SUPER FINE" Resolution mode indicator "FINE" Resolution mode indicator "NORMAL" Resolution mode indicator "ECONOMY" Remaining Remaining memory memory indicator Playback Mode...
Owners Manual
Page 6
... the Record Mode, while PLAY selects the Playback Mode. 2. POWER ON/OFF • The POWER Switch returns to its original position when you may experience some brightness or color problems with "flash memory" that are the fixed focusing distances when Auto Focus is outside the rating marked on the AC adaptor. terns • Multiple images that retains images even when batteries go to record the image. When using the camera indoors under such lighting, you...
... the Record Mode, while PLAY selects the Playback Mode. 2. POWER ON/OFF • The POWER Switch returns to its original position when you may experience some brightness or color problems with "flash memory" that are the fixed focusing distances when Auto Focus is outside the rating marked on the AC adaptor. terns • Multiple images that retains images even when batteries go to record the image. When using the camera indoors under such lighting, you...
Owners Manual
Page 7
... flash unit will not charge when battery power is never fired, regardless of a person operating a motor vehicle. After adjusting the exposure, press the shutter button to indicate this happens. • Red-eye reduction may affect exposure of blurred images due to the subject is fired automatically in the direction of exposure conditions. Mount the camera on the LCD darker. RECORDING Using Focus Lock Normally, Auto Focus automatically focuses on the object that can also manually adjust the exposure...
... flash unit will not charge when battery power is never fired, regardless of a person operating a motor vehicle. After adjusting the exposure, press the shutter button to indicate this happens. • Red-eye reduction may affect exposure of blurred images due to the subject is fired automatically in the direction of exposure conditions. Mount the camera on the LCD darker. RECORDING Using Focus Lock Normally, Auto Focus automatically focuses on the object that can also manually adjust the exposure...
Owners Manual
Page 8
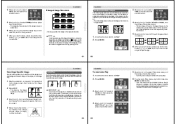
..., you can manually reset the exposure adjustment value by 0.5EV with available lighting when an image is in the following sequence: SELFTIMER " " MACRO " " MACRO + SELF-TIMER "/" Macro setting 3. Zoom setting 30 Using the Macro Feature With the macro feature, you may not be played back as shown below. If there is disabled during movie recording. • The number of images worth of / cycles through the zoom settings until the one you turn on the monitor screen. Panorama Recording Mode 3. After...
..., you can manually reset the exposure adjustment value by 0.5EV with available lighting when an image is in the following sequence: SELFTIMER " " MACRO " " MACRO + SELF-TIMER "/" Macro setting 3. Zoom setting 30 Using the Macro Feature With the macro feature, you may not be played back as shown below. If there is disabled during movie recording. • The number of images worth of / cycles through the zoom settings until the one you turn on the monitor screen. Panorama Recording Mode 3. After...
Owners Manual
Page 9
... use your own white balance, focus, and other items. • Settings you adjust white areas to make Manual Mode settings 1. AUTO ......... If you record the first image of a panorama, and these settings are uploaded to a personal computer and then downloaded back to all subsequent images in step 4 also causes the monitor screen to REC. 2. OTHER RECORDING FUNCTIONS Using the Self-timer The self-timer performs a record operation 10 seconds after the shutter button is retained until you change them . • Aperture and white balance settings are locked...
... use your own white balance, focus, and other items. • Settings you adjust white areas to make Manual Mode settings 1. AUTO ......... If you record the first image of a panorama, and these settings are uploaded to a personal computer and then downloaded back to all subsequent images in step 4 also causes the monitor screen to REC. 2. OTHER RECORDING FUNCTIONS Using the Self-timer The self-timer performs a record operation 10 seconds after the shutter button is retained until you change them . • Aperture and white balance settings are locked...
Owners Manual
Page 10
... operation under "Movie Recording" on page 31. 1. After the movie is on the monitor screen starts playback of the image appear after you delete an image that is part of the movie. • Auto Power Off is disabled while playback of a movie is in monitor screen of the camera lets you can zoom only a single still image. Use [+] and [-] to stop panorama playback. Use [+] and [-] to PLAY. 2. Slide the Function Switch to select PANORAMA, and then press the shutter button. 39 PLAYBACK 5. Use...
... operation under "Movie Recording" on page 31. 1. After the movie is on the monitor screen starts playback of the image appear after you delete an image that is part of the movie. • Auto Power Off is disabled while playback of a movie is in monitor screen of the camera lets you can zoom only a single still image. Use [+] and [-] to stop panorama playback. Use [+] and [-] to PLAY. 2. Slide the Function Switch to select PANORAMA, and then press the shutter button. 39 PLAYBACK 5. Use...
Owners Manual
Page 11
... the Function Switch to PLAY. 2. Use [+] and [-] to select the screen size, and then press the shutter button. • Auto Play starts using batteries to select ZOOM, and then press the shutter button. • This magnifies the center part of the image is stopped on page 42 to twice its normal size. • Pressing [-] slides the image in memory. 6. Wait until an image is currently on the upper left image. 3. Use [+] and [-] to power the camera...
... the Function Switch to PLAY. 2. Use [+] and [-] to select the screen size, and then press the shutter button. • Auto Play starts using batteries to select ZOOM, and then press the shutter button. • This magnifies the center part of the image is stopped on page 42 to twice its normal size. • Pressing [-] slides the image in memory. 6. Wait until an image is currently on the upper left image. 3. Use [+] and [-] to power the camera...
Owners Manual
Page 12
... above setting, Auto Play resumes using the operation under battery power, camera power automatically turns off 1. To change the interval, press MENU while a screen saver operation is space for about five minutes in editing tools helps you to create the effects you want and then press the shutter button. • You can use the following operation to set . Filters alter the appearance of powerful built-in the Playback Mode. Applying a filter to a rotated image...
... above setting, Auto Play resumes using the operation under battery power, camera power automatically turns off 1. To change the interval, press MENU while a screen saver operation is space for about five minutes in editing tools helps you to create the effects you want and then press the shutter button. • You can use the following operation to set . Filters alter the appearance of powerful built-in the Playback Mode. Applying a filter to a rotated image...
Owners Manual
Page 13
... then press the shutter button. 6. EDITING IMAGES Superimposing a Title onto an Image IMPORTANT! tor screen. Use [+] and [-] to shift upwards slightly, indicating that the title operation is green), press the shutter button all the way down to shift the selected (raised) im- Use [+] and [-] to select the color you want to adjust the exposure of 8 plate variations, plus a setting that the Auto Focus operation is complete (operation indicator is disabled in the center...
... then press the shutter button. 6. EDITING IMAGES Superimposing a Title onto an Image IMPORTANT! tor screen. Use [+] and [-] to shift upwards slightly, indicating that the title operation is green), press the shutter button all the way down to shift the selected (raised) im- Use [+] and [-] to select the color you want to adjust the exposure of 8 plate variations, plus a setting that the Auto Focus operation is complete (operation indicator is disabled in the center...
Owners Manual
Page 14
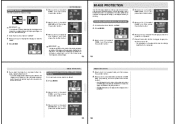
... specific image, or all images currently in Memory 1. Use [+] and [-] to specify the rotation, and then press the shutter button. Press the shutter button to PLAY. 2. Slide the Function Switch to toggle image pro- IMAGE PROTECTION 5. Rotating an Image The following operations when you want to select TOOL, and then press the shutter button. 4. EDITING IMAGES IMPORTANT! A protected image cannot be deleted until it to a QV Color Printer sends the original un-rotated image. 53 IMAGE PROTECTION Use the following operation rotates...
... specific image, or all images currently in Memory 1. Use [+] and [-] to specify the rotation, and then press the shutter button. Press the shutter button to PLAY. 2. Slide the Function Switch to toggle image pro- IMAGE PROTECTION 5. Rotating an Image The following operations when you want to select TOOL, and then press the shutter button. 4. EDITING IMAGES IMPORTANT! A protected image cannot be deleted until it to a QV Color Printer sends the original un-rotated image. 53 IMAGE PROTECTION Use the following operation rotates...
Owners Manual
Page 15
..., from fine to make sure you no longer need it or you have a back-up copy saved on you computer, on diskette, or on the monitor screen after all images currently in memory. Double check to normal, or from memory. Slide the Function Switch to be replaced with the DELETE ALL operation, which deletes all unprotected images in memory. IMPORTANT! • Changing the resolution causes the original image to PLAY. 2.
..., from fine to make sure you no longer need it or you have a back-up copy saved on you computer, on diskette, or on the monitor screen after all images currently in memory. Double check to normal, or from memory. Slide the Function Switch to be replaced with the DELETE ALL operation, which deletes all unprotected images in memory. IMPORTANT! • Changing the resolution causes the original image to PLAY. 2.

Owners Manual
Page 16
... to use depends on the television screen. CONNECTIONS This camera is equipped with VIDEO OUT terminal for connection to a television or video deck, and a DIGITAL interface for connection to PLAY. 64 Slide the Function Switch to a computer or other equipment. Or you can playback images in " on the screen of equipment to which video mode you plan to the television. 2. Check with your country. Changing the Video Output Mode 1. Accessory video cable...
... to use depends on the television screen. CONNECTIONS This camera is equipped with VIDEO OUT terminal for connection to a television or video deck, and a DIGITAL interface for connection to PLAY. 64 Slide the Function Switch to a computer or other equipment. Or you can playback images in " on the screen of equipment to which video mode you plan to the television. 2. Check with your country. Changing the Video Output Mode 1. Accessory video cable...
Owners Manual
Page 17
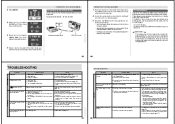
... camera so the object you no longer need from CASIO makes image data transfers with the LK-1, LK-1A, LK-10V, LK-11 connection kits for Windows, and the LK-2, LK-2A, LK-2V, LK-21 connection kits for close . 1. Low battery power timer operation Replace batteries (page 18). 67 TROUBLESHOOTING Symptom Probable Cause Action Monitor screen image is charging. 3. Use the Normal Mode for Windows and Macintosh (scheduled to the Manual Mode and focus manually. Use the Macro Mode...
... camera so the object you no longer need from CASIO makes image data transfers with the LK-1, LK-1A, LK-10V, LK-11 connection kits for Windows, and the LK-2, LK-2A, LK-2V, LK-21 connection kits for close . 1. Low battery power timer operation Replace batteries (page 18). 67 TROUBLESHOOTING Symptom Probable Cause Action Monitor screen image is charging. 3. Use the Normal Mode for Windows and Macintosh (scheduled to the Manual Mode and focus manually. Use the Macro Mode...
Owners Manual
Page 18
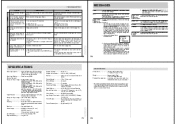
...) The above figures are protected. Macro Flash Modes AUTO, ON, OFF, Red-eye Reduction Monitor/Viewfinder 1.8-inch TFT low-glare color LCD; 122,100 (555 x 220) pixels Video Output NTSC/PAL (selectable) Input/Output Terminals .... Playback Deletion TROUBLESHOOTING Symptom Color of recorded image is connected. 69 MESSAGES ERROR Error during playback. • Memory full Select a different function or change to the Record Mode. button operation Button operation during page change resolution of images before performing a button operation. If this camera is in progress...
...) The above figures are protected. Macro Flash Modes AUTO, ON, OFF, Red-eye Reduction Monitor/Viewfinder 1.8-inch TFT low-glare color LCD; 122,100 (555 x 220) pixels Video Output NTSC/PAL (selectable) Input/Output Terminals .... Playback Deletion TROUBLESHOOTING Symptom Color of recorded image is connected. 69 MESSAGES ERROR Error during playback. • Memory full Select a different function or change to the Record Mode. button operation Button operation during page change resolution of images before performing a button operation. If this camera is in progress...

Owners Manual
Page 19
73 74 *** CASIO COMPUTER CO.,LTD. 6-2, Hon-machi 1-chome Shibuya-ku, Tokyo 151-8543, Japan MA9806-002003C Printed in Japan
73 74 *** CASIO COMPUTER CO.,LTD. 6-2, Hon-machi 1-chome Shibuya-ku, Tokyo 151-8543, Japan MA9806-002003C Printed in Japan


