
Owners Manual
Page 3
... Self-timer lamp E-29 Using the Bundled Accessories E-30 Using the Lens Cap E-30 Attaching the Neck Strap E-30 Adjusting the Length of the Neck Strap E-31 Using the Soft Case E-31 Power Requirements E-32 Loading Batteries E-32 Battery Handling Precautions E-35 Low Battery Indicator E-35 Using AC Power E-36 Turning the Camera On and Off E-37 Power Save Settings E-37 Memory Cards E-39 Inserting a Memory Card into the Camera E-39 Removing a Memory Card from the Camera E-40 Formatting a Memory Card...
... Self-timer lamp E-29 Using the Bundled Accessories E-30 Using the Lens Cap E-30 Attaching the Neck Strap E-30 Adjusting the Length of the Neck Strap E-31 Using the Soft Case E-31 Power Requirements E-32 Loading Batteries E-32 Battery Handling Precautions E-35 Low Battery Indicator E-35 Using AC Power E-36 Turning the Camera On and Off E-37 Power Save Settings E-37 Memory Cards E-39 Inserting a Memory Card into the Camera E-39 Removing a Memory Card from the Camera E-40 Formatting a Memory Card...
Owners Manual
Page 4
... Indicators Adjusting the Flash Intensity Precautions when Using Flash E-57 E-57 E-58 Selecting the Focus Mode E-59 Using the Auto Focus Mode Using the Macro Mode Using the Infinity Mode Using the Manual Focus Mode Using Focus Lock Specifying the Focus Frame Location E-59 E-60 E-61 E-61 E-62 E-63 E-4 Specifying Image Size and Quality E-64 Using the Self-timer E-65 Exposure Compensation E-66 E-68 OTHER RECORDING FUNCTIONS Using the Continuous Shutter Mode E-68 Shooting Portraits E-69 Shooting Landscapes E-69 Shooting Night Scenes E-70 Instant Setup Using the Best Shot Mode...
... Indicators Adjusting the Flash Intensity Precautions when Using Flash E-57 E-57 E-58 Selecting the Focus Mode E-59 Using the Auto Focus Mode Using the Macro Mode Using the Infinity Mode Using the Manual Focus Mode Using Focus Lock Specifying the Focus Frame Location E-59 E-60 E-61 E-61 E-62 E-63 E-4 Specifying Image Size and Quality E-64 Using the Self-timer E-65 Exposure Compensation E-66 E-68 OTHER RECORDING FUNCTIONS Using the Continuous Shutter Mode E-68 Shooting Portraits E-69 Shooting Landscapes E-69 Shooting Night Scenes E-70 Instant Setup Using the Best Shot Mode...
Owners Manual
Page 5
... Turning the On-screen Grid On and Off E-91 Specifying Outline Sharpness E-92 Specifying Color Saturation E-92 Specifying Contrast E-93 Saving Uncompressed Images (TIFF Mode) ......... E-93 Specifying Power On Default Settings E-94 Resetting the Camera E-95 Using the Camera's Shortcut Features E-96 Changing REC mode FUNCTION Menu Settings Using the Shortcut Buttons E-96 To assign REC mode FUNCTION menu items to shortcut buttons E-97 Directly Accessing the REC mode FUNCTION Menu E-99 E-100 PLAYBACK Basic Playback Operation E-100 Playing a Movie E-101 Playing a Panorama...
... Turning the On-screen Grid On and Off E-91 Specifying Outline Sharpness E-92 Specifying Color Saturation E-92 Specifying Contrast E-93 Saving Uncompressed Images (TIFF Mode) ......... E-93 Specifying Power On Default Settings E-94 Resetting the Camera E-95 Using the Camera's Shortcut Features E-96 Changing REC mode FUNCTION Menu Settings Using the Shortcut Buttons E-96 To assign REC mode FUNCTION menu items to shortcut buttons E-97 Directly Accessing the REC mode FUNCTION Menu E-99 E-100 PLAYBACK Basic Playback Operation E-100 Playing a Movie E-101 Playing a Panorama...
Owners Manual
Page 6
...134 Viewing Card Browser File Contents Saving Card Browser Files E-136 E-139 E-140 REFERENCE Camera Menus E-140 REC mode E-140 PLAY mode E-141 Mode Settings E-142 Settings in Each Mode E-142 Recording Mode + Exposure Mode Combinations E-143 Troubleshooting E-144 Messages E-147 Specifications E-149 E-6 E-129 Memory Card Data E-130 DCF Protocol E-130 Memory Card File Structure E-131 Image Files Supported by the Camera E-132 Precautions when Using a Memory Card on the Memory Card E-119 E-120 E-121 E-122 OTHER SETTINGS Changing the Display Language E-122 Turning...
...134 Viewing Card Browser File Contents Saving Card Browser Files E-136 E-139 E-140 REFERENCE Camera Menus E-140 REC mode E-140 PLAY mode E-141 Mode Settings E-142 Settings in Each Mode E-142 Recording Mode + Exposure Mode Combinations E-143 Troubleshooting E-144 Messages E-147 Specifications E-149 E-6 E-129 Memory Card Data E-130 DCF Protocol E-130 Memory Card File Structure E-131 Image Files Supported by the Camera E-132 Precautions when Using a Memory Card on the Memory Card E-119 E-120 E-121 E-122 OTHER SETTINGS Changing the Display Language E-122 Turning...

Owners Manual
Page 8
INTRODUCTION Recording an Image (page E-48) 4 After confirming that the Auto Focus operation is complete (the operation lamp lights green), press the shutter release button all the way down to focus the image. 1 Remove the lens cap from the lens. 2 Align the POWER/Function Switch with REC. MENU Use the Diopter Dial to adjust the view through the viewfinder to suit your particular eyesight. (page E-54) SET/ DISP REC RESIZ/ E / MF OFF PLAY BEST SHOT T SHIFT...
INTRODUCTION Recording an Image (page E-48) 4 After confirming that the Auto Focus operation is complete (the operation lamp lights green), press the shutter release button all the way down to focus the image. 1 Remove the lens cap from the lens. 2 Align the POWER/Function Switch with REC. MENU Use the Diopter Dial to adjust the view through the viewfinder to suit your particular eyesight. (page E-54) SET/ DISP REC RESIZ/ E / MF OFF PLAY BEST SHOT T SHIFT...
Owners Manual
Page 11
... USB driver uses software by Phoenix Technologies Ltd., Compatibility Software Copyright C 1997 Phoenix Technologies Ltd., All Rights Reserved. • IBM is a registered trademark of International Business Machines Corporation. • Other company, product and service names used herein may arise through the use of malfunction, repairs, or battery replacement. assumes no responsibility for any loss or claims by deletion of data as a result of this manual. • CASIO...
... USB driver uses software by Phoenix Technologies Ltd., Compatibility Software Copyright C 1997 Phoenix Technologies Ltd., All Rights Reserved. • IBM is a registered trademark of International Business Machines Corporation. • Other company, product and service names used herein may arise through the use of malfunction, repairs, or battery replacement. assumes no responsibility for any loss or claims by deletion of data as a result of this manual. • CASIO...
Owners Manual
Page 12
...; Digital Print Order Format (DPOF) Images can be used when specifying images and quantities for printing by professional print services. • DCF Data Storage DCF (Design rule for Camera File system) data storage protocol provides image inter-compatibility with useful software. You can view a gallery of image thumbnails on your computer screen. • Image management and manipulation software The QV-3500EX comes bundled with a CD-ROM that's packed with printers and other digital cameras. • VIDEO OUT terminal Connect...
...; Digital Print Order Format (DPOF) Images can be used when specifying images and quantities for printing by professional print services. • DCF Data Storage DCF (Design rule for Camera File system) data storage protocol provides image inter-compatibility with useful software. You can view a gallery of image thumbnails on your computer screen. • Image management and manipulation software The QV-3500EX comes bundled with a CD-ROM that's packed with printers and other digital cameras. • VIDEO OUT terminal Connect...
Owners Manual
Page 15
... light from the flash can cause the image data stored in its use is fired too close to take it to personal computer memory. Using the camera under these conditions creates the danger of this camera" and "the camera" refer to the CASIO QV-3500EX Digital Camera. • Never try to open the case of data by transferring them to your nearest CASIO service provider for repair. Dust build up to authorized CASIO service...
... light from the flash can cause the image data stored in its use is fired too close to take it to personal computer memory. Using the camera under these conditions creates the danger of this camera" and "the camera" refer to the CASIO QV-3500EX Digital Camera. • Never try to open the case of data by transferring them to your nearest CASIO service provider for repair. Dust build up to authorized CASIO service...

Owners Manual
Page 22
... keep the zoom setting at its image is not changed by the lens you are using. • Flash is disabled while a conversion lens or 58mm close -up lens. Whenever you are using a conversion lens, install the cushion that comes with it and mount the camera on the camera. If you don't, the lens will come into contact with the conversion lens or 58mm close-up lens when it...
... keep the zoom setting at its image is not changed by the lens you are using. • Flash is disabled while a conversion lens or 58mm close -up lens. Whenever you are using a conversion lens, install the cushion that comes with it and mount the camera on the camera. If you don't, the lens will come into contact with the conversion lens or 58mm close-up lens when it...

Owners Manual
Page 24
... camera's batteries or unplug its body when you turn on the lens, the message "LENS CAP!" appears on the camera. • If you align the POWER/Function switch with proper image recording. Never touch the lens with a tabletop, etc. If this camera extends from the lens surface by using a lens blower to blow them off. E-24 Be sure to remove the lens cap before turning on the display and camera power turns off automatically. Take...
... camera's batteries or unplug its body when you turn on the lens, the message "LENS CAP!" appears on the camera. • If you align the POWER/Function switch with proper image recording. Never touch the lens with a tabletop, etc. If this camera extends from the lens surface by using a lens blower to blow them off. E-24 Be sure to remove the lens cap before turning on the display and camera power turns off automatically. Take...
Owners Manual
Page 27
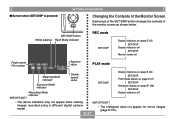
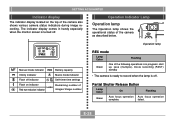
images recorded using a different digital camera model. • The histogram does not appear for movie images (page E-101). Shutter speed value SET/DISP Display indicators on (page E-26) SET/DISP PLAY Mode details on (page E-27) SET/DISP Histogram display on (page E-25) SET/DISP Display indicators off SET/DISP Monitor screen off • The above indicators may not appear when viewing IMPORTANT! GETTING ACQUAINTED s Screen when SET/DISP is pressed SET/DISP SET/DISP button White balance Flash Mode indicator Changing the Contents of the Monitor Screen Each...
images recorded using a different digital camera model. • The histogram does not appear for movie images (page E-101). Shutter speed value SET/DISP Display indicators on (page E-26) SET/DISP PLAY Mode details on (page E-27) SET/DISP Histogram display on (page E-25) SET/DISP Display indicators off SET/DISP Monitor screen off • The above indicators may not appear when viewing IMPORTANT! GETTING ACQUAINTED s Screen when SET/DISP is pressed SET/DISP SET/DISP button White balance Flash Mode indicator Changing the Contents of the Monitor Screen Each...
Owners Manual
Page 28
...Partial Shutter Release Button Lamp Color On Flashing Green Auto focus operation Auto focus operation complete. GETTING ACQUAINTED Indicator display The indicator display located on indicator Remaining number of number Red eye reduction indicator images/Image number REC mode Lamp Color Flashing Green One of the following operations is in handy especially when the monitor screen is off . Operation lamp Manual mode indicator Battery capacity Infinity indicator Macro mode indicator Flash off indicator Self-timer time settings Flash on the top of the camera MENU...
...Partial Shutter Release Button Lamp Color On Flashing Green Auto focus operation Auto focus operation complete. GETTING ACQUAINTED Indicator display The indicator display located on indicator Remaining number of number Red eye reduction indicator images/Image number REC mode Lamp Color Flashing Green One of the following operations is in handy especially when the monitor screen is off . Operation lamp Manual mode indicator Battery capacity Infinity indicator Macro mode indicator Flash off indicator Self-timer time settings Flash on the top of the camera MENU...
Owners Manual
Page 33
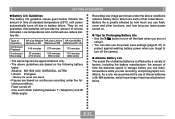
... also use of Operation Continuous Playback Continuous Recording AA-size Alkaline AA-size Lithium AA-size Ni-MH Batteries LR6 Batteries FR6 Batteries NP-H3 145 minutes 35 minutes (210 shots) 270 minutes 150 minutes (900 shots) 170 minutes 110 minutes (660 shots) • The above figures are approximations only. • The above conditions reduces battery life to turn off the camera. As a rule, we recommend the use the power save settings...
... also use of Operation Continuous Playback Continuous Recording AA-size Alkaline AA-size Lithium AA-size Ni-MH Batteries LR6 Batteries FR6 Batteries NP-H3 145 minutes 35 minutes (210 shots) 270 minutes 150 minutes (900 shots) 170 minutes 110 minutes (660 shots) • The above figures are approximations only. • The above conditions reduces battery life to turn off the camera. As a rule, we recommend the use the power save settings...

Owners Manual
Page 34
... battery life changes under different shooting conditions. Conditions • Temperature: 25°C • Repeat of a cycle of recording of one minute of playback, and a nine minutes of power off (power on, full lens extention, half lens contraction, full lens extension, image recording, power off ) • Flash on Approximate Battery Life: 8 minutes (8 shots) q About rechargeable batteries Use only the nickel-metal hydride batteries (NP-H3) that are available from different sets...
... battery life changes under different shooting conditions. Conditions • Temperature: 25°C • Repeat of a cycle of recording of one minute of playback, and a nine minutes of power off (power on, full lens extention, half lens contraction, full lens extension, image recording, power off ) • Flash on Approximate Battery Life: 8 minutes (8 shots) q About rechargeable batteries Use only the nickel-metal hydride batteries (NP-H3) that are available from different sets...

Owners Manual
Page 35
... serious damage to your camera. Remove batteries from the camera if you continue to use the camera while the battery level is used. Be sure to note the following shows how the battery capacity indicator on the camera itself. GETTING ACQUAINTED Battery Handling Precautions Incorrect use or handling of batteries can cause them by the markings on the monitor screen and the indicator display changes as they go dead...
... serious damage to your camera. Remove batteries from the camera if you continue to use the camera while the battery level is used. Be sure to note the following shows how the battery capacity indicator on the camera itself. GETTING ACQUAINTED Battery Handling Precautions Incorrect use or handling of batteries can cause them by the markings on the monitor screen and the indicator display changes as they go dead...

Owners Manual
Page 37
... turn camera power off power. Turning the Camera On and Off Rotate the POWER/Function Switch to turn camera power on power while the lens cap is attached to the lens or while the lens is connected to REC or PLAY. IMPORTANT! • Never turn off automatically when you specify sleep and auto power off , rotate the POWER/Function switch to OFF and then back to a computer. REC OFF PLAY REC : Turns on power and enters the PLAY mode. Power Save Settings The settings...
... turn camera power off power. Turning the Camera On and Off Rotate the POWER/Function Switch to turn camera power on power while the lens cap is attached to the lens or while the lens is connected to REC or PLAY. IMPORTANT! • Never turn off automatically when you specify sleep and auto power off , rotate the POWER/Function switch to OFF and then back to a computer. REC OFF PLAY REC : Turns on power and enters the PLAY mode. Power Save Settings The settings...

Owners Manual
Page 38
... operation. To power save settings 1. Align the POWER/Function Switch with REC. 2. On the screen that the camera turns off this setting entirely. In the REC mode, you want to make auto power off camera power if no operation is playing - When you do not perform any operation for about two minutes in the REC mode. • Auto Power Off is automatically disabled under any button immediately wakes up and restores normal operation. • The Auto Power Off setting...
... operation. To power save settings 1. Align the POWER/Function Switch with REC. 2. On the screen that the camera turns off this setting entirely. In the REC mode, you want to make auto power off camera power if no operation is playing - When you do not perform any operation for about two minutes in the REC mode. • Auto Power Off is automatically disabled under any button immediately wakes up and restores normal operation. • The Auto Power Off setting...
Owners Manual
Page 39
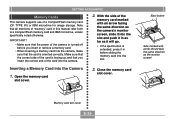
... the same direction as the camera's monitor screen, slide it into the slot and push it in as far as the monitor screen! Make sure that the correct side of the card is facing up, and that you insert or remove a memory card. • When inserting a memory card into the Camera 1. GETTING ACQUAINTED Memory Cards This camera supports use of "memory" card in this manual refer both to a CompactFlash memory card and...
... the same direction as the camera's monitor screen, slide it into the slot and push it in as far as the monitor screen! Make sure that the correct side of the card is facing up, and that you insert or remove a memory card. • When inserting a memory card into the Camera 1. GETTING ACQUAINTED Memory Cards This camera supports use of "memory" card in this manual refer both to a CompactFlash memory card and...
Owners Manual
Page 42
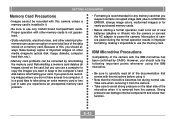
... a RECORD ERROR, strange image colors, malformed images) or for any memory card that you want to keep to the computer's hard disk before using the IBM microdrive. • Be sure to carefully read all images stored on the card, but you can use . IBM Microdrive Precautions Compatibility of the microdrive when it is recommended for newly purchased memory cards. • Before starting a format operation, load a full set of new batteries...
... a RECORD ERROR, strange image colors, malformed images) or for any memory card that you want to keep to the computer's hard disk before using the IBM microdrive. • Be sure to carefully read all images stored on the card, but you can use . IBM Microdrive Precautions Compatibility of the microdrive when it is recommended for newly purchased memory cards. • Before starting a format operation, load a full set of new batteries...

Owners Manual
Page 45
... recorded with REC or PLAY. 2. Press MENU. 3. Select "Date/Time" using the camera again. • A flashing time display indicates that the time and date (clock) settings have been cleared. You can even use the camera. Be sure to the current date and time, all images are here REC mode PLAY mode Select this happens, restore power and make the correct time and date settings. • If you do not set the camera's built-in clock. Align the POWER/Function Switch with the default date...
... recorded with REC or PLAY. 2. Press MENU. 3. Select "Date/Time" using the camera again. • A flashing time display indicates that the time and date (clock) settings have been cleared. You can even use the camera. Be sure to the current date and time, all images are here REC mode PLAY mode Select this happens, restore power and make the correct time and date settings. • If you do not set the camera's built-in clock. Align the POWER/Function Switch with the default date...


