
User Manual
Page 3
... proper operation before using the camera! 15 Data Error Precautions 15 Operating conditions 15 Condensation 16 Lens and Phase Differential Sensor 16 Other 16 17 QUICK START GUIDE First, charge the battery 17 To configure display language and clock settings ..... 19 To record an image 20 To view a recorded image 20 To delete an image 21 22 GETTING READY About This Manual 22 General Guide 23 Camera 23 Monitor Screen Contents 26 REC mode 26 PLAY mode 30 Changing the...
... proper operation before using the camera! 15 Data Error Precautions 15 Operating conditions 15 Condensation 16 Lens and Phase Differential Sensor 16 Other 16 17 QUICK START GUIDE First, charge the battery 17 To configure display language and clock settings ..... 19 To record an image 20 To view a recorded image 20 To delete an image 21 22 GETTING READY About This Manual 22 General Guide 23 Camera 23 Monitor Screen Contents 26 REC mode 26 PLAY mode 30 Changing the...

User Manual
Page 4
... 61 Using Zoom 62 Optical Zoom 62 Digital Zoom 63 Using the Flash 64 Flash Unit Status 66 Changing the Flash Intensity Setting 66 Flash Precautions 67 Using the Self-timer 68 Specifying Image Size and Quality 70 To specify the image size 70 To specify image quality 71 73 OTHER RECORDING FUNCTIONS Selecting the Focus Mode 73 Using Auto Focus 74 Using the Macro Mode 76 Using the Infinity Mode 77 Using Manual Focus 77 Using Pan Focus 78 Using Focus Lock 79 Exposure Compensation (EV Shift 80 Adjusting White Balance 81 Adjusting White Balance Manually 83...
... 61 Using Zoom 62 Optical Zoom 62 Digital Zoom 63 Using the Flash 64 Flash Unit Status 66 Changing the Flash Intensity Setting 66 Flash Precautions 67 Using the Self-timer 68 Specifying Image Size and Quality 70 To specify the image size 70 To specify image quality 71 73 OTHER RECORDING FUNCTIONS Selecting the Focus Mode 73 Using Auto Focus 74 Using the Macro Mode 76 Using the Infinity Mode 77 Using Manual Focus 77 Using Pan Focus 78 Using Focus Lock 79 Exposure Compensation (EV Shift 80 Adjusting White Balance 81 Adjusting White Balance Manually 83...

User Manual
Page 8
... in Windows 224 Getting Started 225 Selecting a Language 225 Viewing the Contents of the "Read me" File 225 Installing an Application 226 Viewing User Documentation (PDF Files) 226 User Registration 227 Exiting the Menu Application 227 Installing Software from the CD-ROM on a Macintosh 227 Installing Software 227 Viewing User Documentation (PDF Files) 228 230 APPENDIX Menu Reference 230 Indicator Lamp Reference 233 REC mode 233 PLAY mode 234 Rapid Charger Unit 235 Troubleshooting Guide 236 Display Messages 241 Specifications 242...
... in Windows 224 Getting Started 225 Selecting a Language 225 Viewing the Contents of the "Read me" File 225 Installing an Application 226 Viewing User Documentation (PDF Files) 226 User Registration 227 Exiting the Menu Application 227 Installing Software from the CD-ROM on a Macintosh 227 Installing Software 227 Viewing User Documentation (PDF Files) 228 230 APPENDIX Menu Reference 230 Indicator Lamp Reference 233 REC mode 233 PLAY mode 234 Rapid Charger Unit 235 Troubleshooting Guide 236 Display Messages 241 Specifications 242...

User Manual
Page 9
... Incorporated. • The USB driver (mass storage) uses Phoenix Technologies Ltd. Except as a result of malfunction, repairs, or battery replacement. software. Distribution to third parties of such files over the Internet without notice. • Note that the example screens and product illustrations shown in this User's Guide may differ somewhat by the screens and configuration of the actual camera. • CASIO COMPUTER CO., LTD...
... Incorporated. • The USB driver (mass storage) uses Phoenix Technologies Ltd. Except as a result of malfunction, repairs, or battery replacement. software. Distribution to third parties of such files over the Internet without notice. • Note that the example screens and product illustrations shown in this User's Guide may differ somewhat by the screens and configuration of the actual camera. • CASIO COMPUTER CO., LTD...

User Manual
Page 12
... images to a printer that supports PictBridge, and perform image selection and printing using the camera monitor screen and controls. • Transfer images to a computer simply by connecting the camera with the AV cable and use the TV screen for printing by professional print services. • PRINT Image Matching II Compatible (page 196) Images include PRINT Image Matching II data (mode setting and other camera setup information). When connected directly to print and start the print operation directly from the camera. • PictBridge support (page 192) Your camera supports...
... images to a printer that supports PictBridge, and perform image selection and printing using the camera monitor screen and controls. • Transfer images to a computer simply by connecting the camera with the AV cable and use the TV screen for printing by professional print services. • PRINT Image Matching II Compatible (page 196) Images include PRINT Image Matching II data (mode setting and other camera setup information). When connected directly to print and start the print operation directly from the camera. • PictBridge support (page 192) Your camera supports...

User Manual
Page 15
... memory access operation - Disconnecting the USB cable while a data communication operation is manufactured using the camera to record important images, make sure you turn off the camera - INTRODUCTION Test for use or keep the camera in the following creates the risk of corruption of data in the sun - Other abnormal operations Any of the above conditions can cause an error message to appear on the monitor screen (page 241). Removing the battery or memory card...
... memory access operation - Disconnecting the USB cable while a data communication operation is manufactured using the camera to record important images, make sure you turn off the camera - INTRODUCTION Test for use or keep the camera in the following creates the risk of corruption of data in the sun - Other abnormal operations Any of the above conditions can cause an error message to appear on the monitor screen (page 241). Removing the battery or memory card...

User Manual
Page 47
... turns off the camera. Auto Power Off : Turns off . Press [MENU]. 3. Pressing the power button to turn off the monitor screen if no operation is turned off by the lens when you turn it back on again. • Turning on camera power while the mode dial is set to REC mode causes the lens to extend from the camera. Performing any operation for a specified amount of time. 1. Use [̇] and [̈] to conserve battery power. Press the power button...
... turns off the camera. Auto Power Off : Turns off . Press [MENU]. 3. Pressing the power button to turn off the monitor screen if no operation is turned off by the lens when you turn it back on again. • Turning on camera power while the mode dial is set to REC mode causes the lens to extend from the camera. Performing any operation for a specified amount of time. 1. Use [̇] and [̈] to conserve battery power. Press the power button...

User Manual
Page 48
...; Available Auto Power Off settings are: "2 min" and "5 min". • Note that the Sleep feature does not operate in the PLAY mode. • Pressing any button while the camera is connected to enter the PLAY mode instead, you can use menus. The menu that you would align the mode dial with . The following cases. - Turn on the monitor screen that appears depends on . • The Auto Power Off...
...; Available Auto Power Off settings are: "2 min" and "5 min". • Note that the Sleep feature does not operate in the PLAY mode. • Pressing any button while the camera is connected to enter the PLAY mode instead, you can use menus. The menu that you would align the mode dial with . The following cases. - Turn on the monitor screen that appears depends on . • The Auto Power Off...

User Manual
Page 55
... 61). • When using the optical viewfinder to compose images, you can use the [DISP] button to a memory card if you record are stored on the monitor screen so the main subject is within the focus frame. • The focusing range of the subject. BASIC IMAGE RECORDING Recording an Image Your camera automatically adjusts shutter speed and aperture values in accordance with (Snapshot Mode). • This enters the Snapshot mode for image recording.
... 61). • When using the optical viewfinder to compose images, you can use the [DISP] button to a memory card if you record are stored on the monitor screen so the main subject is within the focus frame. • The focusing range of the subject. BASIC IMAGE RECORDING Recording an Image Your camera automatically adjusts shutter speed and aperture values in accordance with (Snapshot Mode). • This enters the Snapshot mode for image recording.

User Manual
Page 143
.... • The cropping operation cannot be cropped. • If the message "This function is within the boundary. 6. Press [SET] to extract the part of the image enclosed in memory. • The smaller the image, the more limited is the size of the image you display a trimmed image on the camera's monitor screen, the date and time indicates when the image was originally recorded, not when the image was trimmed. 143...
.... • The cropping operation cannot be cropped. • If the message "This function is within the boundary. 6. Press [SET] to extract the part of the image enclosed in memory. • The smaller the image, the more limited is the size of the image you display a trimmed image on the camera's monitor screen, the date and time indicates when the image was originally recorded, not when the image was trimmed. 143...

User Manual
Page 149
... specify. 149 Configure the slideshow settings. • See the pages indicated below for "Time" elapses. PLAYBACK 3. IMPORTANT! • Note that all buttons are disabled while an image change is stopped on page 151 To exit the slideshow setting screen and cancel the slideshow, use [̆] and [̄] to adjust the volume level. • Images copied from another digital camera or a computer may take longer time to appear than the slideshow...
... specify. 149 Configure the slideshow settings. • See the pages indicated below for "Time" elapses. PLAYBACK 3. IMPORTANT! • Note that all buttons are disabled while an image change is stopped on page 151 To exit the slideshow setting screen and cancel the slideshow, use [̆] and [̄] to adjust the volume level. • Images copied from another digital camera or a computer may take longer time to appear than the slideshow...

User Manual
Page 150
... FAVORITE folder (page 163) in the slideshow Select this setting: All images One Image Favorites 3. Use [̇] and [̈] to the menu screen without changing it. 1. Press [SET] to register your selection and return to use is also played back. I Selecting a Particular Image for a Slideshow When you want to the menu screen. • Pressing [MENU] instead of audio snapshot and voice recording files is on the monitor screen. 3. PLAYBACK...
... FAVORITE folder (page 163) in the slideshow Select this setting: All images One Image Favorites 3. Use [̇] and [̈] to the menu screen without changing it. 1. Press [SET] to register your selection and return to use is also played back. I Selecting a Particular Image for a Slideshow When you want to the menu screen. • Pressing [MENU] instead of audio snapshot and voice recording files is on the monitor screen. 3. PLAYBACK...

User Manual
Page 188
...). Use the method that Supports USB DIRECT-PRINT or PictBridge The camera's DPOF feature lets you specify which images you want to print the images it records. I Printing with a Computer Windows Users The camera comes bundled with your specifications. Image management procedures are described below. Then, simply take the memory card to a professional print service where they will print your images in the following pages of different ways to print and how many copies of...
...). Use the method that Supports USB DIRECT-PRINT or PictBridge The camera's DPOF feature lets you specify which images you want to print the images it records. I Printing with a Computer Windows Users The camera comes bundled with your specifications. Image management procedures are described below. Then, simply take the memory card to a professional print service where they will print your images in the following pages of different ways to print and how many copies of...
User Manual
Page 199
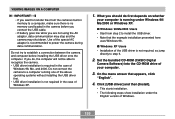
.... I Windows 98/Me/2000 Users • Start from the camera's built-in memory to a computer, make sure there is no memory card loaded in the camera before installing the USB driver onto the computer. Set the bundled CD-ROM (CASIO Digital Camera Software) into the CD-ROM drive of your computer is running one of Windows. 199 On the menu screen that the example installation presented here uses Windows 98. VIEWING IMAGES ON A COMPUTER IMPORTANT! •...
.... I Windows 98/Me/2000 Users • Start from the camera's built-in memory to a computer, make sure there is no memory card loaded in the camera before installing the USB driver onto the computer. Set the bundled CD-ROM (CASIO Digital Camera Software) into the CD-ROM drive of your computer is running one of Windows. 199 On the menu screen that the example installation presented here uses Windows 98. VIEWING IMAGES ON A COMPUTER IMPORTANT! •...

User Manual
Page 206
... Mac OS version you are shaped for the camera's file memory, the "DCIM" folder, and then the folder that contains the image you want to display images on the camera or it . To terminate the USB connection, drag the drive icon that represents the camera to edit, delete, move , or rename operation. 10. To copy all the files in file memory. Next, disconnect the USB cable from the camera, and then turn off the camera...
... Mac OS version you are shaped for the camera's file memory, the "DCIM" folder, and then the folder that contains the image you want to display images on the camera or it . To terminate the USB connection, drag the drive icon that represents the camera to edit, delete, move , or rename operation. 10. To copy all the files in file memory. Next, disconnect the USB cable from the camera, and then turn off the camera...

User Manual
Page 221
... over a USB connection. Installation of these operating systems, you want to the PLAY mode screen. With these applications is the software that comes bundled with the camera contains the applications described below. About the bundled CD-ROM (CASIO Digital Camera Software) The CD-ROM (CASIO Digital Camera Software) that makes it in combination with the USB cable. 221 USING THE CAMERA WITH A COMPUTER To delete an album 1. In the PLAY mode, press [MENU]. 2. Installing the Software from the...
... over a USB connection. Installation of these operating systems, you want to the PLAY mode screen. With these applications is the software that comes bundled with the camera contains the applications described below. About the bundled CD-ROM (CASIO Digital Camera Software) The CD-ROM (CASIO Digital Camera Software) that makes it in combination with the USB cable. 221 USING THE CAMERA WITH A COMPUTER To delete an album 1. In the PLAY mode, press [MENU]. 2. Installing the Software from the...

User Manual
Page 222
... user documentation files (PDF) on the bundled CD-ROM for details about using a web browser. Photo Loader automatically stores transferred files in folders named using a digital camera. Acrobat Reader (for Windows) This software provides an extended tool set including a codec that allows Windows 98 and 2000 to your computer. Photohands (for Windows) Photohands includes retouching tools for adjusting image color, contrast, and brightness, for resizing images, for changing image orientation, and for Windows...
... user documentation files (PDF) on the bundled CD-ROM for details about using a web browser. Photo Loader automatically stores transferred files in folders named using a digital camera. Acrobat Reader (for Windows) This software provides an extended tool set including a codec that allows Windows 98 and 2000 to your computer. Photohands (for Windows) Photohands includes retouching tools for adjusting image color, contrast, and brightness, for resizing images, for changing image orientation, and for Windows...

User Manual
Page 231
... World Time Date Style Adjust Language Sleep Auto Power Off USB Video Out Format Reset Startup / Half Shutter /Shutter / Operation / Volume On (Selectable image) / Off Continue / Reset Home / World Home Time setup (city, DST, etc.) World Time setup (city, DST, etc.) YY/MM/DD / DD/MM/YY / MM/DD/YY Time setting / English / Français / Deutsch / Español / Italiano / Português / / / 30 sec / 1 min / 2 min / Off 2 min / 5 min Mass Storage (USB DIRECT- APPENDIX G Memory tab menu Flash Focus White Balance ISO...
... World Time Date Style Adjust Language Sleep Auto Power Off USB Video Out Format Reset Startup / Half Shutter /Shutter / Operation / Volume On (Selectable image) / Off Continue / Reset Home / World Home Time setup (city, DST, etc.) World Time setup (city, DST, etc.) YY/MM/DD / DD/MM/YY / MM/DD/YY Time setting / English / Français / Deutsch / Español / Italiano / Português / / / 30 sec / 1 min / 2 min / Off 2 min / 5 min Mass Storage (USB DIRECT- APPENDIX G Memory tab menu Flash Focus White Balance ISO...

User Manual
Page 239
... images recorded with another source is shining directly into the lens. while the camera was connected to another digital camera. Images are disabled. All buttons and switches are not displayed. Circuit problem caused by electrostatic charge, impact, etc. Playback APPENDIX Symptom Color of the playback image is different from the image on the camera. Monitor screen is loaded in the REC mode). 3) The camera is connected to turn on the monitor screen. 3) Unplug the AV cable. 1) Check all connections. 2) Install...
... images recorded with another source is shining directly into the lens. while the camera was connected to another digital camera. Images are disabled. All buttons and switches are not displayed. Circuit problem caused by electrostatic charge, impact, etc. Playback APPENDIX Symptom Color of the playback image is different from the image on the camera. Monitor screen is loaded in the REC mode). 3) The camera is connected to turn on the monitor screen. 3) Unplug the AV cable. 1) Check all connections. 2) Install...

User Manual
Page 240
... running Windows 98 before installing the USB driver from the bundled CD-ROM (CASIO Digital Camera Software), or if you have another type of driver installed. If this happens, you will make it impossible for the computer to re-install the camera's USB driver. You may not be able to install the USB driver properly if you use the USB cable to connect the camera to re-install the USB driver, see the USB driver's "Read me" file on "CASIO Digital Camera Software...
... running Windows 98 before installing the USB driver from the bundled CD-ROM (CASIO Digital Camera Software), or if you have another type of driver installed. If this happens, you will make it impossible for the computer to re-install the camera's USB driver. You may not be able to install the USB driver properly if you use the USB cable to connect the camera to re-install the USB driver, see the USB driver's "Read me" file on "CASIO Digital Camera Software...


