User Guide
Page 7
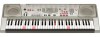
... under other musical style imaginable. ❐ Auto Accompaniment Simply play a chord and the corresponding rhythm, bass, and chord parts play along with the keyboard's builtin tunes and SMF data playback. * If a microphone was included with your keyboard, use special CASIO conversion software to convert SMF data you purchase or create to CASIO format, and then transfer it to the keyboard. ❐ VIDEO OUT Jack Connect the keyboard to teach you the correct notes. When playing back recorded data, keyboard keys light in time with the...
... under other musical style imaginable. ❐ Auto Accompaniment Simply play a chord and the corresponding rhythm, bass, and chord parts play along with the keyboard's builtin tunes and SMF data playback. * If a microphone was included with your keyboard, use special CASIO conversion software to convert SMF data you purchase or create to CASIO format, and then transfer it to the keyboard. ❐ VIDEO OUT Jack Connect the keyboard to teach you the correct notes. When playing back recorded data, keyboard keys light in time with the...
User Guide
Page 8
... AC Adaptor E-13 Auto Power Off E-14 Power On Alert E-14 Memory Contents E-14 Connections E-15 Phones/Output Jack E-15 USB port E-15 Sustain/Assignable Jack E-15 Microphone Jack E-16 VIDEO OUT Jack E-16 Accessories and Options E-16 Basic Operations E-17 To play the keyboard E-17 Selecting a Tone E-17 Using Tone Effects E-18 Turning the Key Light System On and Off E-18 Playing a Built-in Tune E-19 To play back a Song Bank tune E-19 To play back a Piano Bank tune E-20 Musical...
... AC Adaptor E-13 Auto Power Off E-14 Power On Alert E-14 Memory Contents E-14 Connections E-15 Phones/Output Jack E-15 USB port E-15 Sustain/Assignable Jack E-15 Microphone Jack E-16 VIDEO OUT Jack E-16 Accessories and Options E-16 Basic Operations E-17 To play the keyboard E-17 Selecting a Tone E-17 Using Tone Effects E-18 Turning the Key Light System On and Off E-18 Playing a Built-in Tune E-19 To play back a Song Bank tune E-19 To play back a Piano Bank tune E-20 Musical...
User Guide
Page 9
... manual may be registered trademarks of others. E-41 Deleting a Specific Part/Track E-41 Keyboard Settings E-42 Using Layer E-42 Using Split E-43 Using Layer and Split Together E-44 Transposing the Keyboard E-44 Using Touch Response E-45 Adjusting Accompaniment and Song Bank Volume E-46 Tuning the Keyboard E-46 655A-E-009A Connection to a Computer E-47 Expanding the Selections in the Song Bank Tunes E-48 General MIDI Tone E-49 Changing the Settings E-49 Troubleshooting E-51 Specifications E-53 Care of your keyboard E-54 Appendix A-1 Tone List/Note Table A-1 Drum Assignment...
... manual may be registered trademarks of others. E-41 Deleting a Specific Part/Track E-41 Keyboard Settings E-42 Using Layer E-42 Using Split E-43 Using Layer and Split Together E-44 Transposing the Keyboard E-44 Using Touch Response E-45 Adjusting Accompaniment and Song Bank Volume E-46 Tuning the Keyboard E-46 655A-E-009A Connection to a Computer E-47 Expanding the Selections in the Song Bank Tunes E-48 General MIDI Tone E-49 Changing the Settings E-49 Troubleshooting E-51 Specifications E-53 Care of your keyboard E-54 Appendix A-1 Tone List/Note Table A-1 Drum Assignment...
User Guide
Page 11
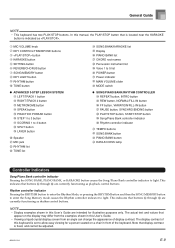
...functioning as . 1 MIC VOLUME knob 2 KEY CONTROL/TRANSPOSE buttons 3 button 4 KARAOKE button 5 SETTING button 6 REVERB/CHORUS button 7 SONG MEMORY button 8 KEY LIGHT button 9 RHYTHM button 0 TONE button G ADVANCED 3-STEP LESSON SYSTEM A LEFT/TRACK 1 button B RIGHT/TRACK 2 button C METRONOME button D SPEAK button E PRACTICE PHRASE button F STEP 1 to 3 button G SCORING 1 to 3 button H SPLIT button I LAYER button J Speaker K MIC jack L RHYTHM list M TONE list N SONG BANK/KARAOKE list O Display P PIANO BANK list Q CHORD root names R Percussion instrument list S Voice 1 to 5 list T POWER button...
...functioning as . 1 MIC VOLUME knob 2 KEY CONTROL/TRANSPOSE buttons 3 button 4 KARAOKE button 5 SETTING button 6 REVERB/CHORUS button 7 SONG MEMORY button 8 KEY LIGHT button 9 RHYTHM button 0 TONE button G ADVANCED 3-STEP LESSON SYSTEM A LEFT/TRACK 1 button B RIGHT/TRACK 2 button C METRONOME button D SPEAK button E PRACTICE PHRASE button F STEP 1 to 3 button G SCORING 1 to 3 button H SPLIT button I LAYER button J Speaker K MIC jack L RHYTHM list M TONE list N SONG BANK/KARAOKE list O Display P PIANO BANK list Q CHORD root names R Percussion instrument list S Voice 1 to 5 list T POWER button...
User Guide
Page 16
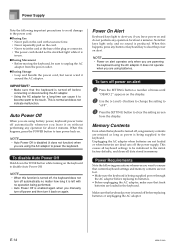
... not function) when you are using battery power, keyboard power turns off automatically whenever you manually turn off the power supply. NOTE • Auto Power Off is turned off before replacing batteries or unplugging the AC adaptor. It does not operate when you are using batteries. Memory Contents Even when the keyboard is turned off, song memory contents are dead cuts off power and then turn off power on alert 1 Press the SETTING button a number of the plug or connector. • The power cord should...
... not function) when you are using battery power, keyboard power turns off automatically whenever you manually turn off the power supply. NOTE • Auto Power Off is turned off before replacing batteries or unplugging the AC adaptor. It does not operate when you are using batteries. Memory Contents Even when the keyboard is turned off, song memory contents are dead cuts off power and then turn off power on alert 1 Press the SETTING button a number of the plug or connector. • The power cord should...
User Guide
Page 17
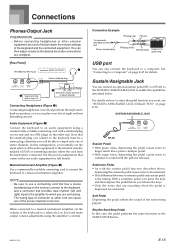
... a relatively low level and make output volume adjustments using a commercially available connecting cord with a standard plug on one of the audio equipment to sound until the pedal is depressed are complete. [Rear Panel] PHONES/OUTPUT jack Audio connection 1 Stereo standard plug 3 Keyboard amp, guitar amp, etc. See the user documentation that provides dual channel (left and right) input to the amplifier to select the pedal function you are sounding when the pedal is released. For details...
... a relatively low level and make output volume adjustments using a commercially available connecting cord with a standard plug on one of the audio equipment to sound until the pedal is depressed are complete. [Rear Panel] PHONES/OUTPUT jack Audio connection 1 Stereo standard plug 3 Keyboard amp, guitar amp, etc. See the user documentation that provides dual channel (left and right) input to the amplifier to select the pedal function you are sounding when the pedal is released. For details...
User Guide
Page 19
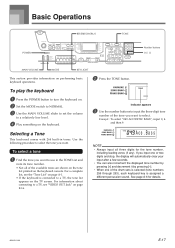
... keyboard operations. 2 Press the TONE button. Basic Operations REVERB/CHORUS POWER TONE Number buttons [+] / [-] MAIN VOLUME MODE KEY LIGHT This section provides information on the keyboard console. Selecting a Tone This keyboard comes with 264 built-in the TONE List and note its tone number. • Not all three digits for details. 655A-E-019A E-17 For a complete list, see "VIDEO OUT Jack" on page E-16. To play the keyboard 1 Press the POWER button to turn the keyboard on. 2 Set the MODE switch to NORMAL. 3 Use...
... keyboard operations. 2 Press the TONE button. Basic Operations REVERB/CHORUS POWER TONE Number buttons [+] / [-] MAIN VOLUME MODE KEY LIGHT This section provides information on the keyboard console. Selecting a Tone This keyboard comes with 264 built-in the TONE List and note its tone number. • Not all three digits for details. 655A-E-019A E-17 For a complete list, see "VIDEO OUT Jack" on page E-16. To play the keyboard 1 Press the POWER button to turn the keyboard on. 2 Set the MODE switch to NORMAL. 3 Use...
User Guide
Page 21
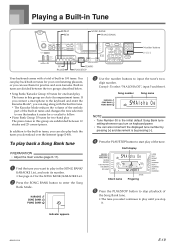
... to play in the SONG BANK/ KARAOKE List, and note its number. • See page A-9 for the SONG BANK/KARAOKE List. 2 Press the SONG BANK button to play The piano tunes in tunes, you can also play back the tunes you can also increment the displayed tune number by pressing [-]. 4 Press the PLAY/STOP button to follow. • Piano Bank Group: 35 tunes for one that makes it . To play back a Song Bank tune PREPARATION • Adjust the main volume (page E-17). 3 Use the number buttons...
... to play in the SONG BANK/ KARAOKE List, and note its number. • See page A-9 for the SONG BANK/KARAOKE List. 2 Press the SONG BANK button to play The piano tunes in tunes, you can also play back the tunes you can also increment the displayed tune number by pressing [-]. 4 Press the PLAY/STOP button to follow. • Piano Bank Group: 35 tunes for one that makes it . To play back a Song Bank tune PREPARATION • Adjust the main volume (page E-17). 3 Use the number buttons...
User Guide
Page 22
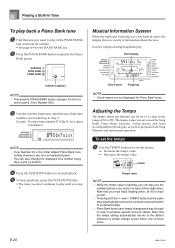
... selected rhythm to its default tempo. • Piano Bank tunes have tempo changes part way through in order to produce specific musical effects. E-20 655A-E-022A To set the tempo 1 Use the TEMPO buttons to set to a value in tunes, the display shows a variety of information about the tune. Note that the tempo setting automatically returns to the default whenever a tempo change the displayed tune number using the [+] and [-] buttons. 4 Press the PLAY/STOP button to start playback. 5 To stop it. Adjusting the Tempo The tempo (beats per...
... selected rhythm to its default tempo. • Piano Bank tunes have tempo changes part way through in order to produce specific musical effects. E-20 655A-E-022A To set the tempo 1 Use the TEMPO buttons to set to a value in tunes, the display shows a variety of information about the tune. Note that the tempo setting automatically returns to the default whenever a tempo change the displayed tune number using the [+] and [-] buttons. 4 Press the PLAY/STOP button to start playback. 5 To stop it. Adjusting the Tempo The tempo (beats per...
User Guide
Page 30
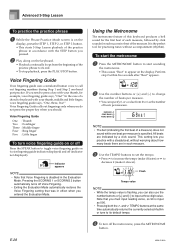
... display, press the STEP 1, STEP 2, or STEP 3 button. • This starts 3-Step Lesson playback of the practice phrase in accordance with the STEP button you pressed. 2 Play along on the keyboard. • Playback continually loops from 2 to input a three-digit value. To start the metronome 1 Press the METRONOME button to start sounding the metronome. • This causes "Beat" to decrease it (make it slower). All beats are in the Evaluation Mode. Voice Fingering Guide Voice fingering guide uses a simulated human voice...
... display, press the STEP 1, STEP 2, or STEP 3 button. • This starts 3-Step Lesson playback of the practice phrase in accordance with the STEP button you pressed. 2 Play along on the keyboard. • Playback continually loops from 2 to input a three-digit value. To start the metronome 1 Press the METRONOME button to start sounding the metronome. • This causes "Beat" to decrease it (make it slower). All beats are in the Evaluation Mode. Voice Fingering Guide Voice fingering guide uses a simulated human voice...

User Guide
Page 36
... played and the auto accompaniment with the FINGERED mode (page E-33), you can also switch to a secondary "variation" rhythm pattern for the rhythm you play . 2 Press the NORMAL/FILL-IN button to start rhythm play chords on the accompaniment keyboard. Chord C 2 C 2 .... E-34 655A-E-036A Chord CE NOTE • As with intro pattern starts as soon as you are separated by 6 or more notes, the lowest sound becomes the bass (2). < Music Example > Tone: 023, Rhythm: 005, Tempo...
... played and the auto accompaniment with the FINGERED mode (page E-33), you can also switch to a secondary "variation" rhythm pattern for the rhythm you play . 2 Press the NORMAL/FILL-IN button to start rhythm play chords on the accompaniment keyboard. Chord C 2 C 2 .... E-34 655A-E-036A Chord CE NOTE • As with intro pattern starts as soon as you are separated by 6 or more notes, the lowest sound becomes the bass (2). < Music Example > Tone: 023, Rhythm: 005, Tempo...
User Guide
Page 38
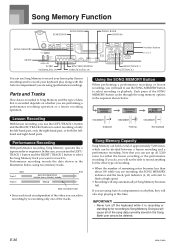
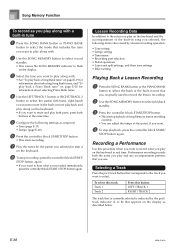
...-hand parts. Lesson Recording With lesson recording, you use the LEFT/TRACK 1 button and the RIGHT/TRACK 2 button to Song Memory and the type of data that you can use Song Memory to record your keyboard play (lesson recording) and to be divided between a lesson recording and a performance recording. Song Memory Function SONG BANK START/STOP PIANO BANK RHYTHM SONG MEMORY MODE INTRO NORMAL/FILL-IN SYNCHRO/ENDING VARIATION/FILL-IN Number buttons [+] / [-] RIGHT/TRACK 2 LEFT/TRACK 1 You can use up all of the song data currently stored in track •...
...-hand parts. Lesson Recording With lesson recording, you use the LEFT/TRACK 1 button and the RIGHT/TRACK 2 button to Song Memory and the type of data that you can use Song Memory to record your keyboard play (lesson recording) and to be divided between a lesson recording and a performance recording. Song Memory Function SONG BANK START/STOP PIANO BANK RHYTHM SONG MEMORY MODE INTRO NORMAL/FILL-IN SYNCHRO/ENDING VARIATION/FILL-IN Number buttons [+] / [-] RIGHT/TRACK 2 LEFT/TRACK 1 You can use up all of the song data currently stored in track •...
User Guide
Page 40
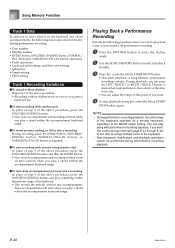
... accompaniment of Song Memory lesson recording contents. • You can adjust the tempo at the same time. 5 Configure the following data is indicated by a lesson recording operation. • Tone setting • Tempo setting • Tune name • Recording part selection • Pedal operations • Layer and split settings, and their tone settings • Effect setting Playing Back a Lesson Recording 1 Press the SONG BANK button or the PIANO BANK button to select the bank of the built-in tune that you originally used to record the lesson recording. 2 Use...
... accompaniment of Song Memory lesson recording contents. • You can adjust the tempo at the same time. 5 Configure the following data is indicated by a lesson recording operation. • Tone setting • Tempo setting • Tune name • Recording part selection • Pedal operations • Layer and split settings, and their tone settings • Effect setting Playing Back a Lesson Recording 1 Press the SONG BANK button or the PIANO BANK button to select the bank of the built-in tune that you originally used to record the lesson recording. 2 Use...
User Guide
Page 42
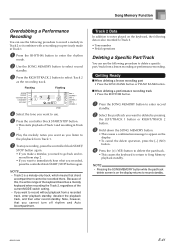
... a chord within the accompaniment keyboard range. Song Memory Function Track 1 Data In addition to notes played on the keyboard and chord accompaniments, the following procedure when you want to the keyboard. • Note that pause, skip forward, and skip back operations cannot be performed during performance recording. • Tone number • Rhythm number • INTRO button, SYNCHRO/ENDING button, NORMAL/ FILL-IN button, VARIATION/FILL-IN button operations • Pedal operations • Layer and split settings, and their tone settings • Split point • Tempo setting...
... a chord within the accompaniment keyboard range. Song Memory Function Track 1 Data In addition to notes played on the keyboard and chord accompaniments, the following procedure when you want to the keyboard. • Note that pause, skip forward, and skip back operations cannot be performed during performance recording. • Tone number • Rhythm number • INTRO button, SYNCHRO/ENDING button, NORMAL/ FILL-IN button, VARIATION/FILL-IN button operations • Pedal operations • Layer and split settings, and their tone settings • Split point • Tempo setting...
User Guide
Page 43
... you make a mistake, you need to go back and re- NOTE • Track 2 is on the keyboard, the following data is also recorded to Track 2. • Tone number • Pedal operations Deleting a Specific Part/Track You can use the following procedure to delete a specific part/track from a lesson recording or performance recording. Track 2 Data In addition to notes played on the display returns to record standby. 655A-E-043A E-41 I When deleting a lesson recording part • Press the SONG BANK button or PIANO BANK button. NOTE • Pressing the SONG MEMORY button...
... you make a mistake, you need to go back and re- NOTE • Track 2 is on the keyboard, the following data is also recorded to Track 2. • Tone number • Pedal operations Deleting a Specific Part/Track You can use the following procedure to delete a specific part/track from a lesson recording or performance recording. Track 2 Data In addition to notes played on the display returns to record standby. 655A-E-043A E-41 I When deleting a lesson recording part • Press the SONG BANK button or PIANO BANK button. NOTE • Pressing the SONG MEMORY button...
User Guide
Page 50
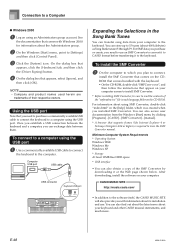
... information about its installation and use an SMF Converter to convert it to CASIO format before transferring it at the Web page shown below. Minimum Computer System Requirements * Operating System: Windows 98SE Windows Me Windows XP * Storage At least 10MB free HDD space * USB interface • You can transfer song data from the Windows [Start] menu by downloading it to the keyboard. NOTE • Company and product names used herein are...
... information about its installation and use an SMF Converter to convert it to CASIO format before transferring it at the Web page shown below. Minimum Computer System Requirements * Operating System: Windows 98SE Windows Me Windows XP * Storage At least 10MB free HDD space * USB interface • You can transfer song data from the Windows [Start] menu by downloading it to the keyboard. NOTE • Company and product names used herein are...
User Guide
Page 51
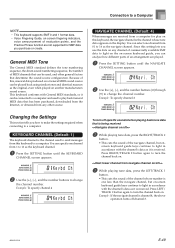
... keyboard supports SMF 0 and 1 format data. • Voice Fingering Guide, on another manufacturers sound source. Nav i . KEYBOARD CHANNEL (Default: 1) The keyboard channel is being received 1 While playing tune data, press the RIGHT/TRACK 2 button. • This cuts the sound of commercially available SMF data to a computer. Ch To turn the channel back on - Example: If the navigate channel is received. Keybd Ch 2 Use the [+], [-], and the number buttons to change the channel number. Because of evaluation points, and the Practice Phrase function...
... keyboard supports SMF 0 and 1 format data. • Voice Fingering Guide, on another manufacturers sound source. Nav i . KEYBOARD CHANNEL (Default: 1) The keyboard channel is being received 1 While playing tune data, press the RIGHT/TRACK 2 button. • This cuts the sound of commercially available SMF data to a computer. Ch To turn the channel back on - Example: If the navigate channel is received. Keybd Ch 2 Use the [+], [-], and the number buttons to change the channel number. Because of evaluation points, and the Practice Phrase function...
User Guide
Page 53
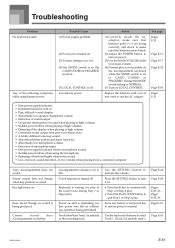
... using battery power. Press any operation being produced. Cannot record Auto Accompaniment or rhythm. See page Pages E-13 Page E-17 Page E-17 Page E-32 Page E-50 Pages E-13 • Dim power supply indicator • Instrument does not turn it on LOCAL CONTROL. Troubleshooting Problem No keyboard sound Any of the correct note during Step 1 or Step 2 play is not possible on the accompaniment keyboard while the MODE switch is set of power, sound distortion, or low volume when playing from a connected...
... using battery power. Press any operation being produced. Cannot record Auto Accompaniment or rhythm. See page Pages E-13 Page E-17 Page E-17 Page E-32 Page E-50 Pages E-13 • Dim power supply indicator • Instrument does not turn it on LOCAL CONTROL. Troubleshooting Problem No keyboard sound Any of the correct note during Step 1 or Step 2 play is not possible on the accompaniment keyboard while the MODE switch is set of power, sound distortion, or low volume when playing from a connected...
User Guide
Page 54
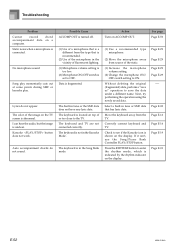
... not sound. I can hear the audio, but the image is connected. Karaoke button does not work. Correctly connect keyboard and TV. Auto accompaniment chords do not appear. See page Page E-50 (1) Use a recommended type Page E-29 microphone. (2) Move the microphone away from source of fluorescent lighting. (1) Microphone volume setting is too low. (2) Microphone ON/OFF switch is in the Song Bank mode. If it isn't, use the Song/Piano Bank Controller PLAY/STOP button...
... not sound. I can hear the audio, but the image is connected. Karaoke button does not work. Correctly connect keyboard and TV. Auto accompaniment chords do not appear. See page Page E-50 (1) Use a recommended type Page E-29 microphone. (2) Move the microphone away from source of fluorescent lighting. (1) Microphone volume setting is too low. (2) Microphone ON/OFF switch is in the Song Bank mode. If it isn't, use the Song/Piano Bank Controller PLAY/STOP button...
User Guide
Page 55
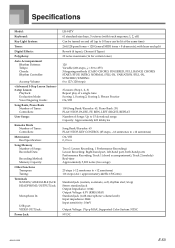
Specifications Model: Keyboard: Key Light System: Tones: Digital Effects: Polyphony: Auto Accompaniment Rhythm Patterns: Tempo: Chords: Rhythm Controller: Accomp Volume: 3-step Lesson: Playback: Evaluation Mode: Voice Fingering Guide: Song Bank, Piano Bank Number of Tunes: Controllers: User Songs: Karaoke Mode Number of Tunes: Controllers: Metronome: Beat Specification: Song Memory Number of Songs: Up to 15 download songs Capacity: Approximately 400 kilobytes Song Bank/Karaoke: 65 PLAY/STOP, KEY CONTROL (25 steps, -12 semitones to +12 semitones) On/Off 0, 2 to 6 Two (1 Lesson Recording, 1 ...
Specifications Model: Keyboard: Key Light System: Tones: Digital Effects: Polyphony: Auto Accompaniment Rhythm Patterns: Tempo: Chords: Rhythm Controller: Accomp Volume: 3-step Lesson: Playback: Evaluation Mode: Voice Fingering Guide: Song Bank, Piano Bank Number of Tunes: Controllers: User Songs: Karaoke Mode Number of Tunes: Controllers: Metronome: Beat Specification: Song Memory Number of Songs: Up to 15 download songs Capacity: Approximately 400 kilobytes Song Bank/Karaoke: 65 PLAY/STOP, KEY CONTROL (25 steps, -12 semitones to +12 semitones) On/Off 0, 2 to 6 Two (1 Lesson Recording, 1 ...


