User Guide
Page 6
..., causing the product to tip over , causing the product to strong impact. Heavy Objects Never place heavy object on the stand correctly. * Stand is required when using the microphone • Dimming of keyboard lights when notes sound • Loss of the display when playing at high volume • Continued sound output even after...
..., causing the product to tip over , causing the product to strong impact. Heavy Objects Never place heavy object on the stand correctly. * Stand is required when using the microphone • Dimming of keyboard lights when notes sound • Loss of the display when playing at high volume • Continued sound output even after...
User Guide
Page 8
Master the timing E-25 Step 2 - Contents Safety Precautions E-1 Main Features E-5 General Guide E-8 Attaching the Score Stand E-10 Quick Reference E-11 To play the keyboard E-11 Power Supply E-13 Using batteries E-13 Using the AC Adaptor E-13 Auto Power Off E-14 Power On Alert E-14 Memory ...USB port E-15 Sustain/Assignable Jack E-15 Microphone Jack E-16 VIDEO OUT Jack E-16 Accessories and Options E-16 Basic Operations E-17 To play the keyboard E-17 Selecting a Tone E-17 Using Tone Effects E-18 Turning the Key Light System On and Off E-18 Playing a Built-in Tune E-19...
Master the timing E-25 Step 2 - Contents Safety Precautions E-1 Main Features E-5 General Guide E-8 Attaching the Score Stand E-10 Quick Reference E-11 To play the keyboard E-11 Power Supply E-13 Using batteries E-13 Using the AC Adaptor E-13 Auto Power Off E-14 Power On Alert E-14 Memory ...USB port E-15 Sustain/Assignable Jack E-15 Microphone Jack E-16 VIDEO OUT Jack E-16 Accessories and Options E-16 Basic Operations E-17 To play the keyboard E-17 Selecting a Tone E-17 Using Tone Effects E-18 Turning the Key Light System On and Off E-18 Playing a Built-in Tune E-19...
User Guide
Page 12
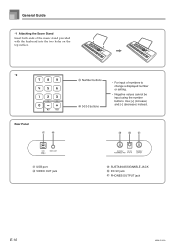
Use [+] (increase) and [-] (decrease) instead. i jk g USB port h VIDEO OUT jack i SUSTAIN/ASSIGNABLE JACK j DC 9V jack k PHONES/OUTPUT jack E-10 655A-E-012A General Guide *1 Attaching the Score Stand Insert both ends of the music stand provided with the keyboard into the two holes on the top surface. *2 Rear Panel g h e Number buttons f [+]/[-] buttons • For input of numbers to change a displayed number or setting. • Negative values cannot be input using the number buttons.
Use [+] (increase) and [-] (decrease) instead. i jk g USB port h VIDEO OUT jack i SUSTAIN/ASSIGNABLE JACK j DC 9V jack k PHONES/OUTPUT jack E-10 655A-E-012A General Guide *1 Attaching the Score Stand Insert both ends of the music stand provided with the keyboard into the two holes on the top surface. *2 Rear Panel g h e Number buttons f [+]/[-] buttons • For input of numbers to change a displayed number or setting. • Negative values cannot be input using the number buttons.

User Guide
Page 27
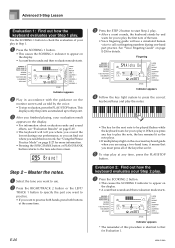
... is selected for practice. 3 Press the STEP 1 button to start Step 1 play. • After a count sounds, they keyboard stands by and waits for you finish playing, the keyboard calculates an evaluation of your total performance, from beginning to end, and displays your evaluation is played for the corresponding number...If your favorite tunes. Note pitch Fingering A l oha Oe Indicator appears 4 Press any keyboard keys to play the notes. • The key for the next note to be played flashes while the keyboard waits for details. When you press any key to play the note, the key remains lit...
... is selected for practice. 3 Press the STEP 1 button to start Step 1 play. • After a count sounds, they keyboard stands by and waits for you finish playing, the keyboard calculates an evaluation of your total performance, from beginning to end, and displays your evaluation is played for the corresponding number...If your favorite tunes. Note pitch Fingering A l oha Oe Indicator appears 4 Press any keyboard keys to play the notes. • The key for the next note to be played flashes while the keyboard waits for details. When you press any key to play the note, the key remains lit...
User Guide
Page 28
...8226; A count beat sounds and then evaluation mode starts. 3 Press the STEP 2 button to start Step 2 play. • After a count sounds, the keyboard stands by the voice. • To stop play at the same time. Bravo! When you are lit. 5 To stop evaluation, press the PLAY/STOP button. ... result appears on the display. • For information about evaluation ranks and sound effects, see "Evaluation Results" on page E-25. • The keyboard will tell you where you need the most work. E-26 Indicator appears * The remainder of the keys that are using a two-hand tune, it...
...8226; A count beat sounds and then evaluation mode starts. 3 Press the STEP 2 button to start Step 2 play. • After a count sounds, the keyboard stands by the voice. • To stop play at the same time. Bravo! When you are lit. 5 To stop evaluation, press the PLAY/STOP button. ... result appears on the display. • For information about evaluation ranks and sound effects, see "Evaluation Results" on page E-25. • The keyboard will tell you where you need the most work. E-26 Indicator appears * The remainder of the keys that are using a two-hand tune, it...
User Guide
Page 38
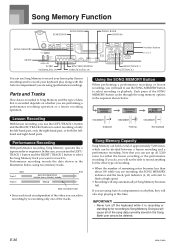
Note that is recording or standing by re-recording only one of the tracks. Doing so will need ... of data that you can use Song Memory to record your lesson play (lesson recording) and to record your keyboard play along with the Auto Accompaniment you are performing a performance recording operation or a lesson recording operation. E-36 ...TRACK 1 button and the RIGHT/TRACK 2 button to Song Memory. Playback Standby Recording Standby SONG MEMORY off the keyboard while it is recorded depends on whether you will start to select the Song Memory track you will cause all ...
Note that is recording or standing by re-recording only one of the tracks. Doing so will need ... of data that you can use Song Memory to record your lesson play (lesson recording) and to record your keyboard play along with the Auto Accompaniment you are performing a performance recording operation or a lesson recording operation. E-36 ...TRACK 1 button and the RIGHT/TRACK 2 button to Song Memory. Playback Standby Recording Standby SONG MEMORY off the keyboard while it is recorded depends on whether you will start to select the Song Memory track you will cause all ...


