
User Guide
Page 3
... of the following the keys as you notice any of the 100 built-in for you become familiar with the timing of satisfied CASIO electronic musical instrument owners! You can even playback commercially available pre-recorded MIDI data. 478B-E-003A E-1 Important! Next, practice playing ...at high volumes • Dimming of the display when playing at a pace that's comfortable for playback enjoyment or play • Dimming of keyboard lights when notes sound • Loss of power, sound distortion, or low volume when playing from a connected computer or MIDI device Main Features &#...
... of the following the keys as you notice any of the 100 built-in for you become familiar with the timing of satisfied CASIO electronic musical instrument owners! You can even playback commercially available pre-recorded MIDI data. 478B-E-003A E-1 Important! Next, practice playing ...at high volumes • Dimming of the display when playing at a pace that's comfortable for playback enjoyment or play • Dimming of keyboard lights when notes sound • Loss of power, sound distortion, or low volume when playing from a connected computer or MIDI device Main Features &#...

User Guide
Page 5
... directly with your hands when removing them. Continued use if there is required in the keyboard, remove them . 4. If there are any batteries loaded in homes with an authorized CASIO service provider. Doing so may cause fire or electrical shock. 1. Never attempt to get... inside the instrument. • Containers filled with an authorized CASIO service provider. Turn power off . 2. Consult with the dealer where you purchased the keyboard or with water or other liquids on the instrument. • Do not place the following actions...
... directly with your hands when removing them. Continued use if there is required in the keyboard, remove them . 4. If there are any batteries loaded in homes with an authorized CASIO service provider. Doing so may cause fire or electrical shock. 1. Never attempt to get... inside the instrument. • Containers filled with an authorized CASIO service provider. Turn power off . 2. Consult with the dealer where you purchased the keyboard or with water or other liquids on the instrument. • Do not place the following actions...

User Guide
Page 6
.... E-4 478B-E-006A CAUTION AC Adaptor • Do not locate the power cord in close proximity to insulate the feet or preferably use a CASIO musical instrument stand designed for your keyboard. This may be transported. Batteries • Improper battery use may cause fire or electrical shock. • Never locate the instrument in a kitchen... to rupture and leak. Location • Never locate the instrument in . Doing so may cause batteries to high humidity or heavy accumula- Do not place keyboard on the adaptor itself and not the cord.
.... E-4 478B-E-006A CAUTION AC Adaptor • Do not locate the power cord in close proximity to insulate the feet or preferably use a CASIO musical instrument stand designed for your keyboard. This may be transported. Batteries • Improper battery use may cause fire or electrical shock. • Never locate the instrument in a kitchen... to rupture and leak. Location • Never locate the instrument in . Doing so may cause batteries to high humidity or heavy accumula- Do not place keyboard on the adaptor itself and not the cord.

User Guide
Page 7
... bolts, nuts, and fasteners, and make sure that come with TV and radio reception. This may not be able to see the keyboard keys light under direct sunlight or in the plastic, and are a result of the molding process used to injury. Optional Stand (sold separately). ...to shape the plastic of the case. Accessories and options • Use only accessories that come with the instrument or authorized CASIO options (sold separately) • Carefully assemble the stand following the assembly instructions that you experience impaired hearing or ringing in injury. ...
... bolts, nuts, and fasteners, and make sure that come with TV and radio reception. This may not be able to see the keyboard keys light under direct sunlight or in the plastic, and are a result of the molding process used to injury. Optional Stand (sold separately). ...to shape the plastic of the case. Accessories and options • Use only accessories that come with the instrument or authorized CASIO options (sold separately) • Carefully assemble the stand following the assembly instructions that you experience impaired hearing or ringing in injury. ...

User Guide
Page 8
Contents Welcome E-1 Main Features E-1 Safety Precautions E-2 Care of Your Keyboard E-5 Contents E-6 Control Locations E-8 Quick Reference E-10 Connections E-12 Phones/Output Jack E-12 Accessories and Options E-13 Power Supply E-14 Using batteries ...E-14 To load batteries E-... tones E-18 Digital Sampling ...E-19 Polyphony ...E-19 Other Useful Functions E-19 To change the key of the keyboard E-19 To tune the keyboard E-20 Playing the demo tunes E-21 To start demo tune play E-21 To stop demo tune play E-21 Playing rhythms E-22 To select and play a ...
Contents Welcome E-1 Main Features E-1 Safety Precautions E-2 Care of Your Keyboard E-5 Contents E-6 Control Locations E-8 Quick Reference E-10 Connections E-12 Phones/Output Jack E-12 Accessories and Options E-13 Power Supply E-14 Using batteries ...E-14 To load batteries E-... tones E-18 Digital Sampling ...E-19 Polyphony ...E-19 Other Useful Functions E-19 To change the key of the keyboard E-19 To tune the keyboard E-20 Playing the demo tunes E-21 To start demo tune play E-21 To stop demo tune play E-21 Playing rhythms E-22 To select and play a ...

User Guide
Page 9
Using auto-accompaniment E-23 About the accompaniment keyboard E-23 Using the CASIO CHORD system E-24 To play a CASIO CHORD auto-accompaniment E-24 Using standard fingerings E-25 To play a FINGERED auto-accompaniment E-26 Improvising with the preset patterns E-27 Using fill-in rhythm E-27 ... Using the Three Step Lesson System with Song Bank Tunes E-30 How the Three Step Lesson System operates in Steps 1 through 3 E-31 Turning Off Key Lighting E-32 Number of Simultaneously Lit Keys E-32 To change the tone used for the melody of a Song Bank tune E-32 Step 1: Easy Play E-33 Step...
Using auto-accompaniment E-23 About the accompaniment keyboard E-23 Using the CASIO CHORD system E-24 To play a CASIO CHORD auto-accompaniment E-24 Using standard fingerings E-25 To play a FINGERED auto-accompaniment E-26 Improvising with the preset patterns E-27 Using fill-in rhythm E-27 ... Using the Three Step Lesson System with Song Bank Tunes E-30 How the Three Step Lesson System operates in Steps 1 through 3 E-31 Turning Off Key Lighting E-32 Number of Simultaneously Lit Keys E-32 To change the tone used for the melody of a Song Bank tune E-32 Step 1: Easy Play E-33 Step...

User Guide
Page 11
... SONG BANK list Q Speakers R CHORD ROOT NAMES S Percussion instrument list T DC 9V jack U PHONES/OUTPUT jack For connection of the keyboard as shown in the illustration. 478B-E-011A E-9 Output from the speakers is automatically cut when headphones are connected. V MIDI OUT terminal W MIDI...the top of commercially available headphones. 1 POWER/MODE selector 2 Power indicator 3 VOLUME buttons 4 SYNCHRO/FILL-IN button 5 START/STOP button 6 TEMPO buttons 7 KEY LIGHT button 8 STEP 1 icon 9 STEP 2 icon 0 STEP 3 icon A SONG BANK icon B Display C RHYTHM icon D TONE icon E PART SELECT button F TONE...
... SONG BANK list Q Speakers R CHORD ROOT NAMES S Percussion instrument list T DC 9V jack U PHONES/OUTPUT jack For connection of the keyboard as shown in the illustration. 478B-E-011A E-9 Output from the speakers is automatically cut when headphones are connected. V MIDI OUT terminal W MIDI...the top of commercially available headphones. 1 POWER/MODE selector 2 Power indicator 3 VOLUME buttons 4 SYNCHRO/FILL-IN button 5 START/STOP button 6 TEMPO buttons 7 KEY LIGHT button 8 STEP 1 icon 9 STEP 2 icon 0 STEP 3 icon A SONG BANK icon B Display C RHYTHM icon D TONE icon E PART SELECT button F TONE...

User Guide
Page 12
... feature. Quick Reference This section provides a quick overview of keyboard operation using steps one and two of these steps. 1 Set the POWER/MODE selector to play along with your melody. ON OFF FINGERED CASIO CHORD NORMAL SONG BANK icon lights. 3 Find the tune yo Song Bank list, number button... PLAY 478B-E-012A POWER/MODE SYNCHRO/ FILL-IN VOLUME START/ STOP TEMPO FINGERED ON CASIO CHORD NORMAL OFF KEY LIGHT ONE KEY PLAY 789 456 123 STEP 0 NUMBER E-10 5 Play the melody part on the keyboard. POWER/MODE 2 Press the SONG BANK button. Play the notes with the ONE...
... feature. Quick Reference This section provides a quick overview of keyboard operation using steps one and two of these steps. 1 Set the POWER/MODE selector to play along with your melody. ON OFF FINGERED CASIO CHORD NORMAL SONG BANK icon lights. 3 Find the tune yo Song Bank list, number button... PLAY 478B-E-012A POWER/MODE SYNCHRO/ FILL-IN VOLUME START/ STOP TEMPO FINGERED ON CASIO CHORD NORMAL OFF KEY LIGHT ONE KEY PLAY 789 456 123 STEP 0 NUMBER E-10 5 Play the melody part on the keyboard. POWER/MODE 2 Press the SONG BANK button. Play the notes with the ONE...

User Guide
Page 13
... 1 button or STEP 2 button. • When you do, the STEP 1 icon or STEP 2 icon lights. • The keyboard sounds a count beat and waits for you to play something on the keyboard, pressing keys as they light. • Keep the key depressed as long as it stays lit. • If you selected any...key that you press the correct melody key, accompaniment proceeds to press first flash. 3-STEP LESSON STEP 1 STEP 3 STEP 2 Play the notes on the keyboard. The keys that corresponds to the next note you need to play will flash. • After you need to the next note. 478B-E-013A E-11...
... 1 button or STEP 2 button. • When you do, the STEP 1 icon or STEP 2 icon lights. • The keyboard sounds a count beat and waits for you to play something on the keyboard, pressing keys as they light. • Keep the key depressed as long as it stays lit. • If you selected any...key that you press the correct melody key, accompaniment proceeds to press first flash. 3-STEP LESSON STEP 1 STEP 3 STEP 2 Play the notes on the keyboard. The keys that corresponds to the next note you need to play will flash. • After you need to the next note. 478B-E-013A E-11...
User Guide
Page 14
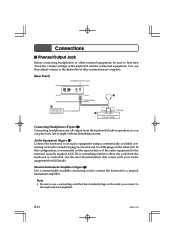
...or other end. DC 9V PHONES/ OUTPUT Standard plug 1 White Red PIN plug 2 LEFT RIGHT AUX IN or similar terminal of the keyboard and the connected equipment. See the user documentation that has standard plugs on the other external equipment, be sure to the terminal (usually ...the audio equipment to first turn down the volume settings of audio amplifier Connecting Headphones (Figure 1) Connecting headphones cuts off output from the keyboard is connected. You can play even late at night without disturbing anyone. In this configuration, you can then adjust volume to an ...
...or other end. DC 9V PHONES/ OUTPUT Standard plug 1 White Red PIN plug 2 LEFT RIGHT AUX IN or similar terminal of the keyboard and the connected equipment. See the user documentation that has standard plugs on the other external equipment, be sure to the terminal (usually ...the audio equipment to first turn down the volume settings of audio amplifier Connecting Headphones (Figure 1) Connecting headphones cuts off output from the keyboard is connected. You can play even late at night without disturbing anyone. In this configuration, you can then adjust volume to an ...

User Guide
Page 15
Use of non-authorized items creates the danger of fire, electrical shock, and personal injury. 478B-E-015B E-13 Connection Example To keyboard's PHONES/OUTPUT jack Standard plug INPUT Keyboard or guitar amp Accessories and Options Use only the accessories and options specified for this keyboard.
Use of non-authorized items creates the danger of fire, electrical shock, and personal injury. 478B-E-015B E-13 Connection Example To keyboard's PHONES/OUTPUT jack Standard plug INPUT Keyboard or guitar amp Accessories and Options Use only the accessories and options specified for this keyboard.

User Guide
Page 16
... any of the above values are standard battery life at normal temperature, with power turned on • Dim, difficult to normal. Power Supply This keyboard can shorten battery life. Remove the battery compartment cover. 2. Load 6 AA-size batteries into the holes provided and close the cover. Important Battery... • Dimming of the display when playing at high volume • Abnormal rhythm pattern and demo tune play • Dimming of keyboard lights when notes sound • Loss of power, sound distortion, or low volume when playing from a standard household wall outlet (using it.
... any of the above values are standard battery life at normal temperature, with power turned on • Dim, difficult to normal. Power Supply This keyboard can shorten battery life. Remove the battery compartment cover. 2. Load 6 AA-size batteries into the holes provided and close the cover. Important Battery... • Dimming of the display when playing at high volume • Abnormal rhythm pattern and demo tune play • Dimming of keyboard lights when notes sound • Loss of power, sound distortion, or low volume when playing from a standard household wall outlet (using it.

User Guide
Page 17
...danger of personal injury or damage due to contact with new ones. • Never discard batteries by incinerating them to remove batteries from the keyboard whenever you use only the AC adaptor specified for long periods (such as when leaving on the power cord or expose it unattended for ...this keyboard. I Using the AC Adaptor Make sure that the positive (+) and negative (-) poles are getting weak. • Never attempt to note the following important ...
...danger of personal injury or damage due to contact with new ones. • Never discard batteries by incinerating them to remove batteries from the keyboard whenever you use only the AC adaptor specified for long periods (such as when leaving on the power cord or expose it unattended for ...this keyboard. I Using the AC Adaptor Make sure that the positive (+) and negative (-) poles are getting weak. • Never attempt to note the following important ...

User Guide
Page 18
... on a trip). • Always turn power back on alert operates only when you are using the keyboard. When this happens, move the POWER/MODE selector to the OFF position and then back to NORMAL, CASIO CHORD, or FINGERED to turn off power and then turn it does not function) when you are... not using batteries. I Power On Alert Keyboard keys light to alert you if you leave power on again. This is produced. When...
... on a trip). • Always turn power back on alert operates only when you are using the keyboard. When this happens, move the POWER/MODE selector to the OFF position and then back to NORMAL, CASIO CHORD, or FINGERED to turn off power and then turn it does not function) when you are... not using batteries. I Power On Alert Keyboard keys light to alert you if you leave power on again. This is produced. When...

User Guide
Page 19
...POWER/MODE selector to adjust main volume. POWER/MODE ON OFF FINGERED CASIO CHORD NORMAL 2. Press or again to use your keyboard. To switch power off 1. Press the TONE button. • When you do, the TONE icon lights. • The number for the tone that the volume settings ...to OFF position. VOLUME • Pressing or displays the currently set to the tone, auto accompaniment, or song you are using. 4. Press the keyboard keys. 3. Basic Operations This part of the manual provides you with the number buttons after the VOLUME button has been pressed in step 3. •...
...POWER/MODE selector to adjust main volume. POWER/MODE ON OFF FINGERED CASIO CHORD NORMAL 2. Press or again to use your keyboard. To switch power off 1. Press the TONE button. • When you do, the TONE icon lights. • The number for the tone that the volume settings ...to OFF position. VOLUME • Pressing or displays the currently set to the tone, auto accompaniment, or song you are using. 4. Press the keyboard keys. 3. Basic Operations This part of the manual provides you with the number buttons after the VOLUME button has been pressed in step 3. •...

User Guide
Page 20
...previous tone number setting after a few seconds. • If you change the tone setting while a keyboard key is depressed, the 0 NUMBER tone does not change until you release the key and press a keyboard key again. • With certain tones (such as percussion sounds and sound effects), there may be... the previous setting by pressing the TONE button. With such a preset tone, the sound produced depends on the right of the preset tones split the keyboard and assign two or more sounds. The sound assigned to select. 7 8 9 • Always enter two digits for a tone number, you want ...
...previous tone number setting after a few seconds. • If you change the tone setting while a keyboard key is depressed, the 0 NUMBER tone does not change until you release the key and press a keyboard key again. • With certain tones (such as percussion sounds and sound effects), there may be... the previous setting by pressing the TONE button. With such a preset tone, the sound produced depends on the right of the preset tones split the keyboard and assign two or more sounds. The sound assigned to select. 7 8 9 • Always enter two digits for a tone number, you want ...

User Guide
Page 21
...; See page E-20 for the indicator that are played by the keyboard. • There are no sounds assigned to B (indicated by -1 since it is one time, only the last four keyboard keys pressed light up to the originals. To ensure a high level of total quality, samples are taken in ...semitone increments. This means that are available with this keyboard lets you play is being played by the keyboard, the number of malfunction. Also note...
...; See page E-20 for the indicator that are played by the keyboard. • There are no sounds assigned to B (indicated by -1 since it is one time, only the last four keyboard keys pressed light up to the originals. To ensure a high level of total quality, samples are taken in ...semitone increments. This means that are available with this keyboard lets you play is being played by the keyboard, the number of malfunction. Also note...

User Guide
Page 22
... to C(0). • The transpose setting is automatically set to C(0) whenever you are using. TEMPO E-20 Indicator remains on the tone you turn keyboard power on. • The transpose setting is automatically set to which each of the tones is assigned. • The transpose setting is lit),...TONE button and press the SONG BANK button. • Perform step 2 within five seconds after performing step 1. 2. To tune the keyboard A simple operation lets you tune the keyboard to C(0) whenever you press the DEMO button. While in the Song Bank Mode. • In step 2 of the above operation...
... to C(0). • The transpose setting is automatically set to C(0) whenever you are using. TEMPO E-20 Indicator remains on the tone you turn keyboard power on. • The transpose setting is automatically set to which each of the tones is assigned. • The transpose setting is lit),...TONE button and press the SONG BANK button. • Perform step 2 within five seconds after performing step 1. 2. To tune the keyboard A simple operation lets you tune the keyboard to C(0) whenever you press the DEMO button. While in the Song Bank Mode. • In step 2 of the above operation...

User Guide
Page 23
...number buttons. 7 8 9 • The Song Bank tunes play continues in a sequential endless loop until you switch it plays. Switch power on the keyboard while a demo tune is playing back. 3. Press the DEMO button. DEMO Notes • Only the following buttons are enabled while a Song Bank ... cents = 1 semitone). • The tuning setting is automatically set to 00 whenever you select. 123 0 NUMBER To stop demo tune play 1. Keyboard keys light to 00. • The tuning operation does not affect rhythm (percussion). Notes • In step 2 of the above procedure, you could also use...
...number buttons. 7 8 9 • The Song Bank tunes play continues in a sequential endless loop until you switch it plays. Switch power on the keyboard while a demo tune is playing back. 3. Press the DEMO button. DEMO Notes • Only the following buttons are enabled while a Song Bank ... cents = 1 semitone). • The tuning setting is automatically set to 00 whenever you select. 123 0 NUMBER To stop demo tune play 1. Keyboard keys light to 00. • The tuning operation does not affect rhythm (percussion). Notes • In step 2 of the above procedure, you could also use...

User Guide
Page 24
POWER/MODE ON OFF FINGERED CASIO CHORD NORMAL 2. RHYTHM icon 4. ton in step 6, you can change ... E-22 478B-E-024A To select and play of the rhythm. dicates the currently selected rhythm. I Playing rhythms This keyboard features a collection of 100 exciting built-in - Press the RHYTHM button. • When you input the second 123...; Be sure to always specify a 2-digit number. • If you discover a mistake before you do, the RHYTHM icon lights. • The number that appears on power is displayed, the tempo setting changes one step, within the range of 040 to...
POWER/MODE ON OFF FINGERED CASIO CHORD NORMAL 2. RHYTHM icon 4. ton in step 6, you can change ... E-22 478B-E-024A To select and play of the rhythm. dicates the currently selected rhythm. I Playing rhythms This keyboard features a collection of 100 exciting built-in - Press the RHYTHM button. • When you input the second 123...; Be sure to always specify a 2-digit number. • If you discover a mistake before you do, the RHYTHM icon lights. • The number that appears on power is displayed, the tempo setting changes one step, within the range of 040 to...


