User Guide
Page 2
...party responsible for a Class B digital device, pursuant to Part 15 of Conformity Model Number: LK-270 Trade Name: CASIO COMPUTER CO., LTD. Responsible party: CASIO AMERICA, INC. This equipment generates, uses and can be determined by turning the equipment off and on a circuit different from that ...to which can radiate radio frequency energy and, if not installed and used in accordance with the instructions, may ...
...party responsible for a Class B digital device, pursuant to Part 15 of Conformity Model Number: LK-270 Trade Name: CASIO COMPUTER CO., LTD. Responsible party: CASIO AMERICA, INC. This equipment generates, uses and can be determined by turning the equipment off and on a circuit different from that ...to which can radiate radio frequency energy and, if not installed and used in accordance with the instructions, may ...
User Guide
Page 3
...battery compartment. • Replace batteries as soon as possible after any sign they are subject to change without the consent of CASIO is prohibited under 3 years. • Use only a CASIO AD-5 adaptor. • The AC adaptor is not intended for children under copyright laws. ● IN NO EVENT ...BUSINESS INTERRUPTION, LOSS OF INFORMATION) ARISING OUT OF THE USE OF OR INABILITY TO USE THIS MANUAL OR PRODUCT, EVEN IF CASIO HAS BEEN ADVISED OF THE POSSIBILITY OF SUCH DAMAGES. ● The contents of this product. • Before using the optional AC Adaptor to power the unit, be ...
...battery compartment. • Replace batteries as soon as possible after any sign they are subject to change without the consent of CASIO is prohibited under 3 years. • Use only a CASIO AD-5 adaptor. • The AC adaptor is not intended for children under copyright laws. ● IN NO EVENT ...BUSINESS INTERRUPTION, LOSS OF INFORMATION) ARISING OUT OF THE USE OF OR INABILITY TO USE THIS MANUAL OR PRODUCT, EVEN IF CASIO HAS BEEN ADVISED OF THE POSSIBILITY OF SUCH DAMAGES. ● The contents of this product. • Before using the optional AC Adaptor to power the unit, be ...
User Guide
Page 4
... Select from a variety of musical instrument sounds E-13 Layering Two Tones E-14 Splitting the Keyboard between Two Different Tones E-14 Using Reverb E-15 Using Chorus E-15 Using a Pedal E-16 Changing the Pitch (Transpose, Tuning, Octave Shift E-16 Sampling Sounds and Playing Them on the Digital Keyboard ... E-23 Playing Built-in Songs E-26 Playing the Demo Songs E-26 Playing Back a Particular Song E-27 Using the Karaoke Feature E-30 Increasing the Selection of Songs E-30 Using Built-in Song E-47 Saving Recorded Data on an External Device E-48 E-2 E-38 Playing the Rhythm Part...
... Select from a variety of musical instrument sounds E-13 Layering Two Tones E-14 Splitting the Keyboard between Two Different Tones E-14 Using Reverb E-15 Using Chorus E-15 Using a Pedal E-16 Changing the Pitch (Transpose, Tuning, Octave Shift E-16 Sampling Sounds and Playing Them on the Digital Keyboard ... E-23 Playing Built-in Songs E-26 Playing the Demo Songs E-26 Playing Back a Particular Song E-27 Using the Karaoke Feature E-30 Increasing the Selection of Songs E-30 Using Built-in Song E-47 Saving Recorded Data on an External Device E-48 E-2 E-38 Playing the Rhythm Part...
User Guide
Page 5
http://world.casio.com/ E-3 English Other Useful Digital Keyboard Functions E-49 Changing the Scale of the Keyboard E-49 Using Music Preset E-50 Using the Arpeggiator E-50 Deleting User Song Data E-51 Deleting All Data in Digital Keyboard Memory E-52 Using a Memory Card E-53 SD Memory ...• Safety Precautions • Appendix • Other (Warranty, etc.) Items included as accessories are separately for this product from the CASIO catalog available from your retailer, and from an SD Memory Card E-57 SD Memory Card Error Messages E-57 Connecting External Devices..... E-58 ...
http://world.casio.com/ E-3 English Other Useful Digital Keyboard Functions E-49 Changing the Scale of the Keyboard E-49 Using Music Preset E-50 Using the Arpeggiator E-50 Deleting User Song Data E-51 Deleting All Data in Digital Keyboard Memory E-52 Using a Memory Card E-53 SD Memory ...• Safety Precautions • Appendix • Other (Warranty, etc.) Items included as accessories are separately for this product from the CASIO catalog available from your retailer, and from an SD Memory Card E-57 SD Memory Card Error Messages E-57 Connecting External Devices..... E-58 ...
User Guide
Page 6
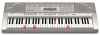
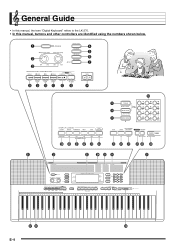
General Guide • In this manual, the term "Digital Keyboard" refers to the LK-270. • In this manual, buttons and other controllers are identified using the numbers shown below. 1 4 5 2 6 7 3 8 9 bk bl bm bn bo bs bp bq br bt ck cl cm cn co cp cq cr cs ct dk dl dm dn do dp dq dl dr ds dt E-4
General Guide • In this manual, the term "Digital Keyboard" refers to the LK-270. • In this manual, buttons and other controllers are identified using the numbers shown below. 1 4 5 2 6 7 3 8 9 bk bl bm bn bo bs bp bq br bt ck cl cm cn co cp cq cr cs ct dk dl dm dn do dp dq dl dr ds dt E-4

User Guide
Page 8
...buttons to enter numbers and values. • Enter the same number of digits as the currently displayed value. Setting St .GrPno Number Buttons Use the number buttons to change the displayed number or value. • Holding down either button scrolls the displayed setting. • Pressing both... of other Digital Keyboard operations. E-6 Refer to display the menu item's submenu. Example: To enter tone number 001, input 0 3 0 3 1. Then use the FUNCTION button (ct) to adjust the reverb effect, to delete data, and to select an item. FUNCTION Button (ct) Functions You can exit the ...
...buttons to enter numbers and values. • Enter the same number of digits as the currently displayed value. Setting St .GrPno Number Buttons Use the number buttons to change the displayed number or value. • Holding down either button scrolls the displayed setting. • Pressing both... of other Digital Keyboard operations. E-6 Refer to display the menu item's submenu. Example: To enter tone number 001, input 0 3 0 3 1. Then use the FUNCTION button (ct) to adjust the reverb effect, to delete data, and to select an item. FUNCTION Button (ct) Functions You can exit the ...

User Guide
Page 10
...Household power outlet • Be sure to turn off Digital Keyboard power before loading batteries. • It is low. Using the AC Adaptor Use the AC adaptor when you to prepare six commercially available D-size batteries. Make sure the positive + and negative - Low ...battery indicator (flashes) E-8 Replace the batteries with this Digital Keyboard. Normally, use oxyride batteries or any other nickel based batteries. 1. Purchase it separately from a household electrical outlet. Open the battery cover on the...
...Household power outlet • Be sure to turn off Digital Keyboard power before loading batteries. • It is low. Using the AC Adaptor Use the AC adaptor when you to prepare six commercially available D-size batteries. Make sure the positive + and negative - Low ...battery indicator (flashes) E-8 Replace the batteries with this Digital Keyboard. Normally, use oxyride batteries or any other nickel based batteries. 1. Purchase it separately from a household electrical outlet. Open the battery cover on the...
User Guide
Page 11
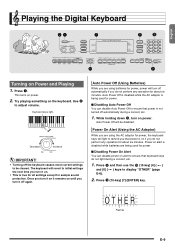
... on it remains on until you turn it off automatically if you do not light during a concert, etc. 1. Auto Power Off (Using Batteries) While you are using the AC adaptor for about six minutes. While holding down bp, turn off again. Auto Power Off will light to initial settings the... next time you that keyboard keys do not perform any operation for about six minutes. Power On Alert (Using the AC Adaptor) While you do not perform any operation for power, the keyboard keys will be cleared. Decrease Increase • Turning off ...
... on it remains on until you turn it off automatically if you do not light during a concert, etc. 1. Auto Power Off (Using Batteries) While you are using the AC adaptor for about six minutes. While holding down bp, turn off again. Auto Power Off will light to initial settings the... next time you that keyboard keys do not perform any operation for about six minutes. Power On Alert (Using the AC Adaptor) While you do not perform any operation for power, the keyboard keys will be cleared. Decrease Increase • Turning off ...
User Guide
Page 12
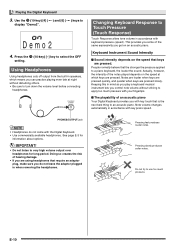
... keyboard, the louder the sound. This provides you some of hearing damage. • If you with the Digital Keyboard. • Use commercially available headphones. Actually, however, the intensity of an acoustic piano Your Digital Keyboard provides you are pressed. Do not try to ...get on the speed at night without striving to Touch Pressure (Touch Response) Touch Response alters tone volume in accordance with keyboard pressure (speed). Use the bs (10-key) [4] ( ) and [6] ( ) keys to very high volume output over headphones for information about options. •...
... keyboard, the louder the sound. This provides you some of hearing damage. • If you with the Digital Keyboard. • Use commercially available headphones. Actually, however, the intensity of an acoustic piano Your Digital Keyboard provides you are pressed. Do not try to ...get on the speed at night without striving to Touch Pressure (Touch Response) Touch Response alters tone volume in accordance with keyboard pressure (speed). Use the bs (10-key) [4] ( ) and [6] ( ) keys to very high volume output over headphones for information about options. •...
User Guide
Page 13
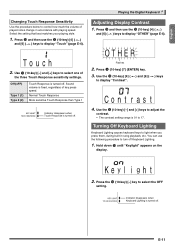
...how much the volume of key press speed. Press bs (10-key) [7] (ENTER) key. 3. Indicator disappears when Keyboard Lighting is turned off . You can use the bs (10-key) [4] ( ) and [6] ( ) keys to turn off . Hold down ct until "Keylight" appears on the display. Sound volume... is turned off . Playing the Digital Keyboard Adjusting Display Contrast 1. Press ct and then use the following procedure to display "OTHER" (page E-6). Press the bs (10-key) [-] key to select one of the three Touch Response ...
...how much the volume of key press speed. Press bs (10-key) [7] (ENTER) key. 3. Indicator disappears when Keyboard Lighting is turned off . You can use the bs (10-key) [4] ( ) and [6] ( ) keys to turn off . Hold down ct until "Keylight" appears on the display. Sound volume... is turned off . Playing the Digital Keyboard Adjusting Display Contrast 1. Press ct and then use the following procedure to display "OTHER" (page E-6). Press the bs (10-key) [-] key to select one of the three Touch Response ...

User Guide
Page 14
... The metronome volume setting is flashing, you on the display. While the tempo value is changed automatically with each measure. Start/Stop 1. Press 7. Use y (slower) and t (faster) to stop flashing if you pressed 7. 2. Hold down either button changes the setting at high speed. •...sounds) is configured automatically for a few seconds after the beats per measure setting screen appears on tempo. Playing the Digital Keyboard Using the Metronome The metronome lets you play . This setting lets you practice with the currently selected song or rhythm. • ...
... The metronome volume setting is flashing, you on the display. While the tempo value is changed automatically with each measure. Start/Stop 1. Press 7. Use y (slower) and t (faster) to stop flashing if you pressed 7. 2. Hold down either button changes the setting at high speed. •...sounds) is configured automatically for a few seconds after the beats per measure setting screen appears on tempo. Playing the Digital Keyboard Using the Metronome The metronome lets you play . This setting lets you practice with the currently selected song or rhythm. • ...
User Guide
Page 15
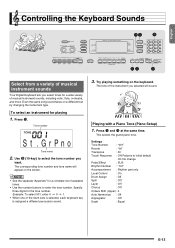
Press bp. Example: To select 001, enter 0 3 0 3 1. • When one of available tones. • Use the number buttons to enter the tone number. Press bp and bq at the same time. Tone number St .GrPno Tone name 2. Try playing something ... tone number and tone name will sound. The tone of musical instrument sounds, including violin, flute, orchestra, and more. Playing with a Piano Tone (Piano Setup) 1. Use bs (10-key) to initial default On: No change Pedal Effect : SUS Rhythm Number : "161" Accompaniment : Rhythm part only Local Control : On Drum Assign : Off...
Press bp. Example: To select 001, enter 0 3 0 3 1. • When one of available tones. • Use the number buttons to enter the tone number. Press bp and bq at the same time. Tone number St .GrPno Tone name 2. Try playing something ... tone number and tone name will sound. The tone of musical instrument sounds, including violin, flute, orchestra, and more. Playing with a Piano Tone (Piano Setup) 1. Use bs (10-key) to initial default On: No change Pedal Effect : SUS Rhythm Number : "161" Accompaniment : Rhythm part only Local Control : On Drum Assign : Off...

User Guide
Page 16
... the two tones for the right side range (page E-13). VIBRAPHONE 1 Split point FLUTE 1 Disappears F3 E-14 Press bp and then use the procedure below to assign different tones to the right range and left range of the keyboard, so it plays only the tone you selected...are playing an ensemble between two instruments. Lights 3. Select the tone for a split keyboard 1. Play something on the keyboard. Press bp and then use the following procedure to layer two different tones (such as piano and strings) so they sound simultaneously when you press a keyboard key. 1. Example...
... the two tones for the right side range (page E-13). VIBRAPHONE 1 Split point FLUTE 1 Disappears F3 E-14 Press bp and then use the procedure below to assign different tones to the right range and left range of the keyboard, so it plays only the tone you selected...are playing an ensemble between two instruments. Lights 3. Select the tone for a split keyboard 1. Play something on the keyboard. Press bp and then use the following procedure to layer two different tones (such as piano and strings) so they sound simultaneously when you press a keyboard key. 1. Example...

User Guide
Page 17
... breadth to notes. Cho r us 2. To change the duration of cp toggles between split (two tones) and unsplit (one tone). E-15 Press ct and then use the bs (10-key) [4] ( ) and [6] ( ) keys to 10 Turns off . The larger the number selected, the longer the reverb duration. C 4 Key name Reve r b 2....on the tone you sound as the split point. Off (oFF) 1 to display "Chorus" (page E-6). It makes you are five chorus types, plus an off . Use the bs (10-key) [-] and [+] keys to unsplit the keyboard (so it plays only the tone you want . Cho r us • The actual effect ...
... breadth to notes. Cho r us 2. To change the duration of cp toggles between split (two tones) and unsplit (one tone). E-15 Press ct and then use the bs (10-key) [4] ( ) and [6] ( ) keys to 10 Turns off . The larger the number selected, the longer the reverb duration. C 4 Key name Reve r b 2....on the tone you sound as the split point. Off (oFF) 1 to display "Chorus" (page E-6). It makes you are five chorus types, plus an off . Use the bs (10-key) [-] and [+] keys to unsplit the keyboard (so it plays only the tone you want . Cho r us • The actual effect ...

User Guide
Page 18
... tuning feature to select the pedal effect you change the pitch to display "OTHER" (page E-6). See page E-3 for information about options. Press ct and then use the bs (10-key) [4] ( ) and [6] ( ) keys to display "Tune" (page E-6). Sostenuto Sustains notes that of a singer. • The .... A simple operation lets you instantly change the pitch, in various ways while playing. • A pedal unit does not come with slightly altered tuning. Use the bs (10-key) [-] and [+] keys to select the transpose setting you need to adjust the pitch slightly to +12 semitones. 1. T u ...
... tuning feature to select the pedal effect you change the pitch to display "OTHER" (page E-6). See page E-3 for information about options. Press ct and then use the bs (10-key) [4] ( ) and [6] ( ) keys to display "Tune" (page E-6). Sostenuto Sustains notes that of a singer. • The .... A simple operation lets you instantly change the pitch, in various ways while playing. • A pedal unit does not come with slightly altered tuning. Use the bs (10-key) [-] and [+] keys to select the transpose setting you need to adjust the pitch slightly to +12 semitones. 1. T u ...

User Guide
Page 19
... affects the entire keyboard range. 3. Keep pressing cq until the screen shown below appears on Split before pressing cq. • If you want to use Split, turn on the display. Controlling the Keyboard Sounds E-17 English Octave Shift Octave Shift lets you raise or lower the pitch of the keyboard... notes in octave units. • The octave shift setting range is -2 to +2 octaves. • When using Split (page E-14), you can individually set the left and right keyboard ranges to the pitches you do not perform any operation for the left...
... affects the entire keyboard range. 3. Keep pressing cq until the screen shown below appears on Split before pressing cq. • If you want to use Split, turn on the display. Controlling the Keyboard Sounds E-17 English Octave Shift Octave Shift lets you raise or lower the pitch of the keyboard... notes in octave units. • The octave shift setting range is -2 to +2 octaves. • When using Split (page E-14), you can individually set the left and right keyboard ranges to the pitches you do not perform any operation for the left...

User Guide
Page 20
... on the Digital Keyboard before you . E-18 For example, you could connect a commercially available microphone. • Connection of your dog and then use the microphone. • Sampled sounds are recorded in a melody. Digital Keyboard AUDIO IN jack • You also could sample the bark of an... external device requires commercially available connecting cords, supplied by you will be able to use the sound in monaural. Connect a microphone or external device to create new sounds that matches the configuration of the external device and ...
... on the Digital Keyboard before you . E-18 For example, you could connect a commercially available microphone. • Connection of your dog and then use the microphone. • Sampled sounds are recorded in a melody. Digital Keyboard AUDIO IN jack • You also could sample the bark of an... external device requires commercially available connecting cords, supplied by you will be able to use the sound in monaural. Connect a microphone or external device to create new sounds that matches the configuration of the external device and ...

User Guide
Page 21
...the external device or microphone. English Sampling Sounds and Playing Them on the Digital Keyboard Sampling and Playing a Melody Sound (Melody Sampling) Use the procedures in this happens, deleting other data. The allowable sampling time (in Digital Keyboard memory as tone numbers 571 through 575. ...Sampled sound 1 S1 :Or gn l Used memory (Unit: Kbytes) Remaining memory capacity No Da t a No sampled sound stored Lights • In place of other memory data you ...
...the external device or microphone. English Sampling Sounds and Playing Them on the Digital Keyboard Sampling and Playing a Melody Sound (Melody Sampling) Use the procedures in this happens, deleting other data. The allowable sampling time (in Digital Keyboard memory as tone numbers 571 through 575. ...Sampled sound 1 S1 :Or gn l Used memory (Unit: Kbytes) Remaining memory capacity No Da t a No sampled sound stored Lights • In place of other memory data you ...

User Guide
Page 22
...This enters repeat standby. After the sampled sound is sounding hold down cs, press co. Changing the Volume of Sampled Sound Looped Playback You can use the following procedure to loop a sampled sound so it continues to stop playback. 5. Press the same button again to repeat, as you want .... Digital Keyboard ■ How sampled sounds are played Pressing Middle C (C4) will decrease volume. 3. C4 Looping a Sampled Sound You can use the following procedure to change (bt to the left and right of the selected sound. While the loop is at different pitches. To select ...
...This enters repeat standby. After the sampled sound is sounding hold down cs, press co. Changing the Volume of Sampled Sound Looped Playback You can use the following procedure to loop a sampled sound so it continues to stop playback. 5. Press the same button again to repeat, as you want .... Digital Keyboard ■ How sampled sounds are played Pressing Middle C (C4) will decrease volume. 3. C4 Looping a Sampled Sound You can use the following procedure to change (bt to the left and right of the selected sound. While the loop is at different pitches. To select ...

User Guide
Page 23
... high to three drum sets and store them as tone numbers 576, 577, and 578. Press bq. Press bp and then use bs (10-key) to sample. Press bp and then use the procedure to change to apply effects. 2. Loop 1 (Loop1) Loops the sampled sound. Press the keyboard key to which ... and changes the pitch by a gradually increasing amount. Funny 2 (Funy2) Alternates between high and low. Incorporating a Sampled Sound into a Drum Set (Drum Sampling) You can use bs (10-key) to enter the tone number (571 to 575) to which you want to assign the drum sound you want is released. bq...
... high to three drum sets and store them as tone numbers 576, 577, and 578. Press bq. Press bp and then use bs (10-key) to sample. Press bp and then use the procedure to change to apply effects. 2. Loop 1 (Loop1) Loops the sampled sound. Press the keyboard key to which ... and changes the pitch by a gradually increasing amount. Funny 2 (Funy2) Alternates between high and low. Incorporating a Sampled Sound into a Drum Set (Drum Sampling) You can use bs (10-key) to enter the tone number (571 to 575) to which you want to assign the drum sound you want is released. bq...


