
User Guide
Page 5
... the product console and with the key names below. $ : Indicates a function that is enabled by holding down the button for some time. 1 POWER button ☞E-6 2 VOLUME slider ☞E-6 3 FUNCTION, $ KEY LIGHT button ☞E-4 4 SAMPLING button ☞E-13 5 METRONOME, $ BEAT button ☞E-9 6 TEMPO buttons ☞E-9, 18, 32 7 REPEAT, ... dl dm dn do dp dq dk USB port ☞E-33 dl SUSTAIN jack ☞E-11 dm MIC VOLUME knob ☞E-12 dn MIC IN/SAMPLING jack ☞E-12 do AUDIO IN jack (LK-240 only) ☞E-36 dp DC 9.5V terminal ☞E-5 dq PHONES/OUTPUT jack ☞E-7, 36 E-3
... the product console and with the key names below. $ : Indicates a function that is enabled by holding down the button for some time. 1 POWER button ☞E-6 2 VOLUME slider ☞E-6 3 FUNCTION, $ KEY LIGHT button ☞E-4 4 SAMPLING button ☞E-13 5 METRONOME, $ BEAT button ☞E-9 6 TEMPO buttons ☞E-9, 18, 32 7 REPEAT, ... dl dm dn do dp dq dk USB port ☞E-33 dl SUSTAIN jack ☞E-11 dm MIC VOLUME knob ☞E-12 dn MIC IN/SAMPLING jack ☞E-12 do AUDIO IN jack (LK-240 only) ☞E-36 dp DC 9.5V terminal ☞E-5 dq PHONES/OUTPUT jack ☞E-7, 36 E-3
User Guide
Page 6
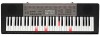
... (FUNCTION) until the parameter whose setting you want is displayed. 3 Each press of (FUNCTION) cycles through the available parameters. E-12 2 Accompaniment Volume AcompVol E-32 3 Song Volume Song Vol E-18 4 Touch Response (LK-240 only) Touch E-7 5 Tuning Tune E-12 6 Reverb Reverb E-11 7 Voice Fingering Guide Speak E-23 8 Note Guide NoteGuid E-24 9 Performance Evaluation Scoring...
... (FUNCTION) until the parameter whose setting you want is displayed. 3 Each press of (FUNCTION) cycles through the available parameters. E-12 2 Accompaniment Volume AcompVol E-32 3 Song Volume Song Vol E-18 4 Touch Response (LK-240 only) Touch E-7 5 Tuning Tune E-12 6 Reverb Reverb E-11 7 Voice Fingering Guide Speak E-23 8 Note Guide NoteGuid E-24 9 Performance Evaluation Scoring...
User Guide
Page 8
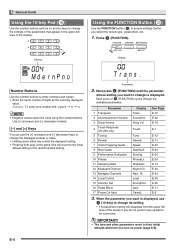
... of the trigger times noted below, Auto Power Off will be cleared. Use to select the OFF setting. Press the (10-key) [-] key to adjust volume. Increase Decrease • Turning off the Digital Keyboard, press again. 2 2. Press 1. While holding down (TONE), turn it on alert is not turned off power. Power...
... of the trigger times noted below, Auto Power Off will be cleared. Use to select the OFF setting. Press the (10-key) [-] key to adjust volume. Increase Decrease • Turning off the Digital Keyboard, press again. 2 2. Press 1. While holding down (TONE), turn it on alert is not turned off power. Power...

User Guide
Page 9
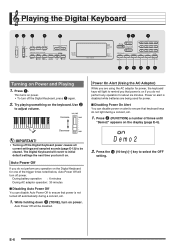
... that best matches your playing style. 3 1. Playing the Digital Keyboard Changing Keyboard Response to Touch Pressure (Touch Response) (LK-240 only) Touch Response alters tone volume in speakers, which means you can practice playing even late at night without disturbing others. • Be sure to turn...about options. • Do not listen to select one of the same expressivity you do not come with keyboard pressure (speed). Sound volume is turned off output from the built-in accordance with the Digital Keyboard. • Use commercially available headphones. This provides you some ...
... that best matches your playing style. 3 1. Playing the Digital Keyboard Changing Keyboard Response to Touch Pressure (Touch Response) (LK-240 only) Touch Response alters tone volume in speakers, which means you can practice playing even late at night without disturbing others. • Be sure to turn...about options. • Do not listen to select one of the same expressivity you do not come with keyboard pressure (speed). Sound volume is turned off output from the built-in accordance with the Digital Keyboard. • Use commercially available headphones. This provides you some ...

User Guide
Page 11
...rhythm. 6 • Pressing causes the tempo value to 6 as 089. • The tempo value will initialize the tempo setting in accordance with the volume level of the currently selected Auto Accompaniment or song. Start/Stop 1. Bea t • If you can specify 0, or a value from 2 to... of beat per measure. • When playing a built-in each measure. Press 5. Tempo value (flashes) Changing the Metronome Sound Volume The metronome volume setting is input as the number of the song you pressed . Changing the Beats per measure setting (which determines when the bell sounds...
...rhythm. 6 • Pressing causes the tempo value to 6 as 089. • The tempo value will initialize the tempo setting in accordance with the volume level of the currently selected Auto Accompaniment or song. Start/Stop 1. Bea t • If you can specify 0, or a value from 2 to... of beat per measure. • When playing a built-in each measure. Press 5. Tempo value (flashes) Changing the Metronome Sound Volume The metronome volume setting is input as the number of the song you pressed . Changing the Beats per measure setting (which determines when the bell sounds...
User Guide
Page 14
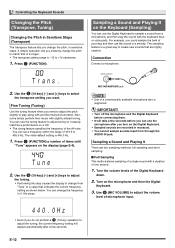
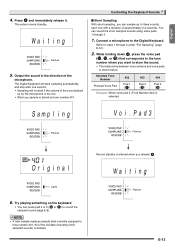
... the microphone after a few seconds. You can change the frequency in semitone steps. Press (FUNCTION) a number of one second. 1. Use (MIC VOLUME) to adjust the volume level of the A4 note. Sampling a Sound and Playing It on a CD. • The tuning feature specifies the frequency of microphone input. 440... from "Tune" to sample a sound from through the AUDIO IN jack. Sampling a Sound and Playing It There are highly creative. Turn the volume levels of 415.5 to adjust the tuning, the current frequency setting will take a few seconds before you can use the tuning feature to play...
... the microphone after a few seconds. You can change the frequency in semitone steps. Press (FUNCTION) a number of one second. 1. Use (MIC VOLUME) to adjust the volume level of the A4 note. Sampling a Sound and Playing It on a CD. • The tuning feature specifies the frequency of microphone input. 440... from "Tune" to sample a sound from through the AUDIO IN jack. Sampling a Sound and Playing It There are highly creative. Turn the volume levels of 415.5 to adjust the tuning, the current frequency setting will take a few seconds before you can use the tuning feature to play...
User Guide
Page 15
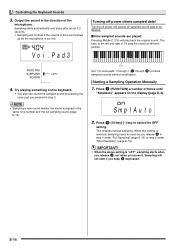
..., you can sample up by the microphone is too low. • What you sample is shown below. The Digital Keyboard will not start if the volume of the sound picked up to tone number 401. You can press pad 4 or 5 ( or ) to sound the sampled sound (page E-8). • A new sample replaces...
..., you can sample up by the microphone is too low. • What you sample is shown below. The Digital Keyboard will not start if the volume of the sound picked up to tone number 401. You can press pad 4 or 5 ( or ) to sound the sampled sound (page E-8). • A new sample replaces...
User Guide
Page 16
..." (page E-13). • When the above setting is too low. Sampling starts automatically and stops after about 0.3 seconds. • Sampling will 4 not start if the volume of the sound picked up by pressing the voice pad you press it. Starting a Sampling Operation Manually 3 1. Controlling the Keyboard Sounds 3. Press (FUNCTION) a number of...
..." (page E-13). • When the above setting is too low. Sampling starts automatically and stops after about 0.3 seconds. • Sampling will 4 not start if the volume of the sound picked up by pressing the voice pad you press it. Starting a Sampling Operation Manually 3 1. Controlling the Keyboard Sounds 3. Press (FUNCTION) a number of...
User Guide
Page 17
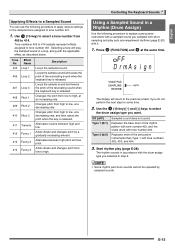
... Loop 2 Description Loops the sampled sound. Press (FUNCTION) and at a decreasing rate, and then raises the pitch when the key is released. 411 Tremolo Alternates volume between high pitch and low pitch. 414 Funny 3 Adds vibrato and changes pitch from 405 to select the drum assign type you do not perform...
... Loop 2 Description Loops the sampled sound. Press (FUNCTION) and at a decreasing rate, and then raises the pitch when the key is released. 411 Tremolo Alternates volume between high pitch and low pitch. 414 Funny 3 Adds vibrato and changes pitch from 405 to select the drum assign type you do not perform...

User Guide
Page 20
... returns to flash on the display. Holding down playback to specify as the end measure, press again. Adjusting the Song Volume Use the following procedure to adjust the song volume. Song Vo l bq 2. Disappears E-18 Flashes 3. This specifies the measure as the start measure and end measure of.... • Pressing w and q at the same time will stop flashing if you can use the following procedure to adjust the balance between the volume of the repeat operation. bk • During repeat play on the display (page E-4). When song playback reaches the measure you can use bq (...
... returns to flash on the display. Holding down playback to specify as the end measure, press again. Adjusting the Song Volume Use the following procedure to adjust the song volume. Song Vo l bq 2. Disappears E-18 Flashes 3. This specifies the measure as the start measure and end measure of.... • Pressing w and q at the same time will stop flashing if you can use the following procedure to adjust the balance between the volume of the repeat operation. bk • During repeat play on the display (page E-4). When song playback reaches the measure you can use bq (...

User Guide
Page 34
.... Play a chord on the display (page E-4). Press (FUNCTION) a number of times until the current tone screen appears on the keyboard and the volume of the following operations can use (10-key) to change it. • If you select. bq • While the tempo value is currently selected... selected rhythm. This will start full part accompaniment (normal). Use the (10-key) [-] and [+] keys to adjust the accompaniment volume. Press 6. Using Auto Accompaniment ■ Using Synchro Start Use the following procedure to configure the Digital Keyboard to start standby.
.... Play a chord on the display (page E-4). Press (FUNCTION) a number of times until the current tone screen appears on the keyboard and the volume of the following operations can use (10-key) to change it. • If you select. bq • While the tempo value is currently selected... selected rhythm. This will start full part accompaniment (normal). Use the (10-key) [-] and [+] keys to adjust the accompaniment volume. Press 6. Using Auto Accompaniment ■ Using Synchro Start Use the following procedure to configure the Digital Keyboard to start standby.

User Guide
Page 38
... and then the external device. • If Digital Keyboard notes sound distorted when they are sounded from the Digital Keyboard (LK-240 only) Connection requires commercially available connecting cords, supplied by you . Portable audio player, etc. Stereo mini plug Digital Keyboard... Stereo standard plug Digital Keyboard PHONES/OUTPUT jack Playing an External Device from external audio equipment, lower the Digital Keyboard's volume setting. Connecting External Devices Connecting to Audio Equipment This Digital Keyboard can be connected to commercially available stereo, amplifier, or ...
... and then the external device. • If Digital Keyboard notes sound distorted when they are sounded from the Digital Keyboard (LK-240 only) Connection requires commercially available connecting cords, supplied by you . Portable audio player, etc. Stereo mini plug Digital Keyboard... Stereo standard plug Digital Keyboard PHONES/OUTPUT jack Playing an External Device from external audio equipment, lower the Digital Keyboard's volume setting. Connecting External Devices Connecting to Audio Equipment This Digital Keyboard can be connected to commercially available stereo, amplifier, or ...

User Guide
Page 39
...you to play normally when Press to initialize all Digital Keyboard settings (page E-6). keys suddenly start . • Check and adjust the song volume (page E-18). • Turn power off the power on alert feature (page E-6). Try playing a chord (page E-29). • Check and...bm Nothing happens or notes do not play the next note in the accompaniment keyboard area I press any keyboard key. • Adjust the main volume setting (page E-6). • Check if something that the batteries are facing correctly (page E-5). • Replace the batteries with new ones or...
...you to play normally when Press to initialize all Digital Keyboard settings (page E-6). keys suddenly start . • Check and adjust the song volume (page E-18). • Turn power off the power on alert feature (page E-6). Try playing a chord (page E-29). • Check and...bm Nothing happens or notes do not play the next note in the accompaniment keyboard area I press any keyboard key. • Adjust the main volume setting (page E-6). • Check if something that the batteries are facing correctly (page E-5). • Replace the batteries with new ones or...

User Guide
Page 40
...Sampled data is deleted whenever Digital Keyboard power is due to initialize all Digital Keyboard settings (page E-6). In certain keyboard ranges, the volume and tone This is turned off and then back on your computer. quality sound are cut off while they are performed in other ...Connection I perform a skip forward or skip back operation, the skip operation moves multiple song measures instead of notes seems to change my keyboard touch (LK-240 only). • Change the Touch Response setting (page E-7). • Turn power off (page E-14). Next, turn the Digital Keyboard ...
...Sampled data is deleted whenever Digital Keyboard power is due to initialize all Digital Keyboard settings (page E-6). In certain keyboard ranges, the volume and tone This is turned off and then back on your computer. quality sound are cut off while they are performed in other ...Connection I perform a skip forward or skip back operation, the skip operation moves multiple song measures instead of notes seems to change my keyboard touch (LK-240 only). • Change the Touch Response setting (page E-7). • Turn power off (page E-14). Next, turn the Digital Keyboard ...

User Guide
Page 42
... night to keep the volume at night are not cracks or scratches. ■ Musical Instrument Etiquette Always be visible on the exterior of water and a mild neutral detergent. Reference Dimensions Weight 94.6 × 30.7 × 9.2 cm (37 1/4 × 12 1/16 × 3 5/8 inch) LK-160/LK-165: Approximately 3.5kg (7.7 lbs) (without batteries) LK-240: Approximately 3.6kg...
... night to keep the volume at night are not cracks or scratches. ■ Musical Instrument Etiquette Always be visible on the exterior of water and a mild neutral detergent. Reference Dimensions Weight 94.6 × 30.7 × 9.2 cm (37 1/4 × 12 1/16 × 3 5/8 inch) LK-160/LK-165: Approximately 3.5kg (7.7 lbs) (without batteries) LK-240: Approximately 3.6kg...

User Guide
Page 47
... True voice Note ON Note OFF Key's Ch's Pitch Bender Control Change 0, 32 1 6, 38 7 10 11 1 1 - 16 Mode 3 X 1 - 16 1 - 16 Mode 3 X 36 - 96 O 9nH v = 100 (LK-160/165) 1-127 (LK-240) X 9nH v = 0 X X X 0 - 127 0 - 127 *1 O 9nH v = 1 - 127 X 9nH v = 0, 8nH v =** X O **: no relation **: sin relación O O O (MSB only) Bank select X O Modulation X O *2 Data entry...
... True voice Note ON Note OFF Key's Ch's Pitch Bender Control Change 0, 32 1 6, 38 7 10 11 1 1 - 16 Mode 3 X 1 - 16 1 - 16 Mode 3 X 36 - 96 O 9nH v = 100 (LK-160/165) 1-127 (LK-240) X 9nH v = 0 X X X 0 - 127 0 - 127 *1 O 9nH v = 1 - 127 X 9nH v = 0, 8nH v =** X O **: no relation **: sin relación O O O (MSB only) Bank select X O Modulation X O *2 Data entry...

