
User Guide
Page 5
... • Never push on a heated carpet, in direct sunlight, in a closed vehicle parked in a notebook or some other location. High temperature precaution Never touch the print head or other areas subjected to strong impact. E-4 Never place a heavy object on an unstable table, desk, etc. Keep backup copies of all important data...
... • Never push on a heated carpet, in direct sunlight, in a closed vehicle parked in a notebook or some other location. High temperature precaution Never touch the print head or other areas subjected to strong impact. E-4 Never place a heavy object on an unstable table, desk, etc. Keep backup copies of all important data...
User Guide
Page 6
... image printing • 6-language display messages (English, German, French, Italian, Spanish, Swedish) All of this makes the CASIO Label Printer the perfect tool for just about all of your selection of the CASIO KL-820 Label Printer. E-5 Operating Temperature Range: 10°C to 35°C (50°F to high humidity, electrostatic charge, sudden temperature changes, and temperature extremes. This CASIO Label Printer...
... image printing • 6-language display messages (English, German, French, Italian, Spanish, Swedish) All of this makes the CASIO Label Printer the perfect tool for just about all of your selection of the CASIO KL-820 Label Printer. E-5 Operating Temperature Range: 10°C to 35°C (50°F to high humidity, electrostatic charge, sudden temperature changes, and temperature extremes. This CASIO Label Printer...
User Guide
Page 7
...E-40 Built-in Logos E-41 Specifications E-43 Contents Safety Precautions E-1 Operating Precautions E-5 Part 1 Getting Acquainted E-7 General Guide E-7 Label Printer Menus E-7 Part 2 Getting Ready E-8 Power Supply E-8 Replacing Batteries E-8 AC Adaptor E-9 Turning Power On and Off E-9 Resetting ... Part 6 Printing E-22 Printing a Tape E-22 Print Preview E-22 Feeding the Tape E-22 Part 7 Configuring Form Settings E-23 Part 8 Using Frames E-24 Part 9 Layout Printing E-24 Using Layout Printing E-24 Part 10 Creating and Printing a Sequentially Numbered Tape Label E-25 Numbering...
...E-40 Built-in Logos E-41 Specifications E-43 Contents Safety Precautions E-1 Operating Precautions E-5 Part 1 Getting Acquainted E-7 General Guide E-7 Label Printer Menus E-7 Part 2 Getting Ready E-8 Power Supply E-8 Replacing Batteries E-8 AC Adaptor E-9 Turning Power On and Off E-9 Resetting ... Part 6 Printing E-22 Printing a Tape E-22 Print Preview E-22 Feeding the Tape E-22 Part 7 Configuring Form Settings E-23 Part 8 Using Frames E-24 Part 9 Layout Printing E-24 Using Layout Printing E-24 Part 10 Creating and Printing a Sequentially Numbered Tape Label E-25 Numbering...
User Guide
Page 9
... from the display. Replacing Batteries A handy low battery power indicator lets you should still be able to perform some Label Printer operations, but some power intensive operations (like printing) may suddenly turn off the printer. In any of the following important points. • Be sure that the plus (+) and minus (-) sides of each battery...
... from the display. Replacing Batteries A handy low battery power indicator lets you should still be able to perform some Label Printer operations, but some power intensive operations (like printing) may suddenly turn off the printer. In any of the following important points. • Be sure that the plus (+) and minus (-) sides of each battery...
User Guide
Page 11
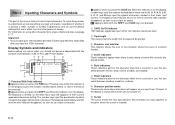
.... E-10 Display Language Setting You can cause operational problems with Layout Printing, Numbering and Bar Code cannot be used with this printer: 6mm, 9mm, 12mm, 18mm, 24mm. For information about six minutes, the Label Printer automatically turns power off . 2. Retrieving a Sentence from Memory If... sentence, the sentence that the Label Printer is saved temporarily in printer memory. Important! • Resetting Label Printer memory clears its memory of the cassette cover and then lift up to open the cover. ➞ • Never touch the print head or other metal objects near ...
.... E-10 Display Language Setting You can cause operational problems with Layout Printing, Numbering and Bar Code cannot be used with this printer: 6mm, 9mm, 12mm, 18mm, 24mm. For information about six minutes, the Label Printer automatically turns power off . 2. Retrieving a Sentence from Memory If... sentence, the sentence that the Label Printer is saved temporarily in printer memory. Important! • Resetting Label Printer memory clears its memory of the cassette cover and then lift up to open the cover. ➞ • Never touch the print head or other metal objects near ...
User Guide
Page 13
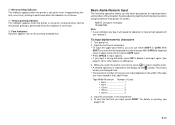
... the accents marked above , below the currently displayed screen. 6 Style indicators These indicators point to the character effect that key to be printed. 4 Character size indicator This indicator shows the size of the keys. You can select between shading, underline, and box. 8 Character ... and sizes, see page E-17. Any character you input appears at the point where the cursor is always blank when you turn power on the Label Printer display. 1 23 4 5 SANS-SERIF SANS-S ITC SANS-S RND ROMAN F a b 0. 0 cm 4 ´4 6 ROMAN ITC VERTICAL 7 MIRROR 0 98 5 1 Function/...
... the accents marked above , below the currently displayed screen. 6 Style indicators These indicators point to the character effect that key to be printed. 4 Character size indicator This indicator shows the size of the keys. You can select between shading, underline, and box. 8 Character ... and sizes, see page E-17. Any character you input appears at the point where the cursor is always blank when you turn power on the Label Printer display. 1 23 4 5 SANS-SERIF SANS-S ITC SANS-S RND ROMAN F a b 0. 0 cm 4 ´4 6 ROMAN ITC VERTICAL 7 MIRROR 0 98 5 1 Function/...
User Guide
Page 14
...display by inputting the following operation shows you must shift the keyboard for each character. Vertical printing indicator This indicator appears when the printer is set up for vertical printing. With SHIFT you the basic procedures for inputting letters and numbers. This shows where you ... SPACE to the currently selected font. 0 Mirror printing indicator This indicator appears when the printer is set up for mirror image printing. See page E-16 for other details on the width of characters. • To input the upper-case letters, you have loaded in the Label Printer.
...display by inputting the following operation shows you must shift the keyboard for each character. Vertical printing indicator This indicator appears when the printer is set up for vertical printing. With SHIFT you the basic procedures for inputting letters and numbers. This shows where you ... SPACE to the currently selected font. 0 Mirror printing indicator This indicator appears when the printer is set up for mirror image printing. See page E-16 for other details on the width of characters. • To input the upper-case letters, you have loaded in the Label Printer.

User Guide
Page 16
... already input into blocks and then apply the following settings on the tape. 3. Using Text Blocks In the example label shown below, "Promotion Plan" and "Retail Package Sample Data" are not printed on a blockby-block basis. • Number of text lines (page E-13) • Text alignment (page ...simply "blocks." Input the text for TAPE LENGTH. See page E-23 for more information. • The frame function cannot be input when FIX is printed at block mark locations.) Block 1 Block 2 • Two lines (page E-13) Example To layout "Promotion Plan" and "Retail Package Sample Data...
... already input into blocks and then apply the following settings on the tape. 3. Using Text Blocks In the example label shown below, "Promotion Plan" and "Retail Package Sample Data" are not printed on a blockby-block basis. • Number of text lines (page E-13) • Text alignment (page ...simply "blocks." Input the text for TAPE LENGTH. See page E-23 for more information. • The frame function cannot be input when FIX is printed at block mark locations.) Block 1 Block 2 • Two lines (page E-13) Example To layout "Promotion Plan" and "Retail Package Sample Data...

User Guide
Page 18
ONE B LOCK A L L B LOCKS Selecting a Font Your printer gives you a choice of the following five fonts. •... Character Size,Text Effects and Character Styles • Roman (ROMAN) This part of the manual explains how to all new labels. FONT - - - - - Important! • The font setting is used first for the text you have just ... You cannot make multiple specifications for the application of characters, how to assign text effects like underlining, shading, and box printing, and how to select either "ONE BLOCK" or "ALL BLOCKS" for specific characters. Use x and z to display ...
ONE B LOCK A L L B LOCKS Selecting a Font Your printer gives you a choice of the following five fonts. •... Character Size,Text Effects and Character Styles • Roman (ROMAN) This part of the manual explains how to all new labels. FONT - - - - - Important! • The font setting is used first for the text you have just ... You cannot make multiple specifications for the application of characters, how to assign text effects like underlining, shading, and box printing, and how to select either "ONE BLOCK" or "ALL BLOCKS" for specific characters. Use x and z to display ...
User Guide
Page 19
...number of the displayed text does not change. If the character size you specify is set automatically in the Label Printer and the number of lines of lines you are printing. appears on the size of the tape you have loaded in accordance with MANUAL size setting. Character Size ... the 24 characters sizes that are available with the tape size you are using and the number of text you are printing. With AUTO, character size is greater than the maximum characters size limit, the Label Printer automatically adjust your text vertically to set the character size manually.
...number of the displayed text does not change. If the character size you specify is set automatically in the Label Printer and the number of lines of lines you are printing. appears on the size of the tape you have loaded in accordance with MANUAL size setting. Character Size ... the 24 characters sizes that are available with the tape size you are using and the number of text you are printing. With AUTO, character size is greater than the maximum characters size limit, the Label Printer automatically adjust your text vertically to set the character size manually.
User Guide
Page 21
...EFFECT - - - - Press SIZE to display the size setting menu. 3. Text Effects There are applied to use the Shading, Underline, and Box effects in the label printer (see table, above). 5. SHAD I NG of f UNDER L I DTH 3×3 4. To specify character sizes (MANUAL) 1. Press SIZE to display the ... Using Auto Sizing (AUTO) 1. Shading: Underlining: Boxed Text: Text effect changes are three text effects that the dimensions you want to printed text only. Input the text. 2. AUTO MANUA L 3. The appearance of the tape loaded in combination with AUTO and then press SET....
...EFFECT - - - - Press SIZE to display the size setting menu. 3. Text Effects There are applied to use the Shading, Underline, and Box effects in the label printer (see table, above). 5. SHAD I NG of f UNDER L I DTH 3×3 4. To specify character sizes (MANUAL) 1. Press SIZE to display the ... Using Auto Sizing (AUTO) 1. Shading: Underlining: Boxed Text: Text effect changes are three text effects that the dimensions you want to printed text only. Input the text. 2. AUTO MANUA L 3. The appearance of the tape loaded in combination with AUTO and then press SET....

User Guide
Page 22
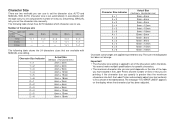
..., and raised. STYLE NORMA L BO L D OUT L I NE ----- 3. Style Indicator Sample Normal None Bold Outline Shadow To specify a character style 1. Character Styles There are applied to printed text only. E-21 Note • You could also perform the above procedure in effect at the style you can be in reverse, specifying the character...
..., and raised. STYLE NORMA L BO L D OUT L I NE ----- 3. Style Indicator Sample Normal None Bold Outline Shadow To specify a character style 1. Character Styles There are applied to printed text only. E-21 Note • You could also perform the above procedure in effect at the style you can be in reverse, specifying the character...

User Guide
Page 23
... specifying the number of copies. 2. This will return you start printing. • To stop the scrolling, press SET. Use c and v, or the number keys to restart scrolling. 3. Press SET to start printing. • Never operate the tape cutter while printer is to bend the tape near one of its ends. Use ...way through, press ESC. While the text input screen is being performed. Do not stick the tape onto human Tape skin. • Do not affix labels to any container you need to pull them apart. Important! • Never touch the tape cutter while a tape cut the tape. 5. Press SET again...
... specifying the number of copies. 2. This will return you start printing. • To stop the scrolling, press SET. Use c and v, or the number keys to restart scrolling. 3. Press SET to start printing. • Never operate the tape cutter while printer is to bend the tape near one of its ends. Use ...way through, press ESC. While the text input screen is being performed. Do not stick the tape onto human Tape skin. • Do not affix labels to any container you need to pull them apart. Important! • Never touch the tape cutter while a tape cut the tape. 5. Press SET again...

User Guide
Page 24
... one of 0cm (0") to 99.9cm (39 5/16"). Press FORM. Use z and x to change other settings, repeat steps 2 through 5. MIRROR • NORMAL: Prints the tape normally. • MIRROR: Prints the tape in this setting is selected: Use z and x to select the option you selected. 4. Changing this setting also causes the tape length...
... one of 0cm (0") to 99.9cm (39 5/16"). Press FORM. Use z and x to change other settings, repeat steps 2 through 5. MIRROR • NORMAL: Prints the tape normally. • MIRROR: Prints the tape in this setting is selected: Use z and x to select the option you selected. 4. Changing this setting also causes the tape length...
User Guide
Page 25
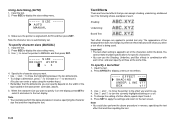
...is displayed, press PRESET. 2. Use z and x to select the type of label you want to select PRINT, and then press SET . Number of Lines with a frame. • The frame function cannot be printed with preset formats for specifying the number of copies. 5. While the text input...press SET. - - - - Input the text you want . 2. Example 1. Part 8 Using Frames The printer comes with a selection of built-in your tape labels. L AYOUT CD / DVD VHS m i n i DV ---- 4. Use x and z to print and then press SET. Use z and x to 2 12/9/6mm 1 E-24 Here we will display a ...
...is displayed, press PRESET. 2. Use z and x to select the type of label you want to select PRINT, and then press SET . Number of Lines with a frame. • The frame function cannot be printed with preset formats for specifying the number of copies. 5. While the text input...press SET. - - - - Input the text you want . 2. Example 1. Part 8 Using Frames The printer comes with a selection of built-in your tape labels. L AYOUT CD / DVD VHS m i n i DV ---- 4. Use x and z to print and then press SET. Use z and x to 2 12/9/6mm 1 E-24 Here we will display a ...

User Guide
Page 26
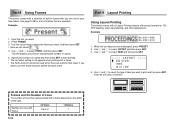
...AYOUT PR I NT S TORE EX I TLE 0 / 16 1 1. 4 cm 7. Specify the number of tape during a print operation, press ESC to the number you can use to print sequentially numbered labels from 0 to 999. • You can select the FORM "Direction" and "Mirror" settings. Use z, x, c and v...cartridge has enough tape left to start printing. • For information about saving tape label data, see "Layout Formats" on page E-39. The following screen appears after input of copies. 9. Part 10 Creating and Printing a Sequentially Numbered Tape Label This label printer gives you a choice of text (...
...AYOUT PR I NT S TORE EX I TLE 0 / 16 1 1. 4 cm 7. Specify the number of tape during a print operation, press ESC to the number you can use to print sequentially numbered labels from 0 to 999. • You can select the FORM "Direction" and "Mirror" settings. Use z, x, c and v...cartridge has enough tape left to start printing. • For information about saving tape label data, see "Layout Formats" on page E-39. The following screen appears after input of copies. 9. Part 10 Creating and Printing a Sequentially Numbered Tape Label This label printer gives you a choice of text (...

User Guide
Page 27
... number. You can specify a number up to select the numbering format, and then press SET. Important! • Consecutive labels are not cut during the print operation. Cut them with scissors after printing is displayed, press PRESET. 2. Use c, v, x, and z to three digits long. 7. Shows the starting number, ...will specify 3 for the COMMENT 1 box, and then press SET. Input the text for the number of labels to be printed, you can specify a value in the range of your label. • Font and style settings • FORM "Direction" and "Mirror" settings Here we will input "...
... number. You can specify a number up to select the numbering format, and then press SET. Important! • Consecutive labels are not cut during the print operation. Cut them with scissors after printing is displayed, press PRESET. 2. Use c, v, x, and z to three digits long. 7. Shows the starting number, ...will specify 3 for the COMMENT 1 box, and then press SET. Input the text for the number of labels to be printed, you can specify a value in the range of your label. • Font and style settings • FORM "Direction" and "Mirror" settings Here we will input "...

User Guide
Page 28
...Always test bar codes produced using this item, you can only input numeric characters (0 to start printing. • For information about saving tape label data, see step 6). • Do not use consecutive printing for specifying the number of bar code you are insufficient digits. BAR CODE - - - Input...page E-29. EAN- 1 3 EAN- 8 4. ab DATA 0 / 12 (ex. EAN-13) 5. Part 11 Bar Code With this label printer before actually using them. Use z and x to select PRINT and then press SET. Use z and x to select NEW and then press SET. - - - If bar codes cannot be used for...
...Always test bar codes produced using this item, you can only input numeric characters (0 to start printing. • For information about saving tape label data, see step 6). • Do not use consecutive printing for specifying the number of bar code you are insufficient digits. BAR CODE - - - Input...page E-29. EAN- 1 3 EAN- 8 4. ab DATA 0 / 12 (ex. EAN-13) 5. Part 11 Bar Code With this label printer before actually using them. Use z and x to select PRINT and then press SET. Use z and x to select NEW and then press SET. - - - If bar codes cannot be used for...
User Guide
Page 29
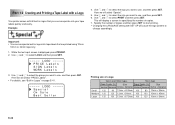
...s S I GN L a b e l s WOR K L a b e l s 3. L OGO - - - - - Here we will select "PRICE Labels". • For details, see "Built-in logos into your tape labels quickly and easily. Specify the number of copies and then press SET to start printing. • Changing the LANGUAGE setting with 60 built-in logos that are... E-41. - - - - - Important! • You can incorporate into tape labels that you want to use , and then press SET. Part 12 Creating and Printing a Tape Label with a Logo Your printer comes with SET UP will cause the logo content to select LOGO and then press SET...
...s S I GN L a b e l s WOR K L a b e l s 3. L OGO - - - - - Here we will select "PRICE Labels". • For details, see "Built-in logos into your tape labels quickly and easily. Specify the number of copies and then press SET to start printing. • Changing the LANGUAGE setting with 60 built-in logos that are... E-41. - - - - - Important! • You can incorporate into tape labels that you want to use , and then press SET. Part 12 Creating and Printing a Tape Label with a Logo Your printer comes with SET UP will cause the logo content to select LOGO and then press SET...

User Guide
Page 30
... 2. While the input screen is more text in printer memory, the next label name will replace any text currently on the display. 2. Input up to select STORE and then press SET. MEMOR Y S TORE RECAL L DE L ET E ---- 3. Use z and x to five characters for printing, or you want to use it to abort.... display. Use z and x to select RECALL and then press SET. 3. Part 13 Memory You can save data you create in printer memory. • Text data (10 items) • Layout printing, Numbering, and Bar code data (10 items each) Text Data To save text data 1. ab NAME ? 0/ 5 To recall ...
... 2. While the input screen is more text in printer memory, the next label name will replace any text currently on the display. 2. Input up to select STORE and then press SET. MEMOR Y S TORE RECAL L DE L ET E ---- 3. Use z and x to five characters for printing, or you want to use it to abort.... display. Use z and x to select RECALL and then press SET. 3. Part 13 Memory You can save data you create in printer memory. • Text data (10 items) • Layout printing, Numbering, and Bar code data (10 items each) Text Data To save text data 1. ab NAME ? 0/ 5 To recall ...


