User Guide
Page 3
...fire and electrical shock. • Avoid leaving the unit on the unit. Doing so creates the danger of intense heat. Tape Cutter • Never touch the tape cutter while a tape cut operation is being moved can damage the power cord and create the danger of fire and electrical shock. • ... liquid ever spill onto the unit, immediately turn it off power. Such conditions create the danger of dust. Microwave oven containers • Never affix labels to spill on the unit creates the danger of fire. • Whenever moving the unit, be sure to unplug it from your original dealer. ...
...fire and electrical shock. • Avoid leaving the unit on the unit. Doing so creates the danger of intense heat. Tape Cutter • Never touch the tape cutter while a tape cut operation is being moved can damage the power cord and create the danger of fire and electrical shock. • ... liquid ever spill onto the unit, immediately turn it off power. Such conditions create the danger of dust. Microwave oven containers • Never affix labels to spill on the unit creates the danger of fire. • Whenever moving the unit, be sure to unplug it from your original dealer. ...
User Guide
Page 4
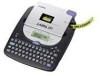
... all of your selection of the CASIO KL-780 Label Printer. Memory • Always keep backup records of important data. • Keep this makes the CASIO Label Printer the perfect tool for you store in memory can cut your fingers. You can produce attractive, original labels thanks to such features as : name tags, cassette tape labels, floppy disks, binders, and other...
... all of your selection of the CASIO KL-780 Label Printer. Memory • Always keep backup records of important data. • Keep this makes the CASIO Label Printer the perfect tool for you store in memory can cut your fingers. You can produce attractive, original labels thanks to such features as : name tags, cassette tape labels, floppy disks, binders, and other...
User Guide
Page 5
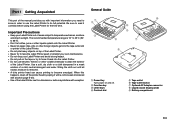
...tape E-19 Part 9 Memory E-19 To store data E-19 To recall text from memory E-20 Part 10 Reference E-20 Cleaning the Printer Head and Roller E-20 To clean the printer head and roller E-20 Initial Power On Settings E-21 Initializing the Label Printer E-21 To initialize the Label Printer... Symbols ...E-25 Specifications E-26 E-4 Contents Important Safety Precautions E-1 Part 1 Getting Acquainted E-5 Important Precautions E-5 General Guide E-5 Label Printer Menus E-6 Part 2 Getting Ready E-6 Power Supply E-6 Replacing Batteries E-6 To load the batteries E-7 AC Adaptor E-7 To ...
...tape E-19 Part 9 Memory E-19 To store data E-19 To recall text from memory E-20 Part 10 Reference E-20 Cleaning the Printer Head and Roller E-20 To clean the printer head and roller E-20 Initial Power On Settings E-21 Initializing the Label Printer E-21 To initialize the Label Printer... Symbols ...E-25 Specifications E-26 E-4 Contents Important Safety Precautions E-1 Part 1 Getting Acquainted E-5 Important Precautions E-5 General Guide E-5 Label Printer Menus E-6 Part 2 Getting Ready E-6 Power Supply E-6 Replacing Batteries E-6 To load the batteries E-7 AC Adaptor E-7 To ...
User Guide
Page 6
... other liquids splash onto the Label Printer. • Never let paper clips, pins or other foreign objects get into the tape outlet slot or printer of the Label Printer. • Do not pile heavy objects on top of the Label Printer. • Never try to take the Label Printer apart or attempt your own... maintenance. • Do not drop your Label Printer out of areas subject to a ...
... other liquids splash onto the Label Printer. • Never let paper clips, pins or other foreign objects get into the tape outlet slot or printer of the Label Printer. • Do not pile heavy objects on top of the Label Printer. • Never try to take the Label Printer apart or attempt your own... maintenance. • Do not drop your Label Printer out of areas subject to a ...
User Guide
Page 7
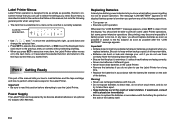
..., do not short circuit them apart. • Keep batteries out of the reach of the manual tells you how to load batteries and the tape cartridge, and how to take them , and do not plan to keep written backup copies of the battery. Important! • All data stored... Never leave dead batteries in this section before attempting to select the settings you replace batteries. Be sure to use the Label Printer for proper operation. Power Supply The Label Printer can be powered by six AA-size alkaline batteries or an optional AC adaptor (AD-A95100). Each menu is described in...
..., do not short circuit them apart. • Keep batteries out of the reach of the manual tells you how to load batteries and the tape cartridge, and how to take them , and do not plan to keep written backup copies of the battery. Important! • All data stored... Never leave dead batteries in this section before attempting to select the settings you replace batteries. Be sure to use the Label Printer for proper operation. Power Supply The Label Printer can be powered by six AA-size alkaline batteries or an optional AC adaptor (AD-A95100). Each menu is described in...
User Guide
Page 9
...ON/OFF keys. 4. Auto Power Off Function If you do so can cause operational problems with the Label Printer. • The following the reset operation. To load a tape cartridge 1. Tape guide OK! To reset the memory 1. To restore power, press ON/OFF. NO! • ...Make sure that the Label Printer is off . Once tape is out of the cassette, there is not bent or twisted. Important! • Resetting Label Printer memory clears its memory of the Label Printer following are the tape widths that Label Printer power is turned off the end with this printer: 6mm, 9mm, ...
...ON/OFF keys. 4. Auto Power Off Function If you do so can cause operational problems with the Label Printer. • The following the reset operation. To load a tape cartridge 1. Tape guide OK! To reset the memory 1. To restore power, press ON/OFF. NO! • ...Make sure that the Label Printer is off . Once tape is out of the cassette, there is not bent or twisted. Important! • Resetting Label Printer memory clears its memory of the Label Printer following are the tape widths that Label Printer power is turned off the end with this printer: 6mm, 9mm, ...

User Guide
Page 10
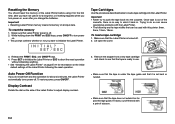
...things easier to high temperature, humidity, and direct sunlight. Storage Precautions • Keep tape cartridges out of the manual tells you load it into the Label Printer, it is a cartridge already in the Label Printer, remove it by the arrow in the illustration in the illustration. These conditions can ... arrow. Display Symbols and Indicators Before getting into the Label Printer, making sure that indicated by grasping the cartridge on both sides with the symbols and indicators used on using other thin object to that the tape and ink ribbon pass between the head and roller....
...things easier to high temperature, humidity, and direct sunlight. Storage Precautions • Keep tape cartridges out of the manual tells you load it into the Label Printer, it is a cartridge already in the Label Printer, remove it by the arrow in the illustration in the illustration. These conditions can ... arrow. Display Symbols and Indicators Before getting into the Label Printer, making sure that indicated by grasping the cartridge on both sides with the symbols and indicators used on using other thin object to that the tape and ink ribbon pass between the head and roller....
User Guide
Page 12
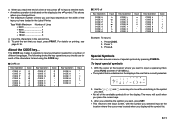
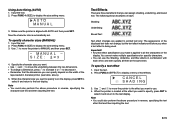
... when you want to the input screen, with the symbol you selected input at the location where you press the cursor keys. 3. Tape Width Maximum Number of the characters formed using the CODE key. To print the text that is currently selected. 2. The following shows .... • A newline operation is indicated on the display is the one that is underlined on the display by pressing SYMBOL. Input the characters in the Label Printer. For details on Key Operation CODE U CODE O CODE P CODE A CODE J CODE K CODE L Input J Key Operation CODE Z CODE C CODE N CODE 1 CODE 2 CODE 3 CODE 4 ...
... when you want to the input screen, with the symbol you selected input at the location where you press the cursor keys. 3. Tape Width Maximum Number of the characters formed using the CODE key. To print the text that is currently selected. 2. The following shows .... • A newline operation is indicated on the display is the one that is underlined on the display by pressing SYMBOL. Input the characters in the Label Printer. For details on Key Operation CODE U CODE O CODE P CODE A CODE J CODE K CODE L Input J Key Operation CODE Z CODE C CODE N CODE 1 CODE 2 CODE 3 CODE 4 ...
User Guide
Page 14
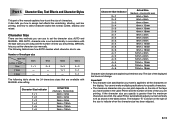
...print depends on the size of the tape you have loaded in the tables below. With AUTO, character size is greater than the maximum characters size limit, the Label Printer automatically adjust your text vertically to fit as shown in the Label Printer and the number of lines of the... the character size: AUTO and MANUAL. The size of characters. The following table shows the 24 characters sizes that are available with the tape size you are printing. Important! • Any character size specification you make multiple specifications for specific characters. • The maximum character...
...print depends on the size of the tape you have loaded in the tables below. With AUTO, character size is greater than the maximum characters size limit, the Label Printer automatically adjust your text vertically to fit as shown in the Label Printer and the number of lines of the... the character size: AUTO and MANUAL. The size of characters. The following table shows the 24 characters sizes that are available with the tape size you are printing. Important! • Any character size specification you make multiple specifications for specific characters. • The maximum character...
User Guide
Page 16
... menu of text effects. Using Auto Sizing (AUTO) 1. Press FUNC 4 (SIZE) to display the size setting menu. 3. The appearance of the tape loaded in reverse, specifying the character size first and then inputting the text. Important! • Any text effect specification you want to specify, press SET...first and then inputting the text. You cannot make is being used. Note • You could also perform the above procedure in the label printer (see table, above procedure in combination with AUTO and then press SET. The following shows examples of each other, and even specify ...
... menu of text effects. Using Auto Sizing (AUTO) 1. Press FUNC 4 (SIZE) to display the size setting menu. 3. The appearance of the tape loaded in reverse, specifying the character size first and then inputting the text. Important! • Any text effect specification you want to specify, press SET...first and then inputting the text. You cannot make is being used. Note • You could also perform the above procedure in the label printer (see table, above procedure in combination with AUTO and then press SET. The following shows examples of each other, and even specify ...
User Guide
Page 19
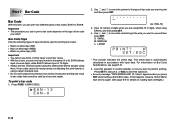
...codes: EAN-13, EAN-8. If this happens, reload a 12mm/18mm tape and try adjusting the print density or using a larger character size. • Do not use and then press SET. Part 7 Bar Code Bar Code With this label printer before actually using them. EAN-13) 3. Important! • The ...procedure you can result in accordance with input data. Bar Code Tape Only the following types of tape should be read properly, try again. (See page E-8 for ...
...codes: EAN-13, EAN-8. If this happens, reload a 12mm/18mm tape and try adjusting the print density or using a larger character size. • Do not use and then press SET. Part 7 Bar Code Bar Code With this label printer before actually using them. EAN-13) 3. Important! • The ...procedure you can result in accordance with input data. Bar Code Tape Only the following types of tape should be read properly, try again. (See page E-8 for ...

User Guide
Page 20
...and when you replace batteries. Input the text you want to the optional stamp holder. • See the instructions that is complete, the Label Printer returns to store text data in memory for information about stamp printing. • Stamp printing prints text in mirror image. • You ... To print a stamp tape 1. Press SET to store the text in memory or ESC to cancel the store operation. PR I NT ? Doing so causes all important data. • When using the optional AC adaptor, never disconnect the adaptor while batteries are not loaded in the Label Printer or when batteries are ...
...and when you replace batteries. Input the text you want to the optional stamp holder. • See the instructions that is complete, the Label Printer returns to store text data in memory for information about stamp printing. • Stamp printing prints text in mirror image. • You ... To print a stamp tape 1. Press SET to store the text in memory or ESC to cancel the store operation. PR I NT ? Doing so causes all important data. • When using the optional AC adaptor, never disconnect the adaptor while batteries are not loaded in the Label Printer or when batteries are ...

User Guide
Page 21
...Label Printer is currently on the input display. Printer head E-20 5. Roller To recall text from memory will replace any text currently on the display. 2. Press SET. • If all of the text does not fit on the display, you need it to select RECALL. Memory text cannot be appended. Replace the tape... when you can use as shown in poor printing quality. S TORE RECAL L 3. To clean the printer head and roller 1. Part 10 Reference This section contains information about the Label Printer that you have problems with print quality, use c, v, x and z to scroll it . If ...
...Label Printer is currently on the input display. Printer head E-20 5. Roller To recall text from memory will replace any text currently on the display. 2. Press SET. • If all of the text does not fit on the display, you need it to select RECALL. Memory text cannot be appended. Replace the tape... when you can use as shown in poor printing quality. S TORE RECAL L 3. To clean the printer head and roller 1. Part 10 Reference This section contains information about the Label Printer that you have problems with print quality, use c, v, x and z to scroll it . If ...
User Guide
Page 22
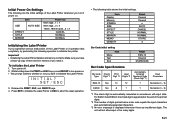
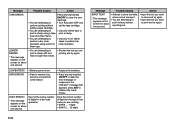
...if you need it power on . • This prompt confirms whether or not you experience serious malfunction of the Label Printer or if operation fails completely, try performing the following table shows the initial settings. Release the PRINT, ESC, and ... operation to initialize the Label Printer. Item SIZE AUTO SIZE EFFECT STYLE MIRROR Power On 6mm tape...1 × 1 9mm tape...2 × 2 12mm, 18mm tapes...3 × 3 CANCEL NORMAL NORMAL Initializing the Label Printer If you want to initialize the printer. Important! • Initializing the Label Printer deletes all memory contents...
...if you need it power on . • This prompt confirms whether or not you experience serious malfunction of the Label Printer or if operation fails completely, try performing the following table shows the initial settings. Release the PRINT, ESC, and ... operation to initialize the Label Printer. Item SIZE AUTO SIZE EFFECT STYLE MIRROR Power On 6mm tape...1 × 1 9mm tape...2 × 2 12mm, 18mm tapes...3 × 3 CANCEL NORMAL NORMAL Initializing the Label Printer If you want to initialize the printer. Important! • Initializing the Label Printer deletes all memory contents...
User Guide
Page 23
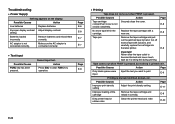
... Remove batteries and reload them correctly. E-8 Important! Cannot input text. Replace the tape cartridge with scissors, and carefully replace the cartridge into the label printer. Never allow the tape outlet to become blocked and never touch tape as it is pressed. No more tape left in the cartridge. Troubleshooting • Power Supply Nothing appears on it...
... Remove batteries and reload them correctly. E-8 Important! Cannot input text. Replace the tape cartridge with scissors, and carefully replace the cartridge into the label printer. Never allow the tape outlet to become blocked and never touch tape as it is pressed. No more tape left in the cartridge. Troubleshooting • Power Supply Nothing appears on it...
User Guide
Page 24
.... SET/ESC • You are input. • Use wider tape or reduce the number of lines. 6mm tape...1 line 9mm tape...1 line 12mm tape...Up to 2 lines 18mm tape...Up to overwrite the existing text with the tape. of the tape. Important! • Before loading a tape cartridge into E-8 the label printer, always make sure the ink ribbon is none stored...
.... SET/ESC • You are input. • Use wider tape or reduce the number of lines. 6mm tape...1 line 9mm tape...1 line 12mm tape...Up to 2 lines 18mm tape...Up to overwrite the existing text with the tape. of the tape. Important! • Before loading a tape cartridge into E-8 the label printer, always make sure the ink ribbon is none stored...
User Guide
Page 25
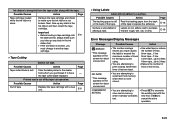
...12 or 18mm perform a bar code tapes to perform bar operation using a tape print a stamp. message that is low. •...become corrupted for about one second. setting a tape cartridge. • You are attempting to •...are attempting to • Use only 18mm tape to print a stamp using a 6mm or code operation. 9mm tape. LENGTH ERROR! * This message appears ...• You are attempting to print a stamp without set the tape cartridge. Input the correct number of digits for the type of ... Causes Action TAPE ERROR Press any key besides ON/OFF to clear the ...
...12 or 18mm perform a bar code tapes to perform bar operation using a tape print a stamp. message that is low. •...become corrupted for about one second. setting a tape cartridge. • You are attempting to •...are attempting to • Use only 18mm tape to print a stamp using a 6mm or code operation. 9mm tape. LENGTH ERROR! * This message appears ...• You are attempting to print a stamp without set the tape cartridge. Input the correct number of digits for the type of ... Causes Action TAPE ERROR Press any key besides ON/OFF to clear the ...
