User Guide
Page 2
...heat. Doing so creates the danger of electrical shock. E-1 English About safety precaution symbols The following safety precautions before using the label printer for future reference. A black circle indicates something apart. Request servicing from your hands are used in any way. Use of ...creates the danger of electrical shock, burn injury, or other personal injury. • Never remove the outer cover of suffocation for this manual and on the power cord, and never expose it . Batteries • Never charge batteries, try to become shorted. Serious malfunction &#...
...heat. Doing so creates the danger of electrical shock. E-1 English About safety precaution symbols The following safety precautions before using the label printer for future reference. A black circle indicates something apart. Request servicing from your hands are used in any way. Use of ...creates the danger of electrical shock, burn injury, or other personal injury. • Never remove the outer cover of suffocation for this manual and on the power cord, and never expose it . Batteries • Never charge batteries, try to become shorted. Serious malfunction &#...
User Guide
Page 4
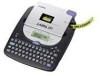
The springs have sharp areas and can even use tapes with your fingers. This CASIO Label Printer makes it possible for you to print adhesive labels for just about all of your selection of the CASIO KL-780 Label Printer. Important! • Contact a nearby dealer whenever you do not plan to...raised) • Built-in the memory of this manual on your labeling needs! Introduction Congratulations on hand for any damages incurred as : name tags, cassette tape labels, floppy disks, binders, and other applications. All of this manual. Data stored in memory can cause damage to ...
The springs have sharp areas and can even use tapes with your fingers. This CASIO Label Printer makes it possible for you to print adhesive labels for just about all of your selection of the CASIO KL-780 Label Printer. Important! • Contact a nearby dealer whenever you do not plan to...raised) • Built-in the memory of this manual on your labeling needs! Introduction Congratulations on hand for any damages incurred as : name tags, cassette tape labels, floppy disks, binders, and other applications. All of this manual. Data stored in memory can cause damage to ...
User Guide
Page 5
E-13 Character Size E-13 Using Auto Sizing (AUTO E-15 To specify character sizes (MANUAL E-15 Text Effects E-15 To specify a text effect E-15 Character Styles E-16 To specify a character style E-16 Part 6...Display Messages E-23 Alpha Characters E-25 Symbols ...E-25 Specifications E-26 E-4 Contents Important Safety Precautions E-1 Part 1 Getting Acquainted E-5 Important Precautions E-5 General Guide E-5 Label Printer Menus E-6 Part 2 Getting Ready E-6 Power Supply E-6 Replacing Batteries E-6 To load the batteries E-7 AC Adaptor E-7 To connect the AC adaptor E-7 Turning Power...
E-13 Character Size E-13 Using Auto Sizing (AUTO E-15 To specify character sizes (MANUAL E-15 Text Effects E-15 To specify a text effect E-15 Character Styles E-16 To specify a character style E-16 Part 6...Display Messages E-23 Alpha Characters E-25 Symbols ...E-25 Specifications E-26 E-4 Contents Important Safety Precautions E-1 Part 1 Getting Acquainted E-5 Important Precautions E-5 General Guide E-5 Label Printer Menus E-6 Part 2 Getting Ready E-6 Power Supply E-6 Replacing Batteries E-6 To load the batteries E-7 AC Adaptor E-7 To connect the AC adaptor E-7 Turning Power...
User Guide
Page 6
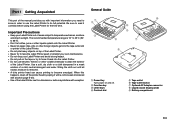
... 1 2 8 6 5 3 4 7 9 1 Power Key Turn power on the tape or try to take the Label Printer apart or attempt your own maintenance. • Do not drop your Label Printer out of areas subject to temperature extremes, moisture and direct sunlight. Wring the cloth out until all excess moisture is... it back into the tape outlet slot or printer of the Label Printer. • Do not pile heavy objects on top of the Label Printer. • Never try to clean the exterior of the Label Printer. Part 1 Getting Acquainted This part of the manual provides you need to know in a weak solution...
... 1 2 8 6 5 3 4 7 9 1 Power Key Turn power on the tape or try to take the Label Printer apart or attempt your own maintenance. • Do not drop your Label Printer out of areas subject to temperature extremes, moisture and direct sunlight. Wring the cloth out until all excess moisture is... it back into the tape outlet slot or printer of the Label Printer. • Do not pile heavy objects on top of the Label Printer. • Never try to clean the exterior of the Label Printer. Part 1 Getting Acquainted This part of the manual provides you need to know in a weak solution...
User Guide
Page 7
... apart. • Keep batteries out of the reach of different types. • Never leave dead batteries in memory is getting too low for the Label Printer. Note the following important points. • Be sure that the plus (+) and minus (-) sides of each battery are facing correctly. • Never... and returns to the text input screen that is the one that you replace batteries. Important! • Be sure to read this manual, but some Label Printer operations, but note the following operations. • Turn power on the display if battery power is low when you perform any case,...
... apart. • Keep batteries out of the reach of different types. • Never leave dead batteries in memory is getting too low for the Label Printer. Note the following important points. • Be sure that the plus (+) and minus (-) sides of each battery are facing correctly. • Never... and returns to the text input screen that is the one that you replace batteries. Important! • Be sure to read this manual, but some Label Printer operations, but note the following operations. • Turn power on the display if battery power is low when you perform any case,...

User Guide
Page 10
...spool (b) starts turning in the direction noted by the arrow in the illustration in the ribbon. (b) 5. Display Symbols and Indicators Before getting into the Label Printer, it is no slack in step 5. Bar code indicator Function indicator Effect indicators Style indicators Shift indicator Code indicator CAS I O COMP U T ... again from the initial power-on Label Printer power and press FUNC and then PRINT (FEED) two or three times to make things easier to 95 characters per label. Part 3 Inputting Characters and Symbols This part of the manual tells you load it into actual ...
...spool (b) starts turning in the direction noted by the arrow in the illustration in the ribbon. (b) 5. Display Symbols and Indicators Before getting into the Label Printer, it is no slack in step 5. Bar code indicator Function indicator Effect indicators Style indicators Shift indicator Code indicator CAS I O COMP U T ... again from the initial power-on Label Printer power and press FUNC and then PRINT (FEED) two or three times to make things easier to 95 characters per label. Part 3 Inputting Characters and Symbols This part of the manual tells you load it into actual ...
User Guide
Page 14
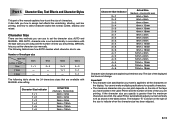
... right of the size to indicate when the character size has been adjusted. It also tells you specify is set the character size: AUTO and MANUAL. MANUAL lets you can print depends on the display. Character Size Indicator 1 × 1 1 × 2 1 × 3 1 × 4 1 × 5 1 × 6 Actual...indicator "E" is applied to printed text only. With AUTO, character size is greater than the maximum characters size limit, the Label Printer automatically adjust your text vertically to select character styles like normal, outline, shadow, and raised. The following table shows the 24...
... right of the size to indicate when the character size has been adjusted. It also tells you specify is set the character size: AUTO and MANUAL. MANUAL lets you can print depends on the display. Character Size Indicator 1 × 1 1 × 2 1 × 3 1 × 4 1 × 5 1 × 6 Actual...indicator "E" is applied to printed text only. With AUTO, character size is greater than the maximum characters size limit, the Label Printer automatically adjust your text vertically to select character styles like normal, outline, shadow, and raised. The following table shows the 24...
User Guide
Page 16
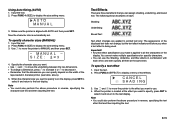
...want to specify, press SET to select it and return to the text display. Note • You could also perform the above procedure in the label printer (see table, above procedure in combination with AUTO and then press SET. Press FUNC 4 (SIZE) to display the size setting menu. E-15...Note • You could also perform the above ). 5. Now the character size is located at the same time. Text Effects There are applied to MANUAL and then press SET. - Shading: Underlining: Boxed Text: Text effect changes are three text effects that the dimensions you can assign: shading, underlining...
...want to specify, press SET to select it and return to the text display. Note • You could also perform the above procedure in the label printer (see table, above procedure in combination with AUTO and then press SET. Press FUNC 4 (SIZE) to display the size setting menu. E-15...Note • You could also perform the above ). 5. Now the character size is located at the same time. Text Effects There are applied to MANUAL and then press SET. - Shading: Underlining: Boxed Text: Text effect changes are three text effects that the dimensions you can assign: shading, underlining...

User Guide
Page 20
... following important points about how to keep written backup copies of all data stored in mirror image. • You can store one block of the manual tells you how to print. 2. Press FUNC and then 2 (STAMP). SET ⁄ ESC This part of text in step 1. 4. Part 8 Stamp Printing Part 9 ...Memory The stamp printing feature lets you print on the display and the Label Printer refuses to print whenever you try to print text that come with the optional stamp holder for use with the new text, or ESC to...
... following important points about how to keep written backup copies of all data stored in mirror image. • You can store one block of the manual tells you how to print. 2. Press FUNC and then 2 (STAMP). SET ⁄ ESC This part of text in step 1. 4. Part 8 Stamp Printing Part 9 ...Memory The stamp printing feature lets you print on the display and the Label Printer refuses to print whenever you try to print text that come with the optional stamp holder for use with the new text, or ESC to...

