User Guide
Page 2
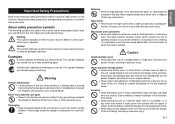
...Never expose batteries to high humidity and large amounts of electrical shock. Microwave oven containers • Never affix labels to fall, resulting in serious personal injury or material damage if ignored. Doing so can result in personal ... contains metal, which the label is affixed. Packaging • Keep the plastic bag that can cause it creates the danger of dust. Location • Avoid leaving the unit in this manual and on the unit creates the danger .... About safety precaution symbols The following safety precautions before using the label printer for future reference.
...Never expose batteries to high humidity and large amounts of electrical shock. Microwave oven containers • Never affix labels to fall, resulting in serious personal injury or material damage if ignored. Doing so can result in personal ... contains metal, which the label is affixed. Packaging • Keep the plastic bag that can cause it creates the danger of dust. Location • Avoid leaving the unit in this manual and on the unit creates the danger .... About safety precaution symbols The following safety precautions before using the label printer for future reference.
User Guide
Page 3
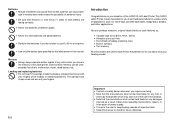
...due to malfunction, repair, dead battery, etc. This CASIO Label Printer makes it possible for you to print adhesive labels for a wide variety of the CASIO KL-60 Label Printer. You can produce attractive, original labels thanks to such features as: • Variable tape ...sizes (6mm, 9mm, 12mm) • Attractive sans-serif font • Font effects (shading, underline, box) • Built-in symbols • Text memory All of this manual...
...due to malfunction, repair, dead battery, etc. This CASIO Label Printer makes it possible for you to print adhesive labels for a wide variety of the CASIO KL-60 Label Printer. You can produce attractive, original labels thanks to such features as: • Variable tape ...sizes (6mm, 9mm, 12mm) • Attractive sans-serif font • Font effects (shading, underline, box) • Built-in symbols • Text memory All of this manual...

User Guide
Page 4
Contents Important Safety Precautions E-1 Part 1 Getting Acquainted E-4 Important Precautions E-4 General Guide E-4 Label Printer Menus E-4 Part 2 Getting Ready E-5 Power Supply E-5 Replacing Batteries E-5 To load the batteries E-5 Turning Power On ...Manual Feed E-13 To manually feed tape E-13 Part 7 Memory E-13 To store text into memory E-13 To recall text from memory E-13 Part 8 Reference E-14 Cleaning the Printer Head and Roller E-14 To clean the printer head and roller E-14 Initial Power On Settings E-14 Initializing the Label Printer E-14 To initialize the Label Printer...
Contents Important Safety Precautions E-1 Part 1 Getting Acquainted E-4 Important Precautions E-4 General Guide E-4 Label Printer Menus E-4 Part 2 Getting Ready E-5 Power Supply E-5 Replacing Batteries E-5 To load the batteries E-5 Turning Power On ...Manual Feed E-13 To manually feed tape E-13 Part 7 Memory E-13 To store text into memory E-13 To recall text from memory E-13 Part 8 Reference E-14 Cleaning the Printer Head and Roller E-14 To clean the printer head and roller E-14 Initial Power On Settings E-14 Initializing the Label Printer E-14 To initialize the Label Printer...
User Guide
Page 5
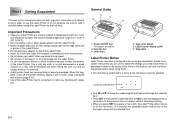
...displayed menu (and return to the previous menu or screen) without selecting anything. • When you press SET to execute a menu item, the Label Printer either moves on to the next menu, or it carefully before using them. • The item that is underlined in order to use benzine, ... or radio may interfere with alcohol (page E-14). • Use of a mild, neutral detergent and water. When this manual, but note the following general points when using the Label Printer for the first time. Each menu is designed to be as simple as possible, thanks to onscreen menus that follow in...
...displayed menu (and return to the previous menu or screen) without selecting anything. • When you press SET to execute a menu item, the Label Printer either moves on to the next menu, or it carefully before using them. • The item that is underlined in order to use benzine, ... or radio may interfere with alcohol (page E-14). • Use of a mild, neutral detergent and water. When this manual, but note the following general points when using the Label Printer for the first time. Each menu is designed to be as simple as possible, thanks to onscreen menus that follow in...
User Guide
Page 6
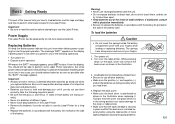
...replacing it. Turn power off. 2. Load batteries into place while it from the display. Important! • Be sure to read this section before using the label printer. Warning! • Never use them . 4. Replace the back cover. • Make sure the back cover is positioned as shown in memory is low when... backup copies of all important data (text and documents). • Batteries can cause print quality problems. E-5 Part 2 Getting Ready This part of the manual tells you how to load batteries and the tape cartridge, and how to perform other basic setups for proper operation.
...replacing it. Turn power off. 2. Load batteries into place while it from the display. Important! • Be sure to read this section before using the label printer. Warning! • Never use them . 4. Replace the back cover. • Make sure the back cover is positioned as shown in memory is low when... backup copies of all important data (text and documents). • Batteries can cause print quality problems. E-5 Part 2 Getting Ready This part of the manual tells you how to load batteries and the tape cartridge, and how to perform other basic setups for proper operation.
User Guide
Page 8
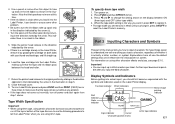
...top or bottom of the tape. Further input becomes impossi- Turn on screen. Be sure to tell the Label Printer when you input a character, regardless of the manual tells you input the 63rd character. Turn power on the display between the head and roller. Part 3 ...Effect indicators Shift indicator Code indicator AAA FUNCTION SHIFT CODE CAPS CAS KL-60 MIRROR 6mm TAPE:6~12mm Mirror image printing indicator Caps indicator Cursor Character position marks 6mm tape indicator E-7 Slide the printer head release in the direction indicated by grasping the cartridge on both ...
...top or bottom of the tape. Further input becomes impossi- Turn on screen. Be sure to tell the Label Printer when you input a character, regardless of the manual tells you input the 63rd character. Turn power on the display between the head and roller. Part 3 ...Effect indicators Shift indicator Code indicator AAA FUNCTION SHIFT CODE CAPS CAS KL-60 MIRROR 6mm TAPE:6~12mm Mirror image printing indicator Caps indicator Cursor Character position marks 6mm tape indicator E-7 Slide the printer head release in the direction indicated by grasping the cartridge on both ...
User Guide
Page 11
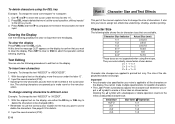
... FUNC and then DEL (CLS). To insert new characters Example: To change the size of the characters for specific characters. • The Label Printer automatically adjusts the character size whenever you plan to use the correct cursor location for the key you input a B symbol to confirm that... 5 Character Size and Text Effects This part of the displayed text does not change. With the original text on the display. The size of the manual explains how to change the text "ABCDEF" to be inserted at the cursor's position, shifting "mputer" to the left ) "m". 2. Initial Size AUTO...
... FUNC and then DEL (CLS). To insert new characters Example: To change the size of the characters for specific characters. • The Label Printer automatically adjusts the character size whenever you plan to use the correct cursor location for the key you input a B symbol to confirm that... 5 Character Size and Text Effects This part of the displayed text does not change. With the original text on the display. The size of the manual explains how to change the text "ABCDEF" to be inserted at the cursor's position, shifting "mputer" to the left ) "m". 2. Initial Size AUTO...
User Guide
Page 13
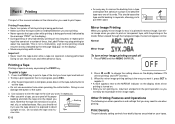
...you turn printing on, input text and perform the print operation as pressing the PRINT key. ing of the same text a number of times, the Label Printer may need to the size you want . Press the PRINT key to use the tape where it is printed in progress, press ESC. 2. Normal ... printing) and OFF (normal). 3. Print Density The print density setting controls how darkly figures are other personal injury. Part 6 Printing This part of the manual includes all the information you need to print a tape of the text you have input and laid out. • To stop printing for text, it...
...you turn printing on, input text and perform the print operation as pressing the PRINT key. ing of the same text a number of times, the Label Printer may need to the size you want . Press the PRINT key to use the tape where it is printed in progress, press ESC. 2. Normal ... printing) and OFF (normal). 3. Print Density The print density setting controls how darkly figures are other personal injury. Part 6 Printing This part of the manual includes all the information you need to print a tape of the text you have input and laid out. • To stop printing for text, it...
User Guide
Page 14
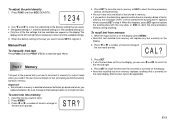
...setting is on the display, press MEMO. • Note that text recalled from memory replaces anything . • You can have only one block of the manual tells you how to store text in memory. Press SET to store the text in memory or ESC to overwrite the existing text?") appears when... the density setting that are available can use H and J to keep written backup copies of all of the five settings that you replace batteries. Manual Feed To manually feed tape Press FUNC and then PRINT (FEED) to the text store prompt. Be sure to scroll it . While the input screen is 3. &#...
...setting is on the display, press MEMO. • Note that text recalled from memory replaces anything . • You can have only one block of the manual tells you how to store text in memory. Press SET to store the text in memory or ESC to overwrite the existing text?") appears when... the density setting that are available can use H and J to keep written backup copies of all of the five settings that you replace batteries. Manual Feed To manually feed tape Press FUNC and then PRINT (FEED) to the text store prompt. Be sure to scroll it . While the input screen is 3. &#...
