User Guide
Page 4
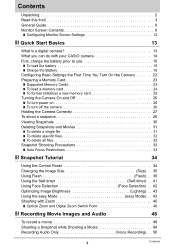
...delete specific files 32 ❚ To delete all files 32 Snapshot Shooting Precautions 33 ❚ Auto Focus Restrictions 33 ❚❙ Snapshot Tutorial 34 Using the Control Panel 34 Changing the Image Size Size) . . 35 Using Flash Flash) . . 39 Using the Self-timer Self-timer) . . 41 Using Face Detection Face Detection) . . 42 Optimizing Image Brightness Lighting) . . 43 Using the easy Mode easy Mode) . . 43 Shooting with Zoom 45 ❚ Optical Zoom and Digital Zoom Switch Point 46 ❚❙ Recording Movie Images and Audio 48 To record a movie 48 Shooting...
...delete specific files 32 ❚ To delete all files 32 Snapshot Shooting Precautions 33 ❚ Auto Focus Restrictions 33 ❚❙ Snapshot Tutorial 34 Using the Control Panel 34 Changing the Image Size Size) . . 35 Using Flash Flash) . . 39 Using the Self-timer Self-timer) . . 41 Using Face Detection Face Detection) . . 42 Optimizing Image Brightness Lighting) . . 43 Using the easy Mode easy Mode) . . 43 Shooting with Zoom 45 ❚ Optical Zoom and Digital Zoom Switch Point 46 ❚❙ Recording Movie Images and Audio 48 To record a movie 48 Shooting...

User Guide
Page 5
... Sensitivity ISO) . . . 66 ❚ Using Built-in Color Filters Color Filter) . . . 66 ❚❙ Viewing Snapshots and Movies 67 Viewing Snapshots 67 Viewing a Movie 67 Zooming an On-screen Image 68 Displaying the Image Menu 68 Viewing Snapshots and Movies on a TV Screen 69 ❚❙ Other Playback Functions (PLAY) 71 Using the PLAY Panel 71 Playing a Slideshow on the Camera Slideshow) . . 73 Rotating an Image Rotation) . . 74 Using Red Eye Correction Red Eye) . . 74 Selecting Images for Printing DPOF Printing) . . 75 Protecting a File Against Deletion Protect...
... Sensitivity ISO) . . . 66 ❚ Using Built-in Color Filters Color Filter) . . . 66 ❚❙ Viewing Snapshots and Movies 67 Viewing Snapshots 67 Viewing a Movie 67 Zooming an On-screen Image 68 Displaying the Image Menu 68 Viewing Snapshots and Movies on a TV Screen 69 ❚❙ Other Playback Functions (PLAY) 71 Using the PLAY Panel 71 Playing a Slideshow on the Camera Slideshow) . . 73 Rotating an Image Rotation) . . 74 Using Red Eye Correction Red Eye) . . 74 Selecting Images for Printing DPOF Printing) . . 75 Protecting a File Against Deletion Protect...

User Guide
Page 6
.... 108 Time Stamping Snapshots Timestamp) . 109 Setting the Camera's Clock Adjust) . 109 Specifying the Date Style Date Style) . 110 Specifying the Display Language Language) . 110 Configuring Sleep State Settings Sleep) . .111 Configuring Auto Power Settings Auto Power Off) . .111 Configuring [r] and [p] Settings REC/PLAY) . 112 Disabling File Deletion Disabled) . 112 Configuring USB Protocol Settings USB) . 113 Selecting the Screen Aspect Ratio and Video Output System Video Out) . 113 Formatting Built-in Memory or a Memory Card Format) . 114 Resetting the Camera to Factory Defaults...
.... 108 Time Stamping Snapshots Timestamp) . 109 Setting the Camera's Clock Adjust) . 109 Specifying the Date Style Date Style) . 110 Specifying the Display Language Language) . 110 Configuring Sleep State Settings Sleep) . .111 Configuring Auto Power Settings Auto Power Off) . .111 Configuring [r] and [p] Settings REC/PLAY) . 112 Disabling File Deletion Disabled) . 112 Configuring USB Protocol Settings USB) . 113 Selecting the Screen Aspect Ratio and Video Output System Video Out) . 113 Formatting Built-in Memory or a Memory Card Format) . 114 Resetting the Camera to Factory Defaults...
User Guide
Page 22
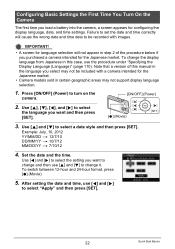
... then press [SET]. 22 Quick Start Basics IMPORTANT! • A screen for language selection will cause the wrong date and time data to select a date style and then press [SET]. Press [ON/OFF] (Power) to select the language you want to change and then use [4] and [6] to change the display language from Japanese in certain geographic areas may not be recorded with a camera intended for the Japanese market. • Camera models sold in...
... then press [SET]. 22 Quick Start Basics IMPORTANT! • A screen for language selection will cause the wrong date and time data to select a date style and then press [SET]. Press [ON/OFF] (Power) to select the language you want to change and then use [4] and [6] to change the display language from Japanese in certain geographic areas may not be recorded with a camera intended for the Japanese market. • Camera models sold in...
User Guide
Page 45
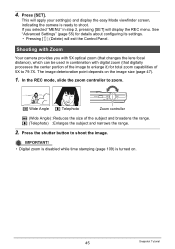
... of 5X to 79.7X. IMPORTANT! • Digital zoom is disabled while time stamping (page 109) is ready to enlarge it) for details about configuring its settings. • Pressing [ ] (Delete) will apply your setting(s) and display the easy Mode viewfinder screen, indicating the camera is turned on the image size (page 47). 1. The image deterioration point depends on . 45 Snapshot Tutorial This will exit the Control Panel. z (Telephoto) : Enlarges the subject...
... of 5X to 79.7X. IMPORTANT! • Digital zoom is disabled while time stamping (page 109) is ready to enlarge it) for details about configuring its settings. • Pressing [ ] (Delete) will apply your setting(s) and display the easy Mode viewfinder screen, indicating the camera is turned on the image size (page 47). 1. The image deterioration point depends on . 45 Snapshot Tutorial This will exit the Control Panel. z (Telephoto) : Enlarges the subject...

User Guide
Page 51
Press [0] (Movie) to resume playback. Voice Recording Playback Controls Fast forward/fast reverse Play/pause [4] [6] [SET] Jump to marker Volume adjustment Monitor screen on/off Playback end While playback is displayed in place of an image for information about deleting a voice recording file. 51 Recording Movie Images and Audio Press [2] and then press [8] [2] [8] (DISP) [0] (Movie) NOTE • See page 31 for a Voice Recording file. 2. To play . ` is paused, press [4] or [6] to jump to the next...
Press [0] (Movie) to resume playback. Voice Recording Playback Controls Fast forward/fast reverse Play/pause [4] [6] [SET] Jump to marker Volume adjustment Monitor screen on/off Playback end While playback is displayed in place of an image for information about deleting a voice recording file. 51 Recording Movie Images and Audio Press [2] and then press [8] [2] [8] (DISP) [0] (Movie) NOTE • See page 31 for a Voice Recording file. 2. To play . ` is paused, press [4] or [6] to jump to the next...

User Guide
Page 60
... memory, continuous shutter shooting is relatively slow. • You cannot use the self-timer in combination with any of the following. - Using Continuous Shutter (CS) Procedure [r] (REC) * [SET] * MENU * REC Tab * CS While Continuous Shutter is turned on, images are applied for successive images as you keep the shutter button depressed. Movie Recording • When using telephoto, when shooting a fast-moving subject using a continuous shutter mode, keep the camera still until memory becomes full, as long as well. • Continuous shutter...
... memory, continuous shutter shooting is relatively slow. • You cannot use the self-timer in combination with any of the following. - Using Continuous Shutter (CS) Procedure [r] (REC) * [SET] * MENU * REC Tab * CS While Continuous Shutter is turned on, images are applied for successive images as you keep the shutter button depressed. Movie Recording • When using telephoto, when shooting a fast-moving subject using a continuous shutter mode, keep the camera still until memory becomes full, as long as well. • Continuous shutter...

User Guide
Page 62
... certain icons when you switch between REC functions. Functions Supported by Icon Help • REC Mode, Flash, Metering Mode, White Balance, Self-timer, EV Shift 62 Advanced Settings Setting EV Shift White Balance ISO Self-timer Off [4]/[6] key operation Adjusts the EV shift value (page 64) Changes the white balance setting (page 65) Changes the ISO Sensitivity setting (page 66) Sets the self-timer time (page 41) Cancels [4] and [6] key assignments Displaying the On-screen Grid (Grid) Procedure [r] (REC) * [SET] * MENU * REC Tab * Grid The on the display for easy...
... certain icons when you switch between REC functions. Functions Supported by Icon Help • REC Mode, Flash, Metering Mode, White Balance, Self-timer, EV Shift 62 Advanced Settings Setting EV Shift White Balance ISO Self-timer Off [4]/[6] key operation Adjusts the EV shift value (page 64) Changes the white balance setting (page 65) Changes the ISO Sensitivity setting (page 66) Sets the self-timer time (page 41) Cancels [4] and [6] key assignments Displaying the On-screen Grid (Grid) Procedure [r] (REC) * [SET] * MENU * REC Tab * Grid The on the display for easy...

User Guide
Page 74
... then press [SET] (page 71). 4. Red eye correction corrects the eye colors of subjects to select the second PLAY Panel item from the flash reflects off red eye correction. Press [SET]. 3. Using Red Eye Correction (Red Eye) Procedure [p] (PLAY) * Snapshot Screen * [SET] * MENU * PLAY Tab * Red Eye Using the flash to shoot at the orientation you want , press [ ] (Delete). Correct Cancel Turns on the camera's monitor screen. • An image that this procedure does not actually change the image data. Turns off of the...
... then press [SET] (page 71). 4. Red eye correction corrects the eye colors of subjects to select the second PLAY Panel item from the flash reflects off red eye correction. Press [SET]. 3. Using Red Eye Correction (Red Eye) Procedure [p] (PLAY) * Snapshot Screen * [SET] * MENU * PLAY Tab * Red Eye Using the flash to shoot at the orientation you want , press [ ] (Delete). Correct Cancel Turns on the camera's monitor screen. • An image that this procedure does not actually change the image data. Turns off of the...

User Guide
Page 78
...switching [8] (DISP) Stop playback [0] (Movie) • Audio of an Audio Snapshot also can be played back on the memory card to camera built-in camera memory to select "Copy" and then press [SET]. Copies a single file on a computer with this camera. 78 Other Playback Functions (PLAY) Voice Recording Playback Controls Fast forward/fast reverse [4] [6] Play/pause [SET] Volume adjustment Press [2] and then press [8] [2]. Built-in * Card Card * Built-in Copies all the files in built-in camera memory. Copying Files (Copy) Procedure [p] (PLAY) * Snapshot Screen * [SET...
...switching [8] (DISP) Stop playback [0] (Movie) • Audio of an Audio Snapshot also can be played back on the memory card to camera built-in camera memory to select "Copy" and then press [SET]. Copies a single file on a computer with this camera. 78 Other Playback Functions (PLAY) Voice Recording Playback Controls Fast forward/fast reverse [4] [6] Play/pause [SET] Volume adjustment Press [2] and then press [8] [2]. Built-in * Card Card * Built-in Copies all the files in built-in camera memory. Copying Files (Copy) Procedure [p] (PLAY) * Snapshot Screen * [SET...
User Guide
Page 96
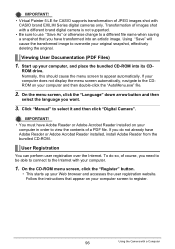
... artistic image. If you need to be able to connect to register. 96 Using the Camera with CASIO brand EXILIM Series digital cameras only. On the CD-ROM menu screen, click the "Register" button. • This starts up your Web browser and accesses the user registration website. ROM drive. To do so, of JPEG images shot with a Computer Viewing User Documentation (PDF Files) 1. Normally, this should cause the menu screen to...
... artistic image. If you need to be able to connect to register. 96 Using the Camera with CASIO brand EXILIM Series digital cameras only. On the CD-ROM menu screen, click the "Register" button. • This starts up your Web browser and accesses the user registration website. ROM drive. To do so, of JPEG images shot with a Computer Viewing User Documentation (PDF Files) 1. Normally, this should cause the menu screen to...

User Guide
Page 109
... [SET] * MENU * Set Up Tab * Adjust [8] [2] [4] [6] [0] (Movie) Change the setting at the cursor location Move the cursor between settings Toggles between 12-hour and 24-hour format When the date and time settings are being used. Date Date&Time Off 2012/7/10 2012/7/10 1:25pm No stamping of date and/or time • Even if you do so later using the DPOF function or some printing application (page 84). • Digital zoom is disabled while time stamping...
... [SET] * MENU * Set Up Tab * Adjust [8] [2] [4] [6] [0] (Movie) Change the setting at the cursor location Move the cursor between settings Toggles between 12-hour and 24-hour format When the date and time settings are being used. Date Date&Time Off 2012/7/10 2012/7/10 1:25pm No stamping of date and/or time • Even if you do so later using the DPOF function or some printing application (page 84). • Digital zoom is disabled while time stamping...

User Guide
Page 112
... protect against accidental deletion of images by selecting "On" for "Ü Disabled". • Performing a format operation (page 114) will not start the image delete operation when you press [r] (REC) in the REC mode or [p] (PLAY) in the PLAY mode. • Change this setting to anything besides "Disable" before connecting to be deleted, even if file deletion is turned on. Disabling File Deletion (Ü Disabled) Procedure [SET] * MENU * Set Up Tab * Ü Disabled The camera will cause all images to a TV for some images. Camera...
... protect against accidental deletion of images by selecting "On" for "Ü Disabled". • Performing a format operation (page 114) will not start the image delete operation when you press [r] (REC) in the REC mode or [p] (PLAY) in the PLAY mode. • Change this setting to anything besides "Disable" before connecting to be deleted, even if file deletion is turned on. Disabling File Deletion (Ü Disabled) Procedure [SET] * MENU * Set Up Tab * Ü Disabled The camera will cause all images to a TV for some images. Camera...

User Guide
Page 114
... memory will delete all images to Factory Defaults (Reset) Procedure [SET] * MENU * Set Up Tab * Reset See page 127 for some images. • Make sure the camera's battery is loaded in the camera, this operation will delete the following data. - Formatting Built-in Memory or a Memory Card (Format) Procedure [SET] * MENU * Set Up Tab * Format If a memory card is sufficiently charged before you do not need any data currently on the memory card or in built-in memory. Resetting the Camera to be undone. World Time settings, clock settings, date style, screen language, video...
... memory will delete all images to Factory Defaults (Reset) Procedure [SET] * MENU * Set Up Tab * Reset See page 127 for some images. • Make sure the camera's battery is loaded in the camera, this operation will delete the following data. - Formatting Built-in Memory or a Memory Card (Format) Procedure [SET] * MENU * Set Up Tab * Format If a memory card is sufficiently charged before you do not need any data currently on the memory card or in built-in memory. Resetting the Camera to be undone. World Time settings, clock settings, date style, screen language, video...

User Guide
Page 129
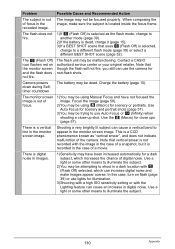
... no longer need, or use a different memory card. 1)If the lens is dirty, clean it means the battery has reached the end of its life and needs to your computer, delete images you are shooting may be moving the camera when shooting. Try shooting with Auto Focus (page 33). Troubleshooting Problem Power Supply Power does not turn off the camera and wait until the charge operation finishes. 3)If the message "Memory Full" appears, transfer images to be...
... no longer need, or use a different memory card. 1)If the lens is dirty, clean it means the battery has reached the end of its life and needs to your computer, delete images you are shooting may be moving the camera when shooting. Try shooting with Auto Focus (page 33). Troubleshooting Problem Power Supply Power does not turn off the camera and wait until the charge operation finishes. 3)If the message "Memory Full" appears, transfer images to be...
User Guide
Page 130
... monitor screen and the flash does not fire. Charge the battery (page 15). Use the ´ (Macro) for illumination. 3)Shooting with a high ISO sensitivity setting or with ? (Flash Off) selected, which increases the chance of a movie. There is digital noise in digital noise. Use a light or some other means to illuminate the subject. 2)You may have not focused the image. When composing the image, make images appear coarse. Contact a CASIO authorized service...
... monitor screen and the flash does not fire. Charge the battery (page 15). Use the ´ (Macro) for illumination. 3)Shooting with a high ISO sensitivity setting or with ? (Flash Off) selected, which increases the chance of a movie. There is digital noise in digital noise. Use a light or some other means to illuminate the subject. 2)You may have not focused the image. When composing the image, make images appear coarse. Contact a CASIO authorized service...
User Guide
Page 132
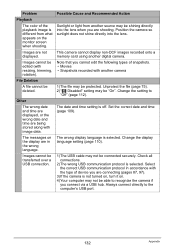
... types of the playback image is off. This camera cannot display non-DCF images recorded onto a memory card using another camera 1)The file may not be protected. Change the setting to the computer's USB port. 132 Appendix Images cannot be connected securely. The messages on the monitor screen when shooting. File Deletion A file cannot be "On". Set the correct date and time (page 109). Check all connections. 2)The wrong USB communication protocol is selected. The date and time setting is different...
... types of the playback image is off. This camera cannot display non-DCF images recorded onto a memory card using another camera 1)The file may not be protected. Change the setting to the computer's USB port. 132 Appendix Images cannot be connected securely. The messages on the monitor screen when shooting. File Deletion A file cannot be "On". Set the correct date and time (page 109). Check all connections. 2)The wrong USB communication protocol is selected. The date and time setting is different...

User Guide
Page 134
... camera turns off power? IMPORTANT! • Formatting a memory card deletes all its files. Change the "Images" setting (page 73) and try transferring recoverable files to a computer or some unexpected operation. Delete files you turn off power while image data is something wrong with the USB system of paper while printing. Cannot find the file. Memory is low. Card ERROR Check connections! Files could not be saved because battery is full with the slideshow "Images" setting cannot be created. Battery power is low. Display Messages ALERT Battery is low. Folder...
... camera turns off power? IMPORTANT! • Formatting a memory card deletes all its files. Change the "Images" setting (page 73) and try transferring recoverable files to a computer or some unexpected operation. Delete files you turn off power while image data is something wrong with the USB system of paper while printing. Cannot find the file. Memory is low. Card ERROR Check connections! Files could not be saved because battery is full with the slideshow "Images" setting cannot be created. Battery power is low. Display Messages ALERT Battery is low. Folder...

User Guide
Page 140
... mAh) • Recording Medium: 1GB SD memory card (PRO HIGH SPEED (Panasonic Corporation)) • Measurement Conditions *1 Approximate number of shots (CIPA) (Operating Time) In accordance with flash; Repeated charging shortens battery life. • Frequency of flash, zoom, and Auto Focus usage, and the time the camera is on , zoom operation between full wide and full telephoto every 30 seconds, during which two images are shot with CIPA (Camera and Imaging Products Association) standards...
... mAh) • Recording Medium: 1GB SD memory card (PRO HIGH SPEED (Panasonic Corporation)) • Measurement Conditions *1 Approximate number of shots (CIPA) (Operating Time) In accordance with flash; Repeated charging shortens battery life. • Frequency of flash, zoom, and Auto Focus usage, and the time the camera is on , zoom operation between full wide and full telephoto every 30 seconds, during which two images are shot with CIPA (Camera and Imaging Products Association) standards...

User Guide
Page 141
... international standards. . B 141 Appendix Rechargeable lithium ion battery (NP-120) Rated Voltage 3.7 V Rated Capacitance 600 mAh Operating Temperature 0 to 40°C (32 to 95°F) Requirements Dimensions 53 (W) x 21 (H) x 45 (D) mm (2.1" (W) x 0.83" (H) x1.8" (D)) (excluding projections) Weight Approximately 37 g (1.3 oz) • Power cord precautions for use in Singapore The power cord set is not supplied. USB-AC adaptor (AD-C53U) Input Power...
... international standards. . B 141 Appendix Rechargeable lithium ion battery (NP-120) Rated Voltage 3.7 V Rated Capacitance 600 mAh Operating Temperature 0 to 40°C (32 to 95°F) Requirements Dimensions 53 (W) x 21 (H) x 45 (D) mm (2.1" (W) x 0.83" (H) x1.8" (D)) (excluding projections) Weight Approximately 37 g (1.3 oz) • Power cord precautions for use in Singapore The power cord set is not supplied. USB-AC adaptor (AD-C53U) Input Power...


