User Guide
Page 2
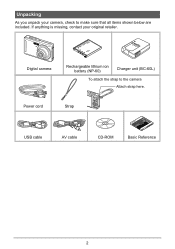
Unpacking As you unpack your original retailer. Power cord Strap USB cable AV cable CD-ROM Basic Reference 2 Digital camera Rechargeable lithium ion battery (NP-60) Charger unit (BC-60L) To attach the strap to make sure that all items shown below are included. If anything is missing, contact your camera, check to the camera Attach strap here.
Unpacking As you unpack your original retailer. Power cord Strap USB cable AV cable CD-ROM Basic Reference 2 Digital camera Rechargeable lithium ion battery (NP-60) Charger unit (BC-60L) To attach the strap to make sure that all items shown below are included. If anything is missing, contact your camera, check to the camera Attach strap here.
User Guide
Page 4
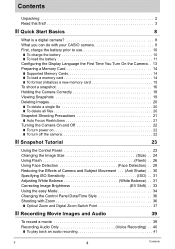
...Start Basics 8 What is a digital camera 8 What you can do with your CASIO camera 9 First, charge the battery prior to use 10 ❚ To charge the battery 10 ❚ To load the battery 11 Configuring the Display Language the First Time You Turn On the Camera. . 13 Preparing a Memory Card...Image Brightness EV Shift) . . 33 Using the easy Mode 34 Changing the Control Panel Date/Time Style 36 Shooting with Zoom 36 ❚ Optical Zoom and Digital Zoom Switch Point 37 ❚❙ Recording Movie Images and Audio 39 To record a movie 39 Recording Audio Only Voice Recording) ...
...Start Basics 8 What is a digital camera 8 What you can do with your CASIO camera 9 First, charge the battery prior to use 10 ❚ To charge the battery 10 ❚ To load the battery 11 Configuring the Display Language the First Time You Turn On the Camera. . 13 Preparing a Memory Card...Image Brightness EV Shift) . . 33 Using the easy Mode 34 Changing the Control Panel Date/Time Style 36 Shooting with Zoom 36 ❚ Optical Zoom and Digital Zoom Switch Point 37 ❚❙ Recording Movie Images and Audio 39 To record a movie 39 Recording Audio Only Voice Recording) ...
User Guide
Page 7
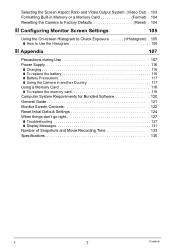
...Aspect Ratio and Video Output System (Video Out) . 103 Formatting Built-in Memory or a Memory Card Format) . 104 Resetting the Camera to Factory Defaults Reset) . 104 ❚❙ Configuring Monitor Screen Settings 105 Using the On-screen Histogram to Check Exposure Histogram) ....;❙ Appendix 107 Precautions during Use 107 Power Supply 116 ❚ Charging 116 ❚ To replace the battery 116 ❚ Battery Precautions 117 ❚ Using the Camera in another Country 117 Using a Memory Card 118 ❚ To replace the memory card 118 Computer System Requirements...
...Aspect Ratio and Video Output System (Video Out) . 103 Formatting Built-in Memory or a Memory Card Format) . 104 Resetting the Camera to Factory Defaults Reset) . 104 ❚❙ Configuring Monitor Screen Settings 105 Using the On-screen Histogram to Check Exposure Histogram) ....;❙ Appendix 107 Precautions during Use 107 Power Supply 116 ❚ Charging 116 ❚ To replace the battery 116 ❚ Battery Precautions 117 ❚ Using the Camera in another Country 117 Using a Memory Card 118 ❚ To replace the memory card 118 Computer System Requirements...
User Guide
Page 10
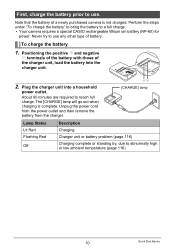
... charger unit. 2. About 90 minutes are required to a full charge. • Your camera requires a special CASIO rechargeable lithium ion battery (NP-60) for power. Positioning the positive + and negative - Unplug the power cord from the power outlet and then remove the battery from the charger. [CHARGE] lamp Lamp Status Description Lit Red Flashing Red...
... charger unit. 2. About 90 minutes are required to a full charge. • Your camera requires a special CASIO rechargeable lithium ion battery (NP-60) for power. Positioning the positive + and negative - Unplug the power cord from the power outlet and then remove the battery from the charger. [CHARGE] lamp Lamp Status Description Lit Red Flashing Red...
User Guide
Page 11
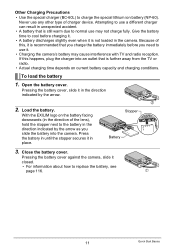
Because of this happens, plug the charger into the camera. Press the battery in place. 2 Stopper Battery 3. If this , it . • Charging the camera's battery may not charge fully. With the EXILIM logo on current battery capacity and charging conditions. Pressing the battery cover against the camera, slide it in until the stopper secures it closed. 2 • For information about...
Because of this happens, plug the charger into the camera. Press the battery in place. 2 Stopper Battery 3. If this , it . • Charging the camera's battery may not charge fully. With the EXILIM logo on current battery capacity and charging conditions. Pressing the battery cover against the camera, slide it in until the stopper secures it closed. 2 • For information about...
User Guide
Page 12
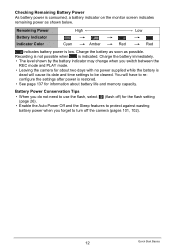
...Off and the Sleep features to turn off the camera (pages 101, 102). 12 Quick Start Basics Charge the battery immediately. • The level shown by the battery indicator may change when you forget to protect against wasting battery power when you switch between the REC mode ... PLAY mode. • Leaving the camera for information about two days with no power supplied while the battery is indicated. Recording is not possible when is dead will have to be cleared. Charge the battery as soon as shown below. Remaining Power Battery Indicator Indicator Color High * * Cyan...
...Off and the Sleep features to turn off the camera (pages 101, 102). 12 Quick Start Basics Charge the battery immediately. • The level shown by the battery indicator may change when you forget to protect against wasting battery power when you switch between the REC mode ... PLAY mode. • Leaving the camera for information about two days with no power supplied while the battery is indicated. Recording is not possible when is dead will have to be cleared. Charge the battery as soon as shown below. Remaining Power Battery Indicator Indicator Color High * * Cyan...
User Guide
Page 13
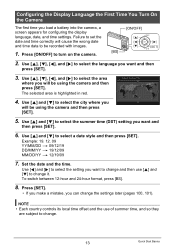
..., 101). Use [4] and [6] to select the language you can change and then use of summer time, and so they are subject to be using the camera and then press [SET]. 5. Press [SET]. • If you make a mistake, you want and then press [SET]. 6. Press [ON/OFF] to select a ... red. 4. Use [8], [2], [4], and [6] to select the setting you want and then press [SET]. 3. Use [8], [2], [4], and [6] to select the city where you load a battery into the camera, a screen appears for configuring the display language, date, and time settings. Example: 19. 12. 09 YY/MM/DD * 09/12/19 DD/MM/YY...
..., 101). Use [4] and [6] to select the language you can change and then use of summer time, and so they are subject to be using the camera and then press [SET]. 5. Press [SET]. • If you make a mistake, you want and then press [SET]. 6. Press [ON/OFF] to select a ... red. 4. Use [8], [2], [4], and [6] to select the setting you want and then press [SET]. 3. Use [8], [2], [4], and [6] to select the city where you load a battery into the camera, a screen appears for configuring the display language, date, and time settings. Example: 19. 12. 09 YY/MM/DD * 09/12/19 DD/MM/YY...
User Guide
Page 14
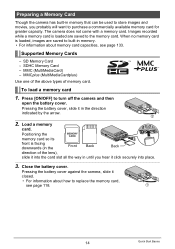
... while a memory card is facing downwards (in the Front Back Back direction of memory card. Close the battery cover. Preparing a Memory Card Though the camera has built-in memory that can be used to store images and movies, you hear it click securely into...Memory Card - To load a memory card 1. Load a memory card. The camera does not come with a memory card. Pressing the battery cover against the camera, slide it in the direction indicated by the arrow. 1 2 2. Pressing the battery cover, slide it closed. 2 • For information about memory card capacities,...
... while a memory card is facing downwards (in the Front Back Back direction of memory card. Close the battery cover. Preparing a Memory Card Though the camera has built-in memory that can be used to store images and movies, you hear it click securely into...Memory Card - To load a memory card 1. Load a memory card. The camera does not come with a memory card. Pressing the battery cover against the camera, slide it in the direction indicated by the arrow. 1 2 2. Pressing the battery cover, slide it closed. 2 • For information about memory card capacities,...
User Guide
Page 15
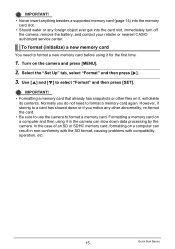
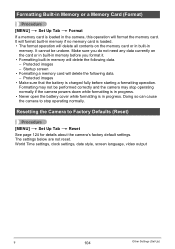
... press [MENU]. 2. Normally you notice any foreign object ever get into the card slot, immediately turn off the camera, remove the battery, and contact your retailer or nearest CASIO authorized service center. Select the "Set Up" tab, select "Format" and then press [6]. 3. To format (initialize) a new memory card You need to format a memory... slot. • Should water or any other files on a computer and then using it for the first time. 1. Turn on a computer can result in the camera can slow down or if you do not need to select "Format" and then press [SET].
... press [MENU]. 2. Normally you notice any foreign object ever get into the card slot, immediately turn off the camera, remove the battery, and contact your retailer or nearest CASIO authorized service center. Select the "Set Up" tab, select "Format" and then press [6]. 3. To format (initialize) a new memory card You need to format a memory... slot. • Should water or any other files on a computer and then using it for the first time. 1. Turn on a computer can result in the camera can slow down or if you do not need to select "Format" and then press [SET].

User Guide
Page 21
Auto Focus Restrictions • Any of the following can cause digital noise in the monitor screen image. • The image that appears on the monitor screen is for the image quality setting (page 57). Blinds or ... shooting - Doing so can affect the brightness or color of the camera • If you just shot being saved incorrectly, damage to slow and can make proper focus impossible. - Fast-moving subject - Snapshot Shooting Precautions Operation • Never open the battery cover while the back lamp is shining directly onto the lens...
Auto Focus Restrictions • Any of the following can cause digital noise in the monitor screen image. • The image that appears on the monitor screen is for the image quality setting (page 57). Blinds or ... shooting - Doing so can affect the brightness or color of the camera • If you just shot being saved incorrectly, damage to slow and can make proper focus impossible. - Fast-moving subject - Snapshot Shooting Precautions Operation • Never open the battery cover while the back lamp is shining directly onto the lens...
User Guide
Page 27
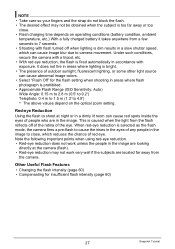
... in the image to close . • Flash charging time depends on the optical zoom setting. It does not fire in areas where lighting is dim results in areas where...Angle: 0.15 m to 2.8 m (0.5' to 9.2') Telephoto: 0.4 m to 1.5 m (1.3' to shoot at the camera (flash). • Red-eye reduction may not be obtained when the subject is caused when the light from a few...the flash to 4.9') * The above values depend on operating conditions (battery condition, ambient temperature, etc.) With a fully charged battery it takes anywhere from the flash reflects off when lighting is bright...
... in the image to close . • Flash charging time depends on the optical zoom setting. It does not fire in areas where lighting is dim results in areas where...Angle: 0.15 m to 2.8 m (0.5' to 9.2') Telephoto: 0.4 m to 1.5 m (1.3' to shoot at the camera (flash). • Red-eye reduction may not be obtained when the subject is caused when the light from a few...the flash to 4.9') * The above values depend on operating conditions (battery condition, ambient temperature, etc.) With a fully charged battery it takes anywhere from the flash reflects off when lighting is bright...
User Guide
Page 72
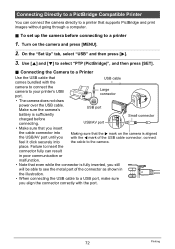
... 4 mark of the connector as shown in poor communication or malfunction. • Note that the 6 mark on the camera and press [MENU]. 2. Connecting the Camera to a Printer Use the USB cable that supports PictBridge and print images without going through a computer. . Use [8] ... and then press [6]. 3. Make sure the camera's USB port battery is fully inserted, you align the connector correctly with the camera to connect the camera to select "PTP (PictBridge)", and then press [SET]. . Large connector • The camera does not draw USB power over the USB ...
... 4 mark of the connector as shown in poor communication or malfunction. • Note that the 6 mark on the camera and press [MENU]. 2. Connecting the Camera to a Printer Use the USB cable that supports PictBridge and print images without going through a computer. . Use [8] ... and then press [6]. 3. Make sure the camera's USB port battery is fully inserted, you align the connector correctly with the camera to connect the camera to select "PTP (PictBridge)", and then press [SET]. . Large connector • The camera does not draw USB power over the USB ...
User Guide
Page 80
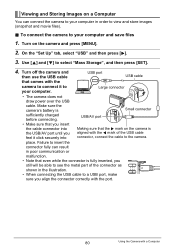
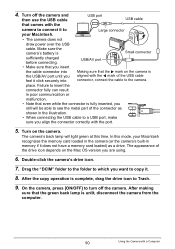
... into the USB/AV port until you feel it click securely into Making sure that the 6 mark on the camera is aligned with the camera to connect it to the camera. Make sure the camera's battery is fully inserted, you still will be able to see the metal part of the USB cable connector, connect... the cable to your computer. Turn off the camera and then use the USB cable USB port USB cable that comes...
... into the USB/AV port until you feel it click securely into Making sure that the 6 mark on the camera is aligned with the camera to connect it to the camera. Make sure the camera's battery is fully inserted, you still will be able to see the metal part of the USB cable connector, connect... the cable to your computer. Turn off the camera and then use the USB cable USB port USB cable that comes...
User Guide
Page 90
...camera's battery is aligned with a Computer USB/AV port • Make sure that you insert the cable connector into the USB/AV port until you are using. 6. Turn on the Mac OS version you feel it click securely into Making sure that even while the connector is unlit, disconnect the camera...still will light green at this mode, your Macintosh. The appearance of the USB cable connector, connect the cable to turn off the camera. Double-click the camera's drive icon. 7. Failure to insert the connector fully can result in memory if it to Trash. 9. In this time. Turn ...
...camera's battery is aligned with a Computer USB/AV port • Make sure that you insert the cable connector into the USB/AV port until you are using. 6. Turn on the Mac OS version you feel it click securely into Making sure that even while the connector is unlit, disconnect the camera...still will light green at this mode, your Macintosh. The appearance of the USB cable connector, connect the cable to turn off the camera. Double-click the camera's drive icon. 7. Failure to insert the connector fully can result in memory if it to Trash. 9. In this time. Turn ...
User Guide
Page 104
... - Protected images • Make sure that the battery is in progress. Formatting may stop operating normally. Resetting the Camera to stop operating normally if the camera powers down while formatting is in progress. • Never open the battery cover while formatting is charged fully before you do ...8226; The format operation will delete all contents on the card or in built-in the camera, this operation will delete the following data. - It cannot be performed correctly and the camera may not be undone. Make sure you format it. • Formatting built-in memory ...
... - Protected images • Make sure that the battery is in progress. Formatting may stop operating normally. Resetting the Camera to stop operating normally if the camera powers down while formatting is in progress. • Never open the battery cover while formatting is charged fully before you do ...8226; The format operation will delete all contents on the card or in built-in the camera, this operation will delete the following data. - It cannot be performed correctly and the camera may not be undone. Make sure you format it. • Formatting built-in memory ...
User Guide
Page 108
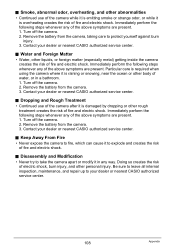
... damaged by dropping or other body of water, or in any of the camera after it in a bathroom. 1. Water and Foreign Matter • Water, other personal injury. Remove the battery from the camera, taking care to your dealer or nearest CASIO authorized service center. . Be sure to leave all internal inspection, maintenance, and repair...
... damaged by dropping or other body of water, or in any of the camera after it in a bathroom. 1. Water and Foreign Matter • Water, other personal injury. Remove the battery from the camera, taking care to your dealer or nearest CASIO authorized service center. . Be sure to leave all internal inspection, maintenance, and repair...
User Guide
Page 109
...dust - Food preparation areas or other device creates the risk of the battery damage, or deterioration of battery performance and service life. • Failure to it. Use with a CASIO Digital Camera only. Rechargeable Battery • Use only the specified charger unit or the specified device to ...heat or fire. - Never carry or store the battery together with items that comes with a hammer, step on a high...
...dust - Food preparation areas or other device creates the risk of the battery damage, or deterioration of battery performance and service life. • Failure to it. Use with a CASIO Digital Camera only. Rechargeable Battery • Use only the specified charger unit or the specified device to ...heat or fire. - Never carry or store the battery together with items that comes with a hammer, step on a high...
User Guide
Page 110
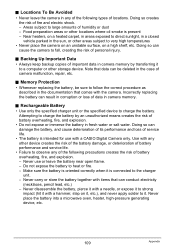
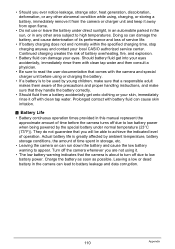
... the risk of battery overheating, fire, and explosion. • Battery fluid can damage your local CASIO authorized service center. They do not guarantee that you will be used by young children, make sure that they handle the battery correctly. • Should fluid from a battery accidentally get into your...then consult a physician. • Be sure to read the user documentation that the camera is about to turn off due to low battery power when being powered by ambient temperature, battery storage conditions, the amount of time spent in this manual represent the approximate amount ...
... the risk of battery overheating, fire, and explosion. • Battery fluid can damage your local CASIO authorized service center. They do not guarantee that you will be used by young children, make sure that they handle the battery correctly. • Should fluid from a battery accidentally get into your...then consult a physician. • Be sure to read the user documentation that the camera is about to turn off due to low battery power when being powered by ambient temperature, battery storage conditions, the amount of time spent in this manual represent the approximate amount ...
User Guide
Page 111
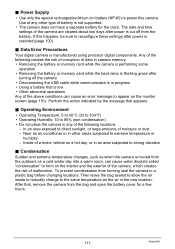
... by the message that is restored (page 100). . Data Error Precautions Your digital camera is cut off the camera • Disconnecting the USB cable while communication is not supported. • The camera does not have a separate battery for a few hours. 111 Appendix Power Supply • Use only the special... sure to form on a hot day, or in other type of data in camera memory. • Removing the battery or memory card while the camera is performing some operation • Removing the battery or memory card while the back lamp is flashing green after turning off from forming...
... by the message that is restored (page 100). . Data Error Precautions Your digital camera is cut off the camera • Disconnecting the USB cable while communication is not supported. • The camera does not have a separate battery for a few hours. 111 Appendix Power Supply • Use only the special... sure to form on a hot day, or in other type of data in camera memory. • Removing the battery or memory card while the camera is performing some operation • Removing the battery or memory card while the back lamp is flashing green after turning off from forming...
User Guide
Page 112
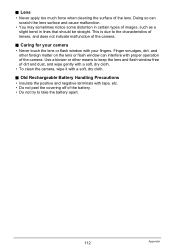
... when cleaning the surface of images, such as a slight bend in lines that should be straight. Old Rechargeable Battery Handling Precautions • Insulate the positive and negative terminals with your camera • Never touch the lens or flash window with tape, etc. • Do not peel the covering ...off of the battery. • Do not try to take the battery apart. 112 Appendix This is due to keep the lens...
... when cleaning the surface of images, such as a slight bend in lines that should be straight. Old Rechargeable Battery Handling Precautions • Insulate the positive and negative terminals with your camera • Never touch the lens or flash window with tape, etc. • Do not peel the covering ...off of the battery. • Do not try to take the battery apart. 112 Appendix This is due to keep the lens...


