
Owners Manual
Page 6
... and Files 154 Protecting Files 155 To protect a single file 155 To protect all files in memory 156 Using the FAVORITE Folder 156 To copy a file to the FAVORITE folder 156 To display a file in the FAVORITE ...) and [ ] (PLAY) Power On/Off Functions 169 Formatting Built-in Memory 170 171 USING A MEMORY CARD Using a Memory Card 172 To insert a memory card into the camera 172 To replace the memory card 173 Formatting a Memory Card 174 Copying Files 175 To copy all the files in built-in memory to a memory card 176 To copy a specific file from a memory card to built-in...
... and Files 154 Protecting Files 155 To protect a single file 155 To protect all files in memory 156 Using the FAVORITE Folder 156 To copy a file to the FAVORITE folder 156 To display a file in the FAVORITE ...) and [ ] (PLAY) Power On/Off Functions 169 Formatting Built-in Memory 170 171 USING A MEMORY CARD Using a Memory Card 172 To insert a memory card into the camera 172 To replace the memory card 173 Formatting a Memory Card 174 Copying Files 175 To copy all the files in built-in memory to a memory card 176 To copy a specific file from a memory card to built-in...
Owners Manual
Page 7
...Camera with a Windows Computer ......... 189 Using the Camera with a Macintosh Computer ....... 196 Using a Memory Card to Transfer Images to a Computer 200 Memory Data 201 DCF Protocol 201 Memory Folder Structure 202 Image Files Supported by the Camera 203 205 USING THE CAMERA WITH A COMPUTER Using the Camera...Playing a Movie 213 Viewing User Documentation (PDF Files) 214 User Registration 214 Exiting the Menu Application 214 Using the Camera with a Macintosh Computer ....... 215 Selecting the Software You Need 215 Computer System Requirements 216 Managing Images on a ...
...Camera with a Windows Computer ......... 189 Using the Camera with a Macintosh Computer ....... 196 Using a Memory Card to Transfer Images to a Computer 200 Memory Data 201 DCF Protocol 201 Memory Folder Structure 202 Image Files Supported by the Camera 203 205 USING THE CAMERA WITH A COMPUTER Using the Camera...Playing a Movie 213 Viewing User Documentation (PDF Files) 214 User Registration 214 Exiting the Menu Application 214 Using the Camera with a Macintosh Computer ....... 215 Selecting the Software You Need 215 Computer System Requirements 216 Managing Images on a ...
Owners Manual
Page 9
... images of outstanding resolution and detail. • 2.5-inch TFT color LCD monitor screen • 8.3MB built-in memory Images can be set up to third parties of such files over the Internet without using a memory card. • REC mode or PLAY mode power up (page 41) Press [ ] (REC) or [ ] (... enough, so images are defective (they do not turn on the camera and enter the mode you want to use. • easy mode (page 55) This feature eliminates troublesome setups. • 12X zoom (page 59) 3X optical zoom, 4X digital zoom • Flash Assist (page 66) This feature compensates when flash ...
... images of outstanding resolution and detail. • 2.5-inch TFT color LCD monitor screen • 8.3MB built-in memory Images can be set up to third parties of such files over the Internet without using a memory card. • REC mode or PLAY mode power up (page 41) Press [ ] (REC) or [ ] (... enough, so images are defective (they do not turn on the camera and enter the mode you want to use. • easy mode (page 55) This feature eliminates troublesome setups. • 12X zoom (page 59) 3X optical zoom, 4X digital zoom • Flash Assist (page 66) This feature compensates when flash ...
Owners Manual
Page 11
... MOTION PRINT (page 138) Capture frames from among 162 cities in 32 time zones. • Support for SD memory cards and MMC (MultiMedia Cards) for memory expansion (page 171) • Digital Print Order Format (DPOF) (page 179) Images can be printed easily in the sequence you can also be used... when specifying images and quantities for printing by connecting the camera (pages 189, 196) • DCF Data Storage (page ...
... MOTION PRINT (page 138) Capture frames from among 162 cities in 32 time zones. • Support for SD memory cards and MMC (MultiMedia Cards) for memory expansion (page 171) • Digital Print Order Format (DPOF) (page 179) Images can be printed easily in the sequence you can also be used... when specifying images and quantities for printing by connecting the camera (pages 189, 196) • DCF Data Storage (page ...
Owners Manual
Page 14
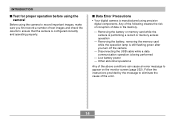
Removing the battery or memory card while the camera is manufactured using precision digital components. INTRODUCTION I Data Error Precautions • Your digital camera is performing a record or memory access operation - Any of the following creates the risk of corruption of the error. 14 I Test for proper operation before using the camera to record important images, make sure you turn...
Removing the battery or memory card while the camera is manufactured using precision digital components. INTRODUCTION I Data Error Precautions • Your digital camera is performing a record or memory access operation - Any of the following creates the risk of corruption of the error. 14 I Test for proper operation before using the camera to record important images, make sure you turn...
Owners Manual
Page 19
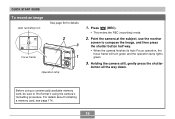
... using a commercially available memory card, be sure to compose the image, and then press the shutter button half way. • When the camera finishes its Auto Focus operation, the focus frame will turn green and the operation lamp lights green. 3. Holding the camera still, gently press the...shutter button all the way down. Point the camera at the subject, use the monitor screen to first format it using the camera's formatting procedure. Press [ ] (REC). • This enters the REC (recording) mode. 2. For details about formatting a memory card, see page 174. 19 QUICK START GUIDE...
... using a commercially available memory card, be sure to compose the image, and then press the shutter button half way. • When the camera finishes its Auto Focus operation, the focus frame will turn green and the operation lamp lights green. 3. Holding the camera still, gently press the...shutter button all the way down. Point the camera at the subject, use the monitor screen to first format it using the camera's formatting procedure. Press [ ] (REC). • This enters the REC (recording) mode. 2. For details about formatting a memory card, see page 174. 19 QUICK START GUIDE...
Owners Manual
Page 22
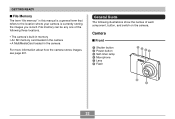
...and switch on the camera. GETTING READY I Front 1 Shutter button 2 Power button 3 Self-timer lamp 4 Microphone 5 Lens 6 Flash 1 234 6 5 22 General Guide The following three locations. • The camera's built-in memory • An SD memory card loaded in the camera • A ...MultiMediaCard loaded in this manual is a general term that refers to the location where your camera is currently storing the images you record.
...and switch on the camera. GETTING READY I Front 1 Shutter button 2 Power button 3 Self-timer lamp 4 Microphone 5 Lens 6 Flash 1 234 6 5 22 General Guide The following three locations. • The camera's built-in memory • An SD memory card loaded in the camera • A ...MultiMediaCard loaded in this manual is a general term that refers to the location where your camera is currently storing the images you record.

Owners Manual
Page 23
GETTING READY I Back 78 F E DC 9 : A [̆] B [̇] [̄] 7 Operation lamp 8 Zoom button 9 Strap ring 0 [ ] (PLAY mode) button A [ ] (REC mode) button B C [SET] button D [BS] (BEST SHOT) button E [MENU] button F Monitor Screen [̈] [SET] I Bottom G Memory card slot H Stopper I 23 M Speaker GH ML K J I Battery cover J Battery compartment K USB/AV connector L Tripod screw hole * Use this hole when attaching to a tripod.
GETTING READY I Back 78 F E DC 9 : A [̆] B [̇] [̄] 7 Operation lamp 8 Zoom button 9 Strap ring 0 [ ] (PLAY mode) button A [ ] (REC mode) button B C [SET] button D [BS] (BEST SHOT) button E [MENU] button F Monitor Screen [̈] [SET] I Bottom G Memory card slot H Stopper I 23 M Speaker GH ML K J I Battery cover J Battery compartment K USB/AV connector L Tripod screw hole * Use this hole when attaching to a tripod.

Owners Manual
Page 51
...can cause blurring of the image. After purchasing a memory card, be sure to load it into the camera and format it before trying to hear if you have one loaded in the camera. • When an optionally available SD memory card or MultiMediaCard (MMC) is low, which slows down... difficult to use it . Recording an Image Your camera automatically adjusts shutter speed in the camera, images are stored in the camera's built-in memory, or to avoid camera movement. Press the shutter button carefully, taking care to a memory card if you cover the speaker with the brightness of the...
...can cause blurring of the image. After purchasing a memory card, be sure to load it into the camera and format it before trying to hear if you have one loaded in the camera. • When an optionally available SD memory card or MultiMediaCard (MMC) is low, which slows down... difficult to use it . Recording an Image Your camera automatically adjusts shutter speed in the camera, images are stored in the camera's built-in memory, or to avoid camera movement. Press the shutter button carefully, taking care to a memory card if you cover the speaker with the brightness of the...

Owners Manual
Page 57
... human eye. Doing so not only causes the current image to malfunction of the camera. • Never remove the memory card while an image is selected for the ISO sensitivity setting (page 117), the camera increases sensitivity and uses a faster shutter speed. Because of relatively dark subjects. &#...open the battery cover while the operation lamp is selected for "easy Mode". When using the camera indoors under such lighting, you may experience some digital noise (graininess) to guard against camera movement if you have flash turned off (page 63). 57 BASIC IMAGE RECORDING • ...
... human eye. Doing so not only causes the current image to malfunction of the camera. • Never remove the memory card while an image is selected for the ISO sensitivity setting (page 117), the camera increases sensitivity and uses a faster shutter speed. Because of relatively dark subjects. &#...open the battery cover while the operation lamp is selected for "easy Mode". When using the camera indoors under such lighting, you may experience some digital noise (graininess) to guard against camera movement if you have flash turned off (page 63). 57 BASIC IMAGE RECORDING • ...
Owners Manual
Page 88
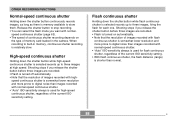
...digital noise than images recorded with high- speed continuous shutter (page 63). • The speed of continuous shutter recording depends on automatically. • Note that the resolution of images recorded with normal-speed continuous shutter. • "Auto" ISO sensitivity always is used for high-speed continuous shutter, regardless of memory card loaded in memory... down the shutter button while flash continuous shutter is selected records up to built-in the camera. High-speed continuous shutter Holding down the shutter button while high-speed continuous shutter is selected...
...digital noise than images recorded with high- speed continuous shutter (page 63). • The speed of continuous shutter recording depends on automatically. • Note that the resolution of images recorded with normal-speed continuous shutter. • "Auto" ISO sensitivity always is used for high-speed continuous shutter, regardless of memory card loaded in memory... down the shutter button while flash continuous shutter is selected records up to built-in the camera. High-speed continuous shutter Holding down the shutter button while high-speed continuous shutter is selected...
Owners Manual
Page 105
... on the monitor screen during movie recording. Digital zoom only is a CCD phenomenon known as "vertical smear", and does not indicate malfunction of this, use before you press the shutter button to let you know when a frame has been dropped. Because of the camera. Use of a memory card (page 171) is recommended when recording movies...
... on the monitor screen during movie recording. Digital zoom only is a CCD phenomenon known as "vertical smear", and does not indicate malfunction of this, use before you press the shutter button to let you know when a frame has been dropped. Because of the camera. Use of a memory card (page 171) is recommended when recording movies...
Owners Manual
Page 134
...edited. • Certain types of memory cards can zoom a movie up more memory. • Splicing of two different movies into a single movie or cutting one movie into multiple parts are cutting. IMPORTANT! • Cut operations cannot be possible for movies not recorded with this camera. • A movie that is... recorded with this section to 3.5 times normal size. • Playback may not be undone. Editing a Movie Use the procedure in this camera. PLAYBACK IMPORTANT! • You can adjust the volume level of movie audio during movie playback only. • You can cause the movie...
...edited. • Certain types of memory cards can zoom a movie up more memory. • Splicing of two different movies into a single movie or cutting one movie into multiple parts are cutting. IMPORTANT! • Cut operations cannot be possible for movies not recorded with this camera. • A movie that is... recorded with this section to 3.5 times normal size. • Playback may not be undone. Editing a Movie Use the procedure in this camera. PLAYBACK IMPORTANT! • You can adjust the volume level of movie audio during movie playback only. • You can cause the movie...
Owners Manual
Page 154
... the 100th folder. 100CASIO Serial number (3 digits) Each folder can have up to 9,999. Memory Folders and Files An image you will be created. Folders Your camera automatically creates folders in its built-in memory or on page 202. 154 See page 27 for information about the folder structure, see "Memory Folder Structure" on the memory card.
... the 100th folder. 100CASIO Serial number (3 digits) Each folder can have up to 9,999. Memory Folders and Files An image you will be created. Folders Your camera automatically creates folders in its built-in memory or on page 202. 154 See page 27 for information about the folder structure, see "Memory Folder Structure" on the memory card.
Owners Manual
Page 155
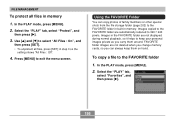
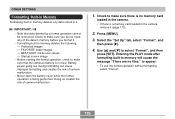
...MENU]. 2. You can protect files individually or you want to protect. 155 IMPORTANT! • Even if a file is indicated by a memory card format operation (page 174) or a builtin memory format operation (page 170). To protect a single file 1. Press [MENU] to select "On", and then press [SET]. •... A file that is protected is protected, it cannot be deleted by the mark. • To unprotect a file, select "Off" in memory with a single operation. Use [̆] and [̄] to exit the menu screen. 3. Select the "PLAY" tab, select "Protect", and then press [&#...
...MENU]. 2. You can protect files individually or you want to protect. 155 IMPORTANT! • Even if a file is indicated by a memory card format operation (page 174) or a builtin memory format operation (page 170). To protect a single file 1. Press [MENU] to select "On", and then press [SET]. •... A file that is protected is protected, it cannot be deleted by the mark. • To unprotect a file, select "Off" in memory with a single operation. Use [̆] and [̄] to exit the menu screen. 3. Select the "PLAY" tab, select "Protect", and then press [&#...
Owners Manual
Page 156
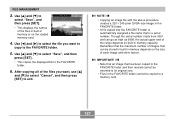
... "Protect", and then press [̈]. 3. FAVORITE folder images are not deleted when you change memory cards, so you carry them on hand. In the PLAY mode, press [MENU]. 2. FILE MANAGEMENT To protect all files, press [SET] in memory 1. Use [̆] and [̄] to select "All Files : On", and then press... [SET]. • To unprotect all files in step 3 so the setting shows "All Files : Off". 4. Images in memory. In the PLAY mode, press [MENU]. 2. Images copied to the FAVORITE folder are not displayed during normal playback, so it helps to 320 × ...
... "Protect", and then press [̈]. 3. FAVORITE folder images are not deleted when you change memory cards, so you carry them on hand. In the PLAY mode, press [MENU]. 2. FILE MANAGEMENT To protect all files, press [SET] in memory 1. Use [̆] and [̄] to select "All Files : On", and then press... [SET]. • To unprotect all files in step 3 so the setting shows "All Files : Off". 4. Images in memory. In the PLAY mode, press [MENU]. 2. Images copied to the FAVORITE folder are not displayed during normal playback, so it helps to 320 × ...
Owners Manual
Page 157
... is automatically assigned a file name that can go as high as 9999, the actual upper end of the range depends on built-in memory depends on the loaded memory card. 4. After copying all of images that is a serial number. Use [̆] and [̄] to select "Save", and then press [SET]. •... the FAVORITE folder and then resized cannot be returned to its original size. • Files in the FAVORITE folder cannot be stored in built-in memory capacity. IMPORTANT! • Note that an image that the maximum number of the files you want , use [̆] and [̄] to select "...
... is automatically assigned a file name that can go as high as 9999, the actual upper end of the range depends on built-in memory depends on the loaded memory card. 4. After copying all of images that is a serial number. Use [̆] and [̄] to select "Save", and then press [SET]. •... the FAVORITE folder and then resized cannot be returned to its original size. • Files in the FAVORITE folder cannot be stored in built-in memory capacity. IMPORTANT! • Note that an image that the maximum number of the files you want , use [̆] and [̄] to select "...
Owners Manual
Page 158
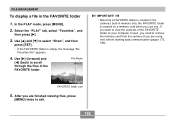
... "No Favorites file!" FAVORITE folder icon 5. If you want to view the contents of the FAVORITE folder on a memory card when you are finished viewing files, press [MENU] twice to remove the memory card from the camera (if you use one ) before starting data communication (pages 173, 189). In the PLAY mode, press [MENU]. 2. Use...
... "No Favorites file!" FAVORITE folder icon 5. If you want to view the contents of the FAVORITE folder on a memory card when you are finished viewing files, press [MENU] twice to remove the memory card from the camera (if you use one ) before starting data communication (pages 173, 189). In the PLAY mode, press [MENU]. 2. Use...
Owners Manual
Page 162
... number from 0001 whenever all files are deleted or whether the memory card is already stored in image - Selecting a new startup image overwrites anything that image in the camera's standard image memory. • The startup image is replaced. The camera's built-in startup image memory. Use [̆] and [̄] to specify the method for file names...
... number from 0001 whenever all files are deleted or whether the memory card is already stored in image - Selecting a new startup image overwrites anything that image in the camera's standard image memory. • The startup image is replaced. The camera's built-in startup image memory. Use [̆] and [̄] to specify the method for file names...
Owners Manual
Page 170
...]. FAVORITE folder images - Battery power going low during formatting can cause improper formatting and creates the risk of camera malfunction. • Never open the battery cover while the format operation is a memory card loaded in the camera. • If there is being performed. Use [̆] and [̄] to appear. • To exit the format...
...]. FAVORITE folder images - Battery power going low during formatting can cause improper formatting and creates the risk of camera malfunction. • Never open the battery cover while the format operation is a memory card loaded in the camera. • If there is being performed. Use [̆] and [̄] to appear. • To exit the format...

