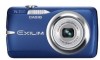

Owners Manual
Page 7
... . (Eye-Fi) . 136 Files and Folders 138 Memory Card Data 139 ❚❙ Other Settings (Set Up) 141 Changing the Menu Screen Color Menu Color) . 141 Turning off Eye-Fi Card Communication Eye-Fi) . 141 Configuring Camera Sound Settings Sounds) . 142 Configuring a Startup Image Startup) . 142 Specifying the File Name Serial Number Generation Rule . . . . . (File No.) . 143 Configuring World Time Settings World Time) . 143 Time Stamping Snapshots Timestamp) . 144 Setting the Camera's Clock Adjust) . 145 Specifying the Date Style Date Style) . 145 Specifying the Display Language...
... . (Eye-Fi) . 136 Files and Folders 138 Memory Card Data 139 ❚❙ Other Settings (Set Up) 141 Changing the Menu Screen Color Menu Color) . 141 Turning off Eye-Fi Card Communication Eye-Fi) . 141 Configuring Camera Sound Settings Sounds) . 142 Configuring a Startup Image Startup) . 142 Specifying the File Name Serial Number Generation Rule . . . . . (File No.) . 143 Configuring World Time Settings World Time) . 143 Time Stamping Snapshots Timestamp) . 144 Setting the Camera's Clock Adjust) . 145 Specifying the Date Style Date Style) . 145 Specifying the Display Language...
Owners Manual
Page 18
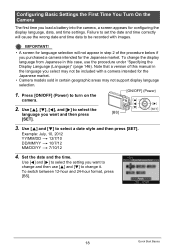
... in step 2 of this manual in this case, use [8] and [2] to select the setting you select may not be included with images. Press [ON/OFF] (Power) to select a date style and then press [SET]. Use [8] and [2] to turn on the camera. [ON/OFF] (Power) 2. IMPORTANT! • A screen for the Japanese market. • Camera models sold in certain geographic areas may not support display language selection. 1. Set the date and the time.
... in step 2 of this manual in this case, use [8] and [2] to select the setting you select may not be included with images. Press [ON/OFF] (Power) to select a date style and then press [SET]. Use [8] and [2] to turn on the camera. [ON/OFF] (Power) 2. IMPORTANT! • A screen for the Japanese market. • Camera models sold in certain geographic areas may not support display language selection. 1. Set the date and the time.

Owners Manual
Page 29
... selected file. 4. Use [8] and [2] to enter the PLAY mode and then press [2] ( ). 2. Deleting Images If memory becomes full, you can delete images you no longer need to select "Delete Files" and then press [SET]. • This displays a file selection screen. 3. To delete a single file 1. Use [8] and [2] to free up storage and record more images. Use [8], [2], [4], and [6] to move the selection boundary to the file you are finished selecting files, press [BS]. 5. IMPORTANT! • Remember that a file (image) delete operation cannot...
... selected file. 4. Use [8] and [2] to enter the PLAY mode and then press [2] ( ). 2. Deleting Images If memory becomes full, you can delete images you no longer need to select "Delete Files" and then press [SET]. • This displays a file selection screen. 3. To delete a single file 1. Use [8] and [2] to free up storage and record more images. Use [8], [2], [4], and [6] to move the selection boundary to the file you are finished selecting files, press [BS]. 5. IMPORTANT! • Remember that a file (image) delete operation cannot...

Owners Manual
Page 54
...) [MENU] 54 Recording Movie Images and Audio In the PLAY mode, use [8] (DISP) during audio recording to toggle the monitor screen on and off. • When monitor screen contents are turned off, selecting the "Voice Recording" scene will cause the monitor screen to turn off Playback end [4] [6] [SET] While playback is displayed in place of an image for a Voice Recording file. 2. Voice Recording Playback Controls Fast forward/fast reverse Play/pause Jump to marker Volume adjustment Monitor screen...
...) [MENU] 54 Recording Movie Images and Audio In the PLAY mode, use [8] (DISP) during audio recording to toggle the monitor screen on and off. • When monitor screen contents are turned off, selecting the "Voice Recording" scene will cause the monitor screen to turn off Playback end [4] [6] [SET] While playback is displayed in place of an image for a Voice Recording file. 2. Voice Recording Playback Controls Fast forward/fast reverse Play/pause Jump to marker Volume adjustment Monitor screen...

Owners Manual
Page 58
..., while movies are assigned numbers in memory (page 149) deletes all user BEST SHOT scenes. • Use the following procedure when you want to delete a user BEST SHOT scene. 1 Display the information screen (page 56) of an image recorded with a scene number. Use [8] and [2] to 999 camera setups as a user BEST SHOT setup. B 58 Using BEST SHOT Face Detection, Focus, EV Shift, White Balance, Flash, ISO, Metering, Lighting, Make-up to select "Save", and then press [SET]. On the BEST SHOT scene menu, select...
..., while movies are assigned numbers in memory (page 149) deletes all user BEST SHOT scenes. • Use the following procedure when you want to delete a user BEST SHOT scene. 1 Display the information screen (page 56) of an image recorded with a scene number. Use [8] and [2] to 999 camera setups as a user BEST SHOT setup. B 58 Using BEST SHOT Face Detection, Focus, EV Shift, White Balance, Flash, ISO, Metering, Lighting, Make-up to select "Save", and then press [SET]. On the BEST SHOT scene menu, select...

Owners Manual
Page 67
... saving. [MENU] Saves the selected images and exits the image select operation. 3Use [8] and [2] to select the save method you want to save . 1While the shot images are played back at slow speed so you can select the images you want and then press [SET]. CS: High Speed CS 1. Buttons Used for saving images recorded with the following continuous shutter (CS) modes. While playback is selected. 67 Advanced Settings Cancel Save : Does not save any of the images. Save...
... saving. [MENU] Saves the selected images and exits the image select operation. 3Use [8] and [2] to select the save method you want to save . 1While the shot images are played back at slow speed so you can select the images you want and then press [SET]. CS: High Speed CS 1. Buttons Used for saving images recorded with the following continuous shutter (CS) modes. While playback is selected. 67 Advanced Settings Cancel Save : Does not save any of the images. Save...

Owners Manual
Page 74
... time. This will continue to ensure proper focus. Off • If you can be displayed on the REC mode monitor screen for Auto Focus. On Turns on Quick Shutter • Some images may be shot without waiting for easy vertical and horizontal alignment when composing images. 74 Advanced Settings Recording is used. Shooting with Quick Shutter (Quick Shutter) Procedure [r] (REC) * [MENU] * REC Tab * Quick Shutter When Quick Shutter is turned on, you press fully the shutter button while Quick Shutter is turned off Quick Shutter so focus...
... time. This will continue to ensure proper focus. Off • If you can be displayed on the REC mode monitor screen for Auto Focus. On Turns on Quick Shutter • Some images may be shot without waiting for easy vertical and horizontal alignment when composing images. 74 Advanced Settings Recording is used. Shooting with Quick Shutter (Quick Shutter) Procedure [r] (REC) * [MENU] * REC Tab * Quick Shutter When Quick Shutter is turned on, you press fully the shutter button while Quick Shutter is turned off Quick Shutter so focus...

Owners Manual
Page 75
...zoom is turned off . Functions Supported by Icon Help • REC Mode, Flash, Metering Mode, White Balance, Self-timer, EV Shift 75 Advanced Settings Using Icon Help (Icon Help) Procedure [r] (REC) * [MENU] * REC Tab * Icon Help While Icon Help is turned on, the camera will appear on or off , operating the zoom controller zooms the image with optical zoom only. Turning on Image Review (Review) Procedure [r] (REC) * [MENU] * REC Tab * Review While Review is turned on, a textual description will display a image for certain icons when you press the shutter button to turn digital zoom...
...zoom is turned off . Functions Supported by Icon Help • REC Mode, Flash, Metering Mode, White Balance, Self-timer, EV Shift 75 Advanced Settings Using Icon Help (Icon Help) Procedure [r] (REC) * [MENU] * REC Tab * Icon Help While Icon Help is turned on, the camera will appear on or off , operating the zoom controller zooms the image with optical zoom only. Turning on Image Review (Review) Procedure [r] (REC) * [MENU] * REC Tab * Review While Review is turned on, a textual description will display a image for certain icons when you press the shutter button to turn digital zoom...

Owners Manual
Page 93
... for the "Images" setting - Before and after playback of a movie or Voice Recording file Off: No image change effect. • Pattern 5 can replace the built-in slideshow background music with other music from one image to the menu screen. • Adjust audio volume by pressing [2] and then press [8] or [2] during playback. • All button operations are played back in name sequence. 93 Other Playback Functions (PLAY) Supported File Types: • PCM format (16-bit...
... for the "Images" setting - Before and after playback of a movie or Voice Recording file Off: No image change effect. • Pattern 5 can replace the built-in slideshow background music with other music from one image to the menu screen. • Adjust audio volume by pressing [2] and then press [8] or [2] during playback. • All button operations are played back in name sequence. 93 Other Playback Functions (PLAY) Supported File Types: • PCM format (16-bit...

Owners Manual
Page 104
... Playback Functions (PLAY) Rotating an Image (Rotation) Procedure [p] (PLAY) * Snapshot or Movie Screen * [MENU] * PLAY Tab * Rotation 1. When the displayed image is protected. • You can input any date from 1980 to select "Rotation" and then press [SET]. NOTE • The date and time stamped into an image using the Time Stamp (page 144) cannot be rotated. • The original (unrotated) version of an image that this procedure does not actually change the image data. Use...
... Playback Functions (PLAY) Rotating an Image (Rotation) Procedure [p] (PLAY) * Snapshot or Movie Screen * [MENU] * PLAY Tab * Rotation 1. When the displayed image is protected. • You can input any date from 1980 to select "Rotation" and then press [SET]. NOTE • The date and time stamped into an image using the Time Stamp (page 144) cannot be rotated. • The original (unrotated) version of an image that this procedure does not actually change the image data. Use...

Owners Manual
Page 107
... a copied image appears on the full-month calendar screen, it is displayed on the memory card to select the file you recorded with Windows Media Player or QuickTime. Copying Files (Copy) Procedure [p] (PLAY) * Snapshot Screen * [MENU] * PLAY Tab * Copy Files can copy snapshots, movies, audio snapshots, or Voice Recording files you want to copy. 2Use [8] and [2] to a memory card. Copies a single file on the date that it was copied (page 89). 107 Other Playback Functions (PLAY) It cannot be copied from the camera's built...
... a copied image appears on the full-month calendar screen, it is displayed on the memory card to select the file you recorded with Windows Media Player or QuickTime. Copying Files (Copy) Procedure [p] (PLAY) * Snapshot Screen * [MENU] * PLAY Tab * Copy Files can copy snapshots, movies, audio snapshots, or Voice Recording files you want to copy. 2Use [8] and [2] to a memory card. Copies a single file on the date that it was copied (page 89). 107 Other Playback Functions (PLAY) It cannot be copied from the camera's built...

Owners Manual
Page 131
... Photo images to movies and send them to the EXILIM. To perform such functions, you want. 3. Play back Dynamic Photo images on your EXILIM, a computer, or on a mobile phone You can copy moving subjects (animated characters) from the CD-ROM that comes with your computer. 1. You also can perform user registration over the Internet. Viewing User Documentation (PDF Files) 1. On the menu screen, click the "Language" down arrow button...
... Photo images to movies and send them to the EXILIM. To perform such functions, you want. 3. Play back Dynamic Photo images on your EXILIM, a computer, or on a mobile phone You can copy moving subjects (animated characters) from the CD-ROM that comes with your computer. 1. You also can perform user registration over the Internet. Viewing User Documentation (PDF Files) 1. On the menu screen, click the "Language" down arrow button...

Owners Manual
Page 147
... Other Settings (Set Up) You can protect against accidental deletion of the following conditions. - Trigger Time Settings: 1 min, 2 min, 5 min (The trigger time is always 5 minutes in the PLAY mode. • Change this setting to anything besides "Disable" before connecting to a computer or other device - During Voice Recording playback or recording - Configuring Auto Power Settings (Auto Power Off) Procedure [MENU] * Set Up Tab * Auto Power Off Auto Power Off turns off the camera whenever no camera operation is connected to a TV for image viewing.
... Other Settings (Set Up) You can protect against accidental deletion of the following conditions. - Trigger Time Settings: 1 min, 2 min, 5 min (The trigger time is always 5 minutes in the PLAY mode. • Change this setting to anything besides "Disable" before connecting to a computer or other device - During Voice Recording playback or recording - Configuring Auto Power Settings (Auto Power Off) Procedure [MENU] * Set Up Tab * Auto Power Off Auto Power Off turns off the camera whenever no camera operation is connected to a TV for image viewing.

Owners Manual
Page 149
... not need any data currently on the memory card or in built-in the camera, this operation will delete all contents on the card or in built-in memory before starting a formatting operation. The settings below are not reset. Protected images - Protected images • Make sure the camera's battery is sufficiently charged before you format it. • Formatting built-in progress. World Time settings, clock settings, date style, screen language, video output 149 Other Settings (Set Up) Formatting Built-in Memory or a Memory Card (Format) Procedure [MENU] * Set Up Tab * Format...
... not need any data currently on the memory card or in built-in the camera, this operation will delete all contents on the card or in built-in memory before starting a formatting operation. The settings below are not reset. Protected images - Protected images • Make sure the camera's battery is sufficiently charged before you format it. • Formatting built-in progress. World Time settings, clock settings, date style, screen language, video output 149 Other Settings (Set Up) Formatting Built-in Memory or a Memory Card (Format) Procedure [MENU] * Set Up Tab * Format...

Owners Manual
Page 167
...'t go right... Image Recording Image is not recorded when the shutter button is pressed. Remove the battery from the camera and then reload it. 1)If the camera is in the PLAY mode, press [r] (REC) to enter the REC mode. 2)If the flash is too high. Turn power back on . Troubleshooting Problem Power Supply Power does not turn off the camera and wait until the charge operation finishes. 3)If the message "Memory Full" appears, transfer images to use a tripod. 5)You...
...'t go right... Image Recording Image is not recorded when the shutter button is pressed. Remove the battery from the camera and then reload it. 1)If the camera is in the PLAY mode, press [r] (REC) to enter the REC mode. 2)If the flash is too high. Turn power back on . Troubleshooting Problem Power Supply Power does not turn off the camera and wait until the charge operation finishes. 3)If the message "Memory Full" appears, transfer images to use a tripod. 5)You...
Owners Manual
Page 168
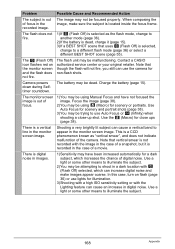
... digital noise in digital noise. Use Auto Focus for close -up shot. Use the ´ (Macro) for scenery and portrait shots (page 38). 3)You may be malfunctioning. This is a CCD phenomenon known as the flash mode, change to use lights for non-flash shots. Problem Possible Cause and Recommended Action The subject is out of the camera. The flash unit may be focused properly. In this case, turn on the monitor screen...
... digital noise in digital noise. Use Auto Focus for close -up shot. Use the ´ (Macro) for scenery and portrait shots (page 38). 3)You may be malfunctioning. This is a CCD phenomenon known as the flash mode, change to use lights for non-flash shots. Problem Possible Cause and Recommended Action The subject is out of the camera. The flash unit may be focused properly. In this case, turn on the monitor screen...

Owners Manual
Page 169
.... Use the following BEST SHOT scenes (page 55) when shooting at night. • Night Scene (for shooting night scenery only) • Night Scene Portrait (for daylight synchro flash (page 36), or adjust EV shift to change . You will need to the + side (page 46). Problem Possible Cause and Recommended Action A recorded image was not saved. 1)Camera power may have removed the memory card from the camera before the save operation...
.... Use the following BEST SHOT scenes (page 55) when shooting at night. • Night Scene (for shooting night scenery only) • Night Scene Portrait (for daylight synchro flash (page 36), or adjust EV shift to change . You will need to the + side (page 46). Problem Possible Cause and Recommended Action A recorded image was not saved. 1)Camera power may have removed the memory card from the camera before the save operation...

Owners Manual
Page 170
... camera 2)With keystone correction and color restoration, editing is not possible if the camera cannot find a shape to edit within the allowable range. Shoot within the frame on the monitor screen when shooting. This camera cannot display non-DCF images recorded onto a memory card using MOTION PRINT • Movies • Snapshots recorded with Auto Shutter, the shutter does not trigger. File Deletion A file cannot be deleted. 1)The file may not be shining directly into the lens. Auto Shutter...
... camera 2)With keystone correction and color restoration, editing is not possible if the camera cannot find a shape to edit within the allowable range. Shoot within the frame on the monitor screen when shooting. This camera cannot display non-DCF images recorded onto a memory card using MOTION PRINT • Movies • Snapshots recorded with Auto Shutter, the shutter does not trigger. File Deletion A file cannot be deleted. 1)The file may not be shining directly into the lens. Auto Shutter...
Owners Manual
Page 171
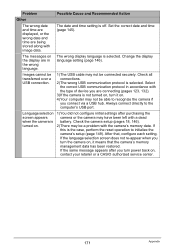
... camera's memory management data has been restored. The messages on . 4)Your computer may have been left with a dead battery. Language selection screen appears when the camera is not turned on, turn power back on , it on the display are being stored along with image data. If this is off. The date and time setting is the case, perform the reset operation to the computer's USB port. Images cannot be transferred over a USB connection. 1)The USB cable...
... camera's memory management data has been restored. The messages on . 4)Your computer may have been left with a dead battery. Language selection screen appears when the camera is not turned on, turn power back on , it on the display are being stored along with image data. If this is off. The date and time setting is the case, perform the reset operation to the computer's USB port. Images cannot be transferred over a USB connection. 1)The USB cable...

Owners Manual
Page 173
... compatible with images you turn power back on , contact a CASIO authorized service center or your retailer or a CASIO authorized service center. If the same message appears after you recorded and/or files saved by editing operations. Image compression could not be inserted into a background image. Folder cannot be malfunctioning. Printing Error Record Error You are attempting to connect the camera to a printer while the camera's USB settings are attempting to record a file while there are being transferred using the Eye-Fi card...
... compatible with images you turn power back on , contact a CASIO authorized service center or your retailer or a CASIO authorized service center. If the same message appears after you recorded and/or files saved by editing operations. Image compression could not be inserted into a background image. Folder cannot be malfunctioning. Printing Error Record Error You are attempting to connect the camera to a printer while the camera's USB settings are attempting to record a file while there are being transferred using the Eye-Fi card...


