
Owners Manual
Page 3
... To charge the battery 33 To replace the battery 38 Power Supply Precautions 39 Turning the Camera On and Off 42 Configuring Power Saving Settings 44 Using the On-screen Menus 45 Configuring Display Language and Clock Settings ... 48 To configure display language and clock settings 49 51 BASIC IMAGE RECORDING Recording an Image 51 Aiming the Camera 51 Recording an Image 52 Using Zoom 58 Optical Zoom 58 Digital Zoom 60 Using the Flash 62 Flash Unit Status 64 Changing the Flash Intensity Setting 65 Using Flash Assist...
... To charge the battery 33 To replace the battery 38 Power Supply Precautions 39 Turning the Camera On and Off 42 Configuring Power Saving Settings 44 Using the On-screen Menus 45 Configuring Display Language and Clock Settings ... 48 To configure display language and clock settings 49 51 BASIC IMAGE RECORDING Recording an Image 51 Aiming the Camera 51 Recording an Image 52 Using Zoom 58 Optical Zoom 58 Digital Zoom 60 Using the Flash 62 Flash Unit Status 64 Changing the Flash Intensity Setting 65 Using Flash Assist...

Owners Manual
Page 4
...Using the Self-timer 67 Specifying Image Size 70 Specifying Image Quality 71 72 OTHER RECORDING FUNCTIONS Selecting the Focus Mode 72 Using Auto Focus 73 Using the Macro Mode 76 Using Pan Focus 77 Using the Infinity Mode 77 Using Manual Focus 78 Using Focus Lock 79 Exposure Compensation (EV Shift 80 Adjusting White Balance 82 Configuring the White Balance Setting Manually 83 Recording Consecutive Images (Continuous Shutter Mode 85 Using the BEST SHOT Mode 86 Displaying Sample Scenes Individually 88 Creating Your Own BEST SHOT Setup 89 To delete a BEST SHOT user...
...Using the Self-timer 67 Specifying Image Size 70 Specifying Image Quality 71 72 OTHER RECORDING FUNCTIONS Selecting the Focus Mode 72 Using Auto Focus 73 Using the Macro Mode 76 Using Pan Focus 77 Using the Infinity Mode 77 Using Manual Focus 78 Using Focus Lock 79 Exposure Compensation (EV Shift 80 Adjusting White Balance 82 Configuring the White Balance Setting Manually 83 Recording Consecutive Images (Continuous Shutter Mode 85 Using the BEST SHOT Mode 86 Displaying Sample Scenes Individually 88 Creating Your Own BEST SHOT Setup 89 To delete a BEST SHOT user...

Owners Manual
Page 6
... World Time settings 153 Changing the Display Language 154 Changing the Brightness of the Monitor Screen ..... 155 Changing the USB Port Protocol 155 Configuring [ ] (REC) and [ ] (PLAY) Power On/Off Functions 156 Formatting Built-in Memory 157 159 USING A MEMORY CARD Using a Memory Card 160 To insert a memory card into the camera 160 To replace the memory card 161 Formatting a Memory Card 162 Copying Files 163 To copy all the files in built-in memory to a memory card 164 To copy a specific file from a memory card to built-in memory 164 166 PRINTING IMAGES...
... World Time settings 153 Changing the Display Language 154 Changing the Brightness of the Monitor Screen ..... 155 Changing the USB Port Protocol 155 Configuring [ ] (REC) and [ ] (PLAY) Power On/Off Functions 156 Formatting Built-in Memory 157 159 USING A MEMORY CARD Using a Memory Card 160 To insert a memory card into the camera 160 To replace the memory card 161 Formatting a Memory Card 162 Copying Files 163 To copy all the files in built-in memory to a memory card 164 To copy a specific file from a memory card to built-in memory 164 166 PRINTING IMAGES...

Owners Manual
Page 7
... 199 Playing a Movie 201 Viewing User Documentation (PDF Files) 202 User Registration 202 Exiting the Menu Application 202 Using the Camera with a Macintosh Computer ....... 203 About the bundled CD-ROM 203 Computer System Requirements 204 Managing Images on a Macintosh 205 Playing a Movie 206 Viewing User Documentation (PDF Files) 206 To register as a camera user 207 208 APPENDIX Menu Reference 208 Indicator Lamp Reference 211 Troubleshooting Guide 214 If you have problems installing the USB driver... 219 Display Messages 220 Specifications...
... 199 Playing a Movie 201 Viewing User Documentation (PDF Files) 202 User Registration 202 Exiting the Menu Application 202 Using the Camera with a Macintosh Computer ....... 203 About the bundled CD-ROM 203 Computer System Requirements 204 Managing Images on a Macintosh 205 Playing a Movie 206 Viewing User Documentation (PDF Files) 206 To register as a camera user 207 208 APPENDIX Menu Reference 208 Indicator Lamp Reference 211 Troubleshooting Guide 214 If you have problems installing the USB driver... 219 Display Messages 220 Specifications...

Owners Manual
Page 8
... malfunction, repairs, or battery replacement. assumes no responsibility for any damages or losses suffered by deletion of data as stipulated above, all important data on other countries. • Other company, product and service names used herein may arise due to the use or malfunction of the EX-Z500. • CASIO COMPUTER CO., LTD. shall not be trademarks or service marks of others. • Photo Loader...
... malfunction, repairs, or battery replacement. assumes no responsibility for any damages or losses suffered by deletion of data as stipulated above, all important data on other countries. • Other company, product and service names used herein may arise due to the use or malfunction of the EX-Z500. • CASIO COMPUTER CO., LTD. shall not be trademarks or service marks of others. • Photo Loader...

Owners Manual
Page 11
...; After Recording (page 134) Use this data and adjusts the printed image accordingly, so your current location. DPOF can also be printed easily in the sequence you turn on the camera's monitor screen. A printer that date, which helps to make searching for Camera File system) data storage protocol provides image compatibility between the digital camera and printers. 11 INTRODUCTION • Calendar screen (page 128) A simple operation displays a full-month calendar on the camera, press the shutter button half...
...; After Recording (page 134) Use this data and adjusts the printed image accordingly, so your current location. DPOF can also be printed easily in the sequence you turn on the camera's monitor screen. A printer that date, which helps to make searching for Camera File system) data storage protocol provides image compatibility between the digital camera and printers. 11 INTRODUCTION • Calendar screen (page 128) A simple operation displays a full-month calendar on the camera, press the shutter button half...

Owners Manual
Page 15
... creates the risk of corruption of data in the following areas. - Removing the battery or memory card, or setting the camera onto the USB cradle while the camera is manufactured using precision digital components. Low battery power - In areas subject to strong vibration 15 Follow the instructions provided by the message to appear on the monitor screen (page 220). Other abnormal operations Any of the above conditions...
... creates the risk of corruption of data in the following areas. - Removing the battery or memory card, or setting the camera onto the USB cradle while the camera is manufactured using precision digital components. Low battery power - In areas subject to strong vibration 15 Follow the instructions provided by the message to appear on the monitor screen (page 220). Other abnormal operations Any of the above conditions...
Owners Manual
Page 23
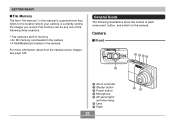
... Guide The following illustrations show the names of the following three locations. • The camera's built-in memory • An SD memory card loaded in the camera • A MultiMediaCard loaded in this manual is a general term that refers to the location where your camera is currently storing the images you record. GETTING READY I Front 2 345 1 1 Zoom controller 2 Shutter button 3 Power button 4 Microphone 5 AF assist light/ self-timer lamp 6 Lens 7 Flash 23 76 File memory...
... Guide The following illustrations show the names of the following three locations. • The camera's built-in memory • An SD memory card loaded in the camera • A MultiMediaCard loaded in this manual is a general term that refers to the location where your camera is currently storing the images you record. GETTING READY I Front 2 345 1 1 Zoom controller 2 Shutter button 3 Power button 4 Microphone 5 AF assist light/ self-timer lamp 6 Lens 7 Flash 23 76 File memory...
Owners Manual
Page 44
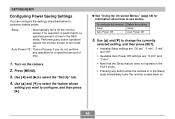
... operate in the PLAY mode. • Pressing any operation for information about how to conserve battery power. Turn on . G See "Using the On-screen Menus" (page 45) for a specified amount of time in the Sleep state immediately turns the monitor screen back on. 44 Press [MENU]. 3. Auto Power Off : Turns off the monitor screen if no operation is in the REC mode. Use [̆] and [̄] to turn back on the camera. 2. Use...
... operate in the PLAY mode. • Pressing any operation for information about how to conserve battery power. Turn on . G See "Using the On-screen Menus" (page 45) for a specified amount of time in the Sleep state immediately turns the monitor screen back on. 44 Press [MENU]. 3. Auto Power Off : Turns off the monitor screen if no operation is in the REC mode. Use [̆] and [̄] to turn back on the camera. 2. Use...
Owners Manual
Page 76
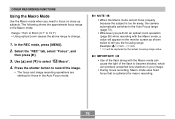
... image. • During movie recording, Macro mode uses fixed focus that is too far away, the camera automatically switches to the Auto Focus range (page 73). • Whenever you the focusing range. Select the "REC" tab, select "Focus", and then press [̈]. 3. IMPORTANT! • Use of the flash along with the Macro mode, a value will be replaced by the actual focusing range value. Use [̆] and [̄] to change. 1. In the REC mode, press [MENU...
... image. • During movie recording, Macro mode uses fixed focus that is too far away, the camera automatically switches to the Auto Focus range (page 73). • Whenever you the focusing range. Select the "REC" tab, select "Focus", and then press [̈]. 3. IMPORTANT! • Use of the flash along with the Macro mode, a value will be replaced by the actual focusing range value. Use [̆] and [̄] to change. 1. In the REC mode, press [MENU...
Owners Manual
Page 108
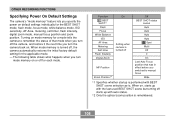
... . Turning on mode memory for a mode tells the camera to remember the status of that was in effect before you switched to manual focus Wide *1 Specifies whether startup is performed with BEST SHOT scene selection as-is turned off starts up with the last used BEST SHOT scene but turning off , the camera automatically restores the initial factory default setting for the BEST SHOT mode, flash mode, focus mode, white balance mode, ISO sensitivity, AF Area, metering, self-timer, flash intensity, digital zoom mode, manual focus...
... . Turning on mode memory for a mode tells the camera to remember the status of that was in effect before you switched to manual focus Wide *1 Specifies whether startup is performed with BEST SHOT scene selection as-is turned off starts up with the last used BEST SHOT scene but turning off , the camera automatically restores the initial factory default setting for the BEST SHOT mode, flash mode, focus mode, white balance mode, ISO sensitivity, AF Area, metering, self-timer, flash intensity, digital zoom mode, manual focus...
Owners Manual
Page 121
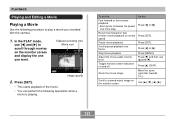
... or fast reverse movie playback to normal speed Pause movie playback Scroll paused playback one frame Stop movie playback Adjust the movie audio volume level Toggle monitor screen indicators on and off Zoom the movie image Scroll a zoomed movie image on the monitor screen and display the one more step. Press [̆] (DISP). Move the zoom controller towards ( ). Press [MENU]. Press [̄] and then use [̇] and [̈] to play a movie you want. Elapsed recording time Movie icon Image quality 2. Press [̇...
... or fast reverse movie playback to normal speed Pause movie playback Scroll paused playback one frame Stop movie playback Adjust the movie audio volume level Toggle monitor screen indicators on and off Zoom the movie image Scroll a zoomed movie image on the monitor screen and display the one more step. Press [̆] (DISP). Move the zoom controller towards ( ). Press [MENU]. Press [̄] and then use [̇] and [̈] to play a movie you want. Elapsed recording time Movie icon Image quality 2. Press [̇...
Owners Manual
Page 135
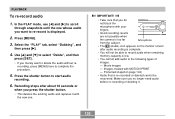
... [SET]. • If you no longer need audio before re-recording or deleting it with the new one whose audio you do not block the microphone with MOTION PRINT - In the PLAY mode, use [̇] and [̈] to the following types of images. - Movie images - Images created with your ON/OFF fingers. • Good recording results are not possible when the camera is displayed. 2. Recording stops...
... [SET]. • If you no longer need audio before re-recording or deleting it with the new one whose audio you do not block the microphone with MOTION PRINT - In the PLAY mode, use [̇] and [̈] to the following types of images. - Movie images - Images created with your ON/OFF fingers. • Good recording results are not possible when the camera is displayed. 2. Recording stops...

Owners Manual
Page 140
... PLAY mode, press [̄] ( ). 2. Especially when deleting all files, make sure you want to delete other files, if you check all files currently in memory are protected (page 144). • Deleting an audio snapshot deletes both the image file and the audio file attached to delete images from the FAVORITE folder. Press [SET] to delete the file. • Repeat steps 2 through files and display the one you want . 5. IMPORTANT! • Note that file deletion cannot be deleted...
... PLAY mode, press [̄] ( ). 2. Especially when deleting all files, make sure you want to delete other files, if you check all files currently in memory are protected (page 144). • Deleting an audio snapshot deletes both the image file and the audio file attached to delete images from the FAVORITE folder. Press [SET] to delete the file. • Repeat steps 2 through files and display the one you want . 5. IMPORTANT! • Note that file deletion cannot be deleted...
Owners Manual
Page 157
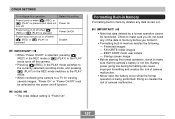
... need any data stored in it . • Formatting built-in memory deletes the following. - Protected images - FAVORITE folder images - Formatting Built-in Memory Formatting built-in memory deletes any of the data in the REC mode switches to the PLAY mode. • When connecting the camera to a TV for the power on or off when [ ] (REC) or [ ] (PLAY) is pressed Select this setting: Power On Power On/Off Disable IMPORTANT! • When "Power On/Off" is being performed. BEST SHOT mode user setups - Battery power...
... need any data stored in it . • Formatting built-in memory deletes the following. - Protected images - FAVORITE folder images - Formatting Built-in Memory Formatting built-in memory deletes any of the data in the REC mode switches to the PLAY mode. • When connecting the camera to a TV for the power on or off when [ ] (REC) or [ ] (PLAY) is pressed Select this setting: Power On Power On/Off Disable IMPORTANT! • When "Power On/Off" is being performed. BEST SHOT mode user setups - Battery power...

Owners Manual
Page 180
.... You do not need to select "Mass Storage (USB DIRECT-PRINT)", and then press [SET]. 11. After you establish a USB connection between the camera and your computer to turn it once, your computer will cause your computer. 180 Use [̆] and [̄] to install the USB driver every time. Select the "Set Up" tab, select "USB", and then press [̈]. 10. Turn off the camera. 12. VIEWING IMAGES ON A COMPUTER...
.... You do not need to select "Mass Storage (USB DIRECT-PRINT)", and then press [SET]. 11. After you establish a USB connection between the camera and your computer to turn it once, your computer will cause your computer. 180 Use [̆] and [̄] to install the USB driver every time. Select the "Set Up" tab, select "USB", and then press [̈]. 10. Turn off the camera. 12. VIEWING IMAGES ON A COMPUTER...
Owners Manual
Page 182
... camera's file memory (Removable Disk), right- On the My Documents [Edit] menu, click [Paste]. • This copies the "Dcim" folder (which may cause large error in your computer before saving a new "Dcim" folder. click the "Dcim" folder. 2. On the shortcut menu that appears, click [Copy]. 3. Doing so can cause problems with the newly saved folder. Always copy images to display images on your "My Documents" folder. IMPORTANT! • Never use your "My Documents" folder. Windows XP 1. VIEWING IMAGES...
... camera's file memory (Removable Disk), right- On the My Documents [Edit] menu, click [Paste]. • This copies the "Dcim" folder (which may cause large error in your computer before saving a new "Dcim" folder. click the "Dcim" folder. 2. On the shortcut menu that appears, click [Copy]. 3. Doing so can cause problems with the newly saved folder. Always copy images to display images on your "My Documents" folder. IMPORTANT! • Never use your "My Documents" folder. Windows XP 1. VIEWING IMAGES...
Owners Manual
Page 193
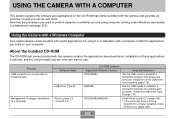
... Camera with a Windows Computer Your digital camera comes bundled with useful applications for image transfer Software Name - About the bundled CD-ROM The CD-ROM that the procedure you want to a computer for using computer running under Windows (see below . Installation of images transferred to a computer Photo Loader 2.3 * DirectX 9.0c CD-ROM Software Supported Windows Versions XP/2000/Me 98SE/98 XP/2000/Me/98SE/98 Required Operation Use...
... Camera with a Windows Computer Your digital camera comes bundled with useful applications for image transfer Software Name - About the bundled CD-ROM The CD-ROM that the procedure you want to a computer for using computer running under Windows (see below . Installation of images transferred to a computer Photo Loader 2.3 * DirectX 9.0c CD-ROM Software Supported Windows Versions XP/2000/Me 98SE/98 XP/2000/Me/98SE/98 Required Operation Use...
Owners Manual
Page 213
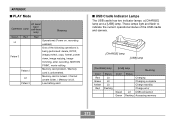
... and a [USB] lamp. Memory card is locked. / Cannot Lit create folder. / Memory is unformatted. Pattern 3 Low battery alert I PLAY Mode Operation Lamp AF assist light / self-timer lamp Meaning Green Red Red Operational (Power on, recording Lit enabled) One of the USB cradle and camera. [CHARGE] lamp [USB] lamp [CHARGE] lamp Color Red Green Amber Red Status Lit Lit Lit Flashing [USB] lamp Meaning Color Status Charging Charging complete Charge standby Charge error Green Lit USB connection Green Flashing Accessing memory 213 These lamps light and flash to indicate the...
... and a [USB] lamp. Memory card is locked. / Cannot Lit create folder. / Memory is unformatted. Pattern 3 Low battery alert I PLAY Mode Operation Lamp AF assist light / self-timer lamp Meaning Green Red Red Operational (Power on, recording Lit enabled) One of the USB cradle and camera. [CHARGE] lamp [USB] lamp [CHARGE] lamp Color Red Green Amber Red Status Lit Lit Lit Flashing [USB] lamp Meaning Color Status Charging Charging complete Charge standby Charge error Green Lit USB connection Green Flashing Accessing memory 213 These lamps light and flash to indicate the...

Owners Manual
Page 218
... is turned off . Other 218 Cannot transfer files over a USB connection. 1) Camera is not set securely on the USB cradle. Action Remove the battery from the camera, reinsert it, and then try again. After confirming that the computer is off . while the camera was connected to another device. Monitor screen is not accessing camera memory, disconnect the USB cable. 1) Check the connection between the camera and USB cradle. 2) Check all connections. 3) Install the USB driver...
... is turned off . Other 218 Cannot transfer files over a USB connection. 1) Camera is not set securely on the USB cradle. Action Remove the battery from the camera, reinsert it, and then try again. After confirming that the computer is off . while the camera was connected to another device. Monitor screen is not accessing camera memory, disconnect the USB cable. 1) Check the connection between the camera and USB cradle. 2) Check all connections. 3) Install the USB driver...


