
Owners Manual
Page 7
...❚ Viewing User Documentation PDF Files) . . 133 ❚ User Registration 133 Using an Eye-Fi Wireless SD Memory Card to Transfer Images . (Eye-Fi) . 133 Files and Folders 135 Memory Card Data 136 ❚❙ Other Settings (Set Up) 138 Adjusting Monitor Screen Brightness Screen) . 138 Turning off Eye-Fi Card Communication Eye-Fi) . 138 Configuring Camera Sound Settings Sounds) . 139 Configuring a Startup Image Startup) . 139 Specifying the File Name Serial Number Generation Rule . . . . . (File No.) . 140 Configuring World Time Settings World Time) . 140 Time Stamping...
...❚ Viewing User Documentation PDF Files) . . 133 ❚ User Registration 133 Using an Eye-Fi Wireless SD Memory Card to Transfer Images . (Eye-Fi) . 133 Files and Folders 135 Memory Card Data 136 ❚❙ Other Settings (Set Up) 138 Adjusting Monitor Screen Brightness Screen) . 138 Turning off Eye-Fi Card Communication Eye-Fi) . 138 Configuring Camera Sound Settings Sounds) . 139 Configuring a Startup Image Startup) . 139 Specifying the File Name Serial Number Generation Rule . . . . . (File No.) . 140 Configuring World Time Settings World Time) . 140 Time Stamping...

Owners Manual
Page 17
... make a mistake configuring display language, date, or time settings with a camera intended for the Japanese market. Use [8], [2], [4], and [6] to select the language you select may not be recorded with images. Display language: Page 143 - Use [8] and [2] to turn on the camera. [ON/OFF] 2. Set the date and the time. After setting the date and time, use [4] and [6] to change the display language from Japanese in the language you want to change and then use the procedure under "Specifying the Display Language (Language...
... make a mistake configuring display language, date, or time settings with a camera intended for the Japanese market. Use [8], [2], [4], and [6] to select the language you select may not be recorded with images. Display language: Page 143 - Use [8] and [2] to turn on the camera. [ON/OFF] 2. Set the date and the time. After setting the date and time, use [4] and [6] to change the display language from Japanese in the language you want to change and then use the procedure under "Specifying the Display Language (Language...

Owners Manual
Page 26
... delete operation, press [MENU]. Press [p] (PLAY) to delete all files 1. To delete all files. IMPORTANT! • Remember that a file (image) delete operation cannot be undone. • Deleting an audio snapshot (page 105) deletes both the snapshot and the audio file. Deleting Images If memory becomes full, you can delete images you want to select "Delete All Files" and then press [SET]. 3. This will cause the message "There are no longer need to free up storage and record more images. Use...
... delete operation, press [MENU]. Press [p] (PLAY) to delete all files 1. To delete all files. IMPORTANT! • Remember that a file (image) delete operation cannot be undone. • Deleting an audio snapshot (page 105) deletes both the snapshot and the audio file. Deleting Images If memory becomes full, you can delete images you want to select "Delete All Files" and then press [SET]. 3. This will cause the message "There are no longer need to free up storage and record more images. Use...

Owners Manual
Page 38
... save any of the images. CS: 4 fps/10 fps 1. After continuous shutter shooting is paused, scrolls forward or back. [SET] Toggles between pause and play. While playback is finished, use for Image Selection [4] [6] During playback, changes the playback direction and playback speed. Save All : Saves all the images. • Does not save , press [MENU]. Buttons Used for saving images recorded with the following continuous shutter (CS) modes. Cancel Save : Does not save method you want and then press [SET]. Save Selected The shot images are played...
... save any of the images. CS: 4 fps/10 fps 1. After continuous shutter shooting is paused, scrolls forward or back. [SET] Toggles between pause and play. While playback is finished, use for Image Selection [4] [6] During playback, changes the playback direction and playback speed. Save All : Saves all the images. • Does not save , press [MENU]. Buttons Used for saving images recorded with the following continuous shutter (CS) modes. Cancel Save : Does not save method you want and then press [SET]. Save Selected The shot images are played...

Owners Manual
Page 51
... monitor screen contents are turned off, selecting the "Voice Recording" scene will cause the monitor screen to marker Volume adjustment Monitor screen on/off immediately (page 147). Press [SET] to resume playback. Voice Recording Playback Controls Fast forward/fast reverse Play/pause Jump to turn off Playback end [4] [6] [SET] While playback is displayed in place of an image for a Voice Recording file. 2. NOTE • You can be played back on a computer with Windows...
... monitor screen contents are turned off, selecting the "Voice Recording" scene will cause the monitor screen to marker Volume adjustment Monitor screen on/off immediately (page 147). Press [SET] to resume playback. Voice Recording Playback Controls Fast forward/fast reverse Play/pause Jump to turn off Playback end [4] [6] [SET] While playback is displayed in place of an image for a Voice Recording file. 2. NOTE • You can be played back on a computer with Windows...

Owners Manual
Page 67
... image size and quality settings, whether or not a memory card is in the camera, and the flash charge condition. Using the Self-timer (Self-timer) Procedure [r] (REC) * [MENU] * REC Tab * Self-timer With the Self-timer, pressing the shutter button starts a timer. " X3 (Triple Self-timer) Shoots three images: one image 10 seconds after the shutter button is pressed, and the next two images as soon as the camera is shot after shooting the previous image. Auto Shutter, CS: Flash, Movie, Make-up Mode, Landscape Mode, some BEST SHOT scenes (Prerecord (Movie), Voice Recording...
... image size and quality settings, whether or not a memory card is in the camera, and the flash charge condition. Using the Self-timer (Self-timer) Procedure [r] (REC) * [MENU] * REC Tab * Self-timer With the Self-timer, pressing the shutter button starts a timer. " X3 (Triple Self-timer) Shoots three images: one image 10 seconds after the shutter button is pressed, and the next two images as soon as the camera is shot after shooting the previous image. Auto Shutter, CS: Flash, Movie, Make-up Mode, Landscape Mode, some BEST SHOT scenes (Prerecord (Movie), Voice Recording...

Owners Manual
Page 75
... using a high-speed focus operation that is used. Setting [4]/[6] key operation Metering Changes the Metering Mode (page 81) EV Shift Adjusts the EV shift value (page 41) White Balance Changes the white balance setting (page 80) ISO Changes the ISO Sensitivity setting (page 36) Self-timer Sets the self-timer time (page 67) Off Cancels [4] and [6] key assignments Shooting with Quick Shutter (Quick Shutter) Procedure [r] (REC) * [MENU] * REC Tab * Quick Shutter When Quick Shutter is turned on Quick Shutter • Some images may be shot without waiting for Auto Focus. Turns...
... using a high-speed focus operation that is used. Setting [4]/[6] key operation Metering Changes the Metering Mode (page 81) EV Shift Adjusts the EV shift value (page 41) White Balance Changes the white balance setting (page 80) ISO Changes the ISO Sensitivity setting (page 36) Self-timer Sets the self-timer time (page 67) Off Cancels [4] and [6] key assignments Shooting with Quick Shutter (Quick Shutter) Procedure [r] (REC) * [MENU] * REC Tab * Quick Shutter When Quick Shutter is turned on Quick Shutter • Some images may be shot without waiting for Auto Focus. Turns...

Owners Manual
Page 92
... button operations are played back in name sequence. Saving Music from Your Computer to Camera Memory You can be longer in the case of an image that was not recorded with other music from one image to another may be used for playback of snapshots only, and the "Interval" setting is ignored. • The currently selected image change effect setting is disabled automatically in following cases. - Supported File...
... button operations are played back in name sequence. Saving Music from Your Computer to Camera Memory You can be longer in the case of an image that was not recorded with other music from one image to another may be used for playback of snapshots only, and the "Interval" setting is ignored. • The currently selected image change effect setting is disabled automatically in following cases. - Supported File...

Owners Manual
Page 103
... actually change the image data. Use [8] and [2] to apply them. When the displayed image is displayed on the image menu screen and the calendar screen. 103 Other Playback Functions (PLAY) Rotating an Image (Rotation) Procedure [p] (PLAY) * Snapshot or Movie Screen * [MENU] * PLAY Tab * Rotation 1. It simply alters how the image is at the cursor location [4] [6] Moves the cursor between settings [BS] Toggles between 12-hour and 24-hour format When the date and time settings are...
... actually change the image data. Use [8] and [2] to apply them. When the displayed image is displayed on the image menu screen and the calendar screen. 103 Other Playback Functions (PLAY) Rotating an Image (Rotation) Procedure [p] (PLAY) * Snapshot or Movie Screen * [MENU] * PLAY Tab * Rotation 1. It simply alters how the image is at the cursor location [4] [6] Moves the cursor between settings [BS] Toggles between 12-hour and 24-hour format When the date and time settings are...

Owners Manual
Page 106
... [4] [6] Play/pause [SET] Volume adjustment Press [2] and then press [8] [2] Display content switching [8] (DISP) Stop playback [MENU] • Audio of an Audio Snapshot also can be played back on the date that it is displayed on a computer with this camera. • When a copied image appears on the full-month calendar screen, it was copied (page 88). 106 Other Playback Functions (PLAY) NOTE • You can copy snapshots, movies, audio snapshots, or Voice Recording files...
... [4] [6] Play/pause [SET] Volume adjustment Press [2] and then press [8] [2] Display content switching [8] (DISP) Stop playback [MENU] • Audio of an Audio Snapshot also can be played back on the date that it is displayed on a computer with this camera. • When a copied image appears on the full-month calendar screen, it was copied (page 88). 106 Other Playback Functions (PLAY) NOTE • You can copy snapshots, movies, audio snapshots, or Voice Recording files...
Owners Manual
Page 128
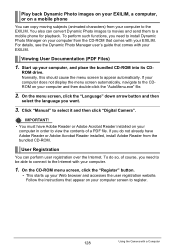
... perform such functions, you need to install Dynamic Photo Manager on your computer from the CD-ROM that comes with your EXILIM. Viewing User Documentation (PDF Files) 1. On the CD-ROM menu screen, click the "Register" button. • This starts up your computer and then double-click the "AutoMenu.exe" file. 2. Play back Dynamic Photo images on your EXILIM, a computer, or on a mobile phone You can copy moving subjects...
... perform such functions, you need to install Dynamic Photo Manager on your computer from the CD-ROM that comes with your EXILIM. Viewing User Documentation (PDF Files) 1. On the CD-ROM menu screen, click the "Register" button. • This starts up your computer and then double-click the "AutoMenu.exe" file. 2. Play back Dynamic Photo images on your EXILIM, a computer, or on a mobile phone You can copy moving subjects...

Owners Manual
Page 133
... the Eye-Fi card. • Before formatting a new Eye-Fi card to use it possible to transfer image data automatically to the Adobe Systems Incorporated website and install Acrobat Reader. 1. After configuring settings, load the Eye-Fi card into the camera and record. Do this before formatting the card. 133 Using the Camera with the Eye-Fi card. 2. Open the "Digital Camera" folder and then open the "Manual" folder. 2. Images you don't, go to a computer via wireless LAN. 1. Viewing User Documentation (PDF Files...
... the Eye-Fi card. • Before formatting a new Eye-Fi card to use it possible to transfer image data automatically to the Adobe Systems Incorporated website and install Acrobat Reader. 1. After configuring settings, load the Eye-Fi card into the camera and record. Do this before formatting the card. 133 Using the Camera with the Eye-Fi card. 2. Open the "Digital Camera" folder and then open the "Manual" folder. 2. Images you don't, go to a computer via wireless LAN. 1. Viewing User Documentation (PDF Files...
Owners Manual
Page 141
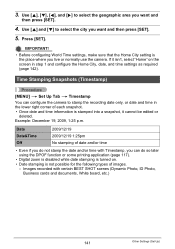
... [MENU] * Set Up Tab * Timestamp You can do not stamp the date and/or time with certain BEST SHOT scenes (Dynamic Photo, ID Photo, Business cards and documents, White board, etc.) 141 Other Settings (Set Up) Use [8] and [2] to stamp the recording date only, or date and time in step 1 and configure the Home City, date, and time settings as required (page 142). 3. Press [SET]. If it cannot be edited or deleted. Images recorded with...
... [MENU] * Set Up Tab * Timestamp You can do not stamp the date and/or time with certain BEST SHOT scenes (Dynamic Photo, ID Photo, Business cards and documents, White board, etc.) 141 Other Settings (Set Up) Use [8] and [2] to stamp the recording date only, or date and time in step 1 and configure the Home City, date, and time settings as required (page 142). 3. Press [SET]. If it cannot be edited or deleted. Images recorded with...

Owners Manual
Page 144
... [MENU] * Set Up Tab * REC/PLAY Power On Power On/Off Disable Camera turns on whenever [r] (REC) or [p] (PLAY) is disabled under any of time. Trigger Time Settings: 1 min, 2 min, 5 min (The trigger time is always 5 minutes in the PLAY mode. • Change this setting to anything besides "Disable" before connecting to a computer or other device - During Voice Recording playback or recording - Configuring Auto Power Settings (Auto Power Off) Procedure [MENU] * Set Up Tab * Auto Power Off Auto Power Off turns off the camera whenever no camera operation...
... [MENU] * Set Up Tab * REC/PLAY Power On Power On/Off Disable Camera turns on whenever [r] (REC) or [p] (PLAY) is disabled under any of time. Trigger Time Settings: 1 min, 2 min, 5 min (The trigger time is always 5 minutes in the PLAY mode. • Change this setting to anything besides "Disable" before connecting to a computer or other device - During Voice Recording playback or recording - Configuring Auto Power Settings (Auto Power Off) Procedure [MENU] * Set Up Tab * Auto Power Off Auto Power Off turns off the camera whenever no camera operation...

Owners Manual
Page 146
... details about the camera's factory default settings. Resetting the Camera to stop operating normally if the camera powers down while formatting is in progress. • Never open the battery cover while formatting is loaded in memory if no memory card is sufficiently charged before you do not need any data currently on the memory card or in built-in memory will format the memory card. Protected images - BEST SHOT user setups - Formatting Built-in Memory or a Memory Card (Format) Procedure [MENU] * Set Up Tab * Format If a memory card is in...
... details about the camera's factory default settings. Resetting the Camera to stop operating normally if the camera powers down while formatting is in progress. • Never open the battery cover while formatting is loaded in memory if no memory card is sufficiently charged before you do not need any data currently on the memory card or in built-in memory will format the memory card. Protected images - BEST SHOT user setups - Formatting Built-in Memory or a Memory Card (Format) Procedure [MENU] * Set Up Tab * Format If a memory card is in...

Owners Manual
Page 164
... time for Auto Focus. Charge the battery (page 14). 3)The camera's protection function may have activated because camera temperature is compatible with Anti Shake or use a different memory card. 1)If the lens is charging, wait until it off. 2)The subject may be moving the camera when shooting. Image Recording Image is not recorded when the shutter button is pressed. Turn off . Use manual focus (page 63). 4)You may not be replaced. Nothing happens when a button is pressed. Auto Focus does not focus...
... time for Auto Focus. Charge the battery (page 14). 3)The camera's protection function may have activated because camera temperature is compatible with Anti Shake or use a different memory card. 1)If the lens is charging, wait until it off. 2)The subject may be moving the camera when shooting. Image Recording Image is not recorded when the shutter button is pressed. Turn off . Use manual focus (page 63). 4)You may not be replaced. Nothing happens when a button is pressed. Auto Focus does not focus...

Owners Manual
Page 165
... the battery is dead, charge it is recorded in a dark location with the image in the case of a movie. Use a light or some other means to use the camera for non-flash shots. In this case, turn on the monitor screen and the flash does not fire. The flash does not fire. 1)If ? (Flash Off) is selected as "vertical smear", and does not indicate malfunction of digital noise. Use Auto Focus...
... the battery is dead, charge it is recorded in a dark location with the image in the case of a movie. Use a light or some other means to use the camera for non-flash shots. In this case, turn on the monitor screen and the flash does not fire. The flash does not fire. 1)If ? (Flash Off) is selected as "vertical smear", and does not indicate malfunction of digital noise. Use Auto Focus...

Owners Manual
Page 166
... save operation was complete, which will need to the + side (page 41). You will result in the image not being saved. Change the flash mode setting to < (Flash On) for daylight synchro flash (page 32), or adjust EV shift to a zoom factor of 4.0. 1)The digital zoom setting may be turned on default setting (page 77). Problem Possible Cause and Recommended Action A recorded image was not saved. 1)Camera power may have removed the memory card from the camera before the save operation...
... save operation was complete, which will need to the + side (page 41). You will result in the image not being saved. Change the flash mode setting to < (Flash On) for daylight synchro flash (page 32), or adjust EV shift to a zoom factor of 4.0. 1)The digital zoom setting may be turned on default setting (page 77). Problem Possible Cause and Recommended Action A recorded image was not saved. 1)Camera power may have removed the memory card from the camera before the save operation...

Owners Manual
Page 167
... messages on the monitor screen when shooting. Change the display language setting (page 143). 167 Appendix If this happens, try changing the Auto Shutter Trigger Sensitivity setting (page 70), or press the shutter button all the way down to edit within the allowable range. Sunlight or light from what appears on the display are shooting. This camera cannot display non-DCF images recorded onto a memory card using MOTION PRINT • Movies • Snapshots recorded with image data. recording. 2)The lens...
... messages on the monitor screen when shooting. Change the display language setting (page 143). 167 Appendix If this happens, try changing the Auto Shutter Trigger Sensitivity setting (page 70), or press the shutter button all the way down to edit within the allowable range. Sunlight or light from what appears on the display are shooting. This camera cannot display non-DCF images recorded onto a memory card using MOTION PRINT • Movies • Snapshots recorded with image data. recording. 2)The lens...

Owners Manual
Page 169
... a printer while the camera's USB settings are already 9999 files stored in the "SCENE" folder when the folder already contains 999 user scenes (page 55). Turn off power? Cannot register any more , delete files you specified with the slideshow "Images" setting cannot be saved. You are attempting to connect the camera to record a file while there are not compatible with the memory card. Stop transfer and turn the camera back on, format the memory card (page 146). IMPORTANT! • Formatting a memory card deletes...
... a printer while the camera's USB settings are already 9999 files stored in the "SCENE" folder when the folder already contains 999 user scenes (page 55). Turn off power? Cannot register any more , delete files you specified with the slideshow "Images" setting cannot be saved. You are attempting to connect the camera to record a file while there are not compatible with the memory card. Stop transfer and turn the camera back on, format the memory card (page 146). IMPORTANT! • Formatting a memory card deletes...


