Owners Manual
Page 2
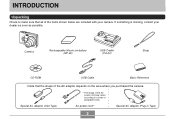
AC power cord * Special AC Adaptor (Plug-in Type) 2 Special AC Adaptor (Inlet Type) * The shape of the AC power cord plug varies according to make sure that the shape of the items shown below are included with your dealer as soon as possible. INTRODUCTION INTRODUCTION Unpacking Check to country or geographic area. If something is missing, contact your camera. Camera Rechargeable lithium ion battery (NP-40) USB Cradle (CA-24) Strap CD-ROM USB Cable Basic Reference • Note that all of the AC adaptor depends on the area where you purchased the camera.
AC power cord * Special AC Adaptor (Plug-in Type) 2 Special AC Adaptor (Inlet Type) * The shape of the AC power cord plug varies according to make sure that the shape of the items shown below are included with your dealer as soon as possible. INTRODUCTION INTRODUCTION Unpacking Check to country or geographic area. If something is missing, contact your camera. Camera Rechargeable lithium ion battery (NP-40) USB Cradle (CA-24) Strap CD-ROM USB Cable Basic Reference • Note that all of the AC adaptor depends on the area where you purchased the camera.
Owners Manual
Page 3
... record an image 17 To view a recorded image 17 To delete an image 18 19 GETTING READY About This Manual 19 General Guide 20 Camera 20 USB Cradle 21 Monitor Screen Contents 22 REC mode 22 PLAY mode 24 Changing the Contents of the Monitor Screen 25 Indicator Lamps 25 Attaching the...
... record an image 17 To view a recorded image 17 To delete an image 18 19 GETTING READY About This Manual 19 General Guide 20 Camera 20 USB Cradle 21 Monitor Screen Contents 22 REC mode 22 PLAY mode 24 Changing the Contents of the Monitor Screen 25 Indicator Lamps 25 Attaching the...

Owners Manual
Page 7
... Files 171 Saving an Album 173 To delete an album 174 Installing the Software from the CD-ROM 174 About the bundled CD-ROM (CASIO Digital Camera Software) 174 Computer System Requirements 176 Installing Software from the CD-ROM in Windows 177 Getting Started 178 Selecting a Language 178 Viewing the ...180 Viewing User Documentation (PDF Files) 181 183 APPENDIX Menu Reference 183 Indicator Lamp Reference 185 REC mode 186 PLAY mode 187 USB Cradle Indicator Lamps 187 Troubleshooting Guide 188 Display Messages 192 Specifications 193 Main Specifications 193 7
... Files 171 Saving an Album 173 To delete an album 174 Installing the Software from the CD-ROM 174 About the bundled CD-ROM (CASIO Digital Camera Software) 174 Computer System Requirements 176 Installing Software from the CD-ROM in Windows 177 Getting Started 178 Selecting a Language 178 Viewing the ...180 Viewing User Documentation (PDF Files) 181 183 APPENDIX Menu Reference 183 Indicator Lamp Reference 185 REC mode 186 PLAY mode 187 USB Cradle Indicator Lamps 187 Troubleshooting Guide 188 Display Messages 192 Specifications 193 Main Specifications 193 7
Owners Manual
Page 9
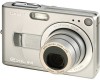
... cards and MMC (MultiMedia Cards) for memory expansion (page 136) • Easy Charging (page 28) Just place the camera onto the USB cradle to charge its USB cradle. • BESTSHOT (page 71) Simply select the sample scene that matches the type of image types. • Pan ... EX-Z40: 4.00 million pixels (4.23 million total pixels) • 2.0-inch TFT color LCD monitor screen • Long battery life The camera's low-power design combines with a largecapacity battery to provide more recording and playback between charges. • 12X seamless zoom (page 51) 3X optical zoom, 4X digital zoom...
... cards and MMC (MultiMedia Cards) for memory expansion (page 136) • Easy Charging (page 28) Just place the camera onto the USB cradle to charge its USB cradle. • BESTSHOT (page 71) Simply select the sample scene that matches the type of image types. • Pan ... EX-Z40: 4.00 million pixels (4.23 million total pixels) • 2.0-inch TFT color LCD monitor screen • Long battery life The camera's low-power design combines with a largecapacity battery to provide more recording and playback between charges. • 12X seamless zoom (page 51) 3X optical zoom, 4X digital zoom...

Owners Manual
Page 13
In areas subject to direct sunlight - Data Error Precautions • Your digital camera is being performed - Disconnecting the USB cable, removing the camera from the USB cradle, or disconnecting the AC adaptor from 0°C to 40°C (32°F to appear on ...dust - Removing the battery or memory card, or setting the camera onto the USB cradle while the camera is designed for proper operation before using precision digital components. Other abnormal operations Operating conditions • This camera is performing a record or memory access operation - Low battery ...
In areas subject to direct sunlight - Data Error Precautions • Your digital camera is being performed - Disconnecting the USB cable, removing the camera from the USB cradle, or disconnecting the AC adaptor from 0°C to 40°C (32°F to appear on ...dust - Removing the battery or memory card, or setting the camera onto the USB cradle while the camera is designed for proper operation before using precision digital components. Other abnormal operations Operating conditions • This camera is performing a record or memory access operation - Low battery ...
Owners Manual
Page 15
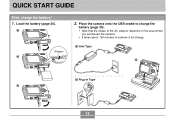
Place the camera onto the USB cradle to charge the battery (page 28). • Note that the shape of the AC adaptor depends on the area where you purchased the camera. • It takes about 190 minutes to achieve a full charge. 1 Inlet Type Stopper 2 2 1 Plug-in Type 3 15 QUICK START GUIDE QUICK START GUIDE First, charge the battery! 1. Load the battery (page 26). 1 2.
Place the camera onto the USB cradle to charge the battery (page 28). • Note that the shape of the AC adaptor depends on the area where you purchased the camera. • It takes about 190 minutes to achieve a full charge. 1 Inlet Type Stopper 2 2 1 Plug-in Type 3 15 QUICK START GUIDE QUICK START GUIDE First, charge the battery! 1. Load the battery (page 26). 1 2.

Owners Manual
Page 21
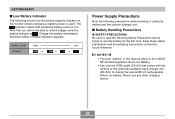
L USB Cradle Simply placing your CASIO digital camera onto the USB cradle lets you perform the following tasks. • Battery charging (page 28) • Automatic transfer of images using the Photo Stand slideshow feature (page 106). I Front 1 23 54 1 Camera connector 2 [USB] lamp 3 [USB] button 4 [CHARGE] lamp 5 [PHOTO] button I Battery compartment cover J Connector K Tripod screw hole * Use...
L USB Cradle Simply placing your CASIO digital camera onto the USB cradle lets you perform the following tasks. • Battery charging (page 28) • Automatic transfer of images using the Photo Stand slideshow feature (page 106). I Front 1 23 54 1 Camera connector 2 [USB] lamp 3 [USB] button 4 [CHARGE] lamp 5 [PHOTO] button I Battery compartment cover J Connector K Tripod screw hole * Use...

Owners Manual
Page 25
... lamp Green operation lamp IMPORTANT! • You cannot turn indicators on and off Indicator Lamps You can find out the operational status of the camera and the USB cradle at a glance by checking the color of the monitor screen as shown below. Red operation lamp [USB] lamp [CHARGE] lamp 25 For details...
... lamp Green operation lamp IMPORTANT! • You cannot turn indicators on and off Indicator Lamps You can find out the operational status of the camera and the USB cradle at a glance by checking the color of the monitor screen as shown below. Red operation lamp [USB] lamp [CHARGE] lamp 25 For details...

Owners Manual
Page 28
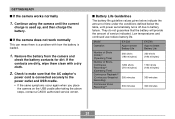
Connect the bundled AC adaptor to the [DC IN 5.3V] connector of the USB cradle, and then plug it in the direction indicated by the arrow. • This will cause the battery to a household power outlet. • Note that the ... the battery. 28 AC power cord Open the battery compartment cover. 2. Stopper To charge the battery 1. Release the stopper and pull the battery from the camera. • Take care so you purchased the camera. [DC IN 5.3V] USB Cradle AC Adaptor 3. GETTING READY To remove the battery 1.
Connect the bundled AC adaptor to the [DC IN 5.3V] connector of the USB cradle, and then plug it in the direction indicated by the arrow. • This will cause the battery to a household power outlet. • Note that the ... the battery. 28 AC power cord Open the battery compartment cover. 2. Stopper To charge the battery 1. Release the stopper and pull the battery from the camera. • Take care so you purchased the camera. [DC IN 5.3V] USB Cradle AC Adaptor 3. GETTING READY To remove the battery 1.

Owners Manual
Page 29
...adaptor is designed for operation with local power outlets when traveling abroad. 2. Turn off the camera. 3. When charging is turned on. • The [CHARGE] lamp on power ranging from the USB cradle. 29 Note, however, that the shape of the power cord plug varies according to country ... READY NOTE • The bundled AC adaptor is designed for operation on the USB cradle should turn green. [CHARGE] lamp 4. Set the camera onto the USB cradle. • Do not place the camera onto the USB cradle while it is complete, the [CHARGE] lamp will turn red, indicating that charging ...
...adaptor is designed for operation with local power outlets when traveling abroad. 2. Turn off the camera. 3. When charging is turned on. • The [CHARGE] lamp on power ranging from the USB cradle. 29 Note, however, that the shape of the power cord plug varies according to country ... READY NOTE • The bundled AC adaptor is designed for operation on the USB cradle should turn green. [CHARGE] lamp 4. Set the camera onto the USB cradle. • Do not place the camera onto the USB cradle while it is complete, the [CHARGE] lamp will turn red, indicating that charging ...
Owners Manual
Page 30
... returns to the allowable charging temperature range. • If the [CHARGE] lamp starts flashing red, it means that the camera connector of the USB cradle is securely inserted into the camera's connector as far as it will start right away if you try to charge immediately after using the Photo Stand feature... only. 30 Never use the USB cradle to charge the camera's battery, to become warm) or when it is too hot or too cold where you are performing the charge operation. An error can...
... returns to the allowable charging temperature range. • If the [CHARGE] lamp starts flashing red, it means that the camera connector of the USB cradle is securely inserted into the camera's connector as far as it will start right away if you try to charge immediately after using the Photo Stand feature... only. 30 Never use the USB cradle to charge the camera's battery, to become warm) or when it is too hot or too cold where you are performing the charge operation. An error can...
Owners Manual
Page 31
...'s power cord is connected securely to the power outlet and USB cradle. • If the same symptoms occur again when you place the camera on the USB cradle after taking the above steps, contact a CASIO authorized service center. Low temperatures and continued use reduce battery life.... Recording) Continuous Voice Recording*4 EX-Z30 Apporoximate Battery Life 360 shots (180 minutes) 1260 shots (210 minutes) 360 minutes 300 minutes EX-Z40 Apporoximate Battery Life 360 shots (180 minutes) 1140 shots (190 minutes) 360 minutes 300 minutes 31 I If the camera does not work normally This ...
...'s power cord is connected securely to the power outlet and USB cradle. • If the same symptoms occur again when you place the camera on the USB cradle after taking the above steps, contact a CASIO authorized service center. Low temperatures and continued use reduce battery life.... Recording) Continuous Voice Recording*4 EX-Z30 Apporoximate Battery Life 360 shots (180 minutes) 1260 shots (210 minutes) 360 minutes 300 minutes EX-Z40 Apporoximate Battery Life 360 shots (180 minutes) 1140 shots (190 minutes) 360 minutes 300 minutes 31 I If the camera does not work normally This ...
Owners Manual
Page 33
... using the battery and the optional charger unit. NOTES • The term "battery" in this manual refers to the CASIO NP-40 Rechargeable Lithium Ion Battery. • Use only the USB cradle (CA-24) that you will not be able to record images while the battery indicator is . Note that comes with... the camera or the optionally available rapid charger unit (BC-30L) to charge the special NP-40 rechargeable lithium ion ...
... using the battery and the optional charger unit. NOTES • The term "battery" in this manual refers to the CASIO NP-40 Rechargeable Lithium Ion Battery. • Use only the USB cradle (CA-24) that you will not be able to record images while the battery indicator is . Note that comes with... the camera or the optionally available rapid charger unit (BC-30L) to charge the special NP-40 rechargeable lithium ion ...
Owners Manual
Page 35
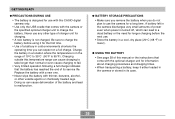
...environments shortens the operating time you do not plan to 95°F). G USING THE BATTERY • See page 28 of this CASIO digital camera only. • Use only the USB cradle that come with thinner, benzene, alcohol, or other type of a battery in the range of its case. 35 Replace the... charged. G BATTERY STORAGE PRECAUTIONS • Make sure you remove the battery when you can lead to charge the battery before the next use the camera for a long time. A battery left in its service life. GETTING READY G PRECAUTIONS DURING USE • The battery is designed for use any...
...environments shortens the operating time you do not plan to 95°F). G USING THE BATTERY • See page 28 of this CASIO digital camera only. • Use only the USB cradle that come with thinner, benzene, alcohol, or other type of a battery in the range of its case. 35 Replace the... charged. G BATTERY STORAGE PRECAUTIONS • Make sure you remove the battery when you can lead to charge the battery before the next use the camera for a long time. A battery left in its service life. GETTING READY G PRECAUTIONS DURING USE • The battery is designed for use any...

Owners Manual
Page 36
... of fire or electric shock. Use only the bundled AC adaptor specified for this camera. • Do not allow the AC adaptor cord to become damaged (exposed internal wiring), request a replacement from a CASIO authorized service center. Water creates the risk of fire and electric shock. •... is normal and does not indicate malfunction. • Unplug the AC power cord from the power outlet whenever you always remove the camera from the USB cradle before connecting or disconnecting the AC adaptor. • Charging, USB data communication, and using it. • Never place a blanket...
... of fire or electric shock. Use only the bundled AC adaptor specified for this camera. • Do not allow the AC adaptor cord to become damaged (exposed internal wiring), request a replacement from a CASIO authorized service center. Water creates the risk of fire and electric shock. •... is normal and does not indicate malfunction. • Unplug the AC power cord from the power outlet whenever you always remove the camera from the USB cradle before connecting or disconnecting the AC adaptor. • Charging, USB data communication, and using it. • Never place a blanket...

Owners Manual
Page 39
... in the Sleep state immediately turns the monitor screen back on whether you want to a computer or some other device through the USB cradle - While playing back a voice recording file Using the On-screen Menus Pressing [MENU] displays menus on the monitor screen that appears depends on . ...] (REC) button. • If you are disabled in the following shows an example menu procedure in the PLAY mode. • Pressing any button while the camera is connected to enter the PLAY mode instead, press the [ ] (PLAY) button. The following cases. - While a slideshow is in the REC mode or the...
... in the Sleep state immediately turns the monitor screen back on whether you want to a computer or some other device through the USB cradle - While playing back a voice recording file Using the On-screen Menus Pressing [MENU] displays menus on the monitor screen that appears depends on . ...] (REC) button. • If you are disabled in the following shows an example menu procedure in the PLAY mode. • Pressing any button while the camera is connected to enter the PLAY mode instead, press the [ ] (PLAY) button. The following cases. - While a slideshow is in the REC mode or the...

Owners Manual
Page 42
...causes incorrect time information to be registered. GETTING READY Configuring Display Language and Clock Settings Be sure to configure the following settings before using the camera to record images. • Display language • Home city • Date Style • Date and time Note that the current date... and time settings are used by the USB cradle. Be sure to generate the date and time that are cleared. IMPORTANT! • The camera's clock settings are cleared whenever power is not being charged for about two days. • Recording...
...causes incorrect time information to be registered. GETTING READY Configuring Display Language and Clock Settings Be sure to configure the following settings before using the camera to record images. • Display language • Home city • Date Style • Date and time Note that the current date... and time settings are used by the USB cradle. Be sure to generate the date and time that are cleared. IMPORTANT! • The camera's clock settings are cleared whenever power is not being charged for about two days. • Recording...
Owners Manual
Page 48
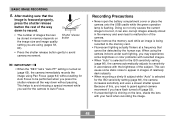
... recording the image. 48 Recording Precautions • Never open the battery compartment cover or place the camera onto the USB cradle while the green operation lamp is selected for the ISO sensitivity setting (page 86), the camera increases sensitivity and uses a slower shutter speed. Because of the subject. Shutter release button • Press...
... recording the image. 48 Recording Precautions • Never open the battery compartment cover or place the camera onto the USB cradle while the green operation lamp is selected for the ISO sensitivity setting (page 86), the camera increases sensitivity and uses a slower shutter speed. Because of the subject. Shutter release button • Press...
Owners Manual
Page 104
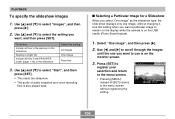
... [̇] and [̈] to the menu screen. • Pressing [MENU] instead of audio snapshot and voice recording files is on the USB cradle (Photo Stand feature). 1. PLAYBACK To specify the slideshow images 1. To do this: Include all files in file memory in the slideshow Display a single...want , and then press [SET]. Use this setting: All images One Image Favorites 3. Use [̆] and [̄] to remain on the display while the camera is on the monitor screen. 3. Select "One image", and then press [̈]. 2. I Selecting a Particular Image for a Slideshow When you select "One ...
... [̇] and [̈] to the menu screen. • Pressing [MENU] instead of audio snapshot and voice recording files is on the USB cradle (Photo Stand feature). 1. PLAYBACK To specify the slideshow images 1. To do this: Include all files in file memory in the slideshow Display a single...want , and then press [SET]. Use this setting: All images One Image Favorites 3. Use [̆] and [̄] to remain on the display while the camera is on the monitor screen. 3. Select "One image", and then press [̈]. 2. I Selecting a Particular Image for a Slideshow When you select "One ...

Owners Manual
Page 106
... [SET]. • While audio is playing, you specify what should appear on the camera's monitor screen while the camera is on . 2. To stop the slideshow. 1. Set the camera onto the USB cradle. • Do not place the camera onto the USB cradle while it is in accordance with the images or image you can play a Photo...
... [SET]. • While audio is playing, you specify what should appear on the camera's monitor screen while the camera is on . 2. To stop the slideshow. 1. Set the camera onto the USB cradle. • Do not place the camera onto the USB cradle while it is in accordance with the images or image you can play a Photo...

