
Owners Manual
Page 4
... Image 45 Aiming the Camera 45 Recording an Image 46 Recording Precautions 48 About Auto Focus 49 About the REC Mode Monitor Screen 49 Using the Optical Viewfinder 50 Using Zoom 51 Optical Zoom 51 Digital Zoom 52 Using the Flash 53 Flash Unit Status 55 Flash Precautions 55 Using the ...Using the Movie Mode 79 Recording Audio 81 Adding Audio to a Snapshot 81 Recording Your Voice 83 Using the Histogram 84 REC Mode Camera Settings 86 Specifying ISO Sensitivity 86 Turning the On-screen Grid On and Off 88 Turning Image Review On and Off 88 Assigning ...
... Image 45 Aiming the Camera 45 Recording an Image 46 Recording Precautions 48 About Auto Focus 49 About the REC Mode Monitor Screen 49 Using the Optical Viewfinder 50 Using Zoom 51 Optical Zoom 51 Digital Zoom 52 Using the Flash 53 Flash Unit Status 55 Flash Precautions 55 Using the ...Using the Movie Mode 79 Recording Audio 81 Adding Audio to a Snapshot 81 Recording Your Voice 83 Using the Histogram 84 REC Mode Camera Settings 86 Specifying ISO Sensitivity 86 Turning the On-screen Grid On and Off 88 Turning Image Review On and Off 88 Assigning ...
Owners Manual
Page 9
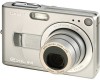
...resolution CCD for beautiful prints EX-Z30: 3.20 million pixels (3.34 million total pixels) EX-Z40: 4.00 million pixels (4.23 million total pixels) • 2.0-inch TFT color LCD monitor screen • Long battery life The camera's low-power design combines ...with a largecapacity battery to provide more recording and playback between charges. • 12X seamless zoom (page 51) 3X optical zoom, 4X digital zoom • 9.7MB Flash...
...resolution CCD for beautiful prints EX-Z30: 3.20 million pixels (3.34 million total pixels) EX-Z40: 4.00 million pixels (4.23 million total pixels) • 2.0-inch TFT color LCD monitor screen • Long battery life The camera's low-power design combines ...with a largecapacity battery to provide more recording and playback between charges. • 12X seamless zoom (page 51) 3X optical zoom, 4X digital zoom • 9.7MB Flash...
Owners Manual
Page 11
...8226; Keep the small parts and accessories of this camera" and "the camera" refer to the CASIO EX-Z30/EX-Z40 Digital Camera. • Never try to a CASIO authorized service center. • Never look at the sun or any other camera setup information). It also comes with Photohands, and application... physician immediately. • Never fire the flash in display while operating a motor vehicle or while walking. Precautions General Precautions Be sure to your camera to observe the following important precautions whenever using the camera monitor screen and controls. • Bundled with...
...8226; Keep the small parts and accessories of this camera" and "the camera" refer to the CASIO EX-Z30/EX-Z40 Digital Camera. • Never try to a CASIO authorized service center. • Never look at the sun or any other camera setup information). It also comes with Photohands, and application... physician immediately. • Never fire the flash in display while operating a motor vehicle or while walking. Precautions General Precautions Be sure to your camera to observe the following important precautions whenever using the camera monitor screen and controls. • Bundled with...
Owners Manual
Page 12
...young children. When using the flash, the camera should ever become cracked due to dropping it or otherwise subjecting it to rough treatment, immediately turn it is too close to your dealer or nearest CASIO authorized service center. Using the camera under these conditions creates the...strange odor coming from the power outlet, and contact your nearest CASIO authorized service center for repair. Using the camera under these conditions creates the danger of the subject. • Keep the camera away from the flash can also corrupt other image data already stored in its use...
...young children. When using the flash, the camera should ever become cracked due to dropping it or otherwise subjecting it to rough treatment, immediately turn it is too close to your dealer or nearest CASIO authorized service center. Using the camera under these conditions creates the...strange odor coming from the power outlet, and contact your nearest CASIO authorized service center for repair. Using the camera under these conditions creates the danger of the subject. • Keep the camera away from the flash can also corrupt other image data already stored in its use...

Owners Manual
Page 13
... subject to ensure that the camera is designed for proper operation before using the camera! Inside of a closed vehicle, especially one parked in file memory. - Before using precision digital components. Removing the battery, removing the memory card, or placing the camera onto the USB cradle while ... the instructions provided by the message to direct sunlight - Removing the battery or memory card, or setting the camera onto the USB cradle while the camera is still flashing after you first record a number of test images and check the results to high humidity or dust - Low...
... subject to ensure that the camera is designed for proper operation before using the camera! Inside of a closed vehicle, especially one parked in file memory. - Before using precision digital components. Removing the battery, removing the memory card, or placing the camera onto the USB cradle while ... the instructions provided by the message to direct sunlight - Removing the battery or memory card, or setting the camera onto the USB cradle while the camera is still flashing after you first record a number of test images and check the results to high humidity or dust - Low...
Owners Manual
Page 19
I Terminology The following three locations. • The camera's built-in Flash memory • An SD memory card loaded in the camera • A MultiMediaCard loaded in the camera For more information about how the camera stores images, see page 114. 19 File memory can be any one of brackets ([ ]).... This term as used in this manual: "this camera" or "the camera" "file memory" "battery" "optional charger unit" Means this: The CASIO EX-Z30/EX-Z40 Digital Camera The location where the camera is currently storing images you need to know about and do before trying to ...
I Terminology The following three locations. • The camera's built-in Flash memory • An SD memory card loaded in the camera • A MultiMediaCard loaded in the camera For more information about how the camera stores images, see page 114. 19 File memory can be any one of brackets ([ ]).... This term as used in this manual: "this camera" or "the camera" "file memory" "battery" "optional charger unit" Means this: The CASIO EX-Z30/EX-Z40 Digital Camera The location where the camera is currently storing images you need to know about and do before trying to ...

Owners Manual
Page 20
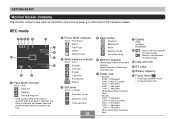
Camera I Front I Back 12 3 4 5 6 1 Shutter release button 2 Power button 3 Flash 4 Microphone 5 Self-timer lamp 6 Lens 7 8 90AB H G FE D C 7 Viewfinder 8 Operation lamp 9 [ ] (PLAY mode) 0 [ ] (REC mode) A [MENU] button B Zoom button C Strap ring D [SET] button E F [DISP] button G Monitor Screen H Speaker 20 GETTING READY General Guide The following illustrations show the names of each component, button, and switch on the camera.
Camera I Front I Back 12 3 4 5 6 1 Shutter release button 2 Power button 3 Flash 4 Microphone 5 Self-timer lamp 6 Lens 7 8 90AB H G FE D C 7 Viewfinder 8 Operation lamp 9 [ ] (PLAY mode) 0 [ ] (REC mode) A [MENU] button B Zoom button C Strap ring D [SET] button E F [DISP] button G Monitor Screen H Speaker 20 GETTING READY General Guide The following illustrations show the names of each component, button, and switch on the camera.
Owners Manual
Page 22
...2048 ҂ 1360 (3:2) pixels 1600 ҂ 1200 pixels 1280 ҂ 960 pixels 640 ҂ 480 pixels Movie Recording: recording time • EX-Z40 2304 ҂ 1728 pixels 2304 ҂ 1536 (3:2) pixels 1600 ҂ 1200 pixels 1280 ҂ 960 pixels 640 ҂ 480 pixels Movie ...; Focusing failed: Red REC mode 1234 5 C 6 7 8 9 0 BA 1 Flash Mode indicator None Auto Flash Off Flash On Red-eye reduction • If the camera detects that flash is required while auto flash is selected, the flash on indicator will appear when the shutter release button is pressed half way. 2 Focus Mode...
...2048 ҂ 1360 (3:2) pixels 1600 ҂ 1200 pixels 1280 ҂ 960 pixels 640 ҂ 480 pixels Movie Recording: recording time • EX-Z40 2304 ҂ 1728 pixels 2304 ҂ 1536 (3:2) pixels 1600 ҂ 1200 pixels 1280 ҂ 960 pixels 640 ҂ 480 pixels Movie ...; Focusing failed: Red REC mode 1234 5 C 6 7 8 9 0 BA 1 Flash Mode indicator None Auto Flash Off Flash On Red-eye reduction • If the camera detects that flash is required while auto flash is selected, the flash on indicator will appear when the shutter release button is pressed half way. 2 Focus Mode...

Owners Manual
Page 25
...monitor screen as shown below. GETTING READY Changing the Contents of the Monitor Screen Each press of the [DISP] button changes the contents of the camera and the USB cradle at a glance by for or performing audio recording. • In the Voice Recording mode, you can only turn off the...the monitor screen while a movie is being recorded, or while standing by checking the color of the indicator lamps, and whether a lamp is lit or flashing. Self-timer lamp Green operation lamp IMPORTANT! • You cannot turn indicators on and off. Red operation lamp [USB] lamp [CHARGE] lamp 25 ...
...monitor screen as shown below. GETTING READY Changing the Contents of the Monitor Screen Each press of the [DISP] button changes the contents of the camera and the USB cradle at a glance by for or performing audio recording. • In the Voice Recording mode, you can only turn off the...the monitor screen while a movie is being recorded, or while standing by checking the color of the indicator lamps, and whether a lamp is lit or flashing. Self-timer lamp Green operation lamp IMPORTANT! • You cannot turn indicators on and off. Red operation lamp [USB] lamp [CHARGE] lamp 25 ...
Owners Manual
Page 30
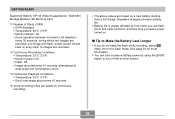
...if you try to charge immediately after using the Photo Stand feature only. 30 Never use the USB cradle to charge the camera's battery, to exchange data with the camera or the optionally available rapid charger unit (BC-30L) to become warm) or when it works normally. • You ...a full charge. GETTING READY IMPORTANT! • It takes about 190 minutes to the allowable charging temperature range. • If the [CHARGE] lamp starts flashing red, it is too hot or too cold where you are performing the charge operation. Never use optionally available AD-C40, AD-C620 and AD...
...if you try to charge immediately after using the Photo Stand feature only. 30 Never use the USB cradle to charge the camera's battery, to exchange data with the camera or the optionally available rapid charger unit (BC-30L) to become warm) or when it works normally. • You ...a full charge. GETTING READY IMPORTANT! • It takes about 190 minutes to the allowable charging temperature range. • If the [CHARGE] lamp starts flashing red, it is too hot or too cold where you are performing the charge operation. Never use optionally available AD-C40, AD-C620 and AD...
Owners Manual
Page 32
...every time 10 images are recorded. *2 Continuous Recording Conditions • Temperature: 23°C (73°F) • Monitor screen: On • Flash: Off • Image recorded every 10 seconds, alternating full wide-angle and full telephoto zoom *3 Continuous Playback Conditions • Temperature: 23°...image about every 10 seconds *4 Voice recording times are based on continuous recording. • The above values are recorded, one image with flash; Repeated charging shortens battery life. • Battery life is greatly affected by using the [DISP] button to turn off ) for ...
...every time 10 images are recorded. *2 Continuous Recording Conditions • Temperature: 23°C (73°F) • Monitor screen: On • Flash: Off • Image recorded every 10 seconds, alternating full wide-angle and full telephoto zoom *3 Continuous Playback Conditions • Temperature: 23°...image about every 10 seconds *4 Voice recording times are based on continuous recording. • The above values are recorded, one image with flash; Repeated charging shortens battery life. • Battery life is greatly affected by using the [DISP] button to turn off ) for ...

Owners Manual
Page 45
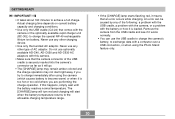
...8226; Horizontal • Vertical Hold the camera still in both hands, with both hands to hold the camera still when shooting an image. Holding the camera with one hand increases the chance of movement, which slows down the shutter speed. 45 Flash Microphone Lens NOTE • Your image will...button. Press the shutter release button carefully, taking care that the flash is low, which can blur your fingers or the strap does not block the flash, microphone or lens. Recording an Image Aiming the Camera Use both hands. BASIC IMAGE RECORDING BASIC IMAGE RECORDING This section ...
...8226; Horizontal • Vertical Hold the camera still in both hands, with both hands to hold the camera still when shooting an image. Holding the camera with one hand increases the chance of movement, which slows down the shutter speed. 45 Flash Microphone Lens NOTE • Your image will...button. Press the shutter release button carefully, taking care that the flash is low, which can blur your fingers or the strap does not block the flash, microphone or lens. Recording an Image Aiming the Camera Use both hands. BASIC IMAGE RECORDING BASIC IMAGE RECORDING This section ...

Owners Manual
Page 47
... screen so the main subject is focused by observing the focus frame and the green operation lamp. Flash Lens 47 Snapshot Mode icon 10 1600 1200 NORMAL IN • The focusing range of the camera in focus. Shutter release button • You can use the [DISP] button to compose images, ...you see this: Green focus frame Green operation lamp Red focus frame Flashing green operation lamp It means this: The image is in the...
... screen so the main subject is focused by observing the focus frame and the green operation lamp. Flash Lens 47 Snapshot Mode icon 10 1600 1200 NORMAL IN • The focusing range of the camera in focus. Shutter release button • You can use the [DISP] button to compose images, ...you see this: Green focus frame Green operation lamp Red focus frame Flashing green operation lamp It means this: The image is in the...
Owners Manual
Page 48
... press the shutter release all the way down to guard against camera movement if you are using the camera indoors under such lighting, you need to record. • The number of the camera. • Never remove the memory card while an image is flashing. After making sure that can cause some static noise to...
... press the shutter release all the way down to guard against camera movement if you are using the camera indoors under such lighting, you need to record. • The number of the camera. • Never remove the memory card while an image is flashing. After making sure that can cause some static noise to...

Owners Manual
Page 53
Using the Flash Perform the following steps to select the flash mode you want to select the flash mode. • Each press of the recorded image. In the REC mode, press [MENU]. 2. Press [̄] ( ) to use. 1. BASIC IMAGE RECORDING IMPORTANT! • Digital zoom is disabled whenever the monitor screen is turned off (page 25). • Using digital zoom can cause degradation of [̄] ( ) cycles through the flash mode settings shown below on the monitor screen. [ ̄] ( ) Flash mode indicator 53
Using the Flash Perform the following steps to select the flash mode you want to select the flash mode. • Each press of the recorded image. In the REC mode, press [MENU]. 2. Press [̄] ( ) to use. 1. BASIC IMAGE RECORDING IMPORTANT! • Digital zoom is disabled whenever the monitor screen is turned off (page 25). • Using digital zoom can cause degradation of [̄] ( ) cycles through the flash mode settings shown below on the monitor screen. [ ̄] ( ) Flash mode indicator 53

Owners Manual
Page 54
... operations, one for the Auto Focus operation. IMPORTANT! • The flash unit of this case, the flash fires automatically when required 3. The initial flashes are looking directly at the camera while the pre-flash operation is followed by image recording with flash, reducing the chance of any people in the image to close, and... one designed to cause the irises in the eyes of red-eye in the image are pre-flashes, which the camera uses to record at night or in a dimly lit room can cause red spots inside the eyes of the eye. Make sure that...
... operations, one for the Auto Focus operation. IMPORTANT! • The flash unit of this case, the flash fires automatically when required 3. The initial flashes are looking directly at the camera while the pre-flash operation is followed by image recording with flash, reducing the chance of any people in the image to close, and... one designed to cause the irises in the eyes of red-eye in the image are pre-flashes, which the camera uses to record at night or in a dimly lit room can cause red spots inside the eyes of the eye. Make sure that...

Owners Manual
Page 55
Low battery power is adjusted automatically in accordance with your fingers do not block the flash when you hold the camera. When these symptoms occur, charge the camera's battery as soon as 10 seconds to charge when battery power is brightly lit. 55 Red operation lamp* * Red operation ...lamp When the red operation lamp is this: Flashing Lit It means this: Flash unit is charging Flash unit is ready to fire &#...
Low battery power is adjusted automatically in accordance with your fingers do not block the flash when you hold the camera. When these symptoms occur, charge the camera's battery as soon as 10 seconds to charge when battery power is brightly lit. 55 Red operation lamp* * Red operation ...lamp When the red operation lamp is this: Flashing Lit It means this: Flash unit is charging Flash unit is ready to fire &#...

Owners Manual
Page 56
... of the shutter release after you press the shutter release button. Use [̆] and [̄] to select the "REC" tab. 3. BASIC IMAGE RECORDING • Using flash in combination with another light source (daylight, fluorescent light, etc.) can result in step 4 disables the self-timer. 56 In the REC mode, press [MENU]. 2.
... of the shutter release after you press the shutter release button. Use [̆] and [̄] to select the "REC" tab. 3. BASIC IMAGE RECORDING • Using flash in combination with another light source (daylight, fluorescent light, etc.) can result in step 4 disables the self-timer. 56 In the REC mode, press [MENU]. 2.

Owners Manual
Page 57
...Triple Self-timer Disable the self-timer Select this setting: 10 sec 2 sec X3 Off • With the Triple Self-timer, the camera records a series of its countdown. • You can interrupt an ongoing self-timer countdown by pressing the shutter release button while the ...selftimer lamp is flashing. Self-timer lamp NOTE • The "2 sec" self-timer setting is recorded one second later. 4. The camera prepares to avoid blurring of memory (built-in the sequence described below. 1. After preparation...
...Triple Self-timer Disable the self-timer Select this setting: 10 sec 2 sec X3 Off • With the Triple Self-timer, the camera records a series of its countdown. • You can interrupt an ongoing self-timer countdown by pressing the shutter release button while the ...selftimer lamp is flashing. Self-timer lamp NOTE • The "2 sec" self-timer setting is recorded one second later. 4. The camera prepares to avoid blurring of memory (built-in the sequence described below. 1. After preparation...

Owners Manual
Page 62
...shutter release button down in focus. 3. The automatic focus operation starts when you see this: Green focus frame Green operation lamp Red focus frame Flashing green operation lamp It means this: The image is focused. Compose the image so the main subject is within the focus frame, and then .... • You can tell whether the image is not in the Auto Focus mode without pausing, the camera immediately records the image using Pan Focus (page 64) without waiting for the camera to avoid missing a special moment while you press the shutter release button all the way down half way....
...shutter release button down in focus. 3. The automatic focus operation starts when you see this: Green focus frame Green operation lamp Red focus frame Flashing green operation lamp It means this: The image is focused. Compose the image so the main subject is within the focus frame, and then .... • You can tell whether the image is not in the Auto Focus mode without pausing, the camera immediately records the image using Pan Focus (page 64) without waiting for the camera to avoid missing a special moment while you press the shutter release button all the way down half way....

