
Owners Manual
Page 1
E Digital Camera User's Guide Thank you for purchasing this CASIO product. • Before using it, be sure to read the precautions contained in this User's Guide. • Keep the User's Guide in a safe place for future reference. • For the most up-to-date information about this product, visit the official EXILIM Website at http://www.exilim.com/ To go to "Getting the Most Out of Dynamic Photo" click here! 1
E Digital Camera User's Guide Thank you for purchasing this CASIO product. • Before using it, be sure to read the precautions contained in this User's Guide. • Keep the User's Guide in a safe place for future reference. • For the most up-to-date information about this product, visit the official EXILIM Website at http://www.exilim.com/ To go to "Getting the Most Out of Dynamic Photo" click here! 1

Owners Manual
Page 2
If anything is missing, contact your camera, check to make sure that all items shown below are included. Power cord To attach the strap to country or geographic area. Strap USB cable AV cable CD-ROM Basic Reference 2 Unpacking As you unpack your original retailer. Digital camera Rechargeable lithium ion battery (NP-60) Charger unit (BC-60L) * The shape of the power cord plug varies according to the camera Attach strap here.
If anything is missing, contact your camera, check to make sure that all items shown below are included. Power cord To attach the strap to country or geographic area. Strap USB cable AV cable CD-ROM Basic Reference 2 Unpacking As you unpack your original retailer. Digital camera Rechargeable lithium ion battery (NP-60) Charger unit (BC-60L) * The shape of the power cord plug varies according to the camera Attach strap here.
Owners Manual
Page 3
...shooting your own personal use, any other use of the contents of this manual without notice. • The contents of this product. • CASIO COMPUTER CO., LTD. This means that some very small number of this manual have been checked at all times. is recording correctly. 3 shall ...contact us if you or any third party due to malfunction, repair, or any other reason. • Note that the camera is forbidden under copyright laws. • CASIO COMPUTER CO., LTD. Feel free to ensure that the example screens and product illustrations shown in this User's Guide, either in...
...shooting your own personal use, any other use of the contents of this manual without notice. • The contents of this product. • CASIO COMPUTER CO., LTD. This means that some very small number of this manual have been checked at all times. is recording correctly. 3 shall ...contact us if you or any third party due to malfunction, repair, or any other reason. • Note that the camera is forbidden under copyright laws. • CASIO COMPUTER CO., LTD. Feel free to ensure that the example screens and product illustrations shown in this User's Guide, either in...

Owners Manual
Page 4
Contents Unpacking 2 Read this first 3 General Guide 9 Monitor Screen Contents 10 ❚❙ Quick Start Basics 13 What is a digital camera 13 What you can do with your CASIO camera 14 First, charge the battery prior to use 15 ❚ To charge the battery 15 ❚ To load the battery 16 ...Configuring Basic Settings the First Time You Turn On the Camera 18 Preparing a Memory Card 19 ❚ Supported Memory Cards 19 ...
Contents Unpacking 2 Read this first 3 General Guide 9 Monitor Screen Contents 10 ❚❙ Quick Start Basics 13 What is a digital camera 13 What you can do with your CASIO camera 14 First, charge the battery prior to use 15 ❚ To charge the battery 15 ❚ To load the battery 16 ...Configuring Basic Settings the First Time You Turn On the Camera 18 Preparing a Memory Card 19 ❚ Supported Memory Cards 19 ...

Owners Manual
Page 6
... and Movies on a TV Screen 91 ❚❙ Other Playback Functions (PLAY) 93 Playing a Slideshow on the Camera Slideshow) . . 93 ❚ Saving Music from Your Computer to Camera Memory 94 Laying Out Snapshots with Layout Print Layout Print) . . 96 Creating a Snapshot of Movie Frames MOTION PRINT...) . . 97 Editing a Movie on the Camera Movie Editing) . . 98 Optimizing Image Brightness Lighting) . 100 Using Red Eye Correction Red Eye) . 100 Adjusting White Balance White Balance) ...
... and Movies on a TV Screen 91 ❚❙ Other Playback Functions (PLAY) 93 Playing a Slideshow on the Camera Slideshow) . . 93 ❚ Saving Music from Your Computer to Camera Memory 94 Laying Out Snapshots with Layout Print Layout Print) . . 96 Creating a Snapshot of Movie Frames MOTION PRINT...) . . 97 Editing a Movie on the Camera Movie Editing) . . 98 Optimizing Image Brightness Lighting) . 100 Using Red Eye Correction Red Eye) . 100 Adjusting White Balance White Balance) ...
Owners Manual
Page 7
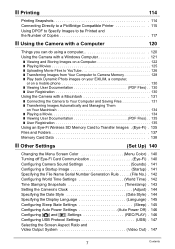
...❚ Playing Movies 125 ❚ Uploading Movie Files to YouTube 126 ❚ Transferring Images from Your Computer to Camera Memory 128 ❚ Play back Dynamic Photo images on your EXILIM, a computer, or on a mobile phone 130 ❚ Viewing User Documentation PDF Files) . . 130 ❚...; User Registration 130 Using the Camera with a Macintosh 131 ❚ Connecting the Camera to Your Computer and Saving Files 131 ❚...
...❚ Playing Movies 125 ❚ Uploading Movie Files to YouTube 126 ❚ Transferring Images from Your Computer to Camera Memory 128 ❚ Play back Dynamic Photo images on your EXILIM, a computer, or on a mobile phone 130 ❚ Viewing User Documentation PDF Files) . . 130 ❚...; User Registration 130 Using the Camera with a Macintosh 131 ❚ Connecting the Camera to Your Computer and Saving Files 131 ❚...

Owners Manual
Page 8
Formatting Built-in Memory or a Memory Card Format) . 148 Resetting the Camera to Factory Defaults Reset) . 148 ❚❙ Configuring Monitor Screen Settings 149 Using the On-screen Histogram to Check Exposure 149 ❚ How to Use ...; Appendix 151 Precautions during Use 151 Power Supply 158 ❚ Charging 158 ❚ To replace the battery 159 ❚ Battery Precautions 159 ❚ Using the Camera in another Country 160 Using a Memory Card 160 ❚ To replace the memory card 160 Computer System Requirements for Bundled Software Bundled CD-ROM) . 162...
Formatting Built-in Memory or a Memory Card Format) . 148 Resetting the Camera to Factory Defaults Reset) . 148 ❚❙ Configuring Monitor Screen Settings 149 Using the On-screen Histogram to Check Exposure 149 ❚ How to Use ...; Appendix 151 Precautions during Use 151 Power Supply 158 ❚ Charging 158 ❚ To replace the battery 159 ❚ Battery Precautions 159 ❚ Using the Camera in another Country 160 Using a Memory Card 160 ❚ To replace the memory card 160 Computer System Requirements for Bundled Software Bundled CD-ROM) . 162...

Owners Manual
Page 9
Camera Front 12 3 4 5 6 Back 7 8 9 bk bl [ ] bm [ ] [ ] [ ] [SET] btbsbrbq bp bo bn 1Shutter button (page 22) 8Zoom controller 2[ON/OFF] (Power) (pages 22, 45, 89, 90) (...
Camera Front 12 3 4 5 6 Back 7 8 9 bk bl [ ] bm [ ] [ ] [ ] [SET] btbsbrbq bp bo bn 1Shutter button (page 22) 8Zoom controller 2[ON/OFF] (Power) (pages 22, 45, 89, 90) (...
Owners Manual
Page 10
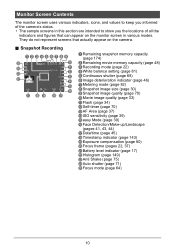
... Screen Contents The monitor screen uses various indicators, icons, and values to keep you informed of the camera's status. • The sample screens in this section are intended to show you the locations of all the indicators and figures that actually appear on ...
... Screen Contents The monitor screen uses various indicators, icons, and values to keep you informed of the camera's status. • The sample screens in this section are intended to show you the locations of all the indicators and figures that actually appear on ...
Owners Manual
Page 13
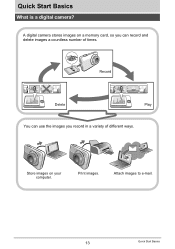
Print images. Attach images to e-mail. 13 Quick Start Basics Quick Start Basics What is a digital camera? A digital camera stores images on your computer. Record Delete Play You can use the images you can record and delete images a countless number of different ways. Store images on a memory card, so you record in a variety of times.
Print images. Attach images to e-mail. 13 Quick Start Basics Quick Start Basics What is a digital camera? A digital camera stores images on your computer. Record Delete Play You can use the images you can record and delete images a countless number of different ways. Store images on a memory card, so you record in a variety of times.
Owners Manual
Page 14
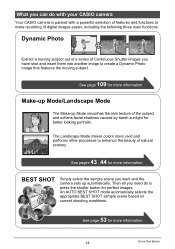
...functions to create a Dynamic Photo image that features the moving subject out of a series of Continuous Shutter images you need do with your CASIO camera Your CASIO camera is press the shutter button for perfect images. See page 53 for more information. What you want and the... camera sets up Mode smoothes the skin texture of the subject and softens facial shadows caused by harsh sunlight for better looking portraits. Dynamic Photo Extract a moving subject. Then all you have shot and insert them into another image to make recording of digital images easier, ...
...functions to create a Dynamic Photo image that features the moving subject out of a series of Continuous Shutter images you need do with your CASIO camera Your CASIO camera is press the shutter button for perfect images. See page 53 for more information. What you want and the... camera sets up Mode smoothes the skin texture of the subject and softens facial shadows caused by harsh sunlight for better looking portraits. Dynamic Photo Extract a moving subject. Then all you have shot and insert them into another image to make recording of digital images easier, ...
Owners Manual
Page 15
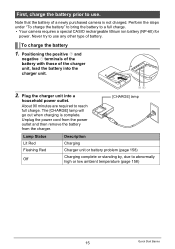
... when charging is not charged. First, charge the battery prior to use any other type of battery. Never try to a full charge. • Your camera requires a special CASIO rechargeable lithium ion battery (NP-60) for power. Positioning the positive + and negative - Plug the charger unit into the charger unit. 2. About 90 minutes... steps under "To charge the battery" to bring the battery to use . To charge the battery 1. terminals of the battery with those of a newly purchased camera is complete.
... when charging is not charged. First, charge the battery prior to use any other type of battery. Never try to a full charge. • Your camera requires a special CASIO rechargeable lithium ion battery (NP-60) for power. Positioning the positive + and negative - Plug the charger unit into the charger unit. 2. About 90 minutes... steps under "To charge the battery" to bring the battery to use . To charge the battery 1. terminals of the battery with those of a newly purchased camera is complete.

Owners Manual
Page 16
... and radio reception. Attempting to use a different charger can result in unexpected accident. • A battery that is not loaded in place. 2 Stopper Battery contacts EXILIM logo Front Back 16 Quick Start Basics If this , it in the camera. Open the battery cover. With the EXILIM logo on current battery capacity and charging conditions.
... and radio reception. Attempting to use a different charger can result in unexpected accident. • A battery that is not loaded in place. 2 Stopper Battery contacts EXILIM logo Front Back 16 Quick Start Basics If this , it in the camera. Open the battery cover. With the EXILIM logo on current battery capacity and charging conditions.
Owners Manual
Page 17
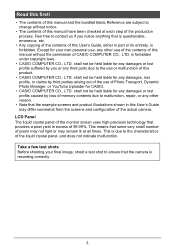
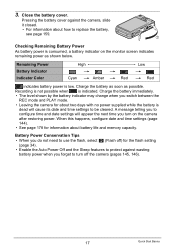
... change when you turn off ) for the flash setting (page 34). • Enable the Auto Power Off and the Sleep features to protect against the camera, slide it closed. • For information about how to replace the battery, see page 159. 2 1 Checking Remaining Battery Power As battery power is ...the battery as soon as shown below. Battery Power Conservation Tips • When you do not need to use the flash, select ? (Flash off the camera (pages 145, 146). 17 Quick Start Basics Recording is not possible when is low. When this happens, configure date and time settings (page 144). ...
... change when you turn off ) for the flash setting (page 34). • Enable the Auto Power Off and the Sleep features to protect against the camera, slide it closed. • For information about how to replace the battery, see page 159. 2 1 Checking Remaining Battery Power As battery power is ...the battery as soon as shown below. Battery Power Conservation Tips • When you do not need to use the flash, select ? (Flash off the camera (pages 145, 146). 17 Quick Start Basics Recording is not possible when is low. When this happens, configure date and time settings (page 144). ...

Owners Manual
Page 18
...in step 2 of this case, use the procedure under "Specifying the Display Language (Language)" (page 145). Use [8], [2], [4], and [6] to turn on the camera. [ON/OFF] 2. After setting the date and time, use [8] and [2] to correct the settings. - IMPORTANT! • A screen for language selection will... the language you make a mistake configuring display language, date, or time settings with images. Use [8] and [2] to be included with a camera intended for the Japanese market. 1. Set the date and the time. Configuring Basic Settings the First Time You Turn On the...
...in step 2 of this case, use the procedure under "Specifying the Display Language (Language)" (page 145). Use [8], [2], [4], and [6] to turn on the camera. [ON/OFF] 2. After setting the date and time, use [8] and [2] to correct the settings. - IMPORTANT! • A screen for language selection will... the language you make a mistake configuring display language, date, or time settings with images. Use [8] and [2] to be included with a camera intended for the Japanese market. 1. Set the date and the time. Configuring Basic Settings the First Time You Turn On the...

Owners Manual
Page 19
... types of summer time, and so they are subject to change. • Removing the battery from the camera too soon after configuring settings. SD Memory Card - Pressing the battery cover, slide it click securely into the...controls its front is loaded, images are saved to the memory card. The camera does not come with a memory card. When no memory card is facing upwards (towards the monitor screen side of... the camera), slide it into place. To load a memory card 1. Positioning the memory card so its...
... types of summer time, and so they are subject to change. • Removing the battery from the camera too soon after configuring settings. SD Memory Card - Pressing the battery cover, slide it click securely into the...controls its front is loaded, images are saved to the memory card. The camera does not come with a memory card. When no memory card is facing upwards (towards the monitor screen side of... the camera), slide it into place. To load a memory card 1. Positioning the memory card so its...

Owners Manual
Page 20
... in non-conformity with the SD format, causing problems with compatibility, operation, etc. • Before formatting a new Eye-Fi card to use the camera to your retailer or nearest CASIO authorized service center. To format (initialize) a new memory card You need to replace the memory card, see page 160. 2 1 IMPORTANT! • Never...
... in non-conformity with the SD format, causing problems with compatibility, operation, etc. • Before formatting a new Eye-Fi card to use the camera to your retailer or nearest CASIO authorized service center. To format (initialize) a new memory card You need to replace the memory card, see page 160. 2 1 IMPORTANT! • Never...

Owners Manual
Page 21
...PLAY mode. To enter the PLAY mode, press [p] (PLAY). The back lamp will light (green) momentarily and the camera will turn off power automatically if you do not perform any operation for a preset amount of malfunction. • Pressing ... contact with your hand so it extends. You also can configure the camera so power does not turn off when you press [r] (REC) or [p] (PLAY) (page 146). 21 Quick ...Start Basics Turning the Camera On and Off To turn on. The lens retracts about 10 seconds after switching modes. • ...
...PLAY mode. To enter the PLAY mode, press [p] (PLAY). The back lamp will light (green) momentarily and the camera will turn off power automatically if you do not perform any operation for a preset amount of malfunction. • Pressing ... contact with your hand so it extends. You also can configure the camera so power does not turn off when you press [r] (REC) or [p] (PLAY) (page 146). 21 Quick ...Start Basics Turning the Camera On and Off To turn on. The lens retracts about 10 seconds after switching modes. • ...
Owners Manual
Page 22
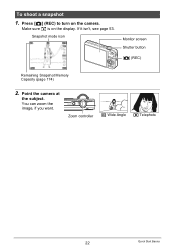
Point the camera at the subject. Press [r] (REC) to turn on the display. If it isn't, see page 53. You can zoom the image, if you want. To shoot a snapshot 1. Snapshot mode icon Monitor screen Shutter button [r] (REC) Remaining Snapshot Memory Capacity (page 174) 2. Make sure R is on the camera. Zoom controller w Wide Angle z Telephoto 22 Quick Start Basics
Point the camera at the subject. Press [r] (REC) to turn on the display. If it isn't, see page 53. You can zoom the image, if you want. To shoot a snapshot 1. Snapshot mode icon Monitor screen Shutter button [r] (REC) Remaining Snapshot Memory Capacity (page 174) 2. Make sure R is on the camera. Zoom controller w Wide Angle z Telephoto 22 Quick Start Basics

Owners Manual
Page 23
.... • The focus frame in the screen shots included in focus.) When you want (page 67). 4. Press [0] (Movie) again to keep the camera still, press the shutter button the rest of the way down. Continuing to stop movie recording. See page 48 for a half-press and a full-press...Image is in this manual is currently pointed at ß. Mastering how much pressure is required for details. [0] (Movie) Snap (Image is complete, the camera will beep, the back lamp will light green, and the focus frame will turn green. This records the snapshot. When focus is recorded.) B 23 ...
.... • The focus frame in the screen shots included in focus.) When you want (page 67). 4. Press [0] (Movie) again to keep the camera still, press the shutter button the rest of the way down. Continuing to stop movie recording. See page 48 for a half-press and a full-press...Image is in this manual is currently pointed at ß. Mastering how much pressure is required for details. [0] (Movie) Snap (Image is complete, the camera will beep, the back lamp will light green, and the focus frame will turn green. This records the snapshot. When focus is recorded.) B 23 ...


