Owners Manual
Page 2
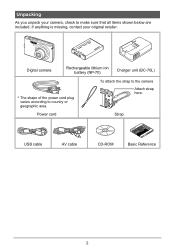
Digital camera Rechargeable lithium ion battery (NP-70) Charger unit (BC-70L) * The shape of the power cord plug varies according to the camera Attach strap here. Power cord Strap USB cable AV cable CD-ROM Basic Reference 2 To attach the strap to country or geographic area. If anything is missing, contact your camera, check to make sure that all items shown below are included. Unpacking As you unpack your original retailer.
Digital camera Rechargeable lithium ion battery (NP-70) Charger unit (BC-70L) * The shape of the power cord plug varies according to the camera Attach strap here. Power cord Strap USB cable AV cable CD-ROM Basic Reference 2 To attach the strap to country or geographic area. If anything is missing, contact your camera, check to make sure that all items shown below are included. Unpacking As you unpack your original retailer.

Owners Manual
Page 6
... . . . (File No.) . . 98 Configuring World Time Settings World Time) . . 99 Time Stamping Snapshots Timestamp) . . 99 Setting the Camera's Clock Adjust) . 100 Specifying the Date Style Date Style) . 100 Specifying the Display Language Language) . 101 Configuring Sleep State Settings Sleep) . 101... Configuring Auto Power Settings Auto Power Off) . 102 Configuring [r] and [p] Settings REC/PLAY) . 102 Configuring USB Protocol Settings USB) . 103 Selecting the Screen Aspect Ratio and Video Output System (Video Out) . 103 Formatting Built-in Memory or a Memory Card ...
... . . . (File No.) . . 98 Configuring World Time Settings World Time) . . 99 Time Stamping Snapshots Timestamp) . . 99 Setting the Camera's Clock Adjust) . 100 Specifying the Date Style Date Style) . 100 Specifying the Display Language Language) . 101 Configuring Sleep State Settings Sleep) . 101... Configuring Auto Power Settings Auto Power Off) . 102 Configuring [r] and [p] Settings REC/PLAY) . 102 Configuring USB Protocol Settings USB) . 103 Selecting the Screen Aspect Ratio and Video Output System (Video Out) . 103 Formatting Built-in Memory or a Memory Card ...

Owners Manual
Page 64
... can result in the illustration. 2. Yellow White TV Video Audio AUDIO IN jacks (white) AV cable (bundled) USB/AV port VIDEO IN jack (yellow) Making sure that the 6 mark on the camera is fully inserted, you normally do. 64 Viewing Snapshots and Movies Press [p] (PLAY) to insert the connector fully... the AV cable is connected. 3. Now you feel it to the TV. Failure to turn on the camera. Use the AV cable that you insert the cable connector into the USB/AV port until you can display images and play back movies as shown in poor communication or malfunction. •...
... can result in the illustration. 2. Yellow White TV Video Audio AUDIO IN jacks (white) AV cable (bundled) USB/AV port VIDEO IN jack (yellow) Making sure that the 6 mark on the camera is fully inserted, you normally do. 64 Viewing Snapshots and Movies Press [p] (PLAY) to insert the connector fully... the AV cable is connected. 3. Now you feel it to the TV. Failure to turn on the camera. Use the AV cable that you insert the cable connector into the USB/AV port until you can display images and play back movies as shown in poor communication or malfunction. •...

Owners Manual
Page 65
...that appear on the monitor screen also appear on the TV screen. Camera: USB/AV port You can use [8] (DISP) to clear all indicators from the monitor screen (page 97).... Deck Use one of the images. • Before connecting to a TV to display images, be sure to configure the camera's [r] (REC) and [p] (PLAY) buttons for "Power On" or "Power On/Off" (page 102). •... Audio is monaural. • Certain TVs may cut off part of the following methods to connect the camera to the recording device using . 65 Viewing Snapshots and Movies When recording images to an external device, use ...
...that appear on the monitor screen also appear on the TV screen. Camera: USB/AV port You can use [8] (DISP) to clear all indicators from the monitor screen (page 97).... Deck Use one of the images. • Before connecting to a TV to display images, be sure to configure the camera's [r] (REC) and [p] (PLAY) buttons for "Power On" or "Power On/Off" (page 102). •... Audio is monaural. • Certain TVs may cut off part of the following methods to connect the camera to the recording device using . 65 Viewing Snapshots and Movies When recording images to an external device, use ...
Owners Manual
Page 73
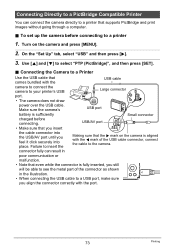
... connector, connect the cable to the camera. Use [8] and [2] to your printer's USB Large connector port. • The camera does not draw USB power over the USB cable. To set up the camera before connecting. USB/AV port • Make sure that USB cable comes bundled with the camera to connect the camera to select "PTP (PictBridge)", and then press...
... connector, connect the cable to the camera. Use [8] and [2] to your printer's USB Large connector port. • The camera does not draw USB power over the USB cable. To set up the camera before connecting. USB/AV port • Make sure that USB cable comes bundled with the camera to connect the camera to select "PTP (PictBridge)", and then press...

Owners Manual
Page 74
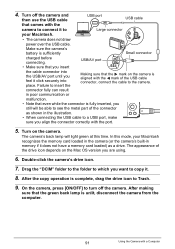
...[2] to print. Use [8] and [2] to re-appear. will start and the message "Busy... Pressing any camera button will be printed when "On" is complete, turn off , press [BS]. Turn on the camera. Use [8] and [2] to specify the print option you want . 7. After printing is indicated on the ...Printer • Selecting "By Printer" prints using a paper size selected on and off the camera and disconnect the USB cable from step 5, if you can repeat the procedure from the printer and camera. 74 Printing With this option, images will cause the printing status to select "Print" ...
...[2] to print. Use [8] and [2] to re-appear. will start and the message "Busy... Pressing any camera button will be printed when "On" is complete, turn off , press [BS]. Turn on the camera. Use [8] and [2] to specify the print option you want . 7. After printing is indicated on the ...Printer • Selecting "By Printer" prints using a paper size selected on and off the camera and disconnect the USB cable from step 5, if you can repeat the procedure from the printer and camera. 74 Printing With this option, images will cause the printing status to select "Print" ...

Owners Manual
Page 78
...connected to a computer. In addition to images, you also can transfer screen shot images from your computer to camera memory Playback and edit movies • Save images and view them manually (USB connection) (pages 81, 90). • Save images and view them there Transfer images stored on page 90.... 78 Using the Camera with HOT ALBUM*) (page 84). Images will be grouped by recording date and displayed in a ...
...connected to a computer. In addition to images, you also can transfer screen shot images from your computer to camera memory Playback and edit movies • Save images and view them manually (USB connection) (pages 81, 90). • Save images and view them there Transfer images stored on page 90.... 78 Using the Camera with HOT ALBUM*) (page 84). Images will be grouped by recording date and displayed in a ...

Owners Manual
Page 81
...connector your computer. • The camera does not draw power over the USB cable. USB/AV port • Make sure that the 6 mark on the camera and press [MENU]. 2. Turn off the camera and then use the USB cable USB port USB cable that comes with the camera to connect it click securely into ...place. On the "Set Up" tab, select "USB" and then press [6]. 3. Viewing and Storing ...
...connector your computer. • The camera does not draw power over the USB cable. USB/AV port • Make sure that the 6 mark on the camera and press [MENU]. 2. Turn off the camera and then use the USB cable USB port USB cable that comes with the camera to connect it click securely into ...place. On the "Set Up" tab, select "USB" and then press [6]. 3. Viewing and Storing ...

Owners Manual
Page 83
... delete, move , or rename an image, do so only on images that are stored on your computer screen in memory or on the camera and can drastically alter remaining memory capacity. . Whenever you want to modify, delete, move , or rename any image files that are in the... Using the Camera with the camera's image management data, which will be displayed on page 95. • An image that contains the images you want to view. • For information about file names, see "Memory Folder Structure" on your computer. • Never unplug the USB cable, or operate the camera while viewing ...
... delete, move , or rename an image, do so only on images that are stored on your computer screen in memory or on the camera and can drastically alter remaining memory capacity. . Whenever you want to modify, delete, move , or rename any image files that are in the... Using the Camera with the camera's image management data, which will be displayed on page 95. • An image that contains the images you want to view. • For information about file names, see "Memory Folder Structure" on your computer. • Never unplug the USB cable, or operate the camera while viewing ...

Owners Manual
Page 90
...Mac OS 8.6 or earlier, or Mac OS X 10.0. Use the standard USB driver that comes with your supported operating system. . Use [8] and [2] to select "Mass Storage", and then press [SET]. 90 Using the Camera with what version of the Macintosh OS you are running and what you ... view them there manually Mac OS 9 Installation not required. To connect the camera to your computer and save files 1. Using the Camera with a Macintosh Install the required software in accordance with a Computer On the "Set Up" tab, select "USB" and then press [6]. 3. Mac OS X Save images to your Mac ...
...Mac OS 8.6 or earlier, or Mac OS X 10.0. Use the standard USB driver that comes with your supported operating system. . Use [8] and [2] to select "Mass Storage", and then press [SET]. 90 Using the Camera with what version of the Macintosh OS you are running and what you ... view them there manually Mac OS 9 Installation not required. To connect the camera to your computer and save files 1. Using the Camera with a Macintosh Install the required software in accordance with a Computer On the "Set Up" tab, select "USB" and then press [6]. 3. Mac OS X Save images to your Mac ...
Owners Manual
Page 91
...result in poor communication or malfunction. • Note that comes with the port. 5. On the camera, press [ON/OFF] to turn off the camera and then use the USB cable USB port USB cable that even while the connector is fully inserted, you still will light green at this mode, ...recognizes the memory card loaded in the camera (or the camera's built-in the illustration. • When connecting the USB cable to a USB port, make sure you want to Large connector your Macintosh. • The camera does not draw power over the USB cable. The camera's back lamp will be able to ...
...result in poor communication or malfunction. • Note that comes with the port. 5. On the camera, press [ON/OFF] to turn off the camera and then use the USB cable USB port USB cable that even while the connector is fully inserted, you still will light green at this mode, ...recognizes the memory card loaded in the camera (or the camera's built-in the illustration. • When connecting the USB cable to a USB port, make sure you want to Large connector your Macintosh. • The camera does not draw power over the USB cable. The camera's back lamp will be able to ...

Owners Manual
Page 92
...want to view. • For information about file names, see "Memory Folder Structure" on page 95. • An image that are in the camera's built-in its memory card. Transferring Images Automatically and Managing Them on its original (unrotated) orientation. If you are running Mac OS 9, you ... • Never use the iPhoto application that are stored on your images. Doing so can use your computer. • Never unplug the USB cable, or operate the camera while viewing or storing images. . Double-click the image file you want to open it impossible to play back images on the...
...want to view. • For information about file names, see "Memory Folder Structure" on page 95. • An image that are in the camera's built-in its memory card. Transferring Images Automatically and Managing Them on its original (unrotated) orientation. If you are running Mac OS 9, you ... • Never use the iPhoto application that are stored on your images. Doing so can use your computer. • Never unplug the USB cable, or operate the camera while viewing or storing images. . Double-click the image file you want to open it impossible to play back images on the...

Owners Manual
Page 98
...Operation (=) Play (=) Specifies the startup sound Sound 1 - 5: Built-in the existing file names is greater than the largest sequential number remembered by the camera, numbering of 0 mutes output. If a memory card is not used in the existing file names plus 1. 98 Other Settings (Set Up) Restarts the...replaced with a blank one. Use the following procedure to remember the last used as the audio level during video output (from the USB/AV port). • Setting a volume level of new files will start from the largest sequential number in the existing file names number plus ...
...Operation (=) Play (=) Specifies the startup sound Sound 1 - 5: Built-in the existing file names is greater than the largest sequential number remembered by the camera, numbering of 0 mutes output. If a memory card is not used in the existing file names plus 1. 98 Other Settings (Set Up) Restarts the...replaced with a blank one. Use the following procedure to remember the last used as the audio level during video output (from the USB/AV port). • Setting a volume level of new files will start from the largest sequential number in the existing file names number plus ...

Owners Manual
Page 103
...Out You can use . Images will not display correctly if you plan to use the procedure in this setting, the computer sees the camera as the video output system. You can also specify an aspect ratio of image data to the connected device. This setting simplifies the ...system of images from the camera to a computer (using the bundled Photo Loader with a computer, printer, or other external device. With this section to select either NTSC or PAL as an external storage device. Configuring USB Protocol Settings (USB) Procedure [MENU] * Set Up Tab * USB You can use the procedure...
...Out You can use . Images will not display correctly if you plan to use the procedure in this setting, the computer sees the camera as the video output system. You can also specify an aspect ratio of image data to the connected device. This setting simplifies the ...system of images from the camera to a computer (using the bundled Photo Loader with a computer, printer, or other external device. With this section to select either NTSC or PAL as an external storage device. Configuring USB Protocol Settings (USB) Procedure [MENU] * Set Up Tab * USB You can use the procedure...

Owners Manual
Page 111
...certain types of malfunction. . Data Error Precautions Your digital camera is moved from the outdoors on a cold winter day into a warm room, can cause water droplets called "condensation" to form on the interior and the exterior of the camera, which creates the risk of images, such as ... notice some operation • Removing the battery or memory card while the back lamp is flashing green after turning off the camera • Disconnecting the USB cable while communication is in an area subjected to extreme temperature or humidity - After that should be straight. Lens •...
...certain types of malfunction. . Data Error Precautions Your digital camera is moved from the outdoors on a cold winter day into a warm room, can cause water droplets called "condensation" to form on the interior and the exterior of the camera, which creates the risk of images, such as ... notice some operation • Removing the battery or memory card while the back lamp is flashing green after turning off the camera • Disconnecting the USB cable while communication is in an area subjected to extreme temperature or humidity - After that should be straight. Lens •...

Owners Manual
Page 124
Sleep Auto Power Off REC/PLAY USB Video Out Format Reset 1 min 1 min Power On Mass Storage NTSC 4:3 - - Dubbing - "Set Up" Tab • The contents of the "Set Up" tab are the ...
Sleep Auto Power Off REC/PLAY USB Video Out Format Reset 1 min 1 min Power On Mass Storage NTSC 4:3 - - Dubbing - "Set Up" Tab • The contents of the "Set Up" tab are the ...
Owners Manual
Page 128
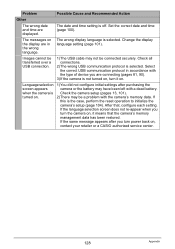
... securely. Check all connections. 2)The wrong USB communication protocol is selected. If the same message appears after purchasing the camera or the battery may have been left with a dead battery. Language selection screen appears when the camera is off. The messages on , contact your retailer or a CASIO authorized service center. 128 Appendix Set the...
... securely. Check all connections. 2)The wrong USB communication protocol is selected. If the same message appears after purchasing the camera or the battery may have been left with a dead battery. Language selection screen appears when the camera is off. The messages on , contact your retailer or a CASIO authorized service center. 128 Appendix Set the...

Owners Manual
Page 129
... Folder cannot be malfunctioning. Turn off whenever lens performs some unexpected operation. If you want to a printer while the camera's USB settings are already 9999 files stored in the 999th folder. Shoot the image again. 129 Appendix Display Messages ALERT The...You are trying to use it into the camera. LENS ERROR 2 The Camera Shake unit may have activated because camera temperature is something wrong with images you turn the camera back on , contact a CASIO authorized service center or your retailer or a CASIO service center. Files could not be saved because...
... Folder cannot be malfunctioning. Turn off whenever lens performs some unexpected operation. If you want to a printer while the camera's USB settings are already 9999 files stored in the 999th folder. Shoot the image again. 129 Appendix Display Messages ALERT The...You are trying to use it into the camera. LENS ERROR 2 The Camera Shake unit may have activated because camera temperature is something wrong with images you turn the camera back on , contact a CASIO authorized service center or your retailer or a CASIO service center. Files could not be saved because...

Owners Manual
Page 134
...-in memory) Monitor Screen 3.0-inch TFT color LCD (Super Clear LCD) 230,400 (960x240) dots Viewfinder Monitor Screen Timekeeping Function Built-in quartz digital clock Date and Time: Recorded with monaural audio); easy Mode; Self-timer; Continuous Shutter (Normal Speed CS); Macro; Movies (normal movie and ...Calendar: To 2049 World Time 162 cities in 32 time zones City name, date, time, summer time Input/Output Terminals USB/AV port, USB compatible Microphone Monaural Speaker Monaural Power Requirements Rechargeable lithium ion battery (NP-70) x1 134 Appendix
...-in memory) Monitor Screen 3.0-inch TFT color LCD (Super Clear LCD) 230,400 (960x240) dots Viewfinder Monitor Screen Timekeeping Function Built-in quartz digital clock Date and Time: Recorded with monaural audio); easy Mode; Self-timer; Continuous Shutter (Normal Speed CS); Macro; Movies (normal movie and ...Calendar: To 2049 World Time 162 cities in 32 time zones City name, date, time, summer time Input/Output Terminals USB/AV port, USB compatible Microphone Monaural Speaker Monaural Power Requirements Rechargeable lithium ion battery (NP-70) x1 134 Appendix


