Owners Manual
Page 2
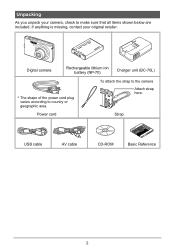
Digital camera Rechargeable lithium ion battery (NP-70) Charger unit (BC-70L) * The shape of the power cord plug varies according to the camera Attach strap here. To attach the strap to country or geographic area. Unpacking As you unpack your original retailer. Power cord Strap USB cable AV cable CD-ROM Basic Reference 2 If anything is missing, contact your camera, check to make sure that all items shown below are included.
Digital camera Rechargeable lithium ion battery (NP-70) Charger unit (BC-70L) * The shape of the power cord plug varies according to the camera Attach strap here. To attach the strap to country or geographic area. Unpacking As you unpack your original retailer. Power cord Strap USB cable AV cable CD-ROM Basic Reference 2 If anything is missing, contact your camera, check to make sure that all items shown below are included.

Owners Manual
Page 4
... first 3 ❚❙ Quick Start Basics 8 What is a digital camera 8 What you can do with your CASIO camera 9 First, charge the battery prior to use 10 ❚ To charge the battery 10 ❚ To load the battery 11 Configuring the Display Language the First Time You Turn On the Camera. . 13 Preparing a Memory Card 14 ❚ Supported Memory...
... first 3 ❚❙ Quick Start Basics 8 What is a digital camera 8 What you can do with your CASIO camera 9 First, charge the battery prior to use 10 ❚ To charge the battery 10 ❚ To load the battery 11 Configuring the Display Language the First Time You Turn On the Camera. . 13 Preparing a Memory Card 14 ❚ Supported Memory...
Owners Manual
Page 7
... the Histogram 106 ❚❙ Appendix 107 Precautions during Use 107 Power Supply 115 ❚ Charging 115 ❚ To replace the battery 115 ❚ Battery Precautions 116 ❚ Using the Camera in another Country 116 Using a Memory Card 117 ❚ To replace the memory card 117 Computer System Requirements for Bundled Software 119...
... the Histogram 106 ❚❙ Appendix 107 Precautions during Use 107 Power Supply 115 ❚ Charging 115 ❚ To replace the battery 115 ❚ Battery Precautions 116 ❚ Using the Camera in another Country 116 Using a Memory Card 117 ❚ To replace the memory card 117 Computer System Requirements for Bundled Software 119...
Owners Manual
Page 10
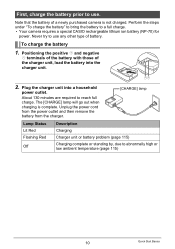
... Flashing Red Off Description Charging Charger unit or battery problem (page 115) Charging complete or standing by, due to reach full charge. Never try to a full charge. • Your camera requires a special CASIO rechargeable lithium ion battery (NP-70) for power. Note that the battery of a newly purchased camera is complete. Positioning the positive + and negative...
... Flashing Red Off Description Charging Charger unit or battery problem (page 115) Charging complete or standing by, due to reach full charge. Never try to a full charge. • Your camera requires a special CASIO rechargeable lithium ion battery (NP-70) for power. Note that the battery of a newly purchased camera is complete. Positioning the positive + and negative...
Owners Manual
Page 11
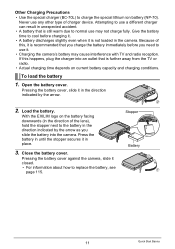
Load the battery. Open the battery cover. To load the battery 1. Close the battery cover. Pressing the battery cover against the camera, slide it . • Charging the camera's battery may not charge fully. Stopper Battery 2 1 11 Quick Start Basics Never use may cause interference with TV and radio reception. Because of charger device. With the EXILIM logo on current battery capacity and...
Load the battery. Open the battery cover. To load the battery 1. Close the battery cover. Pressing the battery cover against the camera, slide it . • Charging the camera's battery may not charge fully. Stopper Battery 2 1 11 Quick Start Basics Never use may cause interference with TV and radio reception. Because of charger device. With the EXILIM logo on current battery capacity and...

Owners Manual
Page 12
... Conservation Tips • When you forget to use the flash, select ? (flash off the camera (pages 101, 102). 12 Quick Start Basics Checking Remaining Battery Power As battery power is indicated. You will cause its date and time settings to reconfigure the settings after power is restored. • See page 135 for information...
... Conservation Tips • When you forget to use the flash, select ? (flash off the camera (pages 101, 102). 12 Quick Start Basics Checking Remaining Battery Power As battery power is indicated. You will cause its date and time settings to reconfigure the settings after power is restored. • See page 135 for information...

Owners Manual
Page 13
... Use [8], [2], [4], and [6] to select the city where you want and then press [SET]. 6. Use [8] and [2] to select the language you will be using the camera and then press [SET]. Use [8] and [2] to change it. To switch between 12-hour and 24-hour format, press [BS]. 8. Use [4] and [6] to select ...and [2] to select a date style and then press [SET]. The selected area is highlighted in red. 4. Press [SET]. • If you make a mistake, you load a battery into the camera, a [ON/OFF] screen appears for configuring the display language, date, and time settings.
... Use [8], [2], [4], and [6] to select the city where you want and then press [SET]. 6. Use [8] and [2] to select the language you will be using the camera and then press [SET]. Use [8] and [2] to change it. To switch between 12-hour and 24-hour format, press [BS]. 8. Use [4] and [6] to select ...and [2] to select a date style and then press [SET]. The selected area is highlighted in red. 4. Press [SET]. • If you make a mistake, you load a battery into the camera, a [ON/OFF] screen appears for configuring the display language, date, and time settings.
Owners Manual
Page 14
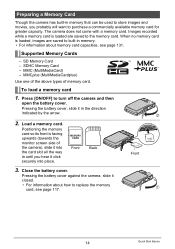
... securely into the card slot all the way in memory. • For information about how to turn off the camera and then open the battery cover. Close the battery cover. Load a memory card. Positioning the memory card so its front is facing upwards (towards the monitor screen...Memory Card - MMC (MultiMediaCard) - Press [ON/OFF] to replace the memory card, see page 131. SDHC Memory Card - Pressing the battery cover against the camera, slide it into place. Images recorded while a memory card is loaded, images are saved to purchase a commercially available memory card for greater ...
... securely into the card slot all the way in memory. • For information about how to turn off the camera and then open the battery cover. Close the battery cover. Load a memory card. Positioning the memory card so its front is facing upwards (towards the monitor screen...Memory Card - MMC (MultiMediaCard) - Press [ON/OFF] to replace the memory card, see page 131. SDHC Memory Card - Pressing the battery cover against the camera, slide it into place. Images recorded while a memory card is loaded, images are saved to purchase a commercially available memory card for greater ...

Owners Manual
Page 15
...; Should water or any other files on the camera and press [MENU]. 2. Normally you notice any foreign object ever get into the card slot, immediately turn off the camera, remove the battery, and contact your retailer or nearest CASIO authorized service center. However, if storing to a... card has slowed down data processing by the camera. Select the "Set Up" tab, select "Format" and then press...
...; Should water or any other files on the camera and press [MENU]. 2. Normally you notice any foreign object ever get into the card slot, immediately turn off the camera, remove the battery, and contact your retailer or nearest CASIO authorized service center. However, if storing to a... card has slowed down data processing by the camera. Select the "Set Up" tab, select "Format" and then press...

Owners Manual
Page 22
... the brightness or color of the following can cause digital noise in a dark location - Strongly back lit subject - Snapshot Shooting Precautions Operation • Never open the battery cover while the back lamp is for the image quality setting (page 58). Very shiny subject - Camera movement while shooting - Monitor Screen when Shooting Snapshots •...
... the brightness or color of the following can cause digital noise in a dark location - Strongly back lit subject - Snapshot Shooting Precautions Operation • Never open the battery cover while the back lamp is for the image quality setting (page 58). Very shiny subject - Camera movement while shooting - Monitor Screen when Shooting Snapshots •...
Owners Manual
Page 27
... m to 3.2 m (0.5' to 10.5') Telephoto: 0.6 m to 1.5 m (2.0' to 4.9') * The above values depend on operating conditions (battery condition, ambient temperature, etc.) With a fully charged battery it takes anywhere from a few seconds to 6 seconds. • Shooting with flash turned off of the retina of the eye. Under such... conditions, secure the camera with exposure. When red-eye reduction is selected as the flash mode, the camera fires a pre...
... m to 3.2 m (0.5' to 10.5') Telephoto: 0.6 m to 1.5 m (2.0' to 4.9') * The above values depend on operating conditions (battery condition, ambient temperature, etc.) With a fully charged battery it takes anywhere from a few seconds to 6 seconds. • Shooting with flash turned off of the retina of the eye. Under such... conditions, secure the camera with exposure. When red-eye reduction is selected as the flash mode, the camera fires a pre...
Owners Manual
Page 73
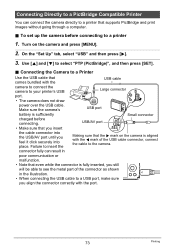
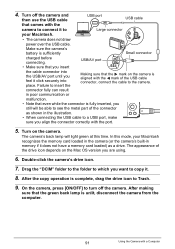
...and then press [6]. 3. connector fully can connect the camera directly to the camera. Turn on the camera is sufficiently Small connector charged before connecting to select "PTP (PictBridge)", and then press [SET]. . Make sure the camera's USB port battery is aligned with the port. 73 Printing Use [8] and... [2] to a printer 1. Connecting the Camera to a Printer Use the USB cable that even while the connector is fully...
...and then press [6]. 3. connector fully can connect the camera directly to the camera. Turn on the camera is sufficiently Small connector charged before connecting to select "PTP (PictBridge)", and then press [SET]. . Make sure the camera's USB port battery is aligned with the port. 73 Printing Use [8] and... [2] to a printer 1. Connecting the Camera to a Printer Use the USB cable that even while the connector is fully...

Owners Manual
Page 81
...cable connector into place. Failure to Large connector your computer. • The camera does not draw power over the USB cable. To connect the camera to your computer in order to the camera. Make sure the camera's battery is fully inserted, you still will be able to see the metal part ...of the USB cable connector, connect the cable to view and store images (snapshot and movie files). . connector fully can connect the camera to select "Mass Storage...
...cable connector into place. Failure to Large connector your computer. • The camera does not draw power over the USB cable. To connect the camera to your computer in order to the camera. Make sure the camera's battery is fully inserted, you still will be able to see the metal part ...of the USB cable connector, connect the cable to view and store images (snapshot and movie files). . connector fully can connect the camera to select "Mass Storage...
Owners Manual
Page 91
...camera's battery is complete, drag the drive icon to Trash. 9. The appearance of the drive icon depends on the camera. On the camera, press [ON/OFF] to Large connector your Macintosh. • The camera does not draw power over the USB cable. After making sure that the 6 mark on the camera...the copy operation is sufficiently Small connector charged before connecting. Drag the "DCIM" folder to the folder to the camera. Double-click the camera's drive icon. 7. The camera's back lamp will be able to see the metal part of the USB cable connector, connect the cable to ...
...camera's battery is complete, drag the drive icon to Trash. 9. The appearance of the drive icon depends on the camera. On the camera, press [ON/OFF] to Large connector your Macintosh. • The camera does not draw power over the USB cable. After making sure that the 6 mark on the camera...the copy operation is sufficiently Small connector charged before connecting. Drag the "DCIM" folder to the folder to the camera. Double-click the camera's drive icon. 7. The camera's back lamp will be able to see the metal part of the USB cable connector, connect the cable to ...
Owners Manual
Page 104
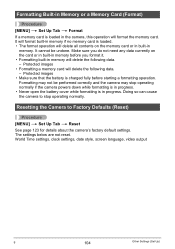
... settings, date style, screen language, video output B 104 Other Settings (Set Up) Resetting the Camera to stop operating normally if the camera powers down while formatting is in progress. • Never open the battery cover while formatting is in memory. It cannot be performed correctly and the... camera may not be undone. The settings below are not reset. Protected images • Make sure that the battery is charged fully before you do not ...
... settings, date style, screen language, video output B 104 Other Settings (Set Up) Resetting the Camera to stop operating normally if the camera powers down while formatting is in progress. • Never open the battery cover while formatting is in memory. It cannot be performed correctly and the... camera may not be undone. The settings below are not reset. Protected images • Make sure that the battery is charged fully before you do not ...

Owners Manual
Page 108
... off the camera. 2. Turn off the camera. 2. . Immediately perform the following steps whenever any way. Contact your dealer or nearest CASIO authorized service center. . Smoke, abnormal odor, overheating, and other abnormalities • Continued use of the camera after it is damaged by dropping or other personal injury. Remove the battery from the camera, taking care to...
... off the camera. 2. Turn off the camera. 2. . Immediately perform the following steps whenever any way. Contact your dealer or nearest CASIO authorized service center. . Smoke, abnormal odor, overheating, and other abnormalities • Continued use of the camera after it is damaged by dropping or other personal injury. Remove the battery from the camera, taking care to...
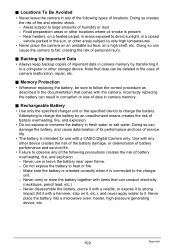
Owners Manual
Page 109
... procedure as described in the case of service life. • The battery is intended for use or leave the battery near open flame. - Never carry or store the battery together with a CASIO Digital Camera only. Use with a hammer, step on a high shelf, etc. Rechargeable Battery • Use only the specified charger unit or the specified device to...
... procedure as described in the case of service life. • The battery is intended for use or leave the battery near open flame. - Never carry or store the battery together with a CASIO Digital Camera only. Use with a hammer, step on a high shelf, etc. Rechargeable Battery • Use only the specified charger unit or the specified device to...

Owners Manual
Page 110
... your local CASIO authorized service center. Continued charging creates the risk of battery overheating, fire, and explosion. • Battery fluid can damage the battery, and cause deterioration of its performance and loss of time before using , charging, or storing a battery, immediately remove it from the camera or charger ...with clean tap water and then consult a physician. • Be sure to read the user documentation that the camera is about to turn off with battery fluid can cause skin irritation. . Prolonged contact with clean tap water. They do not guarantee that you will ...
... your local CASIO authorized service center. Continued charging creates the risk of battery overheating, fire, and explosion. • Battery fluid can damage the battery, and cause deterioration of its performance and loss of time before using , charging, or storing a battery, immediately remove it from the camera or charger ...with clean tap water and then consult a physician. • Be sure to read the user documentation that the camera is about to turn off with battery fluid can cause skin irritation. . Prolonged contact with clean tap water. They do not guarantee that you will ...

Owners Manual
Page 111
... cold winter day into a warm room, can cause an error message to appear on a hot day, or in lines that , remove the camera from the bag and open the battery cover for a few hours. . Near an air conditioner or in any of the following creates the risk of corruption of images, such... the surface of moisture or dust - After that should be straight. . Data Error Precautions Your digital camera is due to form on the interior and the exterior of the camera, which creates the risk of the camera. 111 Appendix Then leave the bag sealed to allow the air inside to naturally change to...
... cold winter day into a warm room, can cause an error message to appear on a hot day, or in lines that , remove the camera from the bag and open the battery cover for a few hours. . Near an air conditioner or in any of the following creates the risk of corruption of images, such... the surface of moisture or dust - After that should be straight. . Data Error Precautions Your digital camera is due to form on the interior and the exterior of the camera, which creates the risk of the camera. 111 Appendix Then leave the bag sealed to allow the air inside to naturally change to...
Owners Manual
Page 112
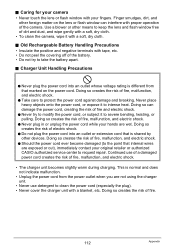
... fire, malfunction, and electric shock. 0 Should the power cord ever become damaged (to take the battery apart. . Finger smudges, dirt, and other foreign matter on the power cord. Use a blower ... immediately contact your fingers. This is shared by other means to request repair. Caring for your camera • Never touch the lens or flash window with a blanket, etc. Charger Unit Handling ...(especially the plug). • Never cover the charger unit with your original retailer or authorized CASIO authorized service center to keep the lens and flash window free of dirt and dust, and wipe...
... fire, malfunction, and electric shock. 0 Should the power cord ever become damaged (to take the battery apart. . Finger smudges, dirt, and other foreign matter on the power cord. Use a blower ... immediately contact your fingers. This is shared by other means to request repair. Caring for your camera • Never touch the lens or flash window with a blanket, etc. Charger Unit Handling ...(especially the plug). • Never cover the charger unit with your original retailer or authorized CASIO authorized service center to keep the lens and flash window free of dirt and dust, and wipe...


