Owners Manual
Page 7
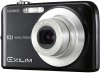
... Changing the Camera Date and Time Setting . . . 181 Using World Time 184 ■ Configuring World Time Settings 184 Changing the Display Language 185 Changing the Brightness of the Monitor Screen 186 Changing the USB Port Protocol 187 [ ] (REC) and [ ] (PLAY) Button Settings 188 Formatting Built-in Memory 189 PRINTING 190 Types of Printing 190 Using Professional Print Service 191 Using Your Printer to Print Images 191 Using DPOF to Specify Images to be Printed and the Number of Copies 195 ■ Date Stamping 197 Supported Protocols 198 USING THE CAMERA...
... Changing the Camera Date and Time Setting . . . 181 Using World Time 184 ■ Configuring World Time Settings 184 Changing the Display Language 185 Changing the Brightness of the Monitor Screen 186 Changing the USB Port Protocol 187 [ ] (REC) and [ ] (PLAY) Button Settings 188 Formatting Built-in Memory 189 PRINTING 190 Types of Printing 190 Using Professional Print Service 191 Using Your Printer to Print Images 191 Using DPOF to Specify Images to be Printed and the Number of Copies 195 ■ Date Stamping 197 Supported Protocols 198 USING THE CAMERA...

Owners Manual
Page 43
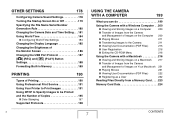
... wrong date and time data to be recorded with images. • If you make a mistake when configuring the language, date, and time settings, you load a battery into the camera, a screen appears for the First Time The first time you can also configure the camera to configure the settings correctly. GETTING READY 43 Use the procedure under "Configuring Display Language, Date, and Time Settings" (page 11) to turn on when you press [ ] (REC) or [ ] (PLAY) (page...
... wrong date and time data to be recorded with images. • If you make a mistake when configuring the language, date, and time settings, you load a battery into the camera, a screen appears for the First Time The first time you can also configure the camera to configure the settings correctly. GETTING READY 43 Use the procedure under "Configuring Display Language, Date, and Time Settings" (page 11) to turn on when you press [ ] (REC) or [ ] (PLAY) (page...

Owners Manual
Page 44
... trigger time and then press [SET]. Use [S] and [T] to select the "Set Up" tab. 3. Note that the Sleep feature does not operate in the PLAY mode. - Settings 30 sec 1 min 2 min Off 1 min 2 min 5 min • Sleep and Auto Power Off always operate as described below in the PLAY mode, regardless of their current PLAY mode settings. - Press [MENU]. 2. Power turns off function to conserve battery power. Selecting "Off" for the sleep setting disables...
... trigger time and then press [SET]. Use [S] and [T] to select the "Set Up" tab. 3. Note that the Sleep feature does not operate in the PLAY mode. - Settings 30 sec 1 min 2 min Off 1 min 2 min 5 min • Sleep and Auto Power Off always operate as described below in the PLAY mode, regardless of their current PLAY mode settings. - Press [MENU]. 2. Power turns off function to conserve battery power. Selecting "Off" for the sleep setting disables...

Owners Manual
Page 45
... SHOT mode user image information - FAVORITE folder - It is up screen image GETTING READY 45 Mode memory settings - NOTE • When both sleep and Auto Power Off have the same time settings, Auto Power Off takes priority. • Sleep and Auto Power Off are disabled under the following data is enough to hold a few snapshots or a short movie. Use built-in memory and a memory card (page 174). • The following conditions. - When there is a connection between the camera...
... SHOT mode user image information - FAVORITE folder - It is up screen image GETTING READY 45 Mode memory settings - NOTE • When both sleep and Auto Power Off have the same time settings, Auto Power Off takes priority. • Sleep and Auto Power Off are disabled under the following data is enough to hold a few snapshots or a short movie. Use built-in memory and a memory card (page 174). • The following conditions. - When there is a connection between the camera...

Owners Manual
Page 62
...; The aperture value indicates the size of time that light is allowed into the camera. The camera adjusts this setting automatically. If the focus frame stays red and the operation lamp is flashing green, it . Checking a Snapshot A snapshot will display the snapshot you just shot. Use [W] and [X] to the REC mode, press [ ]. To return to scroll through other images in focus (because the subject is indicated on the monitor screen for a longer time...
...; The aperture value indicates the size of time that light is allowed into the camera. The camera adjusts this setting automatically. If the focus frame stays red and the operation lamp is flashing green, it . Checking a Snapshot A snapshot will display the snapshot you just shot. Use [W] and [X] to the REC mode, press [ ]. To return to scroll through other images in focus (because the subject is indicated on the monitor screen for a longer time...

Owners Manual
Page 80
... the area within the boundary and display it is located at the part you do not need to keep the shutter button depressed. • Digital zoom is disabled while shooting with Zoom Continuous Shutter 1. SHOOTING A SNAPSHOT 80 IMPORTANT! • Note that with zoom continuous shutter, you want to enlarge, and then press [SET]. This will be recorded. Recording with zoom continuous shutter. • Zoom continuous shutter is not available when the image size setting is 3:2 (3648 × 2432 pixels...
... the area within the boundary and display it is located at the part you do not need to keep the shutter button depressed. • Digital zoom is disabled while shooting with Zoom Continuous Shutter 1. SHOOTING A SNAPSHOT 80 IMPORTANT! • Note that with zoom continuous shutter, you want to enlarge, and then press [SET]. This will be recorded. Recording with zoom continuous shutter. • Zoom continuous shutter is not available when the image size setting is 3:2 (3648 × 2432 pixels...
Owners Manual
Page 113
... focus Press this time the image that is selected as the focus mode, the [W] and [X] keys are not performed when you press the keys during manual focus. 113 ADVANCED SETTINGS NOTE • Whenever you view the results on the monitor screen. IMPORTANT! • While Manual Focus is within the boundary will appear on the monitor screen as you perform an optical zoom operation (page 68) while shooting...
... focus Press this time the image that is selected as the focus mode, the [W] and [X] keys are not performed when you press the keys during manual focus. 113 ADVANCED SETTINGS NOTE • Whenever you view the results on the monitor screen. IMPORTANT! • While Manual Focus is within the boundary will appear on the monitor screen as you perform an optical zoom operation (page 68) while shooting...
Owners Manual
Page 116
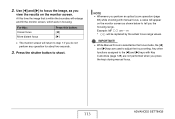
... of lighting so the colors in the shade, etc. Controlling White Balance Shooting on a cloudy day can give your subject a blue cast, while shooting under D Daylight daylight fluorescent lighting Fluorescent Suppress the appearance of light bulb lighting Tungsten Manually adjust white balance to suit a particular light source • For details, see "Configuring the White Balance Setting Manually" (page 117). To do this: Select this setting: Let the camera adjust white balance automatically AWB Auto WB Shoot...
... of lighting so the colors in the shade, etc. Controlling White Balance Shooting on a cloudy day can give your subject a blue cast, while shooting under D Daylight daylight fluorescent lighting Fluorescent Suppress the appearance of light bulb lighting Tungsten Manually adjust white balance to suit a particular light source • For details, see "Configuring the White Balance Setting Manually" (page 117). To do this: Select this setting: Let the camera adjust white balance automatically AWB Auto WB Shoot...

Owners Manual
Page 150
Use the zoom controller to zoom, and [S], [T], [W], and [X] to move around the zoomed image to display the part you want to be the same as a separate file. 1. Keystone Correction Use the following procedure to correct. 2. On the "PLAY" tab, select "Keystone" and then press [X]. Press [SET] to extract the displayed part and save it was recorded at any time before you press [SET], press [MENU]. IMPORTANT! • The image produced by cropping...
Use the zoom controller to zoom, and [S], [T], [W], and [X] to move around the zoomed image to display the part you want to be the same as a separate file. 1. Keystone Correction Use the following procedure to correct. 2. On the "PLAY" tab, select "Keystone" and then press [X]. Press [SET] to extract the displayed part and save it was recorded at any time before you press [SET], press [MENU]. IMPORTANT! • The image produced by cropping...

Owners Manual
Page 168
... PLAY mode, and then use [S] and [T]. Jump to start playback. Stop playback Press [MENU]. 168 USING AUDIO Toggle on-screen indicators on or off Press [T] and then use [W] and [X] to display the Voice Recording file you want to play back Voice Recording data on your computer using Windows Media Player or QuickTime. • Your camera supports the following audio data formats. - Audio Data: WAVE/ADPCM (.WAV extension) - Press [SET] to a marker in the audio data while playback...
... PLAY mode, and then use [S] and [T]. Jump to start playback. Stop playback Press [MENU]. 168 USING AUDIO Toggle on-screen indicators on or off Press [T] and then use [W] and [X] to display the Voice Recording file you want to play back Voice Recording data on your computer using Windows Media Player or QuickTime. • Your camera supports the following audio data formats. - Audio Data: WAVE/ADPCM (.WAV extension) - Press [SET] to a marker in the audio data while playback...

Owners Manual
Page 170
.... Protecting a File Against Deletion You can view folder and file names on your computer. NOTE • You can protect an important file to protect is on the monitor screen. 170 MANAGING YOUR FILES Use [W] and [X] to scroll through images until the one you perform the format operation (pages 14, 49, 189). ■ Protecting a Specific File 1. IMPORTANT! • Note that is allowed depends on the image size and quality, and capacity of the memory card...
.... Protecting a File Against Deletion You can view folder and file names on your computer. NOTE • You can protect an important file to protect is on the monitor screen. 170 MANAGING YOUR FILES Use [W] and [X] to scroll through images until the one you perform the format operation (pages 14, 49, 189). ■ Protecting a Specific File 1. IMPORTANT! • Note that is allowed depends on the image size and quality, and capacity of the memory card...

Owners Manual
Page 174
... last file copied will be copied from the camera's built-in memory to a memory card, or from a memory card to a memory card. Turn on the monitor screen. 174 MANAGING YOUR FILES IMPORTANT! • You can be displayed on the camera, enter the PLAY mode and then press [MENU]. 3. Use [S] and [T] to copy the files into the camera. 2. message disappears from the monitor screen before performing any operation on the camera. • After the copy operation is displayed on the date that it...
... last file copied will be copied from the camera's built-in memory to a memory card, or from a memory card to a memory card. Turn on the monitor screen. 174 MANAGING YOUR FILES IMPORTANT! • You can be displayed on the camera, enter the PLAY mode and then press [MENU]. 3. Use [S] and [T] to copy the files into the camera. 2. message disappears from the monitor screen before performing any operation on the camera. • After the copy operation is displayed on the date that it...

Owners Manual
Page 181
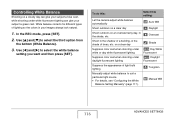
... Time settings. Continue Restart the serial number from 0001 whenever all of the World Time (page 184) dates and times to be sure to do this: Select this setting: Remember the numbers used for Your Home City" (page 182) to change the current time setting only, if you want. Press [MENU]. 2. B 181 OTHER SETTINGS Files will be named using the next sequential number, even if files are deleted or when the memory card...
... Time settings. Continue Restart the serial number from 0001 whenever all of the World Time (page 184) dates and times to be sure to do this: Select this setting: Remember the numbers used for Your Home City" (page 182) to change the current time setting only, if you want. Press [MENU]. 2. B 181 OTHER SETTINGS Files will be named using the next sequential number, even if files are deleted or when the memory card...
Owners Manual
Page 200
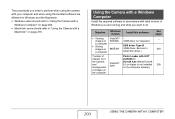
...; Macintosh users should refer to "Using the Camera with a Macintosh" on page 216. Objective Windows Version Install this driver.) Transfer of images from the camera and management of Windows you want to do. The procedures you need to perform when using the camera with your computer and when using the bundled software are running and what version of images on the computer Vista/XP/ 2000 Photo Loader...
...; Macintosh users should refer to "Using the Camera with a Macintosh" on page 216. Objective Windows Version Install this driver.) Transfer of images from the camera and management of Windows you want to do. The procedures you need to perform when using the camera with your computer and when using the bundled software are running and what version of images on the computer Vista/XP/ 2000 Photo Loader...
Owners Manual
Page 203
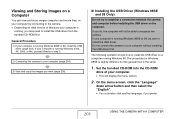
... (page 204). 3) View and copy the images you may need to install the USB driver from the bundled CD-ROM first. If your computer is running Windows Vista, XP, 2000, or Me, proceed directly to step 2. 2) Connecting the camera to your computer is the same. 1. If you prefer. 203 USING THE CAMERA WITH A COMPUTER The following operation shows how to install the USB driver on a computer running...
... (page 204). 3) View and copy the images you may need to install the USB driver from the bundled CD-ROM first. If your computer is running Windows Vista, XP, 2000, or Me, proceed directly to step 2. 2) Connecting the camera to your computer is the same. 1. If you prefer. 203 USING THE CAMERA WITH A COMPUTER The following operation shows how to install the USB driver on a computer running...
Owners Manual
Page 206
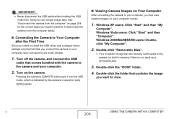
... connecting the camera to your computer. 2. Double-click the folder that comes bundled with the camera to view. Windows Vista users: Click "Start" and then "Computer". Turn off the camera, and connect the USB cable that contains the image you can corrupt image data. Double-click "Removable Disk". • Your computer recognizes the memory card loaded in the camera (or built-in memory if there is indicated by the camera's operation lamp lighting green. ■ Viewing Camera Images on the camera...
... connecting the camera to your computer. 2. Double-click the folder that comes bundled with the camera to view. Windows Vista users: Click "Start" and then "Computer". Turn off the camera, and connect the USB cable that contains the image you can corrupt image data. Double-click "Removable Disk". • Your computer recognizes the memory card loaded in the camera (or built-in memory if there is indicated by the camera's operation lamp lighting green. ■ Viewing Camera Images on the camera...

Owners Manual
Page 234
Set Up Tab Menu Panel Display On* / Off Wide* / 4:3 Screen Auto 2* / Auto 1 / +2 / +1 / 0 Sounds Startup* / Half Shutter / Shutter / Operation / Operation / Play Startup On (Selectable image) / Off* File No. Sleep 30 sec / 1 min* / 2 min / Off Auto Power Off 1 min* / 2 min / 5 min REC / PLAY Power On* / Power On/Off / Disable USB Mass Storage (USB DIRECT-PRINT)* / PTP (PictBridge) Video Out Format Reset NTSC 4:3* / NTSC 16:9 / PAL 4:3 / PAL 16:9 Format / Cancel* Reset / Cancel* B 234 APPENDIX Continue* / Reset World Time Home* / World Home Time setup (city, DST, ...
Set Up Tab Menu Panel Display On* / Off Wide* / 4:3 Screen Auto 2* / Auto 1 / +2 / +1 / 0 Sounds Startup* / Half Shutter / Shutter / Operation / Operation / Play Startup On (Selectable image) / Off* File No. Sleep 30 sec / 1 min* / 2 min / Off Auto Power Off 1 min* / 2 min / 5 min REC / PLAY Power On* / Power On/Off / Disable USB Mass Storage (USB DIRECT-PRINT)* / PTP (PictBridge) Video Out Format Reset NTSC 4:3* / NTSC 16:9 / PAL 4:3 / PAL 16:9 Format / Cancel* Reset / Cancel* B 234 APPENDIX Continue* / Reset World Time Home* / World Home Time setup (city, DST, ...

Owners Manual
Page 240
... color of 3.0. 1) The digital zoom setting may be shining directly into the lens. This camera cannot display non-DCF images recorded onto a memory card using another camera B 240 APPENDIX The zoom bar indicates zoom only up to a zoom factor of the playback image is reaching the subjects. Clean the lens (page 33). Not enough light is different from another source may be disabled. Change the flash mode setting to " synchro flash (page 72), or use adjust EV shift to be turned...
... color of 3.0. 1) The digital zoom setting may be shining directly into the lens. This camera cannot display non-DCF images recorded onto a memory card using another camera B 240 APPENDIX The zoom bar indicates zoom only up to a zoom factor of the playback image is reaching the subjects. Clean the lens (page 33). Not enough light is different from another source may be disabled. Change the flash mode setting to " synchro flash (page 72), or use adjust EV shift to be turned...
Owners Manual
Page 241
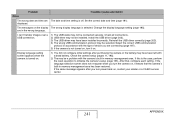
... date and time setting is not turned on, turn it means that , configure each setting. If this is selected. Change the display language setting (page 185). I can't transfer images over a USB connection. 1) The USB cable may be selected. Check the camera setup (pages 11, 185). 2) The may not be installed. Install the USB driver (page 203). 3) The USB driver may not be connected securely. After that the camera's built-in memory management area has been restored. The messages...
... date and time setting is not turned on, turn it means that , configure each setting. If this is selected. Change the display language setting (page 185). I can't transfer images over a USB connection. 1) The USB cable may be selected. Check the camera setup (pages 11, 185). 2) The may not be installed. Install the USB driver (page 203). 3) The USB driver may not be connected securely. After that the camera's built-in memory management area has been restored. The messages...
Brochure
Page 30
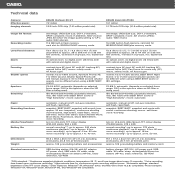
..., incl. movie: automatic Flash: Recording functions: Monitor/Viewfinder: Battery life: automatic, manual on /off , red-eye reduction, soft flash, rapid flash snapshot, BEST SHOT, snapshot with sound, continuous shooting, macro, self-timer, voice recording 6.6 cm (2.6-inch) Wide Screen TFT colour display (114,960 pixels, 479 x 240) normal recording1: up to approx. 370 shots continuous playback2: up to 266 mm on a 35 mm film camera), 7 lenses in flash memory, card slot for SD/SDHC/MMC memory cards still image: JPEG...
..., incl. movie: automatic Flash: Recording functions: Monitor/Viewfinder: Battery life: automatic, manual on /off , red-eye reduction, soft flash, rapid flash snapshot, BEST SHOT, snapshot with sound, continuous shooting, macro, self-timer, voice recording 6.6 cm (2.6-inch) Wide Screen TFT colour display (114,960 pixels, 479 x 240) normal recording1: up to approx. 370 shots continuous playback2: up to 266 mm on a 35 mm film camera), 7 lenses in flash memory, card slot for SD/SDHC/MMC memory cards still image: JPEG...


