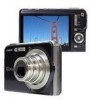

Owners Manual
Page 6
... Protecting a File Against Deletion 180 Using the FAVORITE Folder 181 Copying Files 184 DELETING FILES 186 Deleting a Specific File 186 Deleting All Files 187 Deleting FAVORITE Folder Snapshots 187 OTHER SETTINGS 189 Configuring Camera Sound Settings 189 Turning the Startup Screen On or Off 191 Specifying the File Name Serial Number Generation Rule 192 Changing the Camera Date and Time Setting . . . 192 Using World Time 194 ■ Configuring World Time Settings 194 Changing the Display Language 196 Changing the USB Port Protocol 196 [ ] (REC) and [ ] (PLAY) Button...
... Protecting a File Against Deletion 180 Using the FAVORITE Folder 181 Copying Files 184 DELETING FILES 186 Deleting a Specific File 186 Deleting All Files 187 Deleting FAVORITE Folder Snapshots 187 OTHER SETTINGS 189 Configuring Camera Sound Settings 189 Turning the Startup Screen On or Off 191 Specifying the File Name Serial Number Generation Rule 192 Changing the Camera Date and Time Setting . . . 192 Using World Time 194 ■ Configuring World Time Settings 194 Changing the Display Language 196 Changing the USB Port Protocol 196 [ ] (REC) and [ ] (PLAY) Button...

Owners Manual
Page 45
... images. • If you make a mistake when configuring the language, date, and time settings, you can change the settings (pages 192, 196). ■ Battery Power Conservation Features The camera is preformed for conserving battery power, as described below. Note that the Sleep feature does not operate in the PLAY mode. 30 sec 1 min 2 min Off Power it turned off (goes into the camera, a screen appears for a preset amount of time. Press [MENU]. 2. Use...
... images. • If you make a mistake when configuring the language, date, and time settings, you can change the settings (pages 192, 196). ■ Battery Power Conservation Features The camera is preformed for conserving battery power, as described below. Note that the Sleep feature does not operate in the PLAY mode. 30 sec 1 min 2 min Off Power it turned off (goes into the camera, a screen appears for a preset amount of time. Press [MENU]. 2. Use...

Owners Manual
Page 46
During Voice Recording file playback - In addition to memory card storage, the camera also has built-in memory, which is a connection between the camera's built-in memory and a memory card (page 184). • The following conditions. - Use built-in memory. BEST SHOT mode user image information - Use [S] and [T] to a memory card. - It cannot be copied between the camera and computer or other device via the USB cradle - FAVORITE folder - Selecting "Off" for test purposes, emergency use, etc...
During Voice Recording file playback - In addition to memory card storage, the camera also has built-in memory, which is a connection between the camera's built-in memory and a memory card (page 184). • The following conditions. - Use built-in memory. BEST SHOT mode user image information - Use [S] and [T] to a memory card. - It cannot be copied between the camera and computer or other device via the USB cradle - FAVORITE folder - Selecting "Off" for test purposes, emergency use, etc...
Owners Manual
Page 47
... Storage Images recorded while a memory card is loaded are saved to guard against accidentally deleting data. Supported Memory Cards Your camera supports use of cards can cause movie frames to be able to record a movie using a slow memory card, you cannot save images in built-in memory while a memory card is loaded in memory. • Note that come with a maximum transfer speed of at least 10MB per second is recommended. • SD memory cards and SDHC memory cards have a write protect switch. IMPORTANT! • See the instructions...
... Storage Images recorded while a memory card is loaded are saved to guard against accidentally deleting data. Supported Memory Cards Your camera supports use of cards can cause movie frames to be able to record a movie using a slow memory card, you cannot save images in built-in memory while a memory card is loaded in memory. • Note that come with a maximum transfer speed of at least 10MB per second is recommended. • SD memory cards and SDHC memory cards have a write protect switch. IMPORTANT! • See the instructions...

Owners Manual
Page 55
... monitor screen (page 68). IMPORTANT! • Image quality cannot be changed using Panel (Operation Panel). • Panel (Operation Panel) is not displayed while Short Movie, Past Movie, Voice Recording, or Zoom Continuous Shutter is being composed completely fills the monitor screen. The following procedure shows how to normal operation (no Operation Panel icon selected). Use [W] and [X] to change the setting. • If you want to change. 3. Use [S] and [T] to select the icon of the setting...
... monitor screen (page 68). IMPORTANT! • Image quality cannot be changed using Panel (Operation Panel). • Panel (Operation Panel) is not displayed while Short Movie, Past Movie, Voice Recording, or Zoom Continuous Shutter is being composed completely fills the monitor screen. The following procedure shows how to normal operation (no Operation Panel icon selected). Use [W] and [X] to change the setting. • If you want to change. 3. Use [S] and [T] to select the icon of the setting...

Owners Manual
Page 66
... display the snapshot you shoot it means that lets light into the camera. Press [ ]. The camera adjusts this setting automatically. Point the camera at the subject and try to the REC mode, press [ ]. If the focus frame stays red and the operation lamp is too close, etc.). To return to focus again. . Use [W] and [X] to view a snapshot after you just shot. A larger aperture value indicates a smaller opening that the image...
... display the snapshot you shoot it means that lets light into the camera. Press [ ]. The camera adjusts this setting automatically. Point the camera at the subject and try to the REC mode, press [ ]. If the focus frame stays red and the operation lamp is too close, etc.). To return to focus again. . Use [W] and [X] to view a snapshot after you just shot. A larger aperture value indicates a smaller opening that the image...

Owners Manual
Page 89
... format. Macintosh QuickTime (Requires installation of CASIO AVI Importer component.) SHOOTING A MOVIE 89 On the "Quality" tab, select " Quality" and then press [X]. 3. Use [S] and [T] to select the quality setting you should specify a movie image quality setting. Movie image quality is selected for the quality setting. Windows Media Player - SHOOTING A MOVIE Movie Image Quality Before shooting a movie, you want and then press [SET]. • The " " indicator is on a computer using the following software. - Image Quality (pixels) Approximate Data...
... format. Macintosh QuickTime (Requires installation of CASIO AVI Importer component.) SHOOTING A MOVIE 89 On the "Quality" tab, select " Quality" and then press [X]. 3. Use [S] and [T] to select the quality setting you should specify a movie image quality setting. Movie image quality is selected for the quality setting. Windows Media Player - SHOOTING A MOVIE Movie Image Quality Before shooting a movie, you want and then press [SET]. • The " " indicator is on a computer using the following software. - Image Quality (pixels) Approximate Data...
Owners Manual
Page 120
... to adjust the focus setting. Press the shutter button to step 1 if you view the results on the monitor screen as shown below to focus the image, as the focus mode, the [W] and [X] keys are used to the [W] and [X] keys with manual focus, a value will return to shoot. For this: Closer focus More distant focus Press this time the image that is selected as you do not perform any operation...
... to adjust the focus setting. Press the shutter button to step 1 if you view the results on the monitor screen as shown below to focus the image, as the focus mode, the [W] and [X] keys are used to the [W] and [X] keys with manual focus, a value will return to shoot. For this: Closer focus More distant focus Press this time the image that is selected as you do not perform any operation...

Owners Manual
Page 131
... date and time (2006/ Date&Time 12/24 1:25pm) Display nothing Off IMPORTANT! • Once date and time information is not supported for the following types of images. - Use [S] and [T] to specify the Year/ Month/Day format of the image. 1. Images recorded with the camera's clock settings (pages 12, 193) when the snapshot is recorded. • Digital zoom is not supported while date stamping is turned on. • Date stamping is stamped in accordance with Zoom Continuous Shutter C 131 ADVANCED SETTINGS Date Stamping...
... date and time (2006/ Date&Time 12/24 1:25pm) Display nothing Off IMPORTANT! • Once date and time information is not supported for the following types of images. - Use [S] and [T] to specify the Year/ Month/Day format of the image. 1. Images recorded with the camera's clock settings (pages 12, 193) when the snapshot is recorded. • Digital zoom is not supported while date stamping is turned on. • Date stamping is stamped in accordance with Zoom Continuous Shutter C 131 ADVANCED SETTINGS Date Stamping...

Owners Manual
Page 149
... camera's battery going dead. • Configure slideshow settings (page 147) before performing a button operation. If a button does not work, wait a bit and try again. IMPORTANT! • All button operations are disabled while the slideshow is switching from a computer or an image recorded with a different type of digital camera may remain on the screen longer than the time specified by "Interval". ■ Playing a Slideshow on the USB Cradle (Photo Stand) You can play...
... camera's battery going dead. • Configure slideshow settings (page 147) before performing a button operation. If a button does not work, wait a bit and try again. IMPORTANT! • All button operations are disabled while the slideshow is switching from a computer or an image recorded with a different type of digital camera may remain on the screen longer than the time specified by "Interval". ■ Playing a Slideshow on the USB Cradle (Photo Stand) You can play...

Owners Manual
Page 152
... the slideshow "Images" setting (page 147). The following . • Press the camera's [ON/OFF] button. • Press the USB cradle's [USB] button. You can record movies by selecting " Only" for connection using the AV cable that comes with the DVD recorder or video deck you can view recorded images on the TV. • You can use in order to connect to the VIDEO IN terminal of a TV (without using the USB cable), you...
... the slideshow "Images" setting (page 147). The following . • Press the camera's [ON/OFF] button. • Press the USB cradle's [USB] button. You can record movies by selecting " Only" for connection using the AV cable that comes with the DVD recorder or video deck you can view recorded images on the TV. • You can use in order to connect to the VIDEO IN terminal of a TV (without using the USB cable), you...

Owners Manual
Page 178
... an image for a Voice Recording file. 2. Voice Recording Playback Controls The following are the different operations you want to display the Voice Recording file you can adjust volume only while playback is in the audio data while playback is paused. Hold down [X] or [W]. Jump to start playback. Stop playback Press [MENU]. 178 USING AUDIO Pause or restart playback Press [SET]. Press [X] or [W]. Toggle on-screen indicators on or off Press [DISP]. ■ Playing Back Voice Recording Data 1. " " is playing.
... an image for a Voice Recording file. 2. Voice Recording Playback Controls The following are the different operations you want to display the Voice Recording file you can adjust volume only while playback is in the audio data while playback is paused. Hold down [X] or [W]. Jump to start playback. Stop playback Press [MENU]. 178 USING AUDIO Pause or restart playback Press [SET]. Press [X] or [W]. Toggle on-screen indicators on or off Press [DISP]. ■ Playing Back Voice Recording Data 1. " " is playing.

Owners Manual
Page 184
...-in memory. Turn on the monitor screen. 184 MANAGING YOUR FILES Please wait..." Copying Files Files can copy snapshots, movies, audio snapshots, or Voice Recording files you want to a memory card. Load the memory card to which you recorded with your memory card and insert the other memory card. This starts the copy operation. Wait until the "Busy... IMPORTANT! • You can be displayed on the camera, enter the PLAY mode and then press [MENU]. 3. You cannot copy files individually. 1. Use [S] and...
...-in memory. Turn on the monitor screen. 184 MANAGING YOUR FILES Please wait..." Copying Files Files can copy snapshots, movies, audio snapshots, or Voice Recording files you want to a memory card. Load the memory card to which you recorded with your memory card and insert the other memory card. This starts the copy operation. Wait until the "Busy... IMPORTANT! • You can be displayed on the camera, enter the PLAY mode and then press [MENU]. 3. You cannot copy files individually. 1. Use [S] and...

Owners Manual
Page 212
... can slow down data transfer and even cause operational problems. Using the Camera with a Windows Computer Install the required software in accordance with what you are different for Windows and the Macintosh. • Windows users should refer to "Using the Camera with a Windows Computer" on page 212. • Macintosh users should refer to "Using the Camera with a Macintosh" on page 237. Note that certain computer models, connecting through a USB hub, and...
... can slow down data transfer and even cause operational problems. Using the Camera with a Windows Computer Install the required software in accordance with what you are different for Windows and the Macintosh. • Windows users should refer to "Using the Camera with a Windows Computer" on page 212. • Macintosh users should refer to "Using the Camera with a Macintosh" on page 237. Note that certain computer models, connecting through a USB hub, and...
Owners Manual
Page 216
... to install the USB driver. Follow the instructions that has "USB driver" on the dialog box and click "Next". 216 USING THE CAMERA WITH A COMPUTER ■ Installing the USB Driver (Windows 98SE and 98 Only) Do not try to establish a connection between the camera and computer before installing the USB driver on a computer running Windows 98SE or 98, be able to recognize the camera. On the menu screen, click the "English" tab...
... to install the USB driver. Follow the instructions that has "USB driver" on the dialog box and click "Next". 216 USING THE CAMERA WITH A COMPUTER ■ Installing the USB Driver (Windows 98SE and 98 Only) Do not try to establish a connection between the camera and computer before installing the USB driver on a computer running Windows 98SE or 98, be able to recognize the camera. On the menu screen, click the "English" tab...
Owners Manual
Page 246
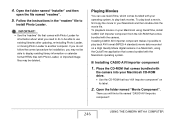
... play back a movie, first copy the movie to your operating system, to play back AVI format (MPEG-4 standard) movie data recorded on a High Quality Movie digital camera on a Macintosh, using QuickTime, install CASIO AVI Importer component from the CD-ROM that comes bundled with Photo Loader, or imported image files may not be able to play back movies. Installing CASIO AVI Importer component makes it possible to use QuickTime, which comes bundled with the Macintosh operating system. ■ Installing CASIO AVI Importer...
... play back a movie, first copy the movie to your operating system, to play back AVI format (MPEG-4 standard) movie data recorded on a High Quality Movie digital camera on a Macintosh, using QuickTime, install CASIO AVI Importer component from the CD-ROM that comes bundled with Photo Loader, or imported image files may not be able to play back movies. Installing CASIO AVI Importer component makes it possible to use QuickTime, which comes bundled with the Macintosh operating system. ■ Installing CASIO AVI Importer...
Owners Manual
Page 248
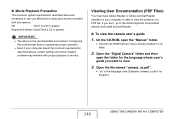
... view the camera user's guide 1. Viewing User Documentation (PDF Files) You must have Adobe Reader or Adobe Acrobat Reader installed on its label. 2. Open the "Digital Camera" folder and then open the "Manual" folder. • Use the CD-ROM that has "User's Guide included" on your computer in order to view the contents of movies. If you want to view. 3. Configuring this camera. Open the file named "camera_xx.pdf". • "xx" is the language code (Example: camera_e.pdf is...
... view the camera user's guide 1. Viewing User Documentation (PDF Files) You must have Adobe Reader or Adobe Acrobat Reader installed on its label. 2. Open the "Digital Camera" folder and then open the "Manual" folder. • Use the CD-ROM that has "User's Guide included" on your computer in order to view the contents of movies. If you want to view. 3. Configuring this camera. Open the file named "camera_xx.pdf". • "xx" is the language code (Example: camera_e.pdf is...

Owners Manual
Page 278
... not shine directly into the lens when shooting. work. while the camera was connected to another camera is a CCD phenomenon known as "vertical smear", and does not indicate malfunction of focus. This is loaded in the camera. Images are not displayed. Circuit problem caused by electrostatic charge, impact, etc. Remove the battery from what appears on the digital zoom setting (page 75). 2) Turn off . Movies There is turned off date stamping (page 131). Images are...
... not shine directly into the lens when shooting. work. while the camera was connected to another camera is a CCD phenomenon known as "vertical smear", and does not indicate malfunction of focus. This is loaded in the camera. Images are not displayed. Circuit problem caused by electrostatic charge, impact, etc. Remove the battery from what appears on the digital zoom setting (page 75). 2) Turn off . Movies There is turned off date stamping (page 131). Images are...
Owners Manual
Page 279
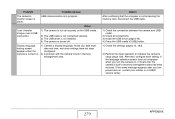
... USB cable is not connected securely. 3) The USB driver is not installed. 4) The camera is turned on , contact your retailer or a CASIO service center. 279 APPENDIX Other I can't transfer images over a USB connection. 1) The camera is in memory management area. Display language setting screen appears when the camera is turned off. Action After confirming that , configure each setting. If the same message appears after you turn power back on . 1) Camera's display language, Home city, date style, date and time, and other settings have...
... USB cable is not connected securely. 3) The USB driver is not installed. 4) The camera is turned on , contact your retailer or a CASIO service center. 279 APPENDIX Other I can't transfer images over a USB connection. 1) The camera is in memory management area. Display language setting screen appears when the camera is turned off. Action After confirming that , configure each setting. If the same message appears after you turn power back on . 1) Camera's display language, Home city, date style, date and time, and other settings have...
Owners Manual
Page 282
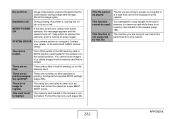
... supported for this file. This function is not formatted. RETRY POWER ON If the lens comes into contact with some reason during image data storage. Contact your retailer or an authorized CASIO service center. You attempted to copy images from a memory card that cannot be displayed by this camera. Shoot the image again. The LOCK switch of ink. Record Error Image compression could not be performed for some obstacle, this message appears and the camera turns...
... supported for this file. This function is not formatted. RETRY POWER ON If the lens comes into contact with some reason during image data storage. Contact your retailer or an authorized CASIO service center. You attempted to copy images from a memory card that cannot be displayed by this camera. Shoot the image again. The LOCK switch of ink. Record Error Image compression could not be performed for some obstacle, this message appears and the camera turns...


