
Owners Manual
Page 5
... Image 137 Using Image Roulette 138 Adding Audio to a Snapshot 139 To re-record audio 140 Playing Back a Voice Recording File 141 Displaying Camera Images on a TV Screen 142 Selecting the Video Output System 144 145 DELETING FILES Deleting a Single File 145 Deleting All Files 146 147... FILE MANAGEMENT Folders 147 Memory Folders and Files 147 Protecting Files 148 To protect a single file 148 To protect all files in memory 149 Using the FAVORITE Folder 149 To copy a file to the FAVORITE folder 149 ...
... Image 137 Using Image Roulette 138 Adding Audio to a Snapshot 139 To re-record audio 140 Playing Back a Voice Recording File 141 Displaying Camera Images on a TV Screen 142 Selecting the Video Output System 144 145 DELETING FILES Deleting a Single File 145 Deleting All Files 146 147... FILE MANAGEMENT Folders 147 Memory Folders and Files 147 Protecting Files 148 To protect a single file 148 To protect all files in memory 149 Using the FAVORITE Folder 149 To copy a file to the FAVORITE folder 149 ...
Owners Manual
Page 6
... Changing the USB Port Protocol 160 Configuring [ ] (REC) and [ ] (PLAY) Power On/Off Functions 161 Formatting Built-in Memory 162 163 USING A MEMORY CARD Using a Memory Card 164 To insert a memory card into the camera 164 To replace the memory card 165 Formatting a Memory Card 166 Copying Files 167 To copy all the files in built-in...
... Changing the USB Port Protocol 160 Configuring [ ] (REC) and [ ] (PLAY) Power On/Off Functions 161 Formatting Built-in Memory 162 163 USING A MEMORY CARD Using a Memory Card 164 To insert a memory card into the camera 164 To replace the memory card 165 Formatting a Memory Card 166 Copying Files 167 To copy all the files in built-in...

Owners Manual
Page 7
...Camera with a Windows Computer ........ 180 Using the Camera with a Macintosh Computer ....... 188 Using a Memory Card to Transfer Images to a Computer 193 Memory Data 194 DCF Protocol 194 Memory Folder Structure 195 Image Files Supported by the Camera 196 198 USING THE CAMERA WITH A COMPUTER Using the Camera...Editing a Movie 210 Viewing User Documentation (PDF Files) 212 User Registration 212 Exiting the Menu Application 212 Using the Camera with a Macintosh Computer ....... 213 About the bundled CD-ROM 213 Computer System Requirements 214 Managing Images on a ...
...Camera with a Windows Computer ........ 180 Using the Camera with a Macintosh Computer ....... 188 Using a Memory Card to Transfer Images to a Computer 193 Memory Data 194 DCF Protocol 194 Memory Folder Structure 195 Image Files Supported by the Camera 196 198 USING THE CAMERA WITH A COMPUTER Using the Camera...Editing a Movie 210 Viewing User Documentation (PDF Files) 212 User Registration 212 Exiting the Menu Application 212 Using the Camera with a Macintosh Computer ....... 213 About the bundled CD-ROM 213 Computer System Requirements 214 Managing Images on a ...

Owners Manual
Page 9
...8226; AF assist light (page 54) Improves auto focus accuracy when shooting under dim lighting. • 12X zoom (page 57) 3X optical zoom, 4X digital zoom 9 B Features • 5.0 million effective pixels The CCD provides 5.25 million total pixels for images of outstanding resolution and detail. • 2.2-inch... TFT color LCD monitor screen • 8.3MB built-in memory Images can be recorded without using a memory card. • Bundled with a USB Cradle The bundled USB cradle can be used to charge the camera's battery (page 33), to view images on a TV screen (page 142), ...
...8226; AF assist light (page 54) Improves auto focus accuracy when shooting under dim lighting. • 12X zoom (page 57) 3X optical zoom, 4X digital zoom 9 B Features • 5.0 million effective pixels The CCD provides 5.25 million total pixels for images of outstanding resolution and detail. • 2.2-inch... TFT color LCD monitor screen • 8.3MB built-in memory Images can be recorded without using a memory card. • Bundled with a USB Cradle The bundled USB cradle can be used to charge the camera's battery (page 33), to view images on a TV screen (page 142), ...
Owners Manual
Page 11
... shooting under difficult lighting conditions easier than ever before. • Calendar screen (page 132) A simple operation displays a full-month calendar on the camera, press the shutter button half-way or all the way, or perform a key operation. • World Time (page 158) A simple operation sets... (pages 98, 130) Capture frames from among 162 cities in 32 time zones. • Support for SD memory cards and MMC (MultiMedia Cards) for memory expansion (page 163) • Digital Print Order Format (DPOF) (page 171) Images can be used when specifying images and quantities for printing by...
... shooting under difficult lighting conditions easier than ever before. • Calendar screen (page 132) A simple operation displays a full-month calendar on the camera, press the shutter button half-way or all the way, or perform a key operation. • World Time (page 158) A simple operation sets... (pages 98, 130) Capture frames from among 162 cities in 32 time zones. • Support for SD memory cards and MMC (MultiMedia Cards) for memory expansion (page 163) • Digital Print Order Format (DPOF) (page 171) Images can be used when specifying images and quantities for printing by...

Owners Manual
Page 14
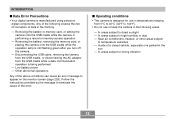
...so will not only make sure you first record a number of this camera can also corrupt other area where its memory to ensure that the camera is configured correctly and operating properly. 14 Next, remove the camera's battery and/or unplug the AC adaptor power cord from the wall ...to dropping it or otherwise subjecting it to personal computer memory. • Never open the battery cover, disconnect the AC adaptor from the camera, or unplug the AC adaptor from the power outlet, and contact your dealer or nearest CASIO authorized service center. • Never use is being recorded...
...so will not only make sure you first record a number of this camera can also corrupt other area where its memory to ensure that the camera is configured correctly and operating properly. 14 Next, remove the camera's battery and/or unplug the AC adaptor power cord from the wall ...to dropping it or otherwise subjecting it to personal computer memory. • Never open the battery cover, disconnect the AC adaptor from the camera, or unplug the AC adaptor from the power outlet, and contact your dealer or nearest CASIO authorized service center. • Never use is being recorded...
Owners Manual
Page 15
... ranging from the USB cradle while a data communication operation is performing a record or memory access operation - I Data Error Precautions • Your digital camera is still flashing green after you turn off the camera - Removing the battery, removing the memory card, or placing the camera onto the USB cradle while the operation lamp is manufactured using precision...
... ranging from the USB cradle while a data communication operation is performing a record or memory access operation - I Data Error Precautions • Your digital camera is still flashing green after you turn off the camera - Removing the battery, removing the memory card, or placing the camera onto the USB cradle while the operation lamp is manufactured using precision...
Owners Manual
Page 20
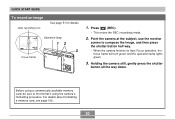
... the subject, use the monitor screen to first format it using a commercially available memory card, be sure to compose the image, and then press the shutter button half way. • When the camera finishes its Auto Focus operation, the focus frame will turn green and the operation lamp lights ...green. 3. For details about formatting a memory card, see page 166. 20 Holding the camera still, gently press the shutter button all the way down. QUICK START GUIDE To record an image Auto recording icon See...
... the subject, use the monitor screen to first format it using a commercially available memory card, be sure to compose the image, and then press the shutter button half way. • When the camera finishes its Auto Focus operation, the focus frame will turn green and the operation lamp lights ...green. 3. For details about formatting a memory card, see page 166. 20 Holding the camera still, gently press the shutter button all the way down. QUICK START GUIDE To record an image Auto recording icon See...

Owners Manual
Page 22
... "snow" in a recorded image or on the monitor screen, which makes the image look grainy. This term as used in this manual: "camera" "file memory" "battery" "charger" Means this: The CASIO EX-S500 Digital Camera The location where the camera is currently storing images you record (page 52) The NP-20 Rechargeable Lithium Ion Battery The optionally available...
... "snow" in a recorded image or on the monitor screen, which makes the image look grainy. This term as used in this manual: "camera" "file memory" "battery" "charger" Means this: The CASIO EX-S500 Digital Camera The location where the camera is currently storing images you record (page 52) The NP-20 Rechargeable Lithium Ion Battery The optionally available...
Owners Manual
Page 23
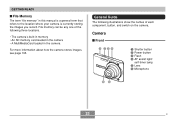
... 195. General Guide The following three locations. • The camera's built-in memory • An SD memory card loaded in the camera • A MultiMediaCard loaded in this manual is a general term that refers to the location where your camera is currently storing the images you record. GETTING READY I Front... 1 234 1 Shutter button 2 Power button 3 Flash 4 AF assist light/ self-timer lamp 5 Lens 6 Microphone 65 23 B File memory can be any one of the following ...
... 195. General Guide The following three locations. • The camera's built-in memory • An SD memory card loaded in the camera • A MultiMediaCard loaded in this manual is a general term that refers to the location where your camera is currently storing the images you record. GETTING READY I Front... 1 234 1 Shutter button 2 Power button 3 Flash 4 AF assist light/ self-timer lamp 5 Lens 6 Microphone 65 23 B File memory can be any one of the following ...

Owners Manual
Page 24
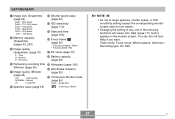
I Stopper J Memory card slot K Battery compartment L Battery cover M Connector N Tripod screw hole * Use this hole when attaching to a tripod. GETTING READY I Back 7 890 A B C D H G FE 7 Operation lamp 8 [ ] (PLAY mode) button 9 [ ] (REC mode) button 0 [ ] (MOVIE) button A Zoom button B Strap ring C Speaker D E [SET] button F [BS] (BEST SHOT) button G [MENU] button H Monitor Screen [̈] [SET] I Bottom I NM L KJ 24
I Stopper J Memory card slot K Battery compartment L Battery cover M Connector N Tripod screw hole * Use this hole when attaching to a tripod. GETTING READY I Back 7 890 A B C D H G FE 7 Operation lamp 8 [ ] (PLAY mode) button 9 [ ] (REC mode) button 0 [ ] (MOVIE) button A Zoom button B Strap ring C Speaker D E [SET] button F [BS] (BEST SHOT) button G [MENU] button H Monitor Screen [̈] [SET] I Bottom I NM L KJ 24
Owners Manual
Page 27
... 69) 2560 × 1920 pixels 2560 × 1712 (3:2) pixels 2304 × 1728 pixels 2048 × 1536 pixels 1600 × 1200 pixels 640 × 480 pixels 8 Memory capacity (Snapshots) (pages 53, 230) 9 Image quality (Snapshots) (page 70) F : Fine N : Normal E : Economy C Shutter speed value (page 53) D ISO sensitivity (page 114) E Date and time...
... 69) 2560 × 1920 pixels 2560 × 1712 (3:2) pixels 2304 × 1728 pixels 2048 × 1536 pixels 1600 × 1200 pixels 640 × 480 pixels 8 Memory capacity (Snapshots) (pages 53, 230) 9 Image quality (Snapshots) (page 70) F : Fine N : Normal E : Economy C Shutter speed value (page 53) D ISO sensitivity (page 114) E Date and time...
Owners Manual
Page 37
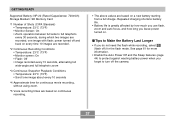
... • If you leave power turned on a new battery starting from a full charge. GETTING READY Supported Battery: NP-20 (Rated Capacitance: 700mAh) Storage Medium: SD Memory Card *1 Number of Shots (CIPA Standard) • Temperature: 23°C (73°F) • Monitor Screen: On • Zoom operation between full wide to full telephoto... every 30 seconds, during which two images are recorded, one image about every 10 seconds *4 Approximate time for the flash mode. power turned off the camera. 37 I Tips to turn off and back on every time 10 images are based on .
... • If you leave power turned on a new battery starting from a full charge. GETTING READY Supported Battery: NP-20 (Rated Capacitance: 700mAh) Storage Medium: SD Memory Card *1 Number of Shots (CIPA Standard) • Temperature: 23°C (73°F) • Monitor Screen: On • Zoom operation between full wide to full telephoto... every 30 seconds, during which two images are recorded, one image about every 10 seconds *4 Approximate time for the flash mode. power turned off the camera. 37 I Tips to turn off and back on every time 10 images are based on .
Owners Manual
Page 52
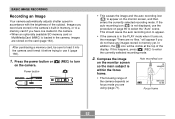
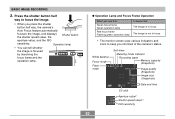
.... This should cause the auto recording icon to use the procedure on the camera. In addition, the icon will appear if you have any images stored in the camera. • When an optionally available SD memory card or MultiMediaCard (MMC) is within the focus frame. • The focusing range ... subject. Compose the image on the monitor screen so the main subject is loaded in memory, or to enter the currently selected recording mode. 2. Images you are stored in the camera's built-in the camera, images are stored on focus mode you record are using (page 71). Auto recording...
.... This should cause the auto recording icon to use the procedure on the camera. In addition, the icon will appear if you have any images stored in the camera. • When an optionally available SD memory card or MultiMediaCard (MMC) is within the focus frame. • The focusing range ... subject. Compose the image on the monitor screen so the main subject is loaded in memory, or to enter the currently selected recording mode. 2. Images you are stored in the camera's built-in the camera, images are stored on focus mode you record are using (page 71). Auto recording...
Owners Manual
Page 53
...focused by observing the focus frame and the operation lamp. White balance Focus mode Flash mode Self-timer Metering mode indicator Recording types Memory capacity (Snapshots) Image quality (Snapshots) Image size (Snapshots) Date and time EV shift Aperture value*1 Shutter speed value*2 ISO sensitivity... 53 Press the shutter button half way to keep you press the shutter button half way, the camera's Auto Focus feature automatically focuses the image, and displays Shutter button the shutter speed value, the aperture value, and the ISO ...
...focused by observing the focus frame and the operation lamp. White balance Focus mode Flash mode Self-timer Metering mode indicator Recording types Memory capacity (Snapshots) Image quality (Snapshots) Image size (Snapshots) Date and time EV shift Aperture value*1 Shutter speed value*2 ISO sensitivity... 53 Press the shutter button half way to keep you press the shutter button half way, the camera's Auto Focus feature automatically focuses the image, and displays Shutter button the shutter speed value, the aperture value, and the ISO ...
Owners Manual
Page 55
...you want, and then press [SET]. When using the camera indoors under such lighting, you may experience some digital noise (graininess) to malfunction of nearby people, etc. 1. This can also corrupt images already stored in file memory and even lead to appear in accordance with the brightness...assist light Select this : Turn on or off the AF assist light when recording images of the camera. • Never remove the memory card while an image is being recorded to the memory card. • Fluorescent lighting actually flickers at the subject's eyes. It is flashing green. Use...
...you want, and then press [SET]. When using the camera indoors under such lighting, you may experience some digital noise (graininess) to malfunction of nearby people, etc. 1. This can also corrupt images already stored in file memory and even lead to appear in accordance with the brightness...assist light Select this : Turn on or off the AF assist light when recording images of the camera. • Never remove the memory card while an image is being recorded to the memory card. • Fluorescent lighting actually flickers at the subject's eyes. It is flashing green. Use...
Owners Manual
Page 57
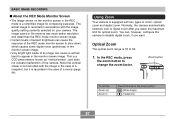
... The optical zoom range is not recorded with two types of an image can , however, configure the camera to appear in Press this side of the camera. The image saved in file memory has much better resolution and detail than the REC mode monitor screen image. • Certain levels of ...subject brightness can cause the response of the REC mode monitor screen to slow down, which causes some digital noise (graininess) in ...
... The optical zoom range is not recorded with two types of an image can , however, configure the camera to appear in Press this side of the camera. The image saved in file memory has much better resolution and detail than the REC mode monitor screen image. • Certain levels of ...subject brightness can cause the response of the REC mode monitor screen to slow down, which causes some digital noise (graininess) in ...
Owners Manual
Page 67
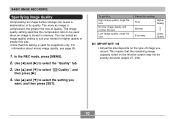
...• This causes an indicator identifying the selected self-timer type to appear on the monitor screen. • With the Triple Self-timer, the camera records a series of three images in or card) you are repeated once more to record the next image. Steps 2 and 3 are using for... After preparation is complete, the indicator "1sec" appears on the monitor screen, and another image is charging. 3. The amount of memory (built-in the sequence described below. The camera prepares to record the third image. 67 BASIC IMAGE RECORDING To do this setting: 10s 10 sec 2s 2 sec x3 X3 Off ...
...• This causes an indicator identifying the selected self-timer type to appear on the monitor screen. • With the Triple Self-timer, the camera records a series of three images in or card) you are repeated once more to record the next image. Steps 2 and 3 are using for... After preparation is complete, the indicator "1sec" appears on the monitor screen, and another image is charging. 3. The amount of memory (built-in the sequence described below. The camera prepares to record the third image. 67 BASIC IMAGE RECORDING To do this setting: 10s 10 sec 2s 2 sec x3 X3 Off ...
Owners Manual
Page 70
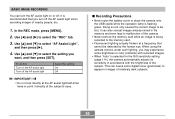
... the monitor screen may not be used when an image is compressed, the greater the loss of quality. The more an image is stored in memory. You can cause a deterioration of image you want, and then press [SET]. In the REC mode, press [MENU]. 2. Use [̆] and [̄] to suit your...
... the monitor screen may not be used when an image is compressed, the greater the loss of quality. The more an image is stored in memory. You can cause a deterioration of image you want, and then press [SET]. In the REC mode, press [MENU]. 2. Use [̆] and [̄] to suit your...
Owners Manual
Page 84
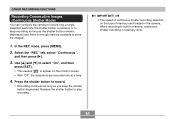
...as long as you keep recording as long as the shutter button remains depressed (and there is enough memory available to stop recording. Press the shutter button to built-in the camera. Use [̆] and [̄] to select "On", and then press [SET]. • This...the snapshots are recorded one at a time. 4. Release the shutter button to store the images). 1. IMPORTANT! • The speed of memory card loaded in memory, continuous shutter recording is relatively slow. 84 In the REC mode, press [MENU]. 2. OTHER RECORDING FUNCTIONS Recording Consecutive Images (Continuous Shutter...
...as long as you keep recording as long as the shutter button remains depressed (and there is enough memory available to stop recording. Press the shutter button to built-in the camera. Use [̆] and [̄] to select "On", and then press [SET]. • This...the snapshots are recorded one at a time. 4. Release the shutter button to store the images). 1. IMPORTANT! • The speed of memory card loaded in memory, continuous shutter recording is relatively slow. 84 In the REC mode, press [MENU]. 2. OTHER RECORDING FUNCTIONS Recording Consecutive Images (Continuous Shutter...


