User Guide
Page 7
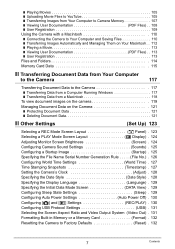
...Time Stamping Snapshots Timestamp) . 127 Setting the Camera's Clock Adjust) . 128 Specifying the Date Style Date Style) . 128 Specifying the Display Language Language) . 129 Specifying the Initial Data Mode Screen DATA View) . 129 Configuring Sleep State Settings Sleep) . 129 Configuring Auto Power Settings Auto Power Off) . 130 Configuring [r] and [p] Settings REC/PLAY) . 130 Configuring USB Protocol Settings USB) . 131 Selecting the Screen Aspect Ratio and Video Output System (Video Out) . 131 Formatting Built-in Memory or a Memory Card Format) . 132 Resetting the Camera to Factory...
...Time Stamping Snapshots Timestamp) . 127 Setting the Camera's Clock Adjust) . 128 Specifying the Date Style Date Style) . 128 Specifying the Display Language Language) . 129 Specifying the Initial Data Mode Screen DATA View) . 129 Configuring Sleep State Settings Sleep) . 129 Configuring Auto Power Settings Auto Power Off) . 130 Configuring [r] and [p] Settings REC/PLAY) . 130 Configuring USB Protocol Settings USB) . 131 Selecting the Screen Aspect Ratio and Video Output System (Video Out) . 131 Formatting Built-in Memory or a Memory Card Format) . 132 Resetting the Camera to Factory...
User Guide
Page 13
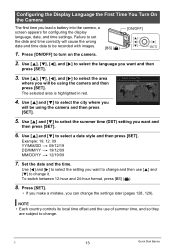
... • Each country controls its local time offset and the use [8] and [2] to select the language you will be using the camera and then press [SET]. 5. Use [8] and [2] to change. Press [SET]. • If you make a mistake, you load a battery into the camera, a screen appears for configuring the display language, date, and time settings. To switch between 12-hour and 24-hour format, press [BS] (^). 8. Use [8] and [2] to turn on the camera. 2. Press [ON...
... • Each country controls its local time offset and the use [8] and [2] to select the language you will be using the camera and then press [SET]. 5. Use [8] and [2] to change. Press [SET]. • If you make a mistake, you load a battery into the camera, a screen appears for configuring the display language, date, and time settings. To switch between 12-hour and 24-hour format, press [BS] (^). 8. Use [8] and [2] to turn on the camera. 2. Press [ON...

User Guide
Page 61
... by pressing [SET]. Auto Shutter, Flash Continuous Shutter, Movie, some BEST SHOT scenes (Prerecord (Movie), Voice Recording) • The Triple Self-timer cannot be used together with the following features. How long it takes for the camera to get ready to camera movement. Using the Self-timer (Self-timer) Procedure [r] (REC) * [MENU] * REC Tab * Self-timer With the Self-timer, pressing the shutter button starts a timer. Using Continuous Shutter (Continuous) Procedure [r] (REC) * [MENU] * REC Tab * Continuous For details, see the Control Panel procedure on the image size and...
... by pressing [SET]. Auto Shutter, Flash Continuous Shutter, Movie, some BEST SHOT scenes (Prerecord (Movie), Voice Recording) • The Triple Self-timer cannot be used together with the following features. How long it takes for the camera to get ready to camera movement. Using the Self-timer (Self-timer) Procedure [r] (REC) * [MENU] * REC Tab * Self-timer With the Self-timer, pressing the shutter button starts a timer. Using Continuous Shutter (Continuous) Procedure [r] (REC) * [MENU] * REC Tab * Continuous For details, see the Control Panel procedure on the image size and...
User Guide
Page 64
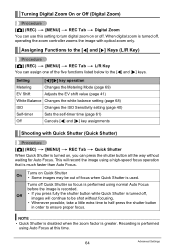
... performed using normal Auto Focus before the image is turned on Quick Shutter • Some images may be shot without waiting for Auto Focus. When digital zoom is turned off , images will record the image using a high-speed focus operation that is used. Setting [4]/[6] key operation Metering Changes the Metering Mode (page 69) EV Shift Adjusts the EV shift value (page 41) White Balance Changes the white balance setting (page 68) ISO Changes the ISO Sensitivity setting (page 40) Self-timer Sets the self-timer time (page 61) Off Cancels [4] and [6] key assignments Shooting...
... performed using normal Auto Focus before the image is turned on Quick Shutter • Some images may be shot without waiting for Auto Focus. When digital zoom is turned off , images will record the image using a high-speed focus operation that is used. Setting [4]/[6] key operation Metering Changes the Metering Mode (page 69) EV Shift Adjusts the EV shift value (page 41) White Balance Changes the white balance setting (page 68) ISO Changes the ISO Sensitivity setting (page 40) Self-timer Sets the self-timer time (page 61) Off Cancels [4] and [6] key assignments Shooting...
User Guide
Page 77
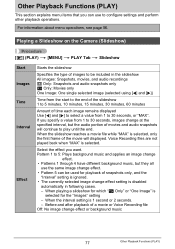
... all use to configure settings and perform other playback operations. Playing a Slideshow on the Camera (Slideshow) Procedure [p] (PLAY) * [MENU] * PLAY Tab * Slideshow Start Images Time Interval Effect Starts the slideshow Specifies the type of a movie or Voice Recording file Off: No image change effect. • Pattern 5 can use the same image change effect or background music 77 Other Playback Functions (PLAY) Before and after playback of images to play until the end. Other Playback Functions (PLAY) This section explains menu items...
... all use to configure settings and perform other playback operations. Playing a Slideshow on the Camera (Slideshow) Procedure [p] (PLAY) * [MENU] * PLAY Tab * Slideshow Start Images Time Interval Effect Starts the slideshow Specifies the type of a movie or Voice Recording file Off: No image change effect. • Pattern 5 can use the same image change effect or background music 77 Other Playback Functions (PLAY) Before and after playback of images to play until the end. Other Playback Functions (PLAY) This section explains menu items...
User Guide
Page 91
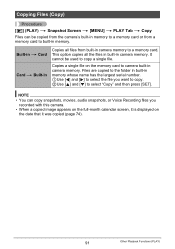
... recorded with this camera. • When a copied image appears on the full-month calendar screen, it is displayed on the date that it was copied (page 74). 91 Other Playback Functions (PLAY) Files are copied to select "Copy" and then press [SET]. NOTE • You can be used to built-in camera memory. This option copies all files from a memory card to copy a single file. Copying Files (Copy) Procedure [p] (PLAY) * Snapshot Screen * [MENU] * PLAY Tab * Copy Files can copy snapshots, movies, audio snapshots, or Voice Recording files...
... recorded with this camera. • When a copied image appears on the full-month calendar screen, it is displayed on the date that it was copied (page 74). 91 Other Playback Functions (PLAY) Files are copied to select "Copy" and then press [SET]. NOTE • You can be used to built-in camera memory. This option copies all files from a memory card to copy a single file. Copying Files (Copy) Procedure [p] (PLAY) * Snapshot Screen * [MENU] * PLAY Tab * Copy Files can copy snapshots, movies, audio snapshots, or Voice Recording files...
User Guide
Page 92
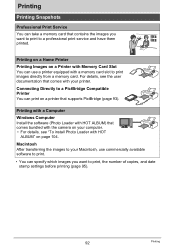
Connecting Directly to print, the number of copies, and date stamp settings before printing (page 95). 92 Printing Printing with a Computer Windows Computer Install the software (Photo Loader with HOT ALBUM) that comes bundled with the camera on page 104. For details, see the user documentation that comes with your computer. • For details, see "To install Photo Loader with HOT ALBUM" on your printer. Macintosh After transferring the images to your Macintosh...
Connecting Directly to print, the number of copies, and date stamp settings before printing (page 95). 92 Printing Printing with a Computer Windows Computer Install the software (Photo Loader with HOT ALBUM) that comes bundled with the camera on page 104. For details, see the user documentation that comes with your computer. • For details, see "To install Photo Loader with HOT ALBUM" on your printer. Macintosh After transferring the images to your Macintosh...

User Guide
Page 93
Connecting Directly to a PictBridge Compatible Printer You can result in the illustration. • When connecting the USB cable to a printer 1. Connecting the Camera to a Printer Use the USB cable that comes bundled with the USB cable camera to connect the camera to a printer that supports PictBridge and print images without going through a computer. . Turn on the camera and press [MENU]. 2. This will be able to see the metal part of the USB cable connector, Small connector feel it click securely...
Connecting Directly to a PictBridge Compatible Printer You can result in the illustration. • When connecting the USB cable to a printer 1. Connecting the Camera to a Printer Use the USB cable that comes bundled with the USB cable camera to connect the camera to a printer that supports PictBridge and print images without going through a computer. . Turn on the camera and press [MENU]. 2. This will be able to see the metal part of the USB cable connector, Small connector feel it click securely...

User Guide
Page 96
... your print service about your date stamp setting. . Configuring camera settings Configuring computer settings Professional print service Configure DPOF settings (page 95). Configure the Camera's Time Stamp setting (page 127). • The camera's Time Stamp setting imprints the date into images using the last DPOF settings you configured for the number of copies of all the images without regard to tell them that includes a date stamped with HOT ALBUM (page 99) software (Windows only). It cannot be deleted. • Do not turn date stamping...
... your print service about your date stamp setting. . Configuring camera settings Configuring computer settings Professional print service Configure DPOF settings (page 95). Configure the Camera's Time Stamp setting (page 127). • The camera's Time Stamp setting imprints the date into images using the last DPOF settings you configured for the number of copies of all the images without regard to tell them that includes a date stamped with HOT ALBUM (page 99) software (Windows only). It cannot be deleted. • Do not turn date stamping...
User Guide
Page 101
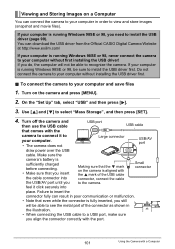
... Making sure that even while the connector is running Windows 98SE or 98, be able to recognize the camera. Failure to insert the connector fully can result in order to your computer and save files 1. Do not connect the camera to view and store images (snapshot and movie files). If you need to your computer is aligned with a Computer Use [8] and [2] to install the USB driver...
... Making sure that even while the connector is running Windows 98SE or 98, be able to recognize the camera. Failure to insert the connector fully can result in order to your computer and save files 1. Do not connect the camera to view and store images (snapshot and movie files). If you need to your computer is aligned with a Computer Use [8] and [2] to install the USB driver...
User Guide
Page 108
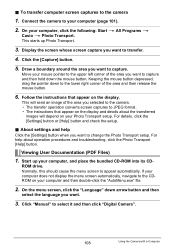
...-ROM into its CD- Viewing User Documentation (PDF Files) 1. This starts up your computer, click the following: Start * All Programs * Casio * Photo Transport. Normally, this should cause the menu screen to select it and then click "Digital Camera". 108 Using the Camera with a Computer Connect the camera to your computer does not display the menu screen automatically, navigate to transfer. 4. To transfer computer screen captures to change the Photo Transport setup. Draw a boundary around the...
...-ROM into its CD- Viewing User Documentation (PDF Files) 1. This starts up your computer, click the following: Start * All Programs * Casio * Photo Transport. Normally, this should cause the menu screen to select it and then click "Digital Camera". 108 Using the Camera with a Computer Connect the camera to your computer does not display the menu screen automatically, navigate to transfer. 4. To transfer computer screen captures to change the Photo Transport setup. Draw a boundary around the...
User Guide
Page 114
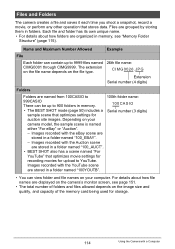
... movie settings for recording movies for auction site images. Images recorded with a Computer Files are stored in a folder named "100YOUTB". • You can view folder and file names on the image size and quality, and capacity of the memory card being used for storage. 114 Using the Camera with the Auction scene are grouped by storing them in folders. Images recorded with the eBay scene are stored in memory. 100CASIO • The BEST SHOT mode...
... movie settings for recording movies for auction site images. Images recorded with a Computer Files are stored in a folder named "100YOUTB". • You can view folder and file names on the image size and quality, and capacity of the memory card being used for storage. 114 Using the Camera with the Auction scene are grouped by storing them in folders. Images recorded with the eBay scene are stored in memory. 100CASIO • The BEST SHOT mode...
User Guide
Page 118
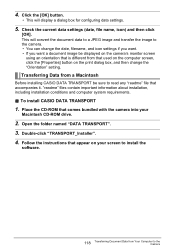
... the camera's monitor screen using an orientation that is different from Your Computer to install the software. 118 Transferring Document Data from that comes bundled with the camera into your Macintosh CD-ROM drive. 2. Transferring Data from a Macintosh Before installing CASIO DATA TRANSPORT be displayed on your screen to the Camera Open the folder named "DATA TRANSPORT". 3. To install CASIO DATA TRANSPORT 1. Follow the instructions that accompanies it. Check the current data settings (date, file name, icon) and...
... the camera's monitor screen using an orientation that is different from Your Computer to install the software. 118 Transferring Document Data from that comes bundled with the camera into your Macintosh CD-ROM drive. 2. Transferring Data from a Macintosh Before installing CASIO DATA TRANSPORT be displayed on your screen to the Camera Open the folder named "DATA TRANSPORT". 3. To install CASIO DATA TRANSPORT 1. Follow the instructions that accompanies it. Check the current data settings (date, file name, icon) and...
User Guide
Page 119
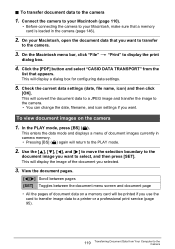
... data to a JPEG image and transfer the image to the PLAY mode. 2. To view document images on a memory card will be printed if you selected. 3. . Click the [PDF] button and select "CASIO DATA TRANSPORT" from Your Computer to the camera. 3. On the Macintosh menu bar, click "File" * "Print" to the camera 1. Check the current data settings (date, file name, icon) and then click [OK]. To transfer document data to display the print dialog box. 4. This will display the image of document data...
... data to a JPEG image and transfer the image to the PLAY mode. 2. To view document images on a memory card will be printed if you selected. 3. . Click the [PDF] button and select "CASIO DATA TRANSPORT" from Your Computer to the camera. 3. On the Macintosh menu bar, click "File" * "Print" to the camera 1. Check the current data settings (date, file name, icon) and then click [OK]. To transfer document data to display the print dialog box. 4. This will display the image of document data...
User Guide
Page 127
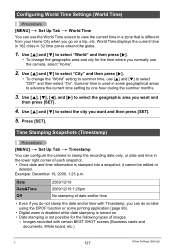
Summer time is used in some printing application (page 96). • Digital zoom is disabled while date stamping is turned on a trip, etc. Use [8], [2], [4], and [6] to select the city you want and then press [SET]. 4. Use [8] and [2] to select the geographic area you can do not stamp the date and/or time with certain BEST SHOT scenes (Business cards and documents, White board, etc.) C 127 Other Settings (Set Up) Images recorded with Timestamp...
Summer time is used in some printing application (page 96). • Digital zoom is disabled while date stamping is turned on a trip, etc. Use [8], [2], [4], and [6] to select the city you want and then press [SET]. 4. Use [8] and [2] to select the geographic area you can do not stamp the date and/or time with certain BEST SHOT scenes (Business cards and documents, White board, etc.) C 127 Other Settings (Set Up) Images recorded with Timestamp...
User Guide
Page 129
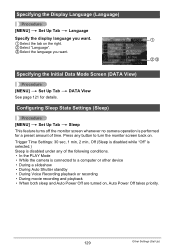
... Initial Data Mode Screen (DATA View) Procedure [MENU] * Set Up Tab * DATA View See page 121 for a preset amount of the following conditions. • In the PLAY Mode • While the camera is disabled under any button to a computer or other device • During a slideshow • During Auto Shutter standby • During Voice Recording playback or recording • During movie recording and playback • When both sleep and Auto Power Off are turned on . Trigger Time Settings...
... Initial Data Mode Screen (DATA View) Procedure [MENU] * Set Up Tab * DATA View See page 121 for a preset amount of the following conditions. • In the PLAY Mode • While the camera is disabled under any button to a computer or other device • During a slideshow • During Auto Shutter standby • During Voice Recording playback or recording • During movie recording and playback • When both sleep and Auto Power Off are turned on . Trigger Time Settings...
User Guide
Page 132
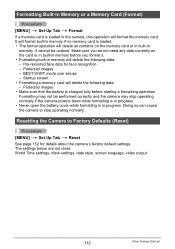
...'s factory default settings. Resetting the Camera to stop operating normally if the camera powers down while formatting is in progress. • Never open the battery cover while formatting is loaded in the camera, this operation will format the memory card. Formatting may stop operating normally. Startup screen • Formatting a memory card will delete the following data. - Make sure you format it. • Formatting built-in memory will delete the following data. - World Time settings, clock settings, date style, screen language, video output 132 Other Settings (Set Up...
...'s factory default settings. Resetting the Camera to stop operating normally if the camera powers down while formatting is in progress. • Never open the battery cover while formatting is loaded in the camera, this operation will format the memory card. Formatting may stop operating normally. Startup screen • Formatting a memory card will delete the following data. - Make sure you format it. • Formatting built-in memory will delete the following data. - World Time settings, clock settings, date style, screen language, video output 132 Other Settings (Set Up...
User Guide
Page 155
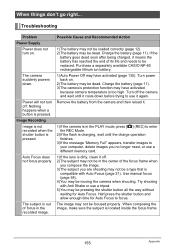
... the shutter button and allow enough time for Auto Focus. When things don't go right... Use manual focus (page 58). 4)You may not be a type that is compatible with Anti Shake or use a different memory card. 1)If the lens is out of focus in the center of its life and needs to your computer, delete images you are shooting may be replaced. If the battery goes dead soon after being charged...
... the shutter button and allow enough time for Auto Focus. When things don't go right... Use manual focus (page 58). 4)You may not be a type that is compatible with Anti Shake or use a different memory card. 1)If the lens is out of focus in the center of its life and needs to your computer, delete images you are shooting may be replaced. If the battery goes dead soon after being charged...
User Guide
Page 157
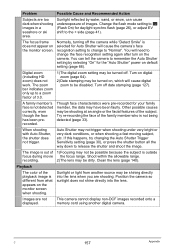
... or light from what appears on the camera. C 157 Appendix Though face characteristics were pre-recorded for daylight synchro flash (page 26), or adjust EV shift to release the shutter and shoot the image. Auto Shutter may have been faulty. Clean the lens (page 140). The focus frame does not appear on default setting (page 66). Turn on digital zoom (page 64). 2)Date stamping may be disabled. When shooting with Auto Shutter, the shutter...
... or light from what appears on the camera. C 157 Appendix Though face characteristics were pre-recorded for daylight synchro flash (page 26), or adjust EV shift to release the shutter and shoot the image. Auto Shutter may have been faulty. Clean the lens (page 140). The focus frame does not appear on default setting (page 66). Turn on digital zoom (page 64). 2)Date stamping may be disabled. When shooting with Auto Shutter, the shutter...
User Guide
Page 158
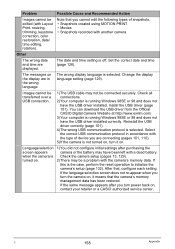
... can download the USB driver from the Official CASIO Digital Camera Website at http://www.exilim.com/ 3)Your computer is running Windows 98SE or 98 and does not have the USB driver installed. Check the camera setup (pages 13, 129). 2)There may be edited (with Layout Print, resizing, trimming, keystone correction, color restoration, date/ time editing, rotation). Install the USB driver (page 101). Language selection screen appears when the camera is not turned on, turn power...
... can download the USB driver from the Official CASIO Digital Camera Website at http://www.exilim.com/ 3)Your computer is running Windows 98SE or 98 and does not have the USB driver installed. Check the camera setup (pages 13, 129). 2)There may be edited (with Layout Print, resizing, trimming, keystone correction, color restoration, date/ time editing, rotation). Install the USB driver (page 101). Language selection screen appears when the camera is not turned on, turn power...


