Owners Manual
Page 2
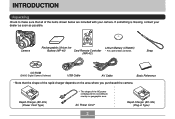
... shape of the items shown below are included with your dealer as soon as possible. Camera Rechargeable Lithium Ion Battery (NP-40) Card Remote Controller (WR-4C) Lithium Battery (CR2025) • For card remote controller. Strap CD-ROM (CASIO Digital Camera Software) USB Cable AV Cable Basic Reference • Note that all of the rapid charger...
... shape of the items shown below are included with your dealer as soon as possible. Camera Rechargeable Lithium Ion Battery (NP-40) Card Remote Controller (WR-4C) Lithium Battery (CR2025) • For card remote controller. Strap CD-ROM (CASIO Digital Camera Software) USB Cable AV Cable Basic Reference • Note that all of the rapid charger...

Owners Manual
Page 3
... General Precautions 14 Test for proper operation before using the camera! 16 Data Error Precautions 17 Operating conditions 17 Condensation 18 Lens and Phase Differential Sensor 18 Other 18 19 QUICK START GUIDE First, charge the battery 19 To configure display language and clock settings ..... 21 ... Attaching the Strap 36 Power Requirements 37 Using the Rapid Charger 37 To load the battery 41 To remove the battery 42 Power Supply Precautions 45 Using AC Power 48 Turning the Camera On and Off 50 Configuring Power Saving Settings 51 Using the On-screen Menus 52...
... General Precautions 14 Test for proper operation before using the camera! 16 Data Error Precautions 17 Operating conditions 17 Condensation 18 Lens and Phase Differential Sensor 18 Other 18 19 QUICK START GUIDE First, charge the battery 19 To configure display language and clock settings ..... 21 ... Attaching the Strap 36 Power Requirements 37 Using the Rapid Charger 37 To load the battery 41 To remove the battery 42 Power Supply Precautions 45 Using AC Power 48 Turning the Camera On and Off 50 Configuring Power Saving Settings 51 Using the On-screen Menus 52...

Owners Manual
Page 6
INTRODUCTION Using the Shortcut Menu (EX Menu 143 Using the Card Remote Controller for Recording ... 144 Loading the Battery 145 Before Using the Card Remote Controller for Recording 146 Using the Card Remote Controller 147 Using an External Flash 149 External Flash Unit ... Display Image 171 Using Image Roulette 172 Adding Audio to a Snapshot 173 To re-record audio 174 Playing Back a Voice Recording File 175 Displaying Camera Images on a TV Screen 176 Selecting the Video Input System 177 178 DELETING FILES Deleting a Single File 178 Deleting All Files 179 6
INTRODUCTION Using the Shortcut Menu (EX Menu 143 Using the Card Remote Controller for Recording ... 144 Loading the Battery 145 Before Using the Card Remote Controller for Recording 146 Using the Card Remote Controller 147 Using an External Flash 149 External Flash Unit ... Display Image 171 Using Image Roulette 172 Adding Audio to a Snapshot 173 To re-record audio 174 Playing Back a Voice Recording File 175 Displaying Camera Images on a TV Screen 176 Selecting the Video Input System 177 178 DELETING FILES Deleting a Single File 178 Deleting All Files 179 6
Owners Manual
Page 9
assumes no responsibility for any third party due to the use of the EX-P700. • CASIO COMPUTER CO., LTD. Be sure to back up all important data on a Macintosh 246 Installing Software 246 Viewing User Documentation (PDF Files) 247 249 APPENDIX ...the use of Photo Loader and/or Photohands. • CASIO COMPUTER CO., LTD. assumes no responsibility for any damage or loss caused by the screens and configuration of the actual camera. • The SD logo is a registered trademark of malfunction, repairs, or battery replacement. shall not be held liable for any damages or...
assumes no responsibility for any third party due to the use of the EX-P700. • CASIO COMPUTER CO., LTD. Be sure to back up all important data on a Macintosh 246 Installing Software 246 Viewing User Documentation (PDF Files) 247 249 APPENDIX ...the use of Photo Loader and/or Photohands. • CASIO COMPUTER CO., LTD. assumes no responsibility for any damage or loss caused by the screens and configuration of the actual camera. • The SD logo is a registered trademark of malfunction, repairs, or battery replacement. shall not be held liable for any damages or...
Owners Manual
Page 11
... design combines with a large-capacity battery to provide more recording and playback between charges. • 16X zoom (page 68) 4X optical zoom, 4X digital zoom • 8.9MB flash memory Images can be recorded without using various filters and other settings. • Ex Finder view (page 32) The Ex Finder view provides you with contrast... to be set up to the location you want. • Support for SD memory cards and MMC (MultiMedia Cards) for the Auto Focus area, the camera takes simultaneous meter readings at seven different points and automatically selects the best one.
... design combines with a large-capacity battery to provide more recording and playback between charges. • 16X zoom (page 68) 4X optical zoom, 4X digital zoom • 8.9MB flash memory Images can be recorded without using various filters and other settings. • Ex Finder view (page 32) The Ex Finder view provides you with contrast... to be set up to the location you want. • Support for SD memory cards and MMC (MultiMedia Cards) for the Auto Focus area, the camera takes simultaneous meter readings at seven different points and automatically selects the best one.

Owners Manual
Page 15
... contact your dealer or nearest CASIO authorized service center. When using the flash, the camera should ever become cracked due to dropping it or otherwise subjecting it to power any other device besides this camera. Never use , and do not burn your fingers, remove the camera's battery and/or unplug the AC ...; Should you do not use is prohibited. After making sure there is no more smoke coming out of the plug. Next, remove the camera's battery and/or unplug the AC adaptor power cord from the flash can cause the data stored in any other area where its memory to personal...
... contact your dealer or nearest CASIO authorized service center. When using the flash, the camera should ever become cracked due to dropping it or otherwise subjecting it to power any other device besides this camera. Never use , and do not burn your fingers, remove the camera's battery and/or unplug the AC ...; Should you do not use is prohibited. After making sure there is no more smoke coming out of the plug. Next, remove the camera's battery and/or unplug the AC adaptor power cord from the flash can cause the data stored in any other area where its memory to personal...

Owners Manual
Page 16
Test for proper operation before using the camera! • Before using the camera to record important images, make storage of test images and check the results to ensure that the camera is being recorded. INTRODUCTION • Never open the battery cover, disconnect the AC adaptor from the camera, or unplug the AC adaptor from the wall socket while an image is configured correctly and operating properly (page 19). 16 Doing so will not only make sure you first record a number of the current image impossible, it can also corrupt other image data already stored in file memory.
Test for proper operation before using the camera! • Before using the camera to record important images, make storage of test images and check the results to ensure that the camera is being recorded. INTRODUCTION • Never open the battery cover, disconnect the AC adaptor from the camera, or unplug the AC adaptor from the wall socket while an image is configured correctly and operating properly (page 19). 16 Doing so will not only make sure you first record a number of the current image impossible, it can also corrupt other image data already stored in file memory.
Owners Manual
Page 17
... strong vibration 17 Removing the battery or memory card while the camera is being performed - Removing the battery or memory card while the operation lamp is manufactured using precision digital components. Inside of data in the sun - In areas subject to direct sunlight - INTRODUCTION Data Error Precautions • Your digital camera is still flashing after you...
... strong vibration 17 Removing the battery or memory card while the camera is being performed - Removing the battery or memory card while the operation lamp is manufactured using precision digital components. Inside of data in the sun - In areas subject to direct sunlight - INTRODUCTION Data Error Precautions • Your digital camera is still flashing after you...

Owners Manual
Page 18
...8226; Fingerprints, dust, or any other soiling of the camera needs cleaning, wipe it with a soft lens cloth. • When aiming the camera, make sure that condensation can remove dust particles from the camera and leave the battery cover open for a few hours. INTRODUCTION Condensation •... When you should avoid exposing it to conditions that might cause condensation. • To keep condensation from forming, place the camera into a plastic bag before ...
...8226; Fingerprints, dust, or any other soiling of the camera needs cleaning, wipe it with a soft lens cloth. • When aiming the camera, make sure that condensation can remove dust particles from the camera and leave the battery cover open for a few hours. INTRODUCTION Condensation •... When you should avoid exposing it to conditions that might cause condensation. • To keep condensation from forming, place the camera into a plastic bag before ...

Owners Manual
Page 19
Charge the rechargeable litium ion battery (NP-40) 1 that comes with the camera (page 37). • Note that the shape of the rapid charger depends on the area where you purchased the camera. • It takes about two hours to achieve a full charge. 1 2 2 [CHARGE] lamp lights red during charging. [CHARGE] lamp turns green when charging is complete. Plug-in Type 19 Power Cord Type [CHARGE] lamp lights red during charging. [CHARGE] lamp turns green when charging is complete. QUICK START GUIDE QUICK START GUIDE First, charge the battery! 1.
Charge the rechargeable litium ion battery (NP-40) 1 that comes with the camera (page 37). • Note that the shape of the rapid charger depends on the area where you purchased the camera. • It takes about two hours to achieve a full charge. 1 2 2 [CHARGE] lamp lights red during charging. [CHARGE] lamp turns green when charging is complete. Plug-in Type 19 Power Cord Type [CHARGE] lamp lights red during charging. [CHARGE] lamp turns green when charging is complete. QUICK START GUIDE QUICK START GUIDE First, charge the battery! 1.

Owners Manual
Page 20
QUICK START GUIDE 2. Load the battery into the camera. (page 41). 1 3 2 Stopper 20
QUICK START GUIDE 2. Load the battery into the camera. (page 41). 1 3 2 Stopper 20
Owners Manual
Page 24
...trying to use the camera. GETTING READY GETTING READY This section contains information about things you record (page 60) The NP-40 Rechargeable Lithium Ion Battery The CASIO BC-30L Rapid Charger This term as used in this manual: "a REC mode" "digital noise" Means this manual.... This term as used in this manual: "camera" "file memory" "battery" "rapid charger" Means this: The CASIO EX-P700 Digital Camera The location where the camera is currently storing images you need to know about the conventions used...
...trying to use the camera. GETTING READY GETTING READY This section contains information about things you record (page 60) The NP-40 Rechargeable Lithium Ion Battery The CASIO BC-30L Rapid Charger This term as used in this manual: "a REC mode" "digital noise" Means this manual.... This term as used in this manual: "camera" "file memory" "battery" "rapid charger" Means this: The CASIO EX-P700 Digital Camera The location where the camera is currently storing images you need to know about the conventions used...

Owners Manual
Page 28
GETTING READY I Bottom W X W Battery cover X Tripod screw hole • Use this hole when attaching to a tripod. Y Y Stopper Z Battery compartment [ Memory card slot [Z 28
GETTING READY I Bottom W X W Battery cover X Tripod screw hole • Use this hole when attaching to a tripod. Y Y Stopper Z Battery compartment [ Memory card slot [Z 28

Owners Manual
Page 30
... (pages 124, 262) (Remaining number of the following functions will cause Icon Help text to appear on the monitor screen. B Date and time (page 192) C Battery capacity (page 45) D Histogram (page 130) E Focus frame (page 61) • Focused: Green • Unfocused: Red NOTE • Changing the setting of any one of...
... (pages 124, 262) (Remaining number of the following functions will cause Icon Help text to appear on the monitor screen. B Date and time (page 192) C Battery capacity (page 45) D Histogram (page 130) E Focus frame (page 61) • Focused: Green • Unfocused: Red NOTE • Changing the setting of any one of...

Owners Manual
Page 34
Memory card selected for data storage. I REC modes Indicators on (page 29) Ex Finder view on (page 32) Histogram on (page 29) Indicators off Monitor screen off I PLAY mode Indicators on (page 33) Histogram/Details on (page 33) ... indicator (page 71) Flash On Flash Off Red-eye reduction C Recording mode (page 58) Snapshot BESTSHOT Aperture Priority AE Shutter Speed Priority AE Manual Exposure D Battery capacity (page 45) E Histogram (page 130) F EV value (page 88) Changing the Contents of the Monitor Screen Each press of [DISP] cycles the contents of...
Memory card selected for data storage. I REC modes Indicators on (page 29) Ex Finder view on (page 32) Histogram on (page 29) Indicators off Monitor screen off I PLAY mode Indicators on (page 33) Histogram/Details on (page 33) ... indicator (page 71) Flash On Flash Off Red-eye reduction C Recording mode (page 58) Snapshot BESTSHOT Aperture Priority AE Shutter Speed Priority AE Manual Exposure D Battery capacity (page 45) E Histogram (page 130) F EV value (page 88) Changing the Contents of the Monitor Screen Each press of [DISP] cycles the contents of...

Owners Manual
Page 37
...: AD-C40 (Option) Using the Rapid Charger Contacts I Loading the Battery into the Rapid Charger Making sure that the battery will not charge properly if it is not charged when you purchase the camera. Note that the positive and negative contacts are aligned correctly, load the... battery into the rapid charger. GETTING READY Power Requirements Your camera can operate on either battery power or AC power. • Battery One NP-40 rechargeable lithium ion battery The battery is not ...
...: AD-C40 (Option) Using the Rapid Charger Contacts I Loading the Battery into the Rapid Charger Making sure that the battery will not charge properly if it is not charged when you purchase the camera. Note that the positive and negative contacts are aligned correctly, load the... battery into the rapid charger. GETTING READY Power Requirements Your camera can operate on either battery power or AC power. • Battery One NP-40 rechargeable lithium ion battery The battery is not ...

Owners Manual
Page 38
Plug the rapid charger into a household power outlet. • This will cause the [CHARGE] lamp to turn red. • Charging will take about two hours. • Note that the shape of the battery, load the battery into the rapid charger. GETTING READY I To charge the battery 1. Correctly positioning the positive and negative terminals of the rapid charger depends on the area where you purchased the camera. [CHARGE] lamp Rapid Charger AC power cord 38 Power Cord Type Plug-in Type 2.
Plug the rapid charger into a household power outlet. • This will cause the [CHARGE] lamp to turn red. • Charging will take about two hours. • Note that the shape of the battery, load the battery into the rapid charger. GETTING READY I To charge the battery 1. Correctly positioning the positive and negative terminals of the rapid charger depends on the area where you purchased the camera. [CHARGE] lamp Rapid Charger AC power cord 38 Power Cord Type Plug-in Type 2.

Owners Manual
Page 39
... power receptacle shape is different from that in your area, replace the AC power cord with one of the other ones that come with the camera, or purchase a commercially available AC power cord that is compatible with local power outlets and to purchase any power supply in the range of ... area. The [CHARGE] lamp turns green when charging is complete. 4. After charging is complete, unplug the rapid charger from the power outlet, and remove the battery from it is up to you are not charging. [CHARGE] lamp Rapid Charger 39 Note, however, that area. Note, however, that the shape of the...
... power receptacle shape is different from that in your area, replace the AC power cord with one of the other ones that come with the camera, or purchase a commercially available AC power cord that is compatible with local power outlets and to purchase any power supply in the range of ... area. The [CHARGE] lamp turns green when charging is complete. 4. After charging is complete, unplug the rapid charger from the power outlet, and remove the battery from it is up to you are not charging. [CHARGE] lamp Rapid Charger 39 Note, however, that area. Note, however, that the shape of the...

Owners Manual
Page 40
...[CHARGE] lamp is specifically designed for use with digital cameras. If you want to try to use it. • The battery used , you can expect to be able to recharge it about 500 times before it needs replacement. • Charging the battery may cause interference with TV and radio reception. Give...allowable charging temperature range, which is indicated when the [CHARGE] lamp turns red. • Charging the battery while it is used with this camera is lit amber. Because of the battery depends on the environment under which it is still warm immediately after removing it from the TV or ...
...[CHARGE] lamp is specifically designed for use with digital cameras. If you want to try to use it. • The battery used , you can expect to be able to recharge it about 500 times before it needs replacement. • Charging the battery may cause interference with TV and radio reception. Give...allowable charging temperature range, which is indicated when the [CHARGE] lamp turns red. • Charging the battery while it is used with this camera is lit amber. Because of the battery depends on the environment under which it is still warm immediately after removing it from the TV or ...

Owners Manual
Page 41
Stopper • Push the bottom of the camera in the direction indicated by the arrow in place. (-) marks NP-40 41 GETTING READY To load the battery 1. While pulling the stopper in the direction indicated by the arrow, and then swing it open. 2. Slide the battery cover on the bottom of the battery, and make sure that the stopper securely locks the battery in the illustration, slide the battery into the camera.
Stopper • Push the bottom of the camera in the direction indicated by the arrow in place. (-) marks NP-40 41 GETTING READY To load the battery 1. While pulling the stopper in the direction indicated by the arrow, and then swing it open. 2. Slide the battery cover on the bottom of the battery, and make sure that the stopper securely locks the battery in the illustration, slide the battery into the camera.


