
Owners Manual
Page 1
E Digital Camera User's Guide K1160PCM2DMX Thank you for purchasing this CASIO product. • Before using it, be sure to read the precautions contained in this User's Guide. • Keep the User's Guide in a safe place for future reference. • For the most up-to-date information about this product, visit the official EXILIM Website at http://www.exilim.com/
E Digital Camera User's Guide K1160PCM2DMX Thank you for purchasing this CASIO product. • Before using it, be sure to read the precautions contained in this User's Guide. • Keep the User's Guide in a safe place for future reference. • For the most up-to-date information about this product, visit the official EXILIM Website at http://www.exilim.com/

Owners Manual
Page 2
Unpacking As you unpack your original retailer. If anything is missing, contact your camera, check to make sure that all items shown below are included. Digital camera Alkaline batteries (4 AA-size batteries) Strap Lens cap/cap holder USB cable AV cable CD-ROM Basic Reference 2
Unpacking As you unpack your original retailer. If anything is missing, contact your camera, check to make sure that all items shown below are included. Digital camera Alkaline batteries (4 AA-size batteries) Strap Lens cap/cap holder USB cable AV cable CD-ROM Basic Reference 2

Owners Manual
Page 3
...without notice. • The contents of this manual have been checked at all times. This is due to the use of YouTube Uploader for CASIO. • CASIO COMPUTER CO., LTD. Feel free to ensure that provides a pixel yield of this User's Guide may remain lit at each step of the ... means that is forbidden. Except for the monitor screen and viewfinder employs highprecision technology that the camera is forbidden under copyright laws. • CASIO COMPUTER CO., LTD. LCD Panel The liquid crystal panel used for your final image, shoot a test shot to contact us if you or any...
...without notice. • The contents of this manual have been checked at all times. This is due to the use of YouTube Uploader for CASIO. • CASIO COMPUTER CO., LTD. Feel free to ensure that provides a pixel yield of this User's Guide may remain lit at each step of the ... means that is forbidden. Except for the monitor screen and viewfinder employs highprecision technology that the camera is forbidden under copyright laws. • CASIO COMPUTER CO., LTD. LCD Panel The liquid crystal panel used for your final image, shoot a test shot to contact us if you or any...

Owners Manual
Page 4
...; Quick Start Basics 9 What is a digital camera 9 What you can do with your CASIO camera 10 Attaching the Lens Cap and Strap 11 To load the batteries 12 ❚ Specifying the Battery Type 15 Configuring the Display Language the First Time You Turn On the Camera. . 15 Preparing a Memory Card 17 ... 41 Specifying the Auto Focus Area AF Area) . . 41 Changing the Control Panel Date/Time Style 43 Shooting with Zoom 43 ❚ Optical Zoom/Digital Zoom Switch Point 44 Selecting a Focus Mode Focus) . . 46 Locking the Auto Exposure and Auto Focus Setting 49 ❚ Specifying the [AEL] ...
...; Quick Start Basics 9 What is a digital camera 9 What you can do with your CASIO camera 10 Attaching the Lens Cap and Strap 11 To load the batteries 12 ❚ Specifying the Battery Type 15 Configuring the Display Language the First Time You Turn On the Camera. . 15 Preparing a Memory Card 17 ... 41 Specifying the Auto Focus Area AF Area) . . 41 Changing the Control Panel Date/Time Style 43 Shooting with Zoom 43 ❚ Optical Zoom/Digital Zoom Switch Point 44 Selecting a Focus Mode Focus) . . 46 Locking the Auto Exposure and Auto Focus Setting 49 ❚ Specifying the [AEL] ...

Owners Manual
Page 5
...SHOT 64 ❚ Creating Your Own BEST SHOT Setups 66 Shooting with High Speed Night Scene . . . . . (High Speed Night Scene) . . 67 Shooting with High Speed Anti Shake High Speed Anti Shake) . . 68 Shooting with Digital Panning Digital Panning) . . 69 Isolating Moving Subjects Multi-motion image) . ...-timer Self-timer) . . . 78 ❚ Using the Auto Focus Assist Light AF Assist Light) . . . 79 ❚ Reducing the Effects of Camera and Subject Movement Anti Shake) . . . 79 ❚ Shooting with Face Detection Face Detection) . . . 80 ❚ Shooting with Continuous Auto Focus ...
...SHOT 64 ❚ Creating Your Own BEST SHOT Setups 66 Shooting with High Speed Night Scene . . . . . (High Speed Night Scene) . . 67 Shooting with High Speed Anti Shake High Speed Anti Shake) . . 68 Shooting with Digital Panning Digital Panning) . . 69 Isolating Moving Subjects Multi-motion image) . ...-timer Self-timer) . . . 78 ❚ Using the Auto Focus Assist Light AF Assist Light) . . . 79 ❚ Reducing the Effects of Camera and Subject Movement Anti Shake) . . . 79 ❚ Shooting with Face Detection Face Detection) . . . 80 ❚ Shooting with Continuous Auto Focus ...

Owners Manual
Page 6
... on a TV Screen 93 ❚❙ Other Playback Functions (PLAY) 95 Playing a Slideshow on the Camera Slideshow) . . 95 Creating a Snapshot of Movie Frames MOTION PRINT) . . 96 Editing a Movie on the Camera Movie Editing) . . 97 Adjusting White Balance White Balance) . . 99 Adjusting the Brightness of an ... DPOF to Specify Images to be Printed and the Number of Copies 108 ❚❙ Using the Camera with a Computer 111 Things you can do using a computer 111 Using the Camera with a Windows Computer 112 ❚ Viewing and Storing Images on a Computer 113 ❚ Playing ...
... on a TV Screen 93 ❚❙ Other Playback Functions (PLAY) 95 Playing a Slideshow on the Camera Slideshow) . . 95 Creating a Snapshot of Movie Frames MOTION PRINT) . . 96 Editing a Movie on the Camera Movie Editing) . . 97 Adjusting White Balance White Balance) . . 99 Adjusting the Brightness of an ... DPOF to Specify Images to be Printed and the Number of Copies 108 ❚❙ Using the Camera with a Computer 111 Things you can do using a computer 111 Using the Camera with a Windows Computer 112 ❚ Viewing and Storing Images on a Computer 113 ❚ Playing ...

Owners Manual
Page 7
...124 ❚❙ Other Settings (Set Up) 126 Adjusting Monitor Screen Brightness Screen) . 126 Adjusting Viewfinder Brightness EVF Brightness) . 126 Configuring Camera Sound Settings Sounds) . 127 Specifying the File Name Serial Number Generation Rule . . . . . (File No.) . 127 Configuring World... Time Settings World Time) . 128 Time Stamping Snapshots Timestamp) . 129 Setting the Camera's Clock Adjust) . 129 Specifying the Date Style Date Style) . 130 Specifying the Display Language Language) . 130 Configuring Sleep State Settings Sleep)...
...124 ❚❙ Other Settings (Set Up) 126 Adjusting Monitor Screen Brightness Screen) . 126 Adjusting Viewfinder Brightness EVF Brightness) . 126 Configuring Camera Sound Settings Sounds) . 127 Specifying the File Name Serial Number Generation Rule . . . . . (File No.) . 127 Configuring World... Time Settings World Time) . 128 Time Stamping Snapshots Timestamp) . 129 Setting the Camera's Clock Adjust) . 129 Specifying the Date Style Date Style) . 130 Specifying the Display Language Language) . 130 Configuring Sleep State Settings Sleep)...

Owners Manual
Page 9
A digital camera stores images on your computer. Record Delete Play You can record and delete images a countless number of different ways. Store images on a memory card, so you can use the images you record in a variety of times. Quick Start Basics What is a digital camera? Attach images to e-mail. 9 Quick Start Basics Print images.
A digital camera stores images on your computer. Record Delete Play You can record and delete images a countless number of different ways. Store images on a memory card, so you can use the images you record in a variety of times. Quick Start Basics What is a digital camera? Attach images to e-mail. 9 Quick Start Basics Print images.
Owners Manual
Page 10
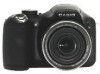
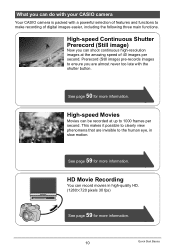
What you can do with your CASIO camera Your CASIO camera is packed with the shutter button. High-speed Continuous Shutter Prerecord (Still image) Now you are invisible to clearly view phenomena that are almost never too late with a powerful selection of features... ensure you can shoot continuous high-resolution images at up to 1000 frames per second. See page 59 for more information. 10 Quick Start Basics HD Movie Recording You can be recorded at the amazing speed of digital images easier, including the following three main functions. High-speed Movies Movies can record movies ...
What you can do with your CASIO camera Your CASIO camera is packed with the shutter button. High-speed Continuous Shutter Prerecord (Still image) Now you are invisible to clearly view phenomena that are almost never too late with a powerful selection of features... ensure you can shoot continuous high-resolution images at up to 1000 frames per second. See page 59 for more information. 10 Quick Start Basics HD Movie Recording You can be recorded at the amazing speed of digital images easier, including the following three main functions. High-speed Movies Movies can record movies ...

Owners Manual
Page 11
This protects against accidental loss of the camera as shown in the illustration. • After you are finished pull on the lens when the camera is turned off and the lens is retracted. • Attach the lens cap holder to the strap or ...the strap ring. Attaching the Lens Cap Always keep the lens cap on camera power with the lens cap affixed to make sure it does not come loose. 11 Quick Start Basics Always leave the lens ... it and to the lens. Attaching the strap • Attach either end of the strap to the camera before using the...
This protects against accidental loss of the camera as shown in the illustration. • After you are finished pull on the lens when the camera is turned off and the lens is retracted. • Attach the lens cap holder to the strap or ...the strap ring. Attaching the Lens Cap Always keep the lens cap on camera power with the lens cap affixed to make sure it does not come loose. 11 Quick Start Basics Always leave the lens ... it and to the lens. Attaching the strap • Attach either end of the strap to the camera before using the...
Owners Manual
Page 12
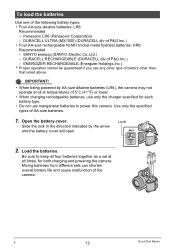
...Open the battery cover. Mixing batteries from different sets can shorten overall battery life and cause malfunction of P&G Inc.) - Be sure to power this camera. To load the batteries Use one of P&G Inc.) • Four AA-size rechargeable Ni-MH (nickel-metal hydride) batteries: HR6 Recommended - DURACELL...SANYO Electric Co.,Ltd.) - B 12 Quick Start Basics Lock Slide the lock in the direction indicated by AA-size alkaline batteries (LR6), the camera may not operate at all at all four batteries together as a set at temperatures of 5°C (41°F) or lower. • ...
...Open the battery cover. Mixing batteries from different sets can shorten overall battery life and cause malfunction of P&G Inc.) - Be sure to power this camera. To load the batteries Use one of P&G Inc.) • Four AA-size rechargeable Ni-MH (nickel-metal hydride) batteries: HR6 Recommended - DURACELL...SANYO Electric Co.,Ltd.) - B 12 Quick Start Basics Lock Slide the lock in the direction indicated by AA-size alkaline batteries (LR6), the camera may not operate at all at all four batteries together as a set at temperatures of 5°C (41°F) or lower. • ...
Owners Manual
Page 13
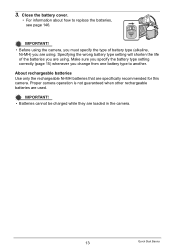
IMPORTANT! • Before using the camera, you must specify the type of the batteries you are using . Make sure you specify the battery type setting correctly (page 15) whenever you are ... one battery type to replace the batteries, see page 146. About rechargeable batteries Use only the rechargeable Ni-MH batteries that are loaded in the camera. 13 Quick Start Basics IMPORTANT! • Batteries cannot be charged while they are specifically recommended for this...
IMPORTANT! • Before using the camera, you must specify the type of the batteries you are using . Make sure you specify the battery type setting correctly (page 15) whenever you are ... one battery type to replace the batteries, see page 146. About rechargeable batteries Use only the rechargeable Ni-MH batteries that are loaded in the camera. 13 Quick Start Basics IMPORTANT! • Batteries cannot be charged while they are specifically recommended for this...

Owners Manual
Page 14
... retracting the lens. Replace batteries as soon as shown below. Checking Remaining Battery Power As battery power is disabled. Remaining Power Battery Indicator Indicator Color High * * Cyan * Amber * Red Low * * Red The flash will take longer than normal to charge if it is being used when the battery ... (page 15). Battery Power Conservation Tips • When you forget to be cleared. You will cause its date and time settings to turn off the camera (pages 131, 131). • Select "Off" for the flash setting (page 35). • Enable the Auto Power Off and the Sleep features to...
... retracting the lens. Replace batteries as soon as shown below. Checking Remaining Battery Power As battery power is disabled. Remaining Power Battery Indicator Indicator Color High * * Cyan * Amber * Red Low * * Red The flash will take longer than normal to charge if it is being used when the battery ... (page 15). Battery Power Conservation Tips • When you forget to be cleared. You will cause its date and time settings to turn off the camera (pages 131, 131). • Select "Off" for the flash setting (page 35). • Enable the Auto Power Off and the Sleep features to...

Owners Manual
Page 15
...OFF] to select "Battery Type" and then press [6]. 5. Use [4] and [6] to turn off without retracting the lens and incorrect indication of the camera is not guaranteed when the wrong battery type is designed to optimize its operation in accordance with images. 1. Press [ON/OFF] to select the "...size rechargeable Ni-MH (nickel metal hydride) (HR6) Configuring the Display Language the First Time You Turn On the Camera The first time you are using to turn on the camera. 2. Proper operation of remaining battery power. Use [8] and [2] to be recorded with the type of battery you...
...OFF] to select "Battery Type" and then press [6]. 5. Use [4] and [6] to turn off without retracting the lens and incorrect indication of the camera is not guaranteed when the wrong battery type is designed to optimize its operation in accordance with images. 1. Press [ON/OFF] to select the "...size rechargeable Ni-MH (nickel metal hydride) (HR6) Configuring the Display Language the First Time You Turn On the Camera The first time you are using to turn on the camera. 2. Proper operation of remaining battery power. Use [8] and [2] to be recorded with the type of battery you...

Owners Manual
Page 16
...and [2] to select the setting you can change . 16 Quick Start Basics Use [8] and [2] to select the area where you will be using the camera and then press [SET]. 2. The selected area is highlighted in red. 4. Use [8], [2], [4], and [6] to select the city where you will be using ...the camera and then press [SET]. 5. To switch between 12-hour and 24-hour format, press [BS]. 8. Use [8], [2], [4], and [6] to select the summer time (...
...and [2] to select the setting you can change . 16 Quick Start Basics Use [8] and [2] to select the area where you will be using the camera and then press [SET]. 2. The selected area is highlighted in red. 4. Use [8], [2], [4], and [6] to select the city where you will be using ...the camera and then press [SET]. 5. To switch between 12-hour and 24-hour format, press [BS]. 8. Use [8], [2], [4], and [6] to select the summer time (...

Owners Manual
Page 17
... - MMC (MultiMediaCard) - In order to avoid problems such as these, use of certain types of memory card. • Use only SD cards that CASIO makes no memory card is recommended. To load a memory card 1. When no guarantees about memory card capacities, see page 168. The "0 REC" indicator ...being dropped. Images recorded while a memory card is loaded are saved to turn off the camera and then open the memory card slot cover. Memory Card Handling Precautions Certain types of any Ultra High-Speed Type SD memory card used to store images and movies, you probably will want to ...
... - MMC (MultiMediaCard) - In order to avoid problems such as these, use of certain types of memory card. • Use only SD cards that CASIO makes no memory card is recommended. To load a memory card 1. When no guarantees about memory card capacities, see page 168. The "0 REC" indicator ...being dropped. Images recorded while a memory card is loaded are saved to turn off the camera and then open the memory card slot cover. Memory Card Handling Precautions Certain types of any Ultra High-Speed Type SD memory card used to store images and movies, you probably will want to ...

Owners Manual
Page 18
...the "Set Up" tab, select "Format" and then press [6]. 3. However, if storing to a card has slowed down data processing by the camera. Load a memory card. Positioning the memory card so its contents. Front Back 3. IMPORTANT! • Formatting a memory card that already has ... 18 Quick Start Basics Pressing the memory card slot cover against the camera, slide it click securely into the card slot, immediately turn off the camera, remove the batteries, and contact your retailer or nearest CASIO authorized service center. To format (initialize) a new memory card You...
...the "Set Up" tab, select "Format" and then press [6]. 3. However, if storing to a card has slowed down data processing by the camera. Load a memory card. Positioning the memory card so its contents. Front Back 3. IMPORTANT! • Formatting a memory card that already has ... 18 Quick Start Basics Pressing the memory card slot cover against the camera, slide it click securely into the card slot, immediately turn off the camera, remove the batteries, and contact your retailer or nearest CASIO authorized service center. To format (initialize) a new memory card You...
Owners Manual
Page 19
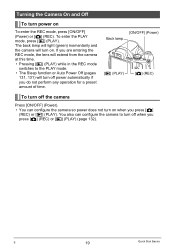
... power does not turn on. To enter the PLAY mode, press [p] (PLAY). If you are entering the REC mode, the lens will extend from the camera at this time. • Pressing [p] (PLAY) while in the REC mode switches to turn power on when you press [r] (REC) or [p] (PLAY) (page 132). B 19... not perform any operation for a preset amount of time. [ON/OFF] (Power) Back lamp [p] (PLAY) [r] (REC) To turn off the camera Press [ON/OFF] (Power). • You can configure the camera to the PLAY mode. • The Sleep function or Auto Power Off (pages 131, 131) will turn on To enter the...
... power does not turn on. To enter the PLAY mode, press [p] (PLAY). If you are entering the REC mode, the lens will extend from the camera at this time. • Pressing [p] (PLAY) while in the REC mode switches to turn power on when you press [r] (REC) or [p] (PLAY) (page 132). B 19... not perform any operation for a preset amount of time. [ON/OFF] (Power) Back lamp [p] (PLAY) [r] (REC) To turn off the camera Press [ON/OFF] (Power). • You can configure the camera to the PLAY mode. • The Sleep function or Auto Power Off (pages 131, 131) will turn on To enter the...

Owners Manual
Page 20
... to adjust it. Use [8] and [2] to t (Single Shot). 3. Each press of the [EVF/LCD] button cycles through the available monitor screen and viewfinder on the camera. 2. Set the mode dial to select the top option in the viewfinder appears blurry, use either monitor screen or viewfinder to turn on /off settings...
... to adjust it. Use [8] and [2] to t (Single Shot). 3. Each press of the [EVF/LCD] button cycles through the available monitor screen and viewfinder on the camera. 2. Set the mode dial to select the top option in the viewfinder appears blurry, use either monitor screen or viewfinder to turn on /off settings...

Owners Manual
Page 21
...Mastering how much pressure is an important technique for a half-press and a full-press of the way down. Point the camera at . Full-press Snap (Image is complete, the camera will beep, the back lamp will light green, and the focus frame will turn green. Half-press the shutter button ...Basics Beep, beep (Image is currently pointed at the subject. 6. You can zoom the image, if you half-press the shutter button, the camera automatically adjusts exposure and focuses on the subject it is in focus.) Focus frame When you want. Back lamp Half-press Press lightly until the...
...Mastering how much pressure is an important technique for a half-press and a full-press of the way down. Point the camera at . Full-press Snap (Image is complete, the camera will beep, the back lamp will light green, and the focus frame will turn green. Half-press the shutter button ...Basics Beep, beep (Image is currently pointed at the subject. 6. You can zoom the image, if you half-press the shutter button, the camera automatically adjusts exposure and focuses on the subject it is in focus.) Focus frame When you want. Back lamp Half-press Press lightly until the...


