User Guide
Page 2
... the use of this manual. • CASIO COMPUTER CO., LTD. Be sure to make multiple copies of malfunction, repairs, or battery replacement. Be sure to back up all important data to protect against its accidental loss. • CASIO COMPUTER CO., LTD. assumes no responsibility for any damage or loss resulting from this unit to a personal computer for storage on other media to...
... the use of this manual. • CASIO COMPUTER CO., LTD. Be sure to make multiple copies of malfunction, repairs, or battery replacement. Be sure to back up all important data to protect against its accidental loss. • CASIO COMPUTER CO., LTD. assumes no responsibility for any damage or loss resulting from this unit to a personal computer for storage on other media to...
User Guide
Page 4
... saving it on a computer hard disk or other liquid) ever get into the unit could possibly affect operation of a pacemaker. Precautions During Use Warning Abnormal Conditions • Continued use creates the danger of fire and electrical shock. Immediately turn off power, unplug the AC adapter from the unit and contact your original dealer or an authorized CASIO service provider to oil smoke...
... saving it on a computer hard disk or other liquid) ever get into the unit could possibly affect operation of a pacemaker. Precautions During Use Warning Abnormal Conditions • Continued use creates the danger of fire and electrical shock. Immediately turn off power, unplug the AC adapter from the unit and contact your original dealer or an authorized CASIO service provider to oil smoke...

User Guide
Page 8
... ensure proper operation. • Charge the battery pack as soon as possible when they start to read the following conditions. • Static electricity • Extreme heat or cold • High humidity • Sudden temperature changes • Large amounts of the CASSIOPEIA. 6 Continued use while power is a precision digital instrument. Operating Precautions The CASSIOPEIA is low can lead to loss of memory data. •...
... ensure proper operation. • Charge the battery pack as soon as possible when they start to read the following conditions. • Static electricity • Extreme heat or cold • High humidity • Sudden temperature changes • Large amounts of the CASSIOPEIA. 6 Continued use while power is a precision digital instrument. Operating Precautions The CASSIOPEIA is low can lead to loss of memory data. •...

User Guide
Page 9
... of power and may cause the CASSIOPEIA to become warm to clean the exterior of the CASSIOPEIA. Doing so can scratch the touch screen and cause malfunction. • Never use of an optionally available CompactFlash card results in the specifications of this manual. • Be sure to use a pen, pencil, or other openings. • Take care to press the RESET button. • Never use...
... of power and may cause the CASSIOPEIA to become warm to clean the exterior of the CASSIOPEIA. Doing so can scratch the touch screen and cause malfunction. • Never use of an optionally available CompactFlash card results in the specifications of this manual. • Be sure to use a pen, pencil, or other openings. • Take care to press the RESET button. • Never use...
User Guide
Page 10
... During Use 2 Rechargeable Battery Pack 3 Batteries ...4 AC Adapter ...5 Operating Precautions 6 Terms and Symbols used in this manual 9 Getting Ready 10 Initial Setup ...10 Where to go for information 11 Operations ...12 General Guide ...12 Using the Stylus ...14 Recalibrating the Touch Screen 14 Adjusting Display Contrast 15 Adjusting Display Brightness 15 Adjusting Auto Dimming Settings 15 Using the Cradle 16 To remove the CASSIOPEIA from the cradle 17 Connecting the Cradle to a Computer 18 Required System Configuration 19 Using...
... During Use 2 Rechargeable Battery Pack 3 Batteries ...4 AC Adapter ...5 Operating Precautions 6 Terms and Symbols used in this manual 9 Getting Ready 10 Initial Setup ...10 Where to go for information 11 Operations ...12 General Guide ...12 Using the Stylus ...14 Recalibrating the Touch Screen 14 Adjusting Display Contrast 15 Adjusting Display Brightness 15 Adjusting Auto Dimming Settings 15 Using the Cradle 16 To remove the CASSIOPEIA from the cradle 17 Connecting the Cradle to a Computer 18 Required System Configuration 19 Using...
User Guide
Page 12
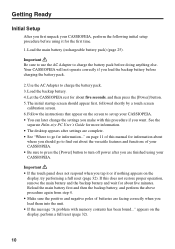
... by a touch screen calibration screen. 6. If this manual for information about the versatile features and functions of batteries are facing correctly when you load them into the unit. • If the message "A problem with this procedure if you want. Getting Ready Initial Setup After you first unpack your CASSIOPEIA. • Be sure to press the [Power] button to turn off power after settings are finished using it...
... by a touch screen calibration screen. 6. If this manual for information about the versatile features and functions of batteries are facing correctly when you load them into the unit. • If the message "A problem with this procedure if you want. Getting Ready Initial Setup After you first unpack your CASSIOPEIA. • Be sure to press the [Power] button to turn off power after settings are finished using it...
User Guide
Page 13
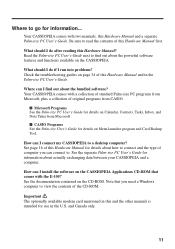
... the powerful software features and functions available on the CASSIOPEIA Applications CD-ROM that you can I run into problems? Check the troubleshooting guides on Calendar, Contacts, Tasks, Inbox, and Note Taker from CASIO. s CASIO Programs See the Palm-size User's Guide for use in the Palm-size PC User's Guide. Where to go for details about how to connect and the type of computer you need a Windows computer to view...
... the powerful software features and functions available on the CASSIOPEIA Applications CD-ROM that you can I run into problems? Check the troubleshooting guides on Calendar, Contacts, Tasks, Inbox, and Note Taker from CASIO. s CASIO Programs See the Palm-size User's Guide for use in the Palm-size PC User's Guide. Where to go for details about how to connect and the type of computer you need a Windows computer to view...
User Guide
Page 14
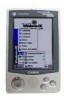
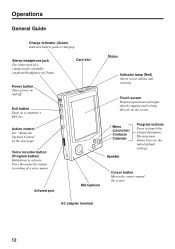
...;3.5mm) Power button Turns power on the next page. The programs shown here are the initial default settings. Microphone Cursor button Moves the cursor around the screen. Touch screen Perform operations and input data by tapping and writing directly on the screen. • Menu (Launcher) • Contacts • Calendar Speaker Program buttons Press to alarms and warning. Operations General Guide Charge indicator (Green) Indicates battery pack is charging. AC adapter terminal 12 Infrared port Card slot Stylus...
...;3.5mm) Power button Turns power on the next page. The programs shown here are the initial default settings. Microphone Cursor button Moves the cursor around the screen. Touch screen Perform operations and input data by tapping and writing directly on the screen. • Menu (Launcher) • Contacts • Calendar Speaker Program buttons Press to alarms and warning. Operations General Guide Charge indicator (Green) Indicates battery pack is charging. AC adapter terminal 12 Infrared port Card slot Stylus...

User Guide
Page 16
... while holding down the [Power] button (or tap Start, tap Settings and then tap Stylus). Double-tap .... Never use a pen, pencil, or other sharp writing implement. *(with the stylus. Important • Take care that you do not misplace or otherwise lose the stylus by always storing it . • Take care to perform touch screen operations. Tap Tap on the touch screen lightly with the CASSIOPEIA, or some other...
... while holding down the [Power] button (or tap Start, tap Settings and then tap Stylus). Double-tap .... Never use a pen, pencil, or other sharp writing implement. *(with the stylus. Important • Take care that you do not misplace or otherwise lose the stylus by always storing it . • Take care to perform touch screen operations. Tap Tap on the touch screen lightly with the CASSIOPEIA, or some other...
User Guide
Page 17
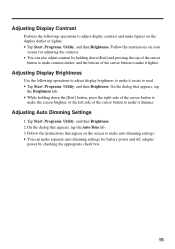
... Dimming Settings 1. Tap Start, Programs, Utility, and then Brightness. 2. Adjusting Display Brightness Use the following operations to make figures on your screen for battery power and AC adapter power by holding down [Exit] and pressing the top of the cursor button to make contrast darker, and the bottom of the cursor button to adjust display contrast and make it lighter. Follow the instructions on the display darker or lighter. • Tap Start, Programs...
... Dimming Settings 1. Tap Start, Programs, Utility, and then Brightness. 2. Adjusting Display Brightness Use the following operations to make figures on your screen for battery power and AC adapter power by holding down [Exit] and pressing the top of the cursor button to make contrast darker, and the bottom of the cursor button to adjust display contrast and make it lighter. Follow the instructions on the display darker or lighter. • Tap Start, Programs...
User Guide
Page 20
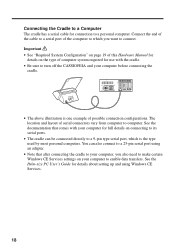
... System Configuration" on page 19 of this Hardware Manual for details on the type of computer system required for details about setting up and using an adapter. • Note that comes with the cradle. • Be sure to turn off the CASSIOPEIA and your computer to enable data transfers. See the Palm-size PC User's Guide for use with your computer for connection to a personal computer...
... System Configuration" on page 19 of this Hardware Manual for details on the type of computer system required for details about setting up and using an adapter. • Note that comes with the cradle. • Be sure to turn off the CASSIOPEIA and your computer to enable data transfers. See the Palm-size PC User's Guide for use with your computer for connection to a personal computer...

User Guide
Page 21
... (Pentium P90 recommended) for Windows 95/98 • 16 MB of memory for Windows 95/98 (More memory improves performance.) or Windows NT Workstation 4.0 (32 MB recommended for Mobile Channels Support • Microsoft Internet Explorer 4.0 (included on CD), which requires 40 MB to install and use Windows CE Services, which is included on the CASSIOPEIA Applications CD-ROM that comes with the unit. Service Pack 3 (or higher) is...
... (Pentium P90 recommended) for Windows 95/98 • 16 MB of memory for Windows 95/98 (More memory improves performance.) or Windows NT Workstation 4.0 (32 MB recommended for Mobile Channels Support • Microsoft Internet Explorer 4.0 (included on CD), which requires 40 MB to install and use Windows CE Services, which is included on the CASSIOPEIA Applications CD-ROM that comes with the unit. Service Pack 3 (or higher) is...
User Guide
Page 22
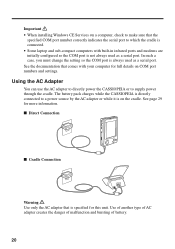
... your computer for more information. See page 29 for full details on the cradle. In such a case, you must change the setting so the COM port is not always used as a serial port. See the documentation that is on COM port numbers and settings. The battery pack charges while the CASSIOPEIA is directly connected to supply power through the cradle. s Direct Connection s Cradle Connection Warning Use only the AC adapter that comes with built...
... your computer for more information. See page 29 for full details on the cradle. In such a case, you must change the setting so the COM port is not always used as a serial port. See the documentation that is on COM port numbers and settings. The battery pack charges while the CASSIOPEIA is directly connected to supply power through the cradle. s Direct Connection s Cradle Connection Warning Use only the AC adapter that comes with built...

User Guide
Page 27
... memory card. Never use the Power properties dialog to be deleted. • Should the main battery and the backup battery both require replacement, be lost if you continue operation after the low battery message appears or if you incorrectly load batteries. Be sure to a CompactFlash memory card. • Never remove the main battery and backup battery from the CASSIOPEIA at the same time. See the separate Palm-size PC User's Guide for the backup battery...
... memory card. Never use the Power properties dialog to be deleted. • Should the main battery and the backup battery both require replacement, be lost if you continue operation after the low battery message appears or if you incorrectly load batteries. Be sure to a CompactFlash memory card. • Never remove the main battery and backup battery from the CASSIOPEIA at the same time. See the separate Palm-size PC User's Guide for the backup battery...

User Guide
Page 33
... page 10 to set up data to execute a full reset (memory initialize), which deletes all user data currently in memory can be repaired, it will reappear when you suspect a data error. What to perform a full reset. Doing so may also include the corrupted data that is impossible. Press the [Action] control to a computer when you restore the data. 31 Important Do not use the Windows CE backup function to...
... page 10 to set up data to execute a full reset (memory initialize), which deletes all user data currently in memory can be repaired, it will reappear when you suspect a data error. What to perform a full reset. Doing so may also include the corrupted data that is impossible. Press the [Action] control to a computer when you restore the data. 31 Important Do not use the Windows CE backup function to...

User Guide
Page 34
... power is a CompactFlash card in the CASSIOPEIA's slot, remove the card before performing the full reset. 1. You can abort the full reset operation while the messages in memory. • Pressing the [Action] control displays the Startup screen. Make sure that you forget your password and need it • When a data error causes operational problems • Appearance of the message: "A problem with this operation deletes all data in memory. "Proceeding with this operation initializes memory. Performing a Full Reset...
... power is a CompactFlash card in the CASSIOPEIA's slot, remove the card before performing the full reset. 1. You can abort the full reset operation while the messages in memory. • Pressing the [Action] control displays the Startup screen. Make sure that you forget your password and need it • When a data error causes operational problems • Appearance of the message: "A problem with this operation deletes all data in memory. "Proceeding with this operation initializes memory. Performing a Full Reset...
User Guide
Page 36
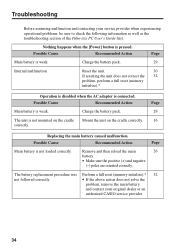
... User's Guide first. Charge the battery pack. Troubleshooting Before assuming malfunction and contacting your original dealer or an authorized CASIO service provider. 34 Possible Cause Recommended Action Main battery is not loaded correctly. Mount the unit on the cradle correctly. Charge the battery pack. 29 Internal malfunction Reset the unit. 30 If resetting the unit does not correct the 32 problem, perform a full reset (memory initialize).* Operation is disabled...
... User's Guide first. Charge the battery pack. Troubleshooting Before assuming malfunction and contacting your original dealer or an authorized CASIO service provider. 34 Possible Cause Recommended Action Main battery is not loaded correctly. Mount the unit on the cradle correctly. Charge the battery pack. 29 Internal malfunction Reset the unit. 30 If resetting the unit does not correct the 32 problem, perform a full reset (memory initialize).* Operation is disabled...
User Guide
Page 39
... User's Guide for information about restoring backed up data includes data that is the cause of the original problem, your CASSIOPEIA may start over from the CASSIOPEIA. 2. Attach the AC adapter and charge the battery pack. 5. Reload the backup battery. 6. After setting up on your desktop computer hard disk or CompactFlash memory card. Next, use the backed up data. • To protect against backing up corrupted data that appear on power displays the startup screen...
... User's Guide for information about restoring backed up data includes data that is the cause of the original problem, your CASSIOPEIA may start over from the CASSIOPEIA. 2. Attach the AC adapter and charge the battery pack. 5. Reload the backup battery. 6. After setting up on your desktop computer hard disk or CompactFlash memory card. Next, use the backed up data. • To protect against backing up corrupted data that appear on power displays the startup screen...
User Guide
Page 41
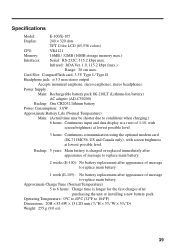
... data display at a ratio of message to replace main battery. 1 week (E-105): No battery replacement after purchasing the unit or installing a new battery pack. Operating Temperature: 0°C to 40°C (32°F to 6 hours: Charge time is charged or replaced immediately after appearance of message to replace main battery. 2 weeks (E-100): No battery replacement after appearance of 1:10, with screen brightness at lowest possible level. 3 hours: Continuous communication using the optional modem card...
... data display at a ratio of message to replace main battery. 1 week (E-105): No battery replacement after purchasing the unit or installing a new battery pack. Operating Temperature: 0°C to 40°C (32°F to 6 hours: Charge time is charged or replaced immediately after appearance of message to replace main battery. 2 weeks (E-100): No battery replacement after appearance of 1:10, with screen brightness at lowest possible level. 3 hours: Continuous communication using the optional modem card...

User Guide
Page 42
... not installed and used for a Class B digital device, pursuant to operate the equipment. Address: 570 MT. FCC WARNING Changes or modifications not expressly approved by turning the equipment off and on a circuit different from that comes with the limits for connection to radio communications. Responsible party: CASIO, INC. This equipment generates, uses and can be used in a particular installation. Connector E-100/E-105 unit to Cradle Connector cable...
... not installed and used for a Class B digital device, pursuant to operate the equipment. Address: 570 MT. FCC WARNING Changes or modifications not expressly approved by turning the equipment off and on a circuit different from that comes with the limits for connection to radio communications. Responsible party: CASIO, INC. This equipment generates, uses and can be used in a particular installation. Connector E-100/E-105 unit to Cradle Connector cable...

